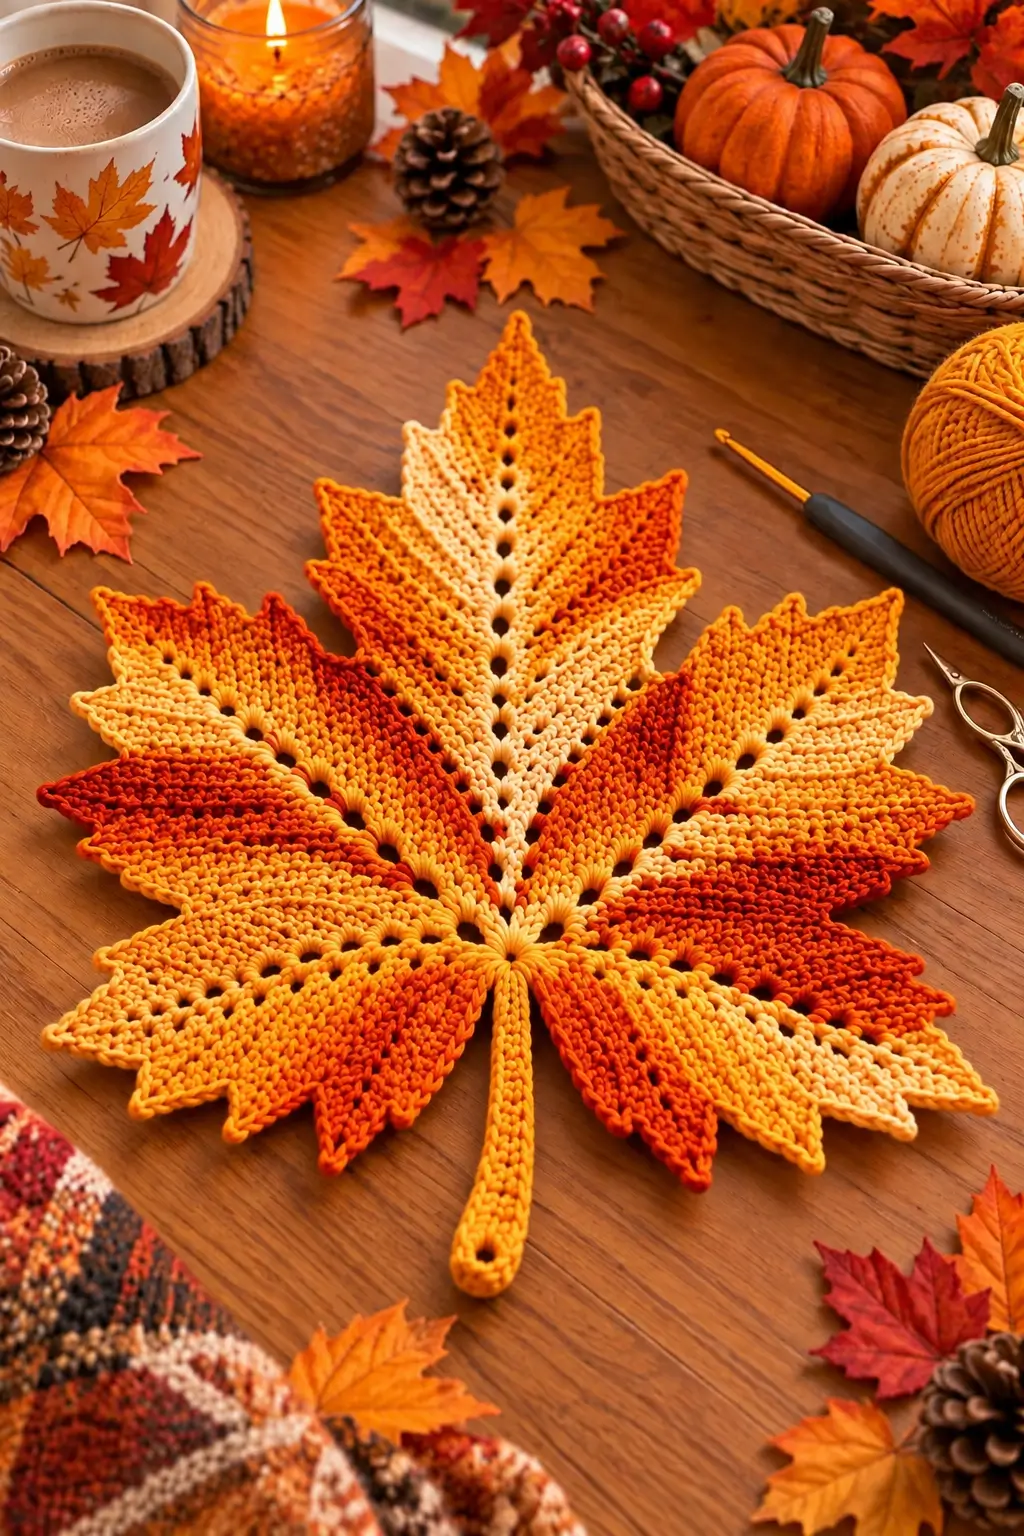
Five lobes are not enough for this maple leaf: each one also needs smaller serrated points and a visible vein line to reproduce the broad autumn silhouette. This large crochet maple leaf pattern uses cotton yarn in cream, golden yellow, pumpkin orange and rust red. Worked flat with a 3.5 mm hook, the intermediate design creates a substantial fall centerpiece with a long integrated stem.
What Makes This Large Crochet Maple Leaf Different
The color placement follows the structure of the leaf rather than forming horizontal stripes. Cream runs through the central lobe, yellow dominates the inner sections, orange fills much of the middle area, and rust red concentrates toward selected outer lobes. That arrangement gives a multicolor maple leaf more visual depth without requiring complicated tapestry crochet.
Five major lobes establish the silhouette: one tall central section, two broad side lobes and two shorter lower lobes. Smaller points are then shaped along their edges.
Open chain spaces form the visible vein lines. They radiate from the center toward each major point and also provide natural locations for color changes. A common mistake is making all five lobes the same length; that creates a star rather than a recognizable maple leaf.
Project Info at a Glance
| Skill Level | Time | Finished Size | Hook | Yarn |
|---|---|---|---|---|
| Intermediate | 4–6 hours | Approx. 25–30 cm tall | 3.5 mm | Worsted cotton #4 |
Published maple-leaf placemat patterns demonstrate that worsted cotton with a 3.5 mm hook can produce a leaf approximately 25.5 cm tall by 23 cm wide. Finished dimensions still depend on construction, yarn and tension, so treat these measurements as a practical reference rather than an exact measurement of the photographed leaf.
Materials and Tools
Yarn
- Cream 100% cotton — Worsted #4 — approximately 20–25 g
- Golden yellow 100% cotton — Worsted #4 — approximately 25–30 g
- Pumpkin orange 100% cotton — Worsted #4 — approximately 30–35 g
- Rust red 100% cotton — Worsted #4 — approximately 20–25 g
Allow approximately 85–100 m of yarn in total for a large leaf in this size range. Published worsted-cotton maple-leaf placemat patterns use approximately 85–91 m, while smaller worsted maple motifs can require only 9–14 m.
Tools
- 3.5 mm crochet hook
- Yarn needle
- Scissors
- 5 locking stitch markers
- Measuring tape
- Blocking mat
- Rust-resistant blocking pins
Abbreviations
- MR — magic ring
- ch — chain
- sl st — slip stitch
- sc — single crochet
- hdc — half double crochet
- dc — double crochet
- tr — treble crochet
- inc — increase
- dec — decrease
- st/sts — stitch/stitches
- sp — space
- ch-sp — chain space
- RS — right side
- WS — wrong side
Keep the chain spaces slightly relaxed. Tight chains close the decorative holes and can pull the five lobe sections toward the center.
Color Plan
The reference image does not use simple concentric color rounds. Instead, the colors travel along individual leaf sections.
- Central lobe: cream through the lower center, changing to golden yellow and orange toward the point
- Upper-left lobe: yellow and orange with rust-red outer sections
- Upper-right lobe: cream and yellow near the center, orange toward the perimeter
- Lower-left lobe: yellow, orange and rust red
- Lower-right lobe: yellow and orange with rust-red sections
- Stem: golden yellow or pumpkin orange
Exact color placement does not affect the structure. Change colors at the beginning of a row or immediately beside a vein space to keep transitions visually controlled.
Large Crochet Maple Leaf Pattern – Step by Step
Pattern note: This is a photo-inspired reconstruction. It is designed to reproduce the five-lobed shape, open vein details, pointed perimeter and multicolor arrangement rather than claim to be the unidentified original pattern shown in the photograph.
Central Foundation
Yarn: golden yellow
Make an MR.
Round 1: Ch 1, work 10 sc into MR. Pull the ring closed. Join with sl st. (10)
Round 2: Ch 1, 2 sc in each st around. Join. (20)
Round 3: Ch 1, repeat (sc in next st, 2 sc in next st) around. Join. (30)
Place five markers approximately evenly around the center. These positions establish the five major leaf axes.
Central Maple Lobe
The central lobe must remain the longest section of the finished leaf.
Change to cream.
Row 1: Ch 1, sc across 6 center stitches. Turn. (6)
Row 2: Ch 1, 2 sc in first st, sc in next 4 sts, 2 sc in last st. Turn. (8)
Row 3: Ch 1, sc in next 3 sts, ch 2, skip 2 sts, sc in next 3 sts. Turn.
The ch-2 space begins the central vein.
Row 4: Ch 1, 2 sc in first st, sc to ch-sp, 2 sc in ch-sp, sc across to final st, 2 sc in final st.
Row 5: Ch 1, sc across.
Row 6: Ch 1, inc in first st, sc across, inc in final st.
Row 7: Sc to the center, ch 2, skip 2 sts, continue in sc.
Row 8: Sc across, working 2 sc into the ch-2 space.
Change to golden yellow.
Rows 9–12: Continue increasing at both outer edges on every second row. Maintain a central ch-2 opening approximately every third row.
Change to pumpkin orange.
Rows 13–16: Work even in sc while maintaining the central vein openings.
Shaping the Central Point
Row 17: Ch 1, sc2tog, sc across to final 2 sts, sc2tog.
Row 18: Sc across.
Repeat Rows 17–18 until 5 stitches remain.
Next Row: Sc2tog, sc, sc2tog. (3)
Point: Ch 3, sl st into second ch from hook, sl st into next ch, sl st into the center stitch.
Fasten off.
Left Upper Lobe
Join golden yellow at the next marked center section.
Row 1: Ch 1, sc in next 6 sts. Turn. (6)
Row 2: Inc, sc in next 4 sts, inc. (8)
Row 3: Sc in next 3 sts, ch 2, skip 2 sts, sc across.
Row 4: Inc at the first and last stitches. Work 2 sc into the ch-2 space.
Rows 5–8: Continue increasing at both edges on every second row.
Change to pumpkin orange.
Rows 9–12: Sc across, adding one central ch-2 vein opening approximately every third row.
Change to rust red.
Rows 13–14: Sc across.
Begin decreasing symmetrically until 5 stitches remain.
Final shaping: Sc2tog, sc, sc2tog. (3)
Ch 3, sl st into second ch from hook, sl st in next ch, sl st into center stitch.
Fasten off.
Right Upper Lobe
Join cream at the corresponding marked section on the right.
Rows 1–4: Follow Rows 1–4 of the left upper lobe.
Change to golden yellow.
Rows 5–9: Continue the expansion sequence, keeping the vein openings aligned toward the lobe point.
Change to pumpkin orange.
Rows 10–14: Work the widest section and begin symmetrical decreases.
Continue until 3 stitches remain.
Finish with the same ch-3 pointed tip.
Fasten off.
Lay the leaf flat. The left and right upper lobes should reach approximately the same distance from the center even though their color placement differs.
Left Lower Lobe
Join golden yellow at the next marked section.
Row 1: Sc across 6 sts. Turn. (6)
Row 2: Inc, sc across, inc. (8)
Row 3: Inc, sc across, inc. (10)
Row 4: Sc in next 4 sts, ch 2, skip 2 sts, sc across.
Row 5: Sc across, working 2 sc into the ch-sp.
Change to pumpkin orange.
Rows 6–9: Work even, adding another ch-2 vein opening if required.
Change to rust red.
Row 10: Sc2tog, sc across, sc2tog.
Row 11: Sc across.
Repeat the decrease sequence until 3 stitches remain.
Ch 2, sl st into second ch from hook, sl st into the center stitch.
Fasten off.
Right Lower Lobe
Work the right lower lobe using the same dimensions as the left.
Begin in golden yellow, transition to pumpkin orange and add rust-red sections toward the outside edge.
Maintain the same number of rows as the left lower lobe. Color changes may be positioned differently without changing the stitch count.
Finish with a ch-2 point and fasten off.
Creating the Smaller Leaf Points
The five major lobes establish the basic shape, but the reference leaf also contains numerous secondary points.
Join pumpkin orange or the appropriate matching color at the lower-left edge.
Work sc evenly along the first lobe.
At the first secondary point work:
sc, hdc, dc, ch 2, sl st into second ch from hook, dc, hdc, sc.
Continue in sc toward the next valley.
At a larger secondary point use:
sc, hdc, dc, tr, ch 3, sl st into first ch, tr, dc, hdc, sc.
Use the taller version sparingly. The five primary points must remain visually dominant.
Continue around the complete perimeter.
Shaping the Deep Valleys
At the deepest indentation between two primary lobes, work one sl st into the lowest available stitch.
Do not place several increases in the valley.
After the sl st, begin climbing the next lobe with sc, followed by hdc when necessary.
This rapid change from a very short stitch to taller stitches produces a sharper indentation.
Open Crochet Veins
The photographed leaf has a prominent open central vein plus smaller diagonal veins.
For a small opening:
Ch 1, skip 1 st.
On the next row, work one sc into the ch-1 space.
For a larger opening:
Ch 2, skip 2 sts.
On the following row, work two stitches into the chain space.
Space the openings approximately 1–2 cm apart along each major vein.
Keep them aligned from the central ring toward the point of the corresponding lobe. Misaligned eyelets look decorative rather than anatomical.
Long Crochet Stem
Yarn: golden yellow or pumpkin orange
Join yarn at the bottom center.
Foundation: Ch 28.
Row 1: Sc in second ch from hook and across. (27)
Row 2: Ch 1, turn, sc across. (27)
Row 3: Ch 1, turn, sc across. (27)
For a rounded lower tip, work 3 sc into the final stitch and continue along the opposite side with sc.
Sl st into the leaf center.
Fasten off.
The stem should remain narrow compared with the lower lobes. If it becomes too wide, omit Row 3.
Optional Hanging Hole
The photographed stem ends with a small opening. Add this feature if the leaf will also be hung when not used on a table.
Near the end of the stem work:
Sc in next 3 sts, ch 3, skip 2 sts, sc across.
On the return row, work 3 sc around the ch-3 space.
This creates a reinforced opening without attaching a separate loop.
Blending the Four Autumn Colors
Complete the last yarn-over of the final stitch with the new color.
Leave approximately 12–15 cm of each old color for weaving.
Whenever possible, place a transition beside a vein opening or along a lobe edge. These structural lines disguise the change more effectively than switching colors across an uninterrupted field of single crochet.
Do not carry all four colors through the complete leaf. Multiple carried strands increase thickness and can make individual lobes curl.
Assembly and Finishing
- Lay the five completed lobes flat and confirm that the central lobe is the longest section.
- Compare the left and right upper lobes and correct any substantial row-count difference before edging.
- Check both lower lobes; they should be shorter and broader than the upper pair.
- Complete the secondary perimeter points while maintaining deep valleys between major lobes.
- Attach or finish the long stem directly on the central axis of the leaf.
- Weave each color tail only through stitches of the same or a similar color.
- Dampen the finished cotton according to the yarn care instructions.
- Pin the center lobe first, followed by the two upper and two lower lobes.
- Pin every secondary point and pull the valleys gently inward.
- Allow the leaf to dry completely before removing the pins and measuring the final dimensions.
The finished maple leaf should display five clearly ranked lobes, multiple smaller points, radiating open veins and a long stem centered beneath the dominant upper point.
Blocking the Large Maple Leaf
Blocking is particularly important for a large leaf because the five independently shaped sections can develop slightly different tension.
Begin by pinning the central point and stem on one vertical line.
Next, pin the widest points of the two upper side lobes. Measure from each tip to the center. The two measurements should be close.
Pin the lower lobes without stretching them to match the upper pair.
Finally, pin each secondary serration separately. Pull the valleys inward just enough to define them without distorting the nearby vein openings.
How to Make a Larger Maple Leaf Placemat
Published worsted-cotton maple-leaf designs demonstrate finished sizes around 25.5 × 23 cm with a 3.5 mm hook. To make a larger table centerpiece, change the scale gradually.
Medium Leaf
Use DK cotton with a 3.5 mm hook. Target approximately 20–25 cm across.
Large Leaf
Use worsted cotton with a 3.5–4 mm hook. Target approximately 25–30 cm across.
Oversized Centerpiece
Use Aran cotton with a 4.5–5 mm hook. Add two expansion rows to the central and upper lobes and approximately one expansion row to each lower lobe.
Do not enlarge all five sections by the same number of rows. The size hierarchy is what preserves the maple silhouette.
Using the Leaf as Autumn Table Décor
The multicolor construction works particularly well as a fall centerpiece because each lobe can display a different stage of autumn color. Place the finished motif beneath lightweight seasonal decorations, use it as a large placemat, or arrange several smaller leaves along a table runner.
For table use, cotton offers useful stitch definition and can generally be reshaped after washing according to the yarn manufacturer’s care instructions.
A single crochet layer should not automatically be treated as heat protection. If the leaf will sit beneath hot cookware, select materials and thickness specifically appropriate for that application.
Alternative Autumn Color Sequences
- Cream + yellow + orange + rust — closest to the photographed palette
- Mustard + pumpkin + burgundy — darker late-autumn version
- Sage + mustard + rust — three-color botanical palette
- Golden yellow + orange + brown — warm woodland version
- Olive + yellow + orange + red — green-to-autumn transition
- Burgundy + rust + cream — reduced three-color version
For a natural-looking transition, keep the lightest shade near the central vein and allow darker shades to occupy selected outer points. Avoid changing every lobe at exactly the same row.
7 Technical Tips for a Better Large Crochet Maple Leaf
- Keep the center lobe at least 20% longer than the lower lobes. Equal-length lobes turn the five-section silhouette into a star rather than a maple leaf.
- Mark each major vein before adding secondary points. A vein opening shifted more than one or two stitches sideways becomes noticeably disconnected from its lobe tip.
- Use one slip stitch at the deepest valleys. Packing several single crochets into these positions fills the indentation and reduces separation between neighboring lobes.
- Compare mirrored lobes every four rows. Correct a difference of approximately 1 cm before the perimeter is added rather than trying to stretch one side during blocking.
- Leave 12–15 cm tails at color changes. Short tails are difficult to secure invisibly in dense cotton stitches, particularly near open vein spaces.
- Pin every secondary point during blocking. Leaving a small serration unpinned allows it to round off while the neighboring points remain sharp.
- Keep the stem centered within approximately 5 mm of the central axis. An off-center stem makes the entire leaf appear asymmetric even when all five lobes have matching stitch counts.
Preventing Curling and Rippling
A lobe that cups upward usually needs additional stitches along its broad outer section or has been worked at tighter tension than the neighboring sections.
A heavily rippled lobe contains too many increases. Remove one or more expansion rows instead of relying on aggressive blocking.
Check the leaf after completing each major section. Small tension differences are easier to correct before the secondary points and stem have been added.
Cotton responds well to controlled blocking, but blocking should refine the geometry rather than compensate for major stitch-count problems.
Finishing the Multicolor Maple Leaf
Inspect the wrong side before blocking. Secure cream tails within cream stitches, rust tails within rust sections and orange or yellow tails through matching areas. This prevents dark fibers from showing through lighter sections.
Place the leaf flat and check the five main axes. The central point should align directly with the stem, while the upper side lobes should extend to comparable widths.
After blocking, measure the finished piece from the center-lobe tip to the end of the stem and across the two widest side points. Record those measurements if you plan to crochet a matching set.
Conclusion
Start with the five marked lobe positions and establish the open vein lines before adding the smaller serrated points. Keep the center section longest, mirror the two upper lobes, and make the lower pair visibly shorter. Change from cream through yellow and orange into rust beside structural lines so the transitions remain clean. Once the stem is attached, block every point separately to define the final silhouette. Save this large crochet maple leaf pattern to Pinterest and share your finished autumn centerpiece on Instagram with #OmbreCrochetMapleLeaf. Which lobe would you make darkest: the lower-left section or one of the broad side points?









