Sage Bobble Stitch Crochet Blanket Pattern: Textured Throw Guide
Raised bobbles are only half the structure of this sage blanket; the open bands between them control both weight and drape. A bobble stitch crochet blanket pattern inspired by this construction needs solid separator rows, openwork, and raised texture rather than uninterrupted bobbles. Reference patterns use yarns from sport through bulky weights, with finished dimensions determined primarily by gauge and repeat count.
The Design: What Makes This Textured Blanket Different
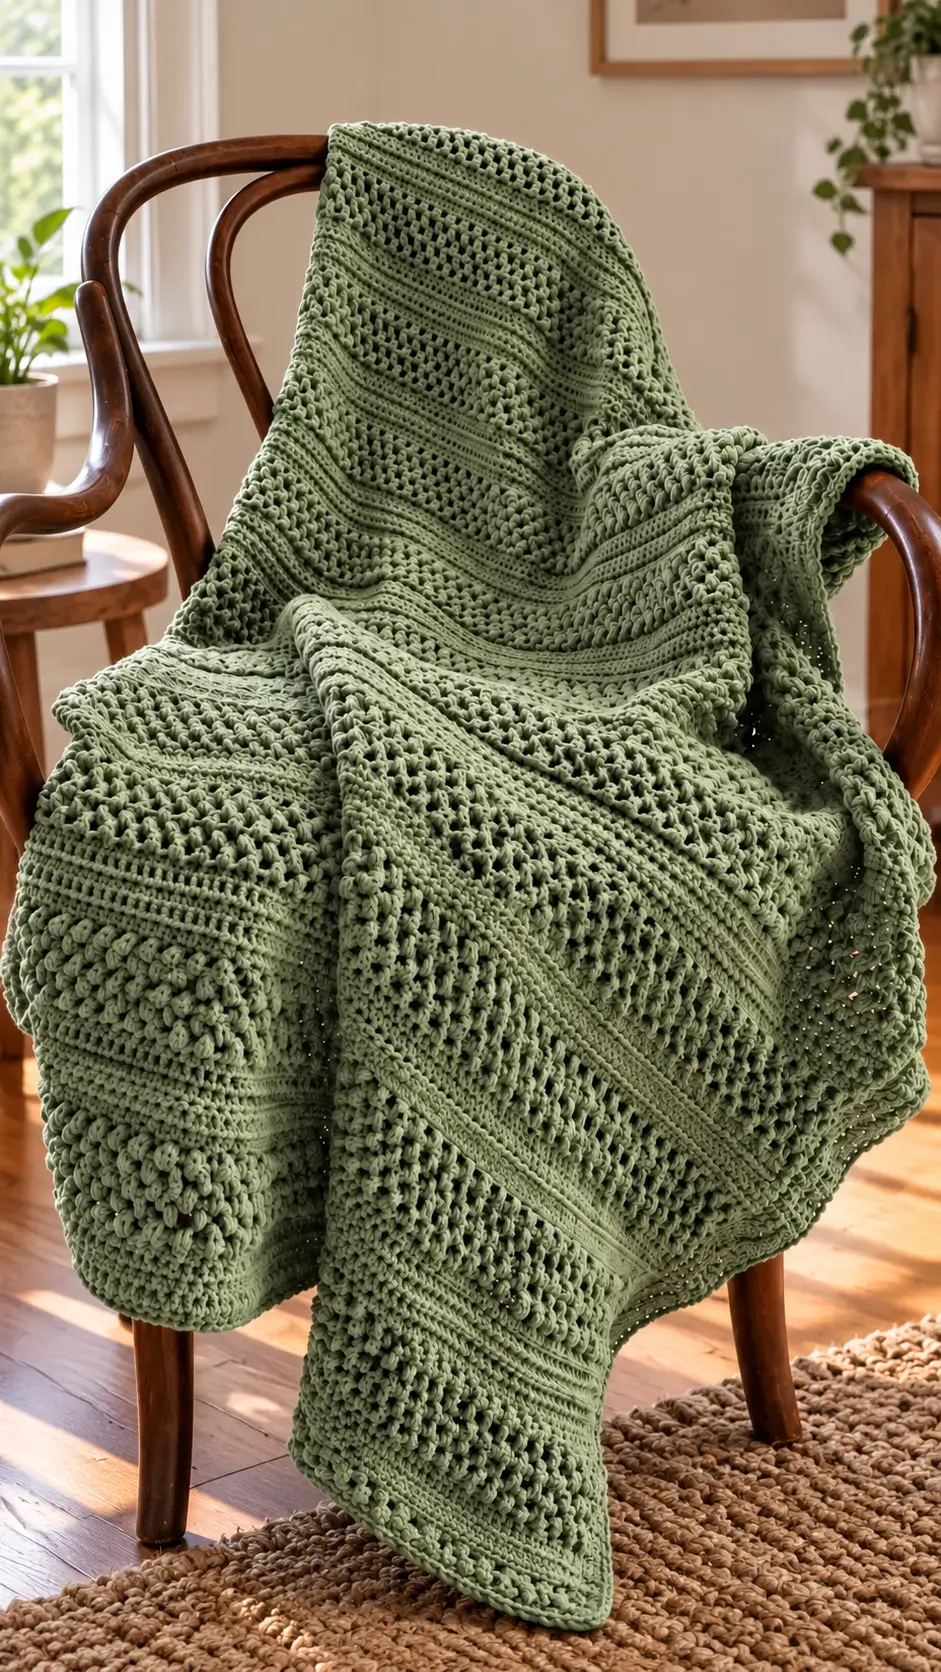
The photographed throw creates contrast without changing color. Dense horizontal bands establish the framework, open crochet sections reduce fabric density, and raised clusters produce the strongest surface relief. This arrangement matters because an all-over field of bobbles requires considerably more yarn and creates a heavier fabric.
The repeated horizontal organization also distinguishes this textured crochet blanket from graph-based bobble designs. Instead of forming a single picture or geometric motif, the texture is distributed in bands. Solid sections act as visual separators between areas of openwork and raised stitches.
One construction mistake is treating bobble, puff, and popcorn stitches as interchangeable. They create similar raised effects but are formed differently. From the photograph, the prominent clusters can reasonably be described as bobble-style texture, although the exact stitch construction cannot be confirmed from the finished fabric alone.
Project Information at a Glance
| Feature | Reference Specification |
|---|---|
| Project Type | Textured crochet throw / blanket |
| Skill Level | Intermediate |
| Construction | Worked flat in rows |
| Main Texture | Bobble-style raised stitches |
| Additional Texture | Openwork and solid crochet bands |
| Color | Sage green |
| Finished Size | Adjustable according to gauge and foundation count |
Materials and Tools
Yarn
Sage green yarn — choose a yarn with enough stitch definition to keep the raised clusters visible. Worsted, Aran, or chunky yarn can all work, but changing yarn weight changes the finished dimensions, drape, yarn requirement, and recommended hook size.
A published bulky bobble blanket measuring approximately 61 × 66 cm uses about 400 g of yarn. A full throw requires considerably more material, so calculate the final requirement from a washed gauge swatch rather than applying the smaller blanket quantity directly.
Tools
- Crochet hook appropriate for the selected yarn and target gauge
- Yarn needle for weaving ends
- Scissors
- Stitch markers for identifying repeat boundaries
- Tape measure for checking width and row depth
- Blocking mats and pins if the finished yarn benefits from blocking
Abbreviations
- ch — chain
- sc — single crochet
- dc — double crochet
- sl st — slip stitch
- st/sts — stitch/stitches
- sp — space
- rep — repeat
- BO — bobble
Check the terminology of any published pattern before beginning because US and UK crochet terms assign different names to several basic stitches.
Understanding the Blanket Construction
The blanket in the photograph is organized as a sequence of horizontal texture zones rather than one uninterrupted stitch pattern. This is the most important structural feature to preserve when developing a similar design.
A practical repeat can be divided into three components: a dense separator section, an openwork section, and a raised bobble section. Repeating those components across the length of the blanket creates the same general visual rhythm while allowing the dimensions to be changed.
Solid Separator Bands
Solid rows stabilize the fabric between more dimensional sections. They also give the eye a resting point between bobbles and open spaces.
These bands can be worked in single crochet, half double crochet, or another compact stitch. Keep the stitch count consistent across every row unless the selected openwork repeat specifically requires an adjustment.
Openwork Bands
The open sections reduce the density created by the raised stitches. A basic mesh can be produced by alternating chains with worked stitches while maintaining the established width.
Openwork requires careful stitch counting. Missing one chain space can shift every subsequent repeat and make the blanket edge angle inward.
Place a stitch marker at regular repeat intervals. For a wide throw, marking every 10, 12, or 20 stitches makes counting errors easier to locate before several rows have been completed.
Bobble Texture Bands
The raised sections provide the defining surface texture. One documented bobble construction uses five incomplete double crochet stitches joined together at the top.
A typical bobble sequence can be written as follows:
- Yarn over and insert the hook into the designated stitch.
- Yarn over and pull up a loop.
- Yarn over and pull through two loops.
- Leave the remaining loops on the hook.
- Repeat the partial double crochet into the same stitch until the required number of partial stitches has been made.
- Yarn over and pull through the remaining loops to close the cluster.
The following stitch helps the cluster project toward the intended side of the fabric. Check the direction of every bobble before continuing across a long row.
Planning the Blanket Size
Do not calculate a full blanket from the photograph alone. Furniture is not a dependable scale reference, and perspective changes the apparent width and length of the fabric.
Start with a gauge swatch containing all three major textures: solid stitches, openwork, and bobbles. A plain single-crochet swatch does not provide enough information because dimensional stitches can change both width and row height.
Make a swatch large enough to contain several complete repeats. Wash and dry it using the same method intended for the finished blanket, then measure the central area without stretching it.
Calculating the Foundation
Once the stitch gauge is known, calculate the approximate foundation using:
Desired width in centimeters × stitches per centimeter = approximate stitch count.
The result must then be adjusted to fit the chosen stitch multiple.
For example, if a repeat requires a multiple of 12 plus 7 stitches, the foundation cannot be selected solely from the width calculation. Move to the nearest valid repeat count while keeping the final width within the intended range.
Building a Textured Stripe Sequence
A balanced crochet bobble blanket does not require raised stitches on every row. Concentrating them into defined sections produces stronger contrast between flat, open, and dimensional areas.
A sample planning sequence could contain several solid rows, followed by an openwork band, another compact separator, a bobble section, and a second separator. Repeat the sequence until the required length is reached.
This is a construction framework rather than a transcription of the photographed blanket. The exact row sequence in the image cannot be verified because sections of the fabric are folded and the reverse side is not visible.
How to Keep the Edges Straight
Textured blankets can gradually lose width when chain spaces, turning chains, or edge stitches are omitted. Count the stitches after every major texture section rather than waiting until the blanket is nearly complete.
Place a marker in the first and last true stitch of each row. Turning chains should only be counted as stitches when the selected stitch pattern specifically says they are part of the row count.
Measure the blanket at several points during construction. Compare the current width with the washed gauge calculation. A difference of several centimeters can indicate a tension change or missed stitches.
Managing Bobble-Stitch Tension
Bobble stitches place multiple partial stitches into one location, so they consume more yarn than ordinary flat stitches. They can also tighten the fabric if the loops are drawn too firmly.
Keep the working loops consistent in height. If the bobble section becomes noticeably narrower than the solid section below it, make a test swatch with a slightly larger hook or loosen the working tension before continuing the full blanket.
The opposite problem can occur when the loops are excessively tall. Loose clusters may look irregular and can create oversized spaces around the base of each bobble.
Yarn Quantity
Yarn consumption should be estimated from the actual swatch. Bobble-heavy fabric generally requires more yarn than a flat fabric covering the same area.
Weigh the washed swatch with an accurate digital scale. Calculate its area, compare that area with the planned blanket dimensions, and multiply the swatch weight accordingly. Add extra yarn for borders, swatching, joining new skeins, and minor gauge variation.
Buy the main color from the same dye lot when possible. A monochrome green crochet throw exposes small color differences more clearly because there are no contrasting colors to separate the skeins visually.
Border Construction
The photographed blanket appears to use a restrained edge rather than a large decorative border. That treatment fits a fabric already carrying several strong textures.
Before adding a border, work evenly around the perimeter and check each corner. Too many stitches along the sides create ruffling. Too few cause the edge to pull inward.
A compact border can consist of one or more rounds of single crochet followed by a simple finishing round. Corner increases must provide enough room for the border to turn without cupping.
7 Technical Tips for a Bobble Stitch Crochet Blanket
- Mark repeat boundaries. A missed stitch in an openwork band can shift every repeat that follows. Place markers at fixed intervals and recount each section before beginning the next texture.
- Measure after changing texture. Bobble rows can contract compared with ordinary crochet rows. Check the width after the first complete bobble section rather than after several repeats.
- Control bobble direction. Raised clusters can project toward the wrong side when the closing stitch is handled inconsistently. Inspect the first three bobbles before completing an entire row.
- Swatch every stitch family. A gauge square made only from single crochet cannot predict the dimensions of openwork and dimensional sections. Include at least one complete texture repeat in the test fabric.
- Check side-edge spacing. Excess stitches along a border create waves. Lay the blanket flat after the first border round and correct the spacing before adding another round.
- Track yarn by weight. Bobbles consume substantially more yarn than flat rows. Weigh a completed repeat and use that measurement to estimate how many additional skeins the planned length requires.
- Pin before final blocking. Uneven openwork can distort the rectangular outline. Measure opposite edges and diagonals before allowing the blocked blanket to dry completely.
Finishing the Blanket
Weave yarn tails through several stitches on the reverse side rather than cutting them directly beside a knot. Change direction at least once when weaving each tail so normal movement of the blanket is less likely to pull the end free.
Wash or block the finished piece according to the yarn manufacturer’s care instructions. Lay the blanket into its intended dimensions without aggressively stretching the bobble sections.
Check all four edges after drying. The openwork should remain evenly spaced, the raised clusters should retain their shape, and the blanket should lie without pronounced rippling along the border.
Final Notes
The photographed design depends on three elements working together: sage yarn, alternating open and dense horizontal bands, and raised bobble-style texture. Reproducing that design language starts with a measured swatch rather than guessing the dimensions from the chair.
Record the yarn weight, hook size, washed gauge, repeat multiple, and yarn consumption before scaling the swatch into a complete bobble stitch crochet blanket pattern. Those measurements turn a visual reference into repeatable crochet instructions.
When the blanket is finished, save the project to Pinterest or share the texture details on Instagram with #SageBobbleBlanket. Before choosing the final repeat, decide one structural detail: should the openwork bands match the depth of the raised bobble sections, or remain narrower so the bobbles dominate the finished throw?









