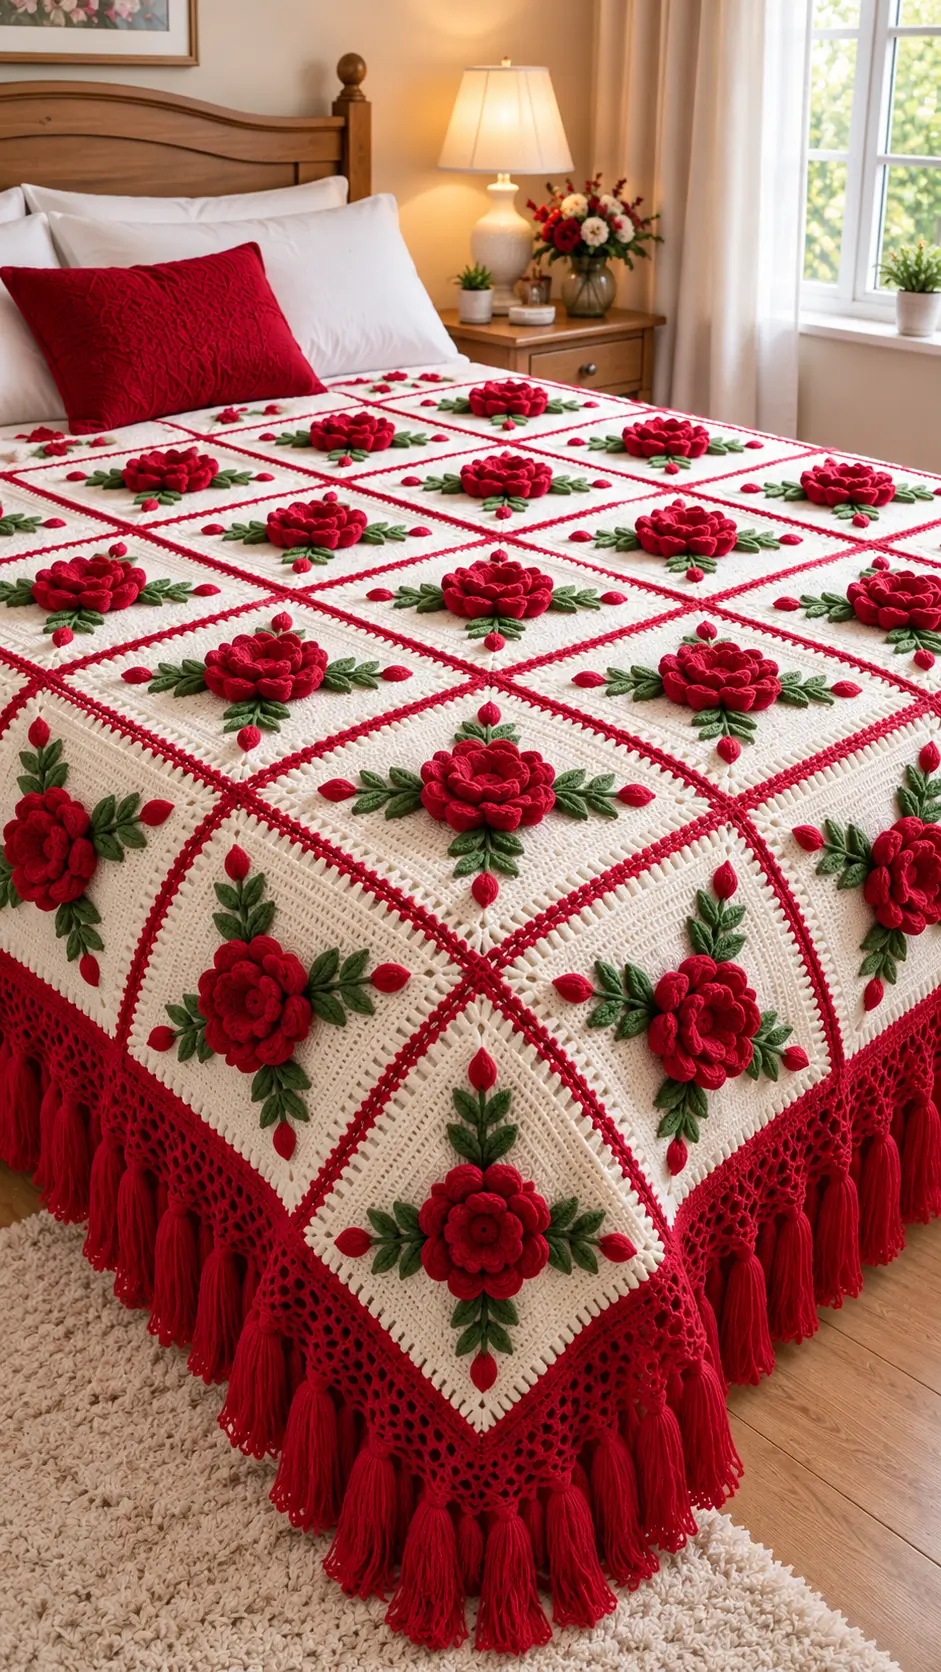
A flat red circle cannot produce the deep overlapping petal structure of the roses shown on this blanket. This 3D rose granny square blanket instead depends on layered petals, separate green leaves, an ivory field, and strong red joining lines. Aran yarn with a 5 mm hook is a documented combination for this motif style. The project suits intermediate crochet work and scales from a lap throw to a bed cover by changing the square count.
The Design: What Makes This Rose Blanket Different
The flower must rise above the ivory square rather than disappear into it. Layering several petal sizes creates that depth, while placing green leaves beneath the outer petals gives the red flower a defined boundary. A contrasting red seam then separates adjacent ivory blocks and reproduces the strong grid visible in the reference design.
The second structural decision concerns weight. A 3D crochet rose square carries considerably more material at its center than a plain granny square, so consistent square dimensions matter before joining. The third is the border: the wide red lace section visually balances the dense flowers across the center.
A frequent mistake in a floral granny square blanket is attaching petals too loosely. The flower can twist or lean when the blanket hangs over the edge of a bed. Stitching the flower through several central points limits that movement.
Project Info at a Glance
| Skill Level | Time | Finished Size | Hook | Best For |
|---|---|---|---|---|
| Intermediate | Depends on square count | Custom / Variable | 5.0 mm | Throws, bed covers, decorative blankets |
The 5 mm hook is a documented size for a 3D Rose Granny Square worked with Aran-weight yarn. The exact dimensions of the photographed blanket cannot be established from the image alone, so the final size should be calculated from the blocked dimensions of one completed square.
Materials and Tools
Yarn
- Ivory/Cream: Aran-weight yarn for the square backgrounds.
- Deep Red: Aran-weight yarn for roses, joining lines, border, buds, and tassels.
- Forest Green: Aran-weight yarn for leaves.
Exact yarn consumption depends on the finished square size, number of squares, flower density, border depth, and tassel count. Make one complete sample square and weigh it before purchasing yarn for a full bed-size blanket.
Tools
- 5.0 mm crochet hook
- Tapestry needle
- Scissors
- Locking stitch markers
- Blocking pins and mats
- Measuring tape
- Card or tassel maker for equal-length fringe
Abbreviations
- MR – Magic ring
- sc – Single crochet
- inc – Two stitches worked into one stitch
- sl st – Slip stitch
- ch – Chain
- hdc – Half double crochet
- dc – Double crochet
- tr – Treble crochet
- BLO – Back loop only
- FLO – Front loop only
- dc2tog – Double crochet two together
- dc3tog – Double crochet three together
An invisible decrease is mainly associated with three-dimensional amigurumi shaping and is not required for the flat square construction used in this blanket.
3D Rose Granny Square Blanket Pattern
The photographed blanket does not include its original written instructions. The construction below therefore recreates its visible structure rather than claiming to reproduce an unpublished designer pattern stitch for stitch. The design combines layered crochet roses, individual leaves, ivory square bases, contrasting red joins, an openwork border, and tassels.
Rose Center
Yarn: Deep red.
R1: 6 sc in MR (6)
R2: inc ×6 (12)
R3: (1 sc, inc) ×6 (18)
Slip stitch to the first stitch. Keep the center compact because this section supports the overlapping petal layers.
Small Petal Base – Make 3
Yarn: Deep red.
R1: 6 sc in MR (6)
R2: inc ×6 (12)
R3: (1 sc, inc) ×6 (18)
R4: (2 sc, inc) ×6 (24)
R5: (3 sc, inc) ×6 (30)
R6: (4 sc, inc) ×6 (36)
Shape the upper portion of each piece with taller stitches so it develops a curved petal edge instead of remaining a flat circle.
Fasten off. Leave a long sewing tail.
Medium Petals – Make 3
Yarn: Deep red.
Repeat the circular foundation through 36 stitches. Work additional shaping across the upper section so each medium petal is slightly wider and taller than an inner petal.
Do not attach the petals at their upper edges. Only the lower portion should be anchored so the top can project away from the square.
Fasten off and leave a long sewing tail.
Large Outer Petals – Make 3
Yarn: Deep red.
Begin with the same 6-stitch circular foundation:
R1: 6 sc in MR (6)
R2: inc ×6 (12)
R3: (1 sc, inc) ×6 (18)
R4: (2 sc, inc) ×6 (24)
R5: (3 sc, inc) ×6 (30)
R6: (4 sc, inc) ×6 (36)
Widen the upper petal section with hdc, dc, or tr stitches. These outer petals should extend beyond the medium layer while remaining compact enough to fit inside the ivory square.
Fasten off. Leave a long tail for assembly.
Assembling the 3D Rose
Place the large petals around the center first. Overlap their edges slightly, then position the medium petals over the gaps between the large petals.
Add the smallest petal layer last. Rotate each successive layer so its petals cover the spaces in the layer underneath.
Pass the sewing yarn through the bases of several petals and the flower center. Avoid stitching through the entire height of a petal because the upper edges need to remain free to create the raised rose shape.
Green Leaves – Make 4 to 6 per Square
Yarn: Forest green.
Foundation: Ch 8.
Starting from the third chain from the hook, work:
1 dc, 2 tr in the next stitch, 1 dc, 1 hdc, 1 sc, sl st.
Ch 1 and continue along the opposite side of the foundation chain, mirroring the stitch heights to form the second side of the leaf.
Slip stitch at the base. Fasten off and leave approximately 15–20 cm of yarn for sewing.
For a sharper leaf, tighten the final slip stitch slightly and block the tip into position before assembly.
Ivory Square Base
Yarn: Ivory or cream.
Make the square large enough to provide a clear cream margin around the flower and foliage. The photographed blanket uses substantial negative space around each central rose, which prevents neighboring flowers from visually merging after the blocks are joined.
Work a conventional square construction from the center outward. Place increases at four evenly spaced corners and maintain the same number of stitches along all four sides.
Continue until the square reaches the required measurement.
Make every subsequent square to the same stitch count and blocked dimensions. Measure the first several blocks rather than relying only on round count because small tension differences accumulate across a large blanket.
Attaching the Rose to the Square
Place the completed flower at the center of the blocked ivory square. Check the distance from the outer petals to all four edges before sewing.
Secure the flower through its central base first. Add several attachment points beneath the outer petals without flattening them.
The flower needs enough anchoring to remain stable when the blanket is lifted, folded, or draped over a bed.
Leaf Placement
Arrange four to six leaves beneath the rose. The foliage should extend outward from the flower instead of forming a complete circular wreath.
Alternate the direction of adjacent leaves. Slide their narrow ends underneath the outer red petals so the attachment points remain concealed.
Sew through the center line of each leaf. Leave part of the outer edge unattached to retain the raised appearance visible in the reference design.
Small Red Bud Accents
Yarn: Deep red.
Foundation: Ch 4.
Work compact sc and hdc stitches back toward the beginning of the chain. Fold the piece slightly lengthwise and secure the lower edge.
Position the small buds near the foliage rather than directly against the main flower. Keep their placement consistent from square to square.
Joining the Granny Squares
Yarn: Deep red.
Arrange every finished square on a large flat surface before joining. Rotate blocks as required so the foliage follows a consistent layout.
Use a visible crochet seam in deep red to reproduce the strong grid shown across the blanket. Keep the stitch count identical along corresponding edges.
Join the horizontal rows, then complete the vertical seams. Check the blanket on a flat surface after several joins.
If the fabric begins to pull inward along a red line, the joining tension is too tight. Correct the seam before adding more rows.
Outer Stabilizing Round
Yarn: Deep red.
Work one complete round around the joined blanket before starting the decorative lace section. This round provides a stable foundation for the wider border.
Distribute stitches evenly along every edge. Add sufficient corner stitches to turn each 90-degree corner without pulling the blanket inward.
Red Lace Border
Yarn: Deep red.
Begin the openwork section with repeated chain spaces separated by anchored stitches.
On the next round, work into the chain spaces to develop the lace depth. Maintain the established repeat across each side while adding extra expansion at the corners.
Continue until the border reaches the required width. The reference design uses a broad red lace section, so a narrow one- or two-round edging will not create the same proportion.
Lay the work flat after each major border round. Corners that curl upward need additional expansion, while heavy waves indicate excess stitches.
Red Tassels
Yarn: Deep red.
Wrap yarn repeatedly around a rigid card sized to the required tassel length. Cut through one end of the wrapped strands.
Separate the strands into equal bundles. Fold each bundle in half.
Insert the folded center through a stable opening in the lace border, pass the loose ends through the loop, and tighten carefully.
Repeat at equal intervals around the blanket. Place tassels consistently along all four sides and at corresponding corner positions.
After every tassel has been attached, lay the blanket flat and trim the fringe to a uniform length.
Assembly Order
- Make and block all ivory square bases to the same dimensions.
- Construct the red roses from the large outer petals toward the smaller inner layers.
- Secure each flower through its lower petal sections while leaving the upper edges raised.
- Arrange the green leaves beneath each rose and pin their positions before sewing.
- Attach each completed rose-and-leaf arrangement to the center of its ivory square.
- Add the small red bud details after the main floral elements are fixed.
- Lay out all squares and check the orientation of every flower and leaf group.
- Join the squares with consistent deep-red crochet seams.
- Work the stabilizing outer round followed by the wide openwork red border.
- Attach matching tassels, weave in remaining yarn tails, and trim the fringe evenly.
The completed blanket should contain uniformly blocked floral squares, visible red grid lines, raised roses, green foliage, an openwork red border, and evenly distributed tassels.
7 Technical Tips for a Cleaner Rose Granny Square Blanket
- Control square-size drift. Measure the width after every five blocks. A 5 mm difference repeated across eight squares creates a 4 cm discrepancy before the border is added.
- Prevent loose flower centers. Pass the sewing yarn through several petal bases instead of catching one outer loop. A single attachment point allows a heavy 3D rose to rotate.
- Stop leaves from flipping backward. Stitch along the central section of each leaf while leaving only part of the outside edge free. Attaching only the stem end provides too little support.
- Avoid flattened petals. Sew each petal through its lower section rather than across the upper edge. The unattached upper portion produces the required three-dimensional profile.
- Watch for seam puckering. Compare each red joining seam with the blocked edge before completing an entire row. A shorter seam pulls the ivory squares inward.
- Check border corners frequently. Lay each corner flat after every openwork round. Raised corners indicate insufficient expansion, while pronounced rippling indicates excess stitches.
- Standardize the tassels. Wrap every bundle around the same rigid card and use an equal strand count. Perform the final trim only after all fringe has been attached.
Planning the Blanket Size
Do not calculate a bed-size version from an assumed square measurement. Crochet one complete sample containing the ivory base, rose, and leaves, then block it exactly as the finished blanket will be blocked.
Measure the square from edge to edge after it is fully dry. Multiply that measurement by the planned number of blocks across and down, then add the expected width of the outer border.
For example, the calculation should follow this structure:
Blanket width = blocked square width × number of squares across + total border width.
Blanket length = blocked square height × number of squares down + total border depth.
This method also makes yarn estimation more reliable. Weigh one completed square and multiply its weight by the required number of blocks, then calculate the joining, border, and tassel yarn separately.
Color Placement
The reference design depends on a restricted palette: ivory, deep red, and green. Keeping the joining yarn identical or very close to the rose color connects the individual flowers visually across the entire blanket.
Use the same red again for the outer lace and tassels. This creates a continuous frame around the ivory center rather than introducing another competing accent.
Green should remain secondary. Concentrate it immediately around the roses so the ivory background remains visible between neighboring motifs.
Blocking and Final Finishing
Block the individual squares before joining whenever possible. Match the dimensions precisely and square all four corners.
After assembly, check the complete blanket again on a flat surface. The visible red joining grid should form straight horizontal and vertical lines.
Steam or wet block according to the fiber manufacturer’s care requirements. Do not press directly onto the raised flowers because excessive pressure can flatten the petal structure.
Inspect every flower attachment point, leaf, seam, border corner, and tassel before weaving in the final tails. Secure long tails inside stitches of the same color so red strands do not show through the ivory background.
Final Notes
A 3D rose granny square blanket depends on controlled repetition: identical square dimensions, firmly anchored flower centers, balanced leaf placement, consistent red joins, and a border that remains flat at every corner.
Make one complete sample square first. Block it, record its finished measurement, weigh it, and use those figures to calculate the number of squares and approximate yarn requirement for the intended blanket size.
Before batch production, decide whether every rose-and-leaf arrangement will face the same direction or whether alternating squares will be rotated. That single choice affects the visual rhythm of the entire finished blanket.
Share the completed project on Pinterest or Instagram with #3DRoseGrannySquareBlanket.









