Introduction
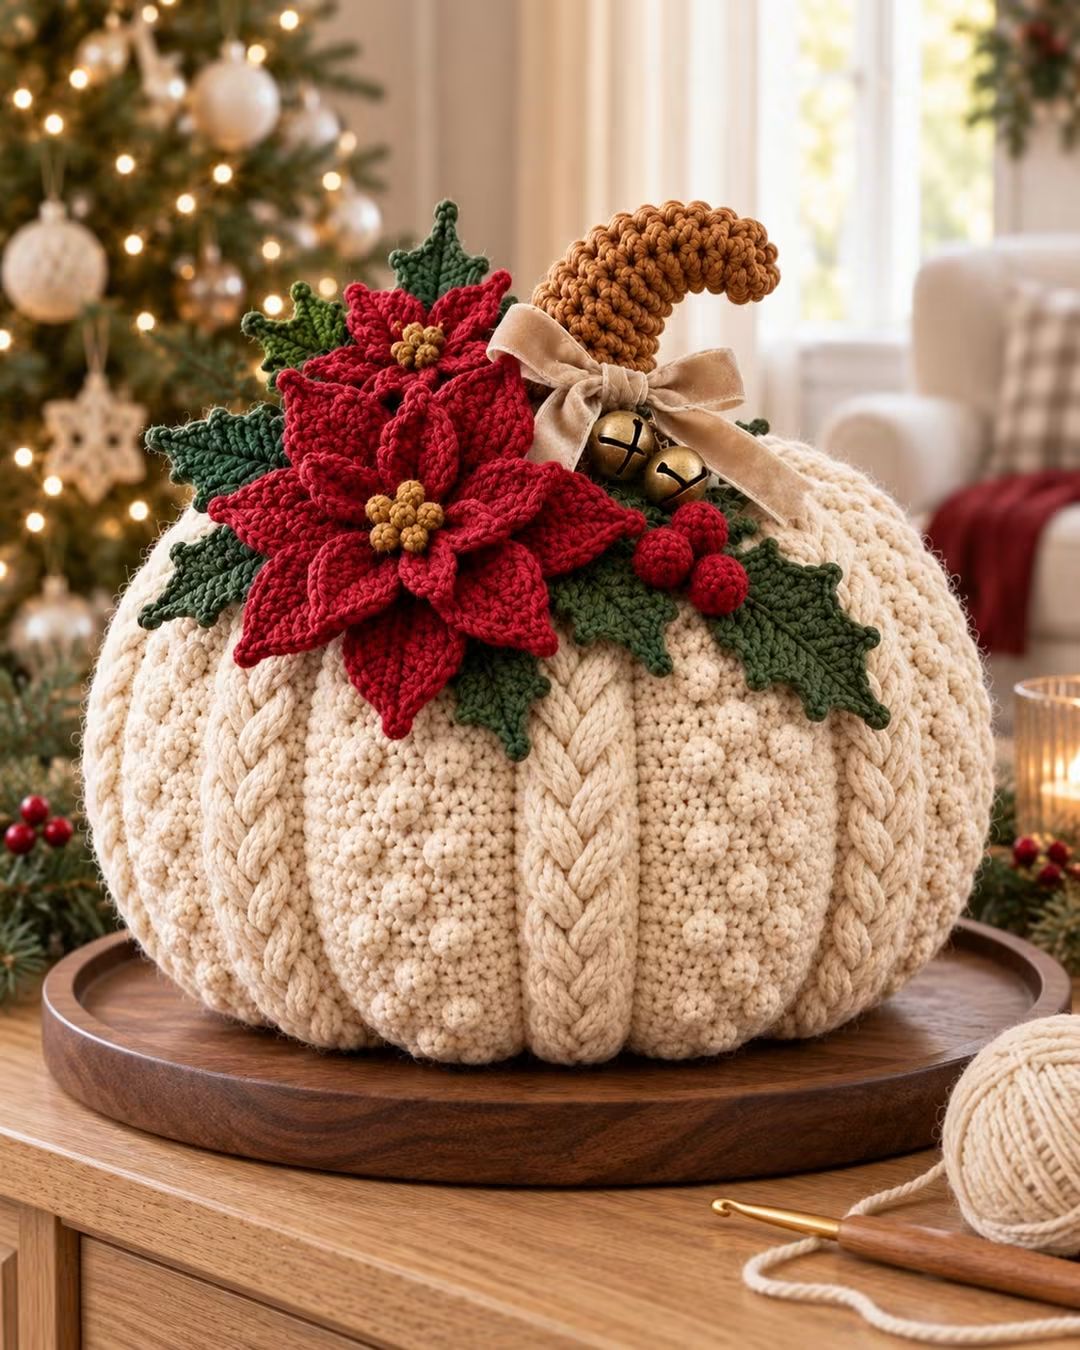
A Christmas pumpkin needs its deepest red at the crown, not across the body, or the poinsettias disappear against the segmented shape. This Christmas crochet pumpkin pattern builds a large cream pumpkin with a curved brown stem, layered red flowers, green leaves and berry clusters. Use worsted-weight yarn with a 5.0 mm hook for dense fabric. The finished decoration measures approximately 30–35 cm wide and suits intermediate crochet skills.
The Design: What Makes This Christmas Pumpkin Different
The photographed pumpkin depends on three structural decisions. First, the cream body is broad and compressed rather than spherical. That proportion leaves enough upper surface for the botanical arrangement while maintaining recognizable pumpkin segmentation. Second, vertical shaping lines divide the body into pronounced sections. They matter because stuffing alone produces a ball; external sculpting creates the pumpkin profile.
The third decision is asymmetry at the crown. Two crochet poinsettia flowers occupy one side of the stem while green leaves and berries spread outward. This prevents the decoration from looking like a centered flower stuck onto a sphere. A common mistake in a Christmas pumpkin crochet project is pulling the sculpting strands too tightly. Excessive tension produces narrow grooves and an unnaturally tall body instead of the wide form shown here.
Project Info at a Glance
| Skill Level | Time | Finished Size | Hook | Best For |
|---|---|---|---|---|
| Intermediate | 8–12 hours | Approx. 30–35 cm wide | 5.0 mm | Christmas table décor, mantel display, centerpiece |
The final dimensions depend on yarn thickness, tension, stuffing density and the amount of compression applied while creating the pumpkin segments.
Materials and Tools
Yarn
- Cream / ivory — worsted or Aran #4 — approximately 180–220 g for the pumpkin body
- Deep Christmas red — worsted #4 — approximately 50–70 g for poinsettias and berries
- Forest green — worsted #4 — approximately 30–40 g for leaves
- Caramel brown — worsted #4 — approximately 20–25 g for the curved stem
- Muted gold — worsted #4 — approximately 5 g for flower centers
Tools
- 5.0 mm crochet hook
- Polyester fiberfill
- Long yarn needle
- Locking stitch markers
- Scissors
- Sewing pins
- Strong cream yarn for sculpting
- Optional velvet ribbon
- Optional decorative bells
Abbreviations
- MR — magic ring
- sc — single crochet
- hdc — half double crochet
- dc — double crochet
- tr — treble crochet
- inc — 2 sc in the same stitch
- dec — invisible decrease over 2 stitches
- sl st — slip stitch
- ch — chain
- BLO — back loop only
For an invisible decrease, insert the hook through the front loops of the next two stitches before completing one single crochet through both loops.
Pattern — Step by Step
Work the pumpkin in a continuous spiral unless otherwise stated. Move the stitch marker after every completed round.
Large Cream Pumpkin Body — Make 1
Yarn: cream / ivory.
R1: 6 sc in MR (6)
R2: inc ×6 (12)
R3: (1 sc, inc) ×6 (18)
R4: (2 sc, inc) ×6 (24)
R5: (3 sc, inc) ×6 (30)
R6: (4 sc, inc) ×6 (36)
R7: (5 sc, inc) ×6 (42)
The 42-stitch plateau establishes the large body size. Keep the fabric dense enough that white stuffing cannot pass visibly between stitches.
R8: sc around (42)
R9: sc around (42)
R10: sc around (42)
R11: sc around (42)
R12: sc around (42)
R13: sc around (42)
R14: sc around (42)
R15: sc around (42)
R16: sc around (42)
R17: sc around (42)
R18: sc around (42)
R19: sc around (42)
R20: sc around (42)
Begin stuffing at this point. Fill the outside edge first and keep the center slightly softer. This distribution makes the later sculpting process easier.
R21: (5 sc, dec) ×6 (36)
R22: (4 sc, dec) ×6 (30)
R23: (3 sc, dec) ×6 (24)
R24: (2 sc, dec) ×6 (18)
Add the remaining stuffing. The body should be full but compressible; an overfilled pumpkin resists segment shaping.
R25: (1 sc, dec) ×6 (12)
R26: dec ×6 (6)
R27: sc around (6)
Fasten off. Leave a 60 cm tail and close the opening through the front loops.
Creating the Pumpkin Segments
Cut approximately 180 cm of strong cream yarn and thread it onto a long yarn needle.
Insert the needle through the center bottom of the pumpkin and bring it out through the center top. Carry the yarn down the outside of the body and insert the needle through the bottom center again.
Pull until a defined groove appears.
Repeat this process around the body to create six evenly spaced segments. Each sculpting strand should run from the same upper and lower center points.
Do not pull one segment to full tension before forming the others. Establish all six grooves first, compare their spacing, then tighten them gradually in sequence.
The finished pumpkin should become wider and slightly flatter as the sculpting strands tighten.
Raised Decorative Rib — Make 6
Yarn: cream. These optional ribs reproduce the strongly raised vertical lines visible in the reference image.
Ch 24.
Row 1: Starting in second ch from hook, sl st in each ch across (23).
Row 2: Ch 1, turn. BLO sl st across (23).
Row 3: Ch 1, turn. BLO sl st across (23).
Fasten off. Leave a 35 cm sewing tail.
Pin one rib over each sculpted groove. Stretch it only enough to follow the pumpkin curve, then sew both long edges to the body with small hidden stitches.
Curved Stem — Make 1
Yarn: caramel brown.
R1: 6 sc in MR (6)
R2: inc ×6 (12)
R3: (1 sc, inc) ×6 (18)
R4: sc around (18)
R5: sc around (18)
R6: (1 sc, dec) ×6 (12)
R7: sc around (12)
R8: sc around (12)
R9: sc around (12)
R10: sc around (12)
R11: sc around (12)
R12: sc around (12)
R13: sc around (12)
R14: sc around (12)
R15: sc around (12)
R16: sc around (12)
R17: sc around (12)
R18: sc around (12)
Stuff progressively but lightly. Bend the stem while adding stuffing so it develops the hooked profile visible in the photograph.
Flatten the bottom opening. Fasten off and leave a 40 cm tail for assembly.
Large Poinsettia Petals — Make 6
Yarn: deep Christmas red.
Ch 10.
Starting in the second chain from the hook:
Row 1: sl st, sc, hdc, dc, tr, dc, hdc, sc, sl st.
Continue around the opposite side of the foundation chain:
Row 2: sl st, sc, hdc, dc, tr, dc, hdc, sc, sl st.
Fasten off. Leave a 20 cm sewing tail.
Pinch the base of each petal before sewing. This small fold gives the poinsettia more vertical depth instead of allowing all petals to lie flat.
Medium Poinsettia Petals — Make 6
Yarn: deep Christmas red.
Ch 8.
Side 1: sl st, sc, hdc, dc, hdc, sc, sl st.
Side 2: work along the opposite side: sl st, sc, hdc, dc, hdc, sc, sl st.
Fasten off. Leave a 20 cm tail.
Small Poinsettia Petals — Make 5
Yarn: deep Christmas red.
Ch 6.
Side 1: sl st, sc, hdc, sc, sl st.
Side 2: work along the opposite side: sl st, sc, hdc, sc, sl st.
Fasten off. Leave a 15 cm tail.
Poinsettia Center — Make 2
Yarn: muted gold.
R1: 6 sc in MR (6)
R2: inc ×6 (12)
Fasten off. Leave a 20 cm tail.
For additional texture, make five small French knots or compact yarn knots over the surface of each center after assembly.
Large Holly Leaves — Make 5
Yarn: forest green.
Ch 13.
Starting in the second chain from the hook:
Side 1: sl st, sc, hdc, dc, tr, dc, hdc, sc, hdc, dc, sc, sl st.
Ch 2 and sl st into the first chain to create a small pointed tip.
Work down the opposite side:
Side 2: sl st, sc, dc, hdc, sc, hdc, dc, tr, dc, hdc, sc, sl st.
Fasten off. Leave a 25 cm sewing tail.
Pinch the base slightly when attaching the leaf. This changes a flat oval into the angled foliage shape needed around the flowers.
Small Green Leaves — Make 2
Yarn: forest green.
Ch 9.
Side 1: sl st, sc, hdc, dc, hdc, sc, sc, sl st.
Side 2: work along the opposite side: sl st, sc, sc, hdc, dc, hdc, sc, sl st.
Fasten off. Leave a 20 cm sewing tail.
Christmas Berries — Make 3
Yarn: deep red.
R1: 6 sc in MR (6)
R2: inc ×6 (12)
R3: sc around (12)
R4: sc around (12)
R5: dec ×6 (6)
Add a small amount of stuffing before closing.
Fasten off. Leave a 20 cm tail.
Optional Bobble Texture
The photographed body includes raised pebble-like areas between several vertical ribs. These can be added as surface details after the pumpkin is complete.
Insert the hook around a body stitch and join cream yarn.
Work five incomplete dc into the same attachment point, leaving the final loop of each stitch on the hook. Yarn over and draw through all loops. Ch 1 to lock the bobble.
Fasten off and pull both yarn ends into the pumpkin.
Space the bobbles irregularly rather than forming a strict grid. Keep at least 2–3 stitches between adjacent bobbles so the surface does not become crowded.
Assembly
- Complete the cream pumpkin body, stuff it and close both center openings before beginning decorative assembly.
- Create the six pumpkin segments with long sculpting strands. Compare all grooves before applying final tension.
- Attach the six optional raised ribs directly over the sculpted grooves, keeping their upper ends approximately 2 cm from the center opening.
- Sew the brown curved stem securely into the crown. Position its curve toward the rear so it does not cover the flowers.
- Assemble the first large poinsettia by arranging six large petals as the lower layer, six medium petals above them and five small petals at the center. Offset each layer so upper petals cover the gaps below.
- Build the second poinsettia in the same manner or omit several large petals to make it slightly smaller. Attach the gold centers after all red layers are secured.
- Pin the green leaves beneath and around the poinsettias. Direct their pointed ends outward from the flower cluster rather than toward the stem.
- Group the three red berries on the opposite side of the flowers. Keep approximately 5–10 mm between their centers so each berry remains visible.
- Add the optional velvet bow and decorative bells at the base of the stem. Sew or tie these accessories independently so they can be removed before cleaning the crochet piece.
- Inspect the pumpkin from all sides, weave every remaining yarn tail into the interior and adjust the petals and leaves. The finished decoration should have six visible body segments, a curved stem and an asymmetrical poinsettia arrangement across the crown.
7 Technical Tips for a Better Christmas Crochet Pumpkin
- Segment collapse: Do not stuff the center as firmly as the outside wall. Leaving the central core slightly softer gives the six sculpting strands enough compression to form grooves.
- Visible stuffing: If polyester fiber shows between stitches, reduce the hook from 5.0 mm to 4.5 mm while keeping the same yarn. Enlarging the hook makes the problem worse.
- Uneven sculpting: Divide the circumference into six positions before tightening any strand completely. A groove displaced by only 2–3 stitches can make one pumpkin section noticeably wider than its neighbor.
- Flat poinsettias: Pinch approximately 5 mm at the base of each red petal before sewing. Attaching every petal completely flat removes the layered height visible in the reference design.
- Loose stem: Sew around the stem base twice and catch at least two complete pumpkin rounds with each pass. A tall curved stem creates more sideways force than a short vertical stem.
- Crowded foliage: Leave approximately one-third of every green leaf exposed beyond the poinsettia petals. If less than that remains visible, the red flower layers visually absorb the foliage.
- Exposed yarn tails: Pass each finishing tail through at least three internal stitch paths before cutting it. Decorative petals and berries are handled repeatedly during positioning, making short unsecured tails more likely to emerge.
How to Shape the Pumpkin Correctly
The body should not remain a conventional stuffed sphere. After stuffing, press the top and bottom toward one another while tightening the six sculpting strands. This redistributes fiberfill toward the outside circumference and creates the broad profile seen in the reference image.
Work around the pumpkin in stages. Tighten groove one slightly, then groove two, continuing around all six positions. Repeat the sequence until the body reaches the required compression. Pulling one strand to maximum tension immediately can distort the center opening and make the remaining segments unequal.
The raised crochet ribs can then cover the sculpting lines. Their purpose is decorative as well as structural: they strengthen the vertical division between cream panels and imitate the cable-heavy appearance of the photographed pumpkin.
How to Arrange the Poinsettias and Holly Leaves
Start with the larger poinsettia rather than the stem. Pin it slightly left of center, with approximately one-third of the flower overlapping the pumpkin crown. Position the second flower lower and farther toward the outside edge.
Next, insert the forest-green leaves underneath the flowers. Alternate their angles. One can point horizontally, another downward across a pumpkin segment, while the upper leaves can rise behind the petals.
The berry cluster belongs on the less crowded side of the arrangement. Three berries are sufficient to repeat the red of the poinsettias without competing with them.
Install the stem after testing this complete arrangement with pins. The curved section should remain visible above the flowers. If the flowers conceal more than half the stem, shift the botanical cluster outward before sewing.
Adjusting the Size
This textured crochet pumpkin can be resized primarily through yarn weight rather than by altering every round. Using DK yarn and a smaller hook produces a considerably smaller centerpiece. Bulky yarn increases both diameter and height.
For a deliberately smaller mathematical version, stop increasing at 30 stitches instead of 42. For a medium version, stop at 36 stitches. Keep enough plateau rounds to create a body that is wider than it is tall after sculpting.
The flower dimensions should change with the pumpkin. On a smaller body, remove two chains from each petal foundation and shorten the leaves proportionally. Oversized flowers can cover the segmentation that identifies the object as a pumpkin.
Conclusion
Check the pumpkin from the front and above before securing the last decorative pieces. Six grooves should remain visible, the curved stem should rise above the flower cluster, and green leaves should extend beyond the red petals on several sides. Your next step is to crochet the cream body first, sculpt its segments, then test the poinsettia arrangement with pins before sewing. Save this Christmas crochet pumpkin pattern to Pinterest or share the finished centerpiece on Instagram with #ChristmasPoinsettiaPumpkin. For this specific design, would you make the two poinsettias equal in size or keep the second flower smaller to emphasize the curved stem?









