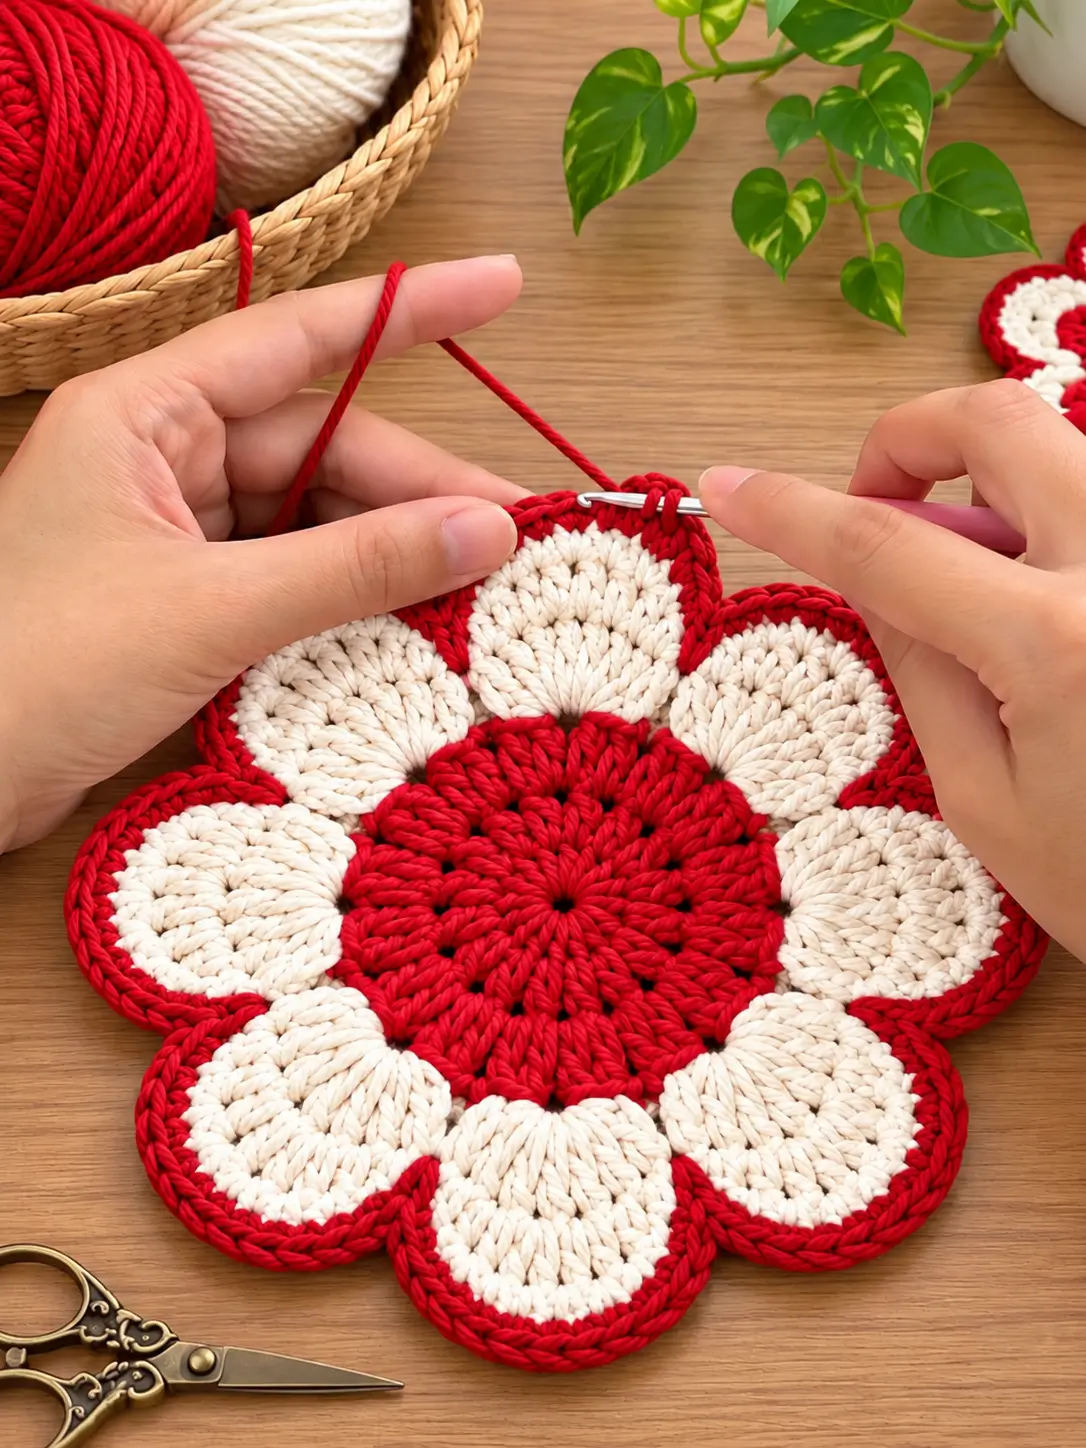
Eight cream petals have to meet the red center at equal angles or this flower immediately loses its radial symmetry. This crochet flower potholder pattern creates a large flat hot pad with a dense red center, eight rounded cream petals and a contrasting red border. Work it in 100% cotton worsted yarn with a 4.5 mm hook for a substantial kitchen mat that can also serve as a decorative trivet or table centerpiece.
What Makes This Crochet Flower Potholder Different
The construction is based on three clearly separated zones. A dense circular center establishes the diameter first. Eight cream sections then expand outward into broad petals, and the final red edging traces every curve while emphasizing the narrow valleys between them.
The petal count matters. Eight sections divide the center evenly and create the balanced flower visible in the reference image. Each petal must contain the same number of stitches and increases; otherwise one section becomes wider and pushes its neighbors out of alignment.
The second important decision is fiber. A decorative crochet flower hot pad may look similar in many yarns, but a piece intended to contact hot cookware should be made from heat-appropriate natural fiber such as 100% cotton rather than ordinary acrylic.
Project Info at a Glance
| Skill Level | Time | Finished Diameter | Hook | Recommended Yarn |
|---|---|---|---|---|
| Intermediate | 2–4 hours | Approx. 25–28 cm | 4.5 mm | 100% cotton, Worsted #4 |
The exact diameter depends on yarn, hook size and tension. Comparable published flower hot pads range from about 8 inches to more than 12 inches across. Make a gauge sample if the finished diameter needs to fit a specific pan or table setting.
Materials and Tools
Yarn
- Red 100% cotton yarn — Worsted #4 — approximately 60–80 g
- Cream 100% cotton yarn — Worsted #4 — approximately 70–90 g
Purchase extra yarn when making a matching set because individual cotton colors can vary slightly between dye lots.
Tools
- 4.5 mm crochet hook
- Yarn needle
- Scissors
- 8 locking stitch markers
- Measuring tape
- Blocking mat
- Rust-resistant blocking pins
Important Heat-Safety Note
Use 100% cotton yarn when the finished piece will function as a potholder or hot pad. Avoid ordinary acrylic yarn for direct contact with hot cookware because synthetic fibers can soften or melt at sufficiently high temperatures.
This pattern creates a decorative, substantial crochet layer, but protection also depends on yarn, thickness, density, moisture and the temperature of the cookware. Do not use a damp potholder to handle hot cookware. If substantial hand protection is required, add a second cotton layer or a heat-resistant lining designed for potholders.
Abbreviations
- MR — magic ring
- ch — chain
- sl st — slip stitch
- sc — single crochet
- hdc — half double crochet
- dc — double crochet
- tr — treble crochet
- inc — increase
- st/sts — stitch/stitches
- sp — space
- rep — repeat
The instructions use US crochet terminology. Beginning chains do not count as stitches unless specifically stated.
Crochet Flower Potholder Pattern – Step by Step
Construction note: The project is worked from the center outward. First crochet the red circular center. Eight cream petal sections are then built around it, followed by a red edging that outlines each petal and sharpens the valleys.
Red Flower Center
Yarn: red 100% cotton
Make a magic ring.
Round 1: Ch 2, work 12 dc into MR. Pull the ring closed and join with sl st to the first dc. (12)
Round 2: Ch 2, work 2 dc in each st around. Join with sl st. (24)
Round 3: Ch 2, repeat (dc in next st, 2 dc in next st) around. Join. (36)
Round 4: Ch 2, repeat (dc in next 2 sts, 2 dc in next st) around. Join. (48)
Round 5: Ch 2, repeat (dc in next 3 sts, 2 dc in next st) around. Join. (60)
Round 6: Ch 2, repeat (dc in next 4 sts, 2 dc in next st) around. Join. (72)
Fasten off.
The center should lie flat. If the outer edge begins to ripple, check the stitch count before continuing. A distorted center becomes more difficult to correct after the eight petals have been attached.
Marking the Eight Petal Sections
The final center contains 72 stitches.
Divide those stitches into 8 sections of 9 stitches each.
Place a locking marker at the beginning of every 9-stitch section.
Count the sections twice before starting the cream yarn. The markers should be spaced evenly around the complete circumference.
Cream Petal Foundation
Yarn: cream 100% cotton
Join cream yarn at the first marker.
Each petal begins across one 9-stitch center section.
Petal 1
Row 1: Ch 2. Dc in each of the next 9 sts. Turn. (9)
Row 2: Ch 2, 2 dc in first st, dc in next 7 sts, 2 dc in last st. Turn. (11)
Row 3: Ch 2, 2 dc in first st, dc in next 9 sts, 2 dc in last st. Turn. (13)
Row 4: Ch 2, dc in each st across. Turn. (13)
Row 5: Ch 2, 2 dc in first st, dc in next 11 sts, 2 dc in last st. Turn. (15)
Row 6: Ch 2, dc in each st across. Turn. (15)
The petal is now at its maximum width.
Rounding the Petal
Row 7: Sl st in first st, sc in next st, hdc in next st, dc in next 9 sts, hdc in next st, sc in next st, sl st in final st. (15)
Row 8: Ch 1, skip first sl st, sc in next st, hdc in next st, dc in next 9 sts, hdc in next st, sc in next st. Turn.
Row 9: Ch 1, sc in next 2 sts, hdc in next 2 sts, dc in next 5 sts, hdc in next 2 sts, sc in next 2 sts.
Fasten off, leaving approximately 15 cm for finishing.
The upper edge should form a broad rounded lobe rather than a sharp point.
Petals 2–8
Join cream yarn at the next marked 9-stitch section.
Repeat Rows 1–9 of Petal 1.
Continue around the red center until all 8 cream petals are complete.
Do not join neighboring petals together yet. Lay the motif flat first and compare the width and length of all eight sections.
Alternative Rounded Petal Shaping
If you prefer a more circular petal like the reference image, replace the final shaping row with a graduated sequence.
Across the outer petal edge, work:
sl st, sc, hdc, dc, 2 dc, 2 tr, 3 tr, 2 tr, 2 dc, dc, hdc, sc, sl st.
Adjust the exact placement symmetrically around the center stitch of the petal.
The tallest stitches must sit at the center of the petal. If the treble stitches shift one or two positions sideways, the finished lobe will lean rather than radiate directly away from the red center.
Joining the Petal Valleys
The reference flower has narrow red triangular divisions between the cream petals. These divisions help keep the petals visually separate.
Join red yarn at the base of a valley between two petals.
Work sl st upward through the edge stitches of the first petal until approximately halfway along the side.
Ch 1.
Work downward along the neighboring petal using closely spaced sl sts.
Fasten off.
Repeat in all eight valleys.
Keep these red joining sections narrow. A wide red wedge reduces the visible cream area and makes the petals appear disconnected from the center.
Red Outer Petal Border
Join red yarn at one valley.
Border Round 1: Ch 1 and sc evenly around the outer edge of the first cream petal.
At the deepest point between petals, work one sl st through the valley.
Continue with sc around the next petal.
Repeat around all eight petals.
Join with sl st to the first sc.
Check the motif before beginning another border round. The flower should lie flat without cupping or ruffling.
Second Red Border Round
Border Round 2: Ch 1, sc in each st around each petal.
Work 2 sc into approximately every fourth or fifth stitch around the broadest outer curves if the border begins pulling inward.
At each valley, work sc2tog across the final stitch of one petal and first stitch of the next petal.
Join with sl st.
Fasten off and leave approximately 15 cm for weaving.
Optional Decorative Surface Round
The red center in the reference has visible radial texture. You can emphasize this structure with surface crochet.
Join red yarn near the center hole.
Work a loose line of surface slip stitches from the center toward the beginning of one cream petal.
Fasten off.
Repeat eight times, placing one radial line toward each petal.
Keep the surface stitches loose enough that the center remains flat.
Optional Hanging Loop
A hanging loop can be added at the outer center of one petal.
Join red yarn at the center stitch of the selected petal border.
Step 1: Ch 18–20.
Step 2: Sl st back into the same border position to form a loop.
Step 3: Work 20–24 sc around the chain loop for additional strength.
Step 4: Sl st into the border and fasten off.
The loop should remain outside the hot surface when the potholder is lying flat.
Optional Second Layer for a Thicker Potholder
If the project will be used primarily as a potholder rather than a decorative trivet, add a second cotton layer.
Using red or cream cotton, crochet a flat circle approximately the same diameter as the flower center and inner portions of the petals.
Begin with 12 dc in a magic ring.
Increase evenly by 12 stitches per round:
Round 1: 12 dc. (12)
Round 2: 2 dc in each st. (24)
Round 3: (dc, inc) around. (36)
Round 4: (dc in next 2, inc) around. (48)
Round 5: (dc in next 3, inc) around. (60)
Round 6: (dc in next 4, inc) around. (72)
Continue the same mathematical increase sequence until the backing reaches the required diameter.
Place the backing against the wrong side of the flower and sew it securely around the perimeter using cotton yarn.
Do not place ordinary polyester batting between the layers when the finished item is intended for direct contact with very hot cookware. Use materials specifically rated for the intended application.
Assembly and Finishing
- Lay the completed flower flat and confirm that all eight cream petals have similar width and length.
- Check that each petal aligns with one of the eight marked sections of the red center.
- Secure any remaining valley joins without pulling neighboring petals toward each other.
- Complete the red border and inspect the outer edge for sections that curl inward.
- Add the optional cotton backing before weaving in the final perimeter tail.
- Attach the optional hanging loop to the center of one petal rather than to a valley.
- Weave red tails only through red stitches and cream tails through cream stitches to prevent contrasting fibers from showing.
- Dampen the finished flower according to the cotton yarn care instructions.
- Pin all eight petals at equal angles and allow the piece to dry completely.
- Measure across opposite petals and correct minor asymmetry during the final blocking stage.
The completed flower should have a flat red center, eight evenly distributed cream petals, narrow red valleys and a continuous red outer border.
How to Keep All Eight Petals the Same Size
Petal consistency begins before the cream yarn is attached. Divide the 72-stitch center into eight exact 9-stitch sections and mark every section independently.
After finishing the first petal, measure its width and length. Use that petal as the physical reference for the remaining seven.
Count every row. A petal with one additional increase row can become visibly wider even when its final row contains only two more stitches.
Place the completed flower on a flat surface after petals four and eight. This makes cumulative tension differences visible before the border locks the shape in place.
How to Resize the Crochet Flower Potholder
Small Flower Coaster
Use DK cotton yarn and a 3.5–4 mm hook. Stop the red center after fewer expansion rounds and shorten every petal proportionally.
Medium Potholder
Use worsted 100% cotton with a 4–4.5 mm hook. Aim for approximately 20–23 cm across opposite petals.
Large Flower Trivet
Use worsted cotton with a 4.5–5 mm hook and extend the petal sections by one or two rows. A diameter around 25–30 cm works well for a substantial table trivet.
Do not resize only the petals while leaving a very small center. The red center and cream lobes need to increase proportionally or the finished motif will look like a narrow daisy rather than the broad flower shown in the reference.
Red and Cream Color Placement
The high contrast in the reference comes from keeping the two colors in distinct structural areas.
- Red — center, petal valleys and outer border
- Cream — all eight broad petal interiors
A two-color layout also reduces the number of visible yarn changes. Avoid alternating individual petals unless a multicolor flower is specifically desired.
Alternative Color Combinations
- Mustard center + cream petals — sunflower-inspired version
- Sage center + ivory petals — muted botanical palette
- Navy center + white petals — high-contrast kitchen version
- Terracotta center + beige petals — autumn palette
- Pink center + cream petals — softer floral variation
- Green center + red petals — seasonal holiday version
Keep both colors in the same yarn line when possible. Two worsted cotton yarns can still differ noticeably in thickness, and that difference becomes obvious where the red center meets the cream petals.
7 Technical Tips for a Better Flower Potholder
- Mark every 9-stitch petal section. Moving one marker by a single stitch makes one petal wider and the neighboring petal narrower.
- Check the 72-stitch center before changing colors. An incorrect center count prevents the circumference from dividing evenly into eight identical sections.
- Keep all petal increases symmetrical. Adding two stitches at only one edge causes the petal centerline to lean away from its assigned radial position.
- Use the same tension for cream and red yarn. A tighter border can reduce the outer circumference enough to make the flower curl upward.
- Work only one compact stitch in each deep valley. Several stitches packed into the valley fill the indentation and make two neighboring petals merge visually.
- Block all eight petal tips at equal angles. A difference of even 1–2 cm between opposite petals is noticeable in a strongly symmetrical flower.
- Weave cotton tails through at least 5 cm of dense stitches. Short ends positioned beside a petal valley can work loose after repeated washing and handling.
Preventing the Flower from Curling
If the outer border curls upward, it usually has too few stitches for the circumference. Add occasional increases along the widest parts of the petals.
If the border ruffles, the opposite problem is occurring. Too many stitches have been placed around the outer curves. Remove some increases and work more sections one-for-one.
A center that forms a bowl indicates insufficient expansion in one of the red rounds. A center that ripples contains too many stitches. Correct the center before attaching the petals rather than attempting to hide the problem during blocking.
Yarn Selection for a Functional Hot Pad
For kitchen use, select a dense, smooth 100% cotton worsted yarn. Cotton gives clear stitch definition, tolerates frequent washing and avoids the melting behavior associated with many synthetic fibers.
A published flower hot-pad pattern uses worsted-weight cotton and a 4 mm hook, while other flower potholder designs use worsted yarn with hooks around 4.5 mm. These specifications provide a practical starting range for the dense fabric required here.
Avoid novelty yarns with loose fibers, sequins or plastic decorations on surfaces intended to sit beneath hot cookware.
Washing and Reshaping
Follow the care instructions printed on the selected cotton yarn label.
After washing, lay the potholder flat rather than leaving the petals folded over one another.
Pull each of the eight petals gently into shape while the cotton is damp. Check opposite petals in pairs to maintain radial symmetry.
Allow the piece to dry completely before storing it in a drawer or hanging it by the optional loop.
Conclusion
Start by completing the 72-stitch red center and mark all eight 9-stitch sections before attaching any cream yarn. That single checkpoint controls the symmetry of the complete flower. Work every petal from the same row sequence, compare opposite lobes before adding the border, and use 100% cotton when the finished piece will be exposed to hot cookware. A second cotton layer can be added when greater thickness is required. Save this crochet flower potholder pattern to Pinterest and share the finished red-and-cream version on Instagram with #EightPetalCrochetPotholder. Would you keep the red center or replace it with mustard for a sunflower-style version? “`1









