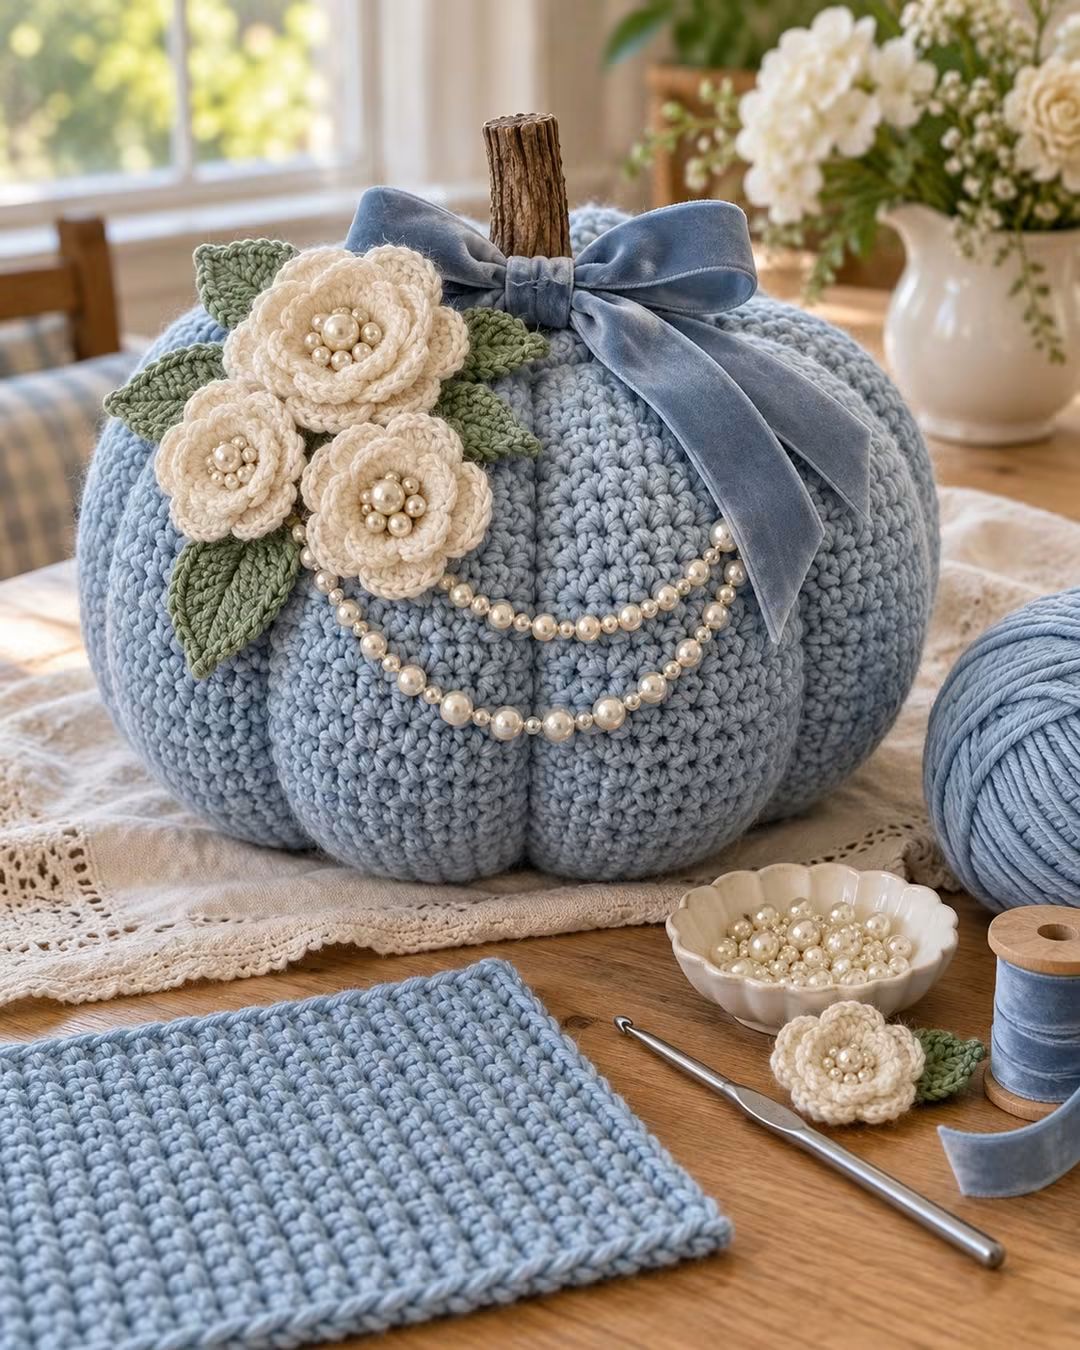
Eight deep ribs give this blue pumpkin its shape before a single flower is attached. This crochet pumpkin pattern uses a ribbed rectangle, firm stuffing and external shaping strands to build a large decorative pumpkin, then adds three cream crochet flowers, sage leaves, a natural-style stem and a blue velvet bow. The project is intermediate because the body itself is simple, while the floral placement and final shaping require more control.
The Design: What Makes This Crochet Pumpkin Different
The pumpkin body depends on pronounced vertical ribs rather than complicated round-by-round shaping. A flat rectangle is worked in back-loop stitches, joined into a tube, gathered at both openings and stuffed. Long strands are then wrapped around the body to deepen the segment lines.
The decoration is intentionally asymmetrical. Three layered cream flowers occupy one upper side instead of forming a centered ring. Sage leaves extend beyond the flowers, while two pearl-style strands curve across the front. A wide blue velvet bow balances that visual weight on the opposite side.
The main construction failure is insufficient stuffing. A loosely filled ribbed crochet pumpkin collapses when the shaping strands are tightened, producing narrow dents instead of rounded segments.
Project Info at a Glance
| Skill Level | Time | Finished Size | Hook | Yarn Weight |
|---|---|---|---|---|
| Intermediate | 4–6 hours | Approx. 25–30 cm wide | 8–9 mm | Super Bulky #6 |
The photographed pumpkin appears substantially larger than a standard palm-sized crochet pumpkin. For comparison, published super-bulky pumpkin patterns use a 9 mm hook and can produce a 21-inch circumference from a 7 × 14-inch rectangle. Adjust the rectangle dimensions when a larger centerpiece is required.
Materials and Tools
Yarn
- Powder blue — Super Bulky #6 — approximately 140–180 g for the pumpkin body
- Cream — Worsted or Aran #4 — approximately 30–40 g for three layered flowers
- Sage green — Worsted or Aran #4 — approximately 20–30 g for leaves
- Matching blue yarn — approximately 3–5 m for external shaping
Tools and Decorations
- 8–9 mm crochet hook for the pumpkin body
- 4–5 mm crochet hook for flowers and leaves
- Polyester fiberfill
- Large tapestry needle
- Stitch markers
- Scissors
- Approximately 45–60 cm of wide blue velvet ribbon
- Short natural twig or wooden stem
- Optional pearl-style bead strands
- Optional pearl-style flower centers
- Strong sewing thread for decorative components
This design is intended as decorative fall décor rather than a child’s toy. Pearl beads, a wooden stem and other detachable decorations create small-part hazards and should not be used on an item intended for unsupervised child play.
Abbreviations
- MR — magic ring
- ch — chain
- sc — single crochet
- hdc — half double crochet
- dc — double crochet
- sl st — slip stitch
- BLO — back loop only
- inc — increase
- st/sts — stitch/stitches
- sp — space
- rep — repeat
Back-loop-only stitches leave the front loop exposed, creating the raised horizontal ridges that become vertical pumpkin ribs after the rectangle is seamed.
Crochet Pumpkin Pattern – Step by Step
Construction note: The pumpkin begins as a flat ribbed rectangle. The short ends are joined to create a tube, both openings are gathered, and the body is stuffed before external strands divide it into pronounced sections.
Large Blue Pumpkin Body
Yarn: powder blue Super Bulky #6
Using an 8–9 mm hook, ch 26.
Row 1: Hdc in second ch from hook and in every ch across. Ch 1, turn. (25)
Row 2: Hdc BLO in each st across. Ch 1, turn. (25)
Rows 3–42: Repeat Row 2. (25)
Do not fasten off immediately. Lay the rectangle flat and inspect the ribbing. There should be 42 rows with 25 hdc in every row.
The exact rectangle dimensions depend on yarn and tension. For a large decorative pumpkin, aim for a rectangle approximately twice as long as it is tall. Add pairs of rows if more circumference is required.
Joining the Pumpkin Body
Fold the rectangle so the foundation edge meets the final row, with the ribbing running vertically from one open end of the tube to the other.
Ch 1. Working through both layers, sl st across to join the two short edges.
Do not pull the seam tightly. A rigid seam creates a flat section that remains visible after stuffing.
Fasten off, leaving approximately 80 cm of yarn for gathering.
Closing the Bottom
Thread the long yarn tail onto a tapestry needle.
Run the needle in and out around the complete lower opening, taking one stitch through approximately every row end.
Pull gradually until the opening closes.
Pass the yarn across the center opening several times, then stitch through the opposite side to reinforce the closure.
Knot securely on the inside and bring the yarn tail into the pumpkin body.
Stuffing the Pumpkin
Add fiberfill in small sections rather than inserting one large mass.
Fill the outer circumference first. Push stuffing into every ribbed section before filling the center.
The pumpkin should feel firm while remaining compressible enough for the shaping strands to create deep grooves.
Add slightly more stuffing around the lower half than directly beneath the stem. This helps produce a broad pumpkin profile rather than a spherical ball.
Closing the Top
Cut approximately 100 cm of matching blue yarn and thread the tapestry needle.
Run a gathering stitch around the upper opening.
Pull the opening until only a small central hole remains. Do not close it completely yet because the stem will be inserted here later.
Secure the gathering yarn temporarily.
Creating the Pumpkin Segments
The photographed design has approximately eight pronounced sections. These can be formed with long strands of matching yarn.
Cut four lengths of blue yarn, each approximately three times the pumpkin circumference.
Thread the first strand through the bottom center. Bring it up the outside of the pumpkin and pass it into the top center.
Pull until a clear groove forms.
Bring the same strand down the opposite side and return through the bottom center.
Repeat with the remaining strands, dividing the pumpkin into approximately eight equal sections.
Check the shape after every strand. The grooves should be deep enough to remain visible without compressing the pumpkin into a flat disk.
Secure the shaping strands inside the top opening.
Crochet Cream Flowers – Make 3
The reference design uses three dimensional cream flowers in different apparent sizes. Create one large flower and two medium flowers for a similar arrangement.
Flower Center
Yarn: cream Worsted/Aran #4
Using a 4–5 mm hook, make an MR.
Round 1: Work 6 sc into MR. Join with sl st. (6)
Round 2: Work 2 sc in each st around. Join. (12)
Inner Petal Layer
Round 3: Repeat around: sl st in next st, ch 2, 3 dc in next st, ch 2, sl st in next st.
Keep these petals compact. They form the raised center layer rather than the final flower diameter.
Middle Petal Layer
Turn the flower slightly and work behind the first petal layer.
Create six ch-4 loops around the backs of the petals, anchoring each loop with a sl st.
Into each ch-4 loop work:
sc, hdc, 3 dc, hdc, sc.
Repeat for all six loops.
Outer Petal Layer
Create six ch-5 loops behind the middle petals.
Into each loop work:
sc, hdc, dc, 3 tr, dc, hdc, sc.
Repeat around.
Fasten off with a 25 cm tail for sewing.
For the two medium flowers, omit the final treble-crochet height and work sc, hdc, 4 dc, hdc, sc in each outer loop instead.
Sage Crochet Leaves – Make 7 to 9
Yarn: sage green Worsted/Aran #4
Ch 12.
Side 1: Sl st in second ch from hook, sc in next ch, hdc in next 2 ch, dc in next 4 ch, hdc in next 2 ch, 3 sc in final ch.
Continue along the opposite side of the foundation chain.
Side 2: Hdc in next 2 ch, dc in next 4 ch, hdc in next 2 ch, sc in next ch, sl st in final ch.
Ch 2 and sl st into the second ch from hook to create a pointed tip if additional definition is needed.
Fasten off with a 20 cm sewing tail.
For smaller leaves, begin with ch 9 and shorten the central dc section proportionally.
Adding the Natural-Style Stem
Choose a dry wooden twig approximately 2–3 cm in diameter and 8–10 cm long for a large pumpkin.
Check the stem for loose bark or sharp projections before installation.
Insert approximately 2–3 cm of the stem through the upper opening.
Pull the gathering yarn firmly around its base.
Stitch repeatedly across the opening to stabilize the surrounding crochet fabric.
The stem should stand vertically without depending on the decorative bow for support.
Blue Velvet Bow
Cut approximately 45–60 cm of wide blue velvet ribbon.
Form two loops approximately equal in width and leave two long tails.
Wrap a short piece of matching ribbon around the center and secure it at the back with strong thread.
Position the bow immediately below the wooden stem and slightly toward the side opposite the flowers.
Sew through the center wrap rather than through the visible loops. This keeps the loops full and prevents stitching from flattening the velvet.
Trim the ribbon tails only after the bow is attached and its final position has been checked.
Adding the Pearl-Style Decoration
The photographed pumpkin uses two curved pearl strands across the front. Treat these as optional decorative components.
Position the upper strand in a shallow curve beneath the flowers.
Place the second strand approximately 2–3 cm lower and allow it to form a deeper curve.
Anchor each strand at both ends and at one or two intermediate points with strong matching thread.
Do not rely on adhesive alone for heavy bead strands. Their weight can pull them away from the crochet surface.
Flower Centers
Pearl-style beads can reproduce the clustered centers shown in the image. For decorative adult-use items, sew one larger pearl-style bead at the center and surround it with several smaller beads.
A bead-free alternative is preferable when small detachable components are unsuitable. Work several cream French knots or crochet a small bobble cluster and sew it into the flower center.
Floral Arrangement
Place the largest cream flower in the upper-left section of the pumpkin, close to the stem but without covering it.
Position the first medium flower below and slightly left of the large flower.
Place the second medium flower lower and toward the center front.
Arrange sage leaves behind all three flowers. Allow several leaf tips to extend beyond the petals so the green remains visible.
Pin every component before sewing. The complete arrangement should occupy one side of the pumpkin rather than forming a symmetrical wreath.
Assembly
- Finish stuffing the pumpkin until all eight sections retain a rounded profile.
- Tighten and secure the top gathering yarn around the base of the wooden stem.
- Adjust the external shaping strands so the eight grooves have similar depth.
- Attach the largest cream flower near the upper-left side of the stem.
- Add the two medium flowers below it to create a triangular floral arrangement.
- Slide the sage leaves beneath the flower edges and sew each leaf through its center line.
- Attach the optional pearl-style centers through multiple crochet stitches rather than one strand of yarn.
- Drape and sew the two optional pearl strands across the front of the pumpkin.
- Attach the velvet bow beneath the stem and position its tails over the upper-right pumpkin sections.
- Hide all remaining yarn and sewing-thread ends inside the stuffed body.
The finished pumpkin should have eight visible rounded sections, an upright stem, an asymmetrical three-flower cluster and a balanced bow on the opposite side.
How to Make a Smaller Crochet Pumpkin
The easiest resizing method is to change the dimensions of the initial rectangle while preserving the same ribbed construction.
Small Pumpkin
Use bulky #5 yarn with a 6–7 mm hook. Make a rectangle approximately 13 × 28 cm, then seam, stuff and shape it using six or eight external strands.
Medium Pumpkin
Use super bulky #6 yarn with an 8 mm hook. Aim for a rectangle approximately 18 × 36 cm.
Large Pumpkin
Use super bulky #6 yarn with an 8–9 mm hook. Work approximately 25 stitches × 42 rows, then add rows until the rectangle reaches the circumference required for the display area.
For this construction, the rectangle should generally be considerably longer than it is tall. Published crochet pumpkin methods commonly use approximately a 2:1 relationship as a practical starting point.
7 Technical Tips for a Better Crochet Pumpkin
- Count all 25 stitches on every body row. Losing one stitch repeatedly creates tapered rectangle edges, and the final seam will not meet cleanly.
- Work the body stitches through the back loop only. Crocheting through both loops removes much of the ribbing responsible for the pronounced pumpkin segments.
- Stuff the outer edge before the center. An underfilled outer circumference collapses when the shaping strands are tightened and produces narrow, uneven lobes.
- Divide the circumference before tightening the shaping yarn. Mark eight equal positions around the pumpkin; a misplaced strand can make one segment several centimetres wider than the others.
- Leave a 2–3 cm opening for the stem. Closing the top completely before installing a natural stem forces the crochet stitches apart and can damage the gathered center.
- Sew each flower through at least three positions. Attaching only the center allows a large layered flower to rotate or droop under its own weight.
- Anchor bead strands every 5–7 cm. Long unsupported sections sag away from the curved pumpkin surface and can pull heavily on their end stitches.
Alternative Color Combinations
The powder-blue and cream combination produces a decorative pumpkin that differs from conventional orange fall décor. The same construction works with several palettes.
- Sage pumpkin + ivory flowers — muted botanical palette
- Cream pumpkin + rust flowers — stronger autumn contrast
- Dusty rose pumpkin + cream flowers — softer decorative scheme
- Burnt orange pumpkin + beige flowers — traditional fall coloring
- Charcoal pumpkin + ivory flowers — high-contrast neutral version
- White pumpkin + blue flowers — reverse of the photographed palette
Keep the flower and leaf yarn thinner than the pumpkin-body yarn. Using super bulky yarn for every decorative component can obscure the ribbing and make the floral cluster disproportionately heavy.
Finishing the Crochet Pumpkin
Place the finished pumpkin on a flat surface and inspect it at eye level. If one section projects farther than the others, redistribute the stuffing before permanently knotting the final shaping strand.
Check the stem from both the front and side. A tilted stem can usually be corrected by adding a few stitches between the gathered top and the lower side of the twig.
Arrange the bow only after the floral cluster is complete. The two decorations should balance the upper surface without covering all of the blue ribbed texture.
If the pumpkin is stored between seasons, avoid crushing the flowers or velvet loops under heavier decorations. Light reshaping by hand is normally enough to restore compressed crochet sections.
Conclusion
Begin with the ribbed blue rectangle and confirm its proportions before seaming, because that flat piece controls both the final diameter and height. Stuff the body firmly, divide it into eight sections, then attach the flowers only after the pumpkin shape is permanent. For a version close to the photographed design, use powder blue for the body, three cream layered flowers, seven to nine sage leaves and a wide velvet bow. Save this crochet pumpkin pattern to Pinterest and share the finished centerpiece on Instagram with #BlueFloralCrochetPumpkin. Would you keep the blue velvet bow, or replace it with cream ribbon to match the flowers? “`1









