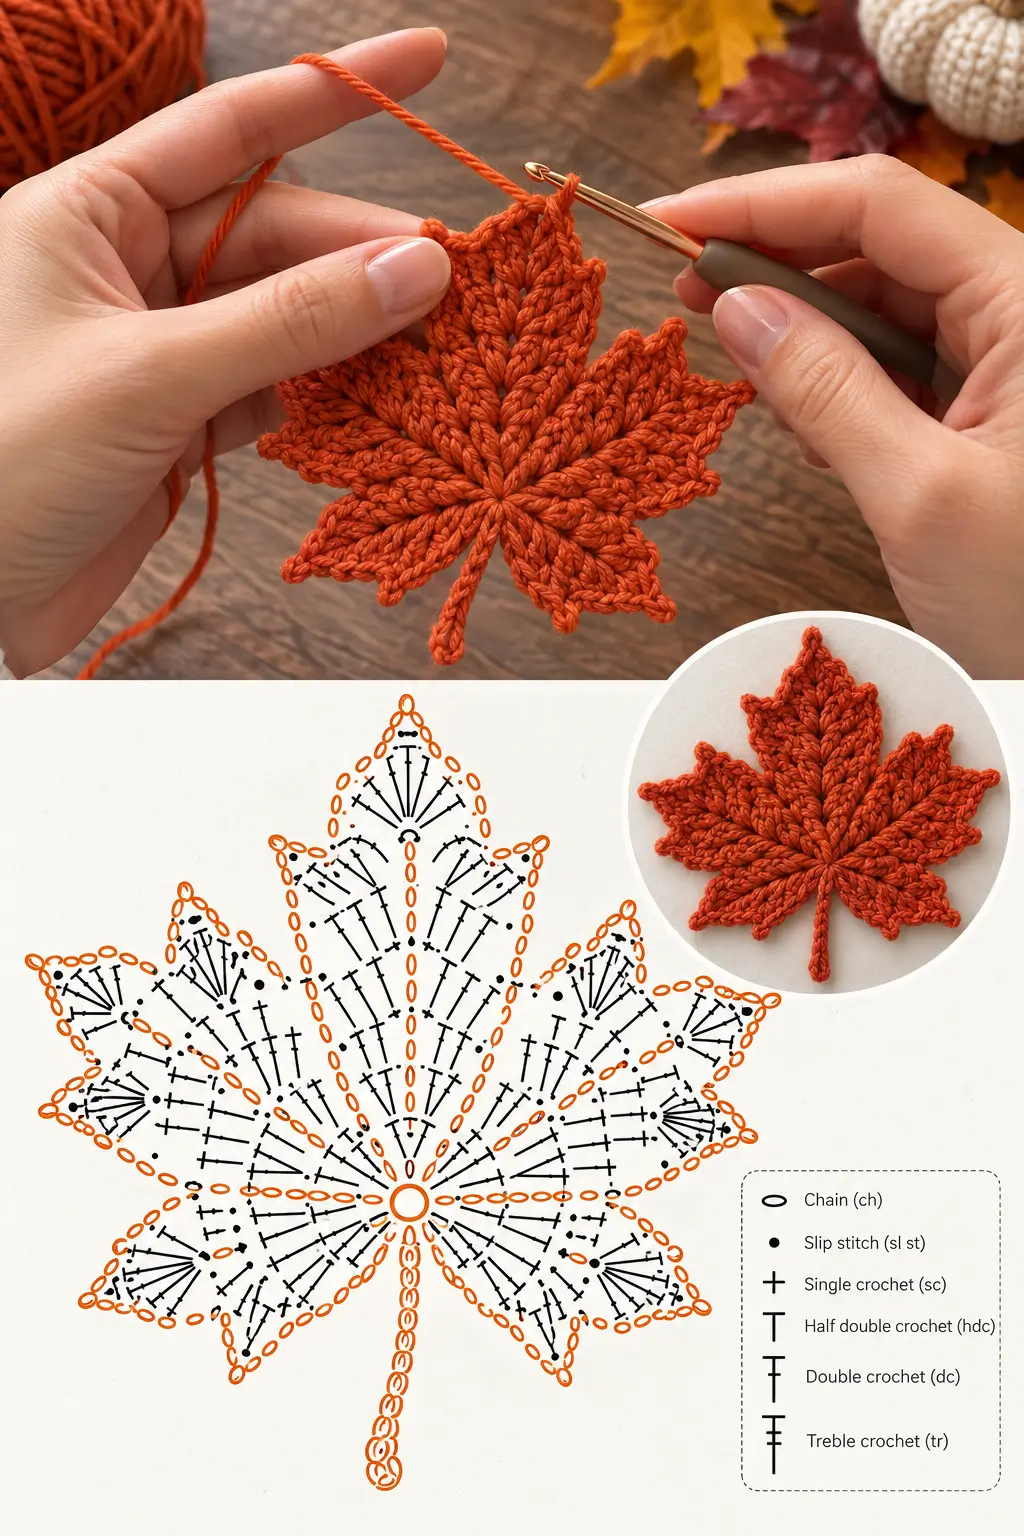
A maple leaf needs five recognizable lobes before the edging can make it look botanical rather than star-shaped. This crochet maple leaf pattern builds those points around a compact center, then adds valleys, smaller side points and a narrow stem. Use DK yarn with a 3.5 mm crochet hook for an appliqué approximately 8.5 cm wide. The pattern is intermediate and uses only a small quantity of yarn.
What Makes This Crochet Maple Leaf Different
The defining feature is not simply the number of points. A convincing maple leaf needs one dominant center lobe, two substantial side lobes and two smaller lower lobes. The valleys between them must also be deep enough to keep the five sections visually separate.
Stitch height controls that geometry. Single crochet forms low transitions, half double crochet begins each rise, double crochet builds the main body, and treble crochet creates the tallest points. Short chains sharpen the tips without adding unnecessary bulk.
The second structural decision is the stem. It extends directly from the lower center rather than being crocheted separately, which reduces finishing work and keeps the stem aligned with the central lobe.
A frequent mistake in a crochet maple leaf appliqué is making all five lobes identical. That produces a symmetrical star. The lower lobes need to remain visibly smaller than the center and upper side lobes.
Project Info at a Glance
| Skill Level | Time | Finished Size | Hook | Yarn |
|---|---|---|---|---|
| Intermediate | 30–45 minutes | Approx. 8.5 × 8.5 cm | 3.5 mm | DK / Light #3 |
The final dimensions depend strongly on yarn thickness and tension. DK acrylic with a 3.5 mm hook produces a published reference size of approximately 8.5 × 8.5 cm. A DK cotton version worked with a 3 mm hook can measure approximately 10 × 10 cm.
Materials and Tools
Yarn
- Burnt orange DK yarn — approximately 5–10 g
- Alternative colors — rust, burgundy, mustard, gold, brown, red or green
This is a scrap-yarn project. Exact consumption changes with yarn thickness and the size of the finished leaf. A published DK maple leaf uses approximately 20 metres of yarn, while smaller fingering-weight versions require less.
Tools
- 3.5 mm crochet hook
- Yarn needle
- Scissors
- Stitch marker
- Blocking pins
- Blocking mat or other pin-safe surface
Abbreviations
- MR — magic ring
- ch — chain
- sl st — slip stitch
- sc — single crochet
- hdc — half double crochet
- dc — double crochet
- tr — treble crochet
- st/sts — stitch/stitches
- sp — space
- rep — repeat
The pattern is written in US crochet terminology. Beginning chains used for height do not count as stitches unless specifically stated.
Crochet Maple Leaf Pattern – Step by Step
Construction note: The leaf is worked from the center outward. The foundation creates a circular base, after which five differently sized lobes are shaped around that center. Keep the right side facing you while working the final shaping sections.
Center Foundation
Using burnt orange DK yarn, make a magic ring.
Round 1: Ch 2, work 12 dc into MR. Pull the ring closed and join with a sl st to the first dc. (12)
Round 2: Ch 1. Work 2 hdc in each stitch around. Join with a sl st. (24)
The 24-stitch foundation provides enough positions to distribute the five lobes and the valleys between them.
Shaping the Five Maple Leaf Lobes
The shaping round is intentionally asymmetrical. Do not replace the different lobe instructions with one repeated shell. The changing stitch heights create the maple silhouette.
First Lower Lobe
Sl st into the next stitch.
In the following stitches, work:
sc, hdc, dc, 2 dc in next st, ch 2, sl st into second ch from hook, dc in same base st, hdc, sc.
Sl st into the next foundation stitch to create the first valley.
The first lobe should be one of the two smallest main lobes. Its point must angle outward rather than directly upward.
First Large Side Lobe
Work sc in next st, hdc in next st, dc in next st.
In the next stitch work:
dc, tr, ch 3, sl st into first ch, tr, dc.
Continue with dc in next st, hdc in next st, sc in next st.
Sl st into the next available foundation stitch.
The ch-3 picot creates the pointed end. Keep this lobe taller than the lower lobe but slightly shorter than the central point.
Center Lobe
The center lobe establishes the maximum height of the leaf.
Work sc, hdc, dc progressively toward the center.
In the central stitch work:
2 dc, 2 tr, ch 3, sl st into first ch, 2 tr, 2 dc.
Work downward on the opposite side with dc, hdc, sc.
Finish the section with a sl st to form a distinct valley.
The center point should extend farther than either side lobe. If all three upper lobes finish at the same height, the motif loses the characteristic maple-leaf hierarchy.
Second Large Side Lobe
Mirror the first large side lobe.
Work sc in next st, hdc in next st, dc in next st.
In the next stitch work:
dc, tr, ch 3, sl st into first ch, tr, dc.
Continue with dc, hdc, sc down the opposite side.
Sl st into the next foundation stitch.
Lay the work flat before proceeding. The two large side lobes should reach approximately the same horizontal distance from the center.
Second Lower Lobe
Mirror the first lower lobe.
Work:
sc, hdc, dc, 2 dc in next st, ch 2, sl st into second ch from hook, dc in same base st, hdc, sc.
Finish with a sl st at the lower center of the leaf.
Check all five primary lobes before beginning the stem. You should see one tall center point, two medium-large side points and two smaller lower points.
Adding Secondary Points
The photographed maple leaf contains smaller teeth along the edges of the five main lobes. These details can be added during an edging round.
Join the working yarn at the base of the first lower lobe if necessary.
Edging: Sl st along low valley sections. Work sc along the lower part of each lobe, hdc toward the middle and dc close to the major point.
At selected edge positions work:
ch 2, sl st into second ch from hook.
This creates a compact secondary point.
Use approximately two secondary points on each large side lobe and one on each lower lobe. The center lobe can carry two smaller side teeth plus its dominant central tip.
Avoid placing picots at equal distances around the entire motif. Maple-leaf serration should follow the individual lobes rather than behave like a decorative shell border.
Crochet Maple Leaf Stem
When the edging reaches the lower center, begin the stem without fastening off.
Stem: Ch 10.
Starting in the second chain from the hook, sl st in each chain back toward the leaf. (9 sl sts)
Sl st into the lower center of the leaf.
For a slightly thicker stem, work back along the opposite side of the chain with one loose sl st in each available chain loop.
Fasten off and leave approximately 10 cm of yarn for weaving.
Optional Curved Stem
The reference image shows a narrow stem with a slight curve rather than a rigid straight line. To reproduce that shape, work one extra chain on one side of the stem or block the finished stem into a gentle curve.
Do not pull the slip stitches tightly. Excessive tension makes the chain twist and can pull the two lower lobes toward each other.
Blocking the Maple Leaf
- Weave in the center yarn tail before blocking.
- Dampen the finished leaf lightly using the method appropriate for the selected yarn fiber.
- Place the center flat on a blocking surface.
- Pin the central lobe first so its tip aligns directly above the stem.
- Pin the two large side lobes at matching angles.
- Position the two smaller lower lobes symmetrically around the stem.
- Pin each secondary point separately instead of stretching an entire edge from one pin.
- Shape the valleys deeply enough to keep neighboring lobes visually separate.
- Curve or straighten the stem before the motif dries.
- Remove the pins only after the leaf has retained its final shape.
The finished maple leaf should display five distinct primary lobes, pointed serrations, deep valleys and a centered narrow stem.
How to Change the Maple Leaf Size
Yarn weight provides the easiest method for changing the finished dimensions without rewriting the shaping sequence.
Small Maple Leaf
Use fingering-weight yarn and approximately a 2.0–2.5 mm hook. Published fingering-weight maple-leaf patterns can produce motifs around 7 cm, depending on the exact construction and tension.
Medium Maple Leaf
Use DK yarn with a 3.0–3.5 mm hook. Expect approximately 8.5–10 cm for patterns of this general construction.
Large Maple Leaf
Use worsted or Aran yarn with approximately a 5 mm hook. Published worsted/Aran maple-leaf appliqués can reach roughly 8.25 × 10 cm.
Changing yarn weight is preferable to adding arbitrary rounds around the leaf. Extra rounds can soften the deep valleys and make the motif increasingly circular.
Color Variations
Burnt orange closely matches the photographed example, but the same construction can represent different stages of autumn foliage.
- Dark red — strong contrast on cream blankets and table linens
- Burnt orange — classic autumn maple appearance
- Mustard yellow — useful in mixed fall garlands
- Rust brown — works well with natural and neutral décor
- Deep green — represents a summer maple leaf
- Bright red — suitable for Canada-themed appliqué projects
For a mixed garland, keep the yarn weight and hook size constant across all colors. This preserves consistent leaf dimensions even when the color sequence changes.
7 Technical Tips for a Better Crochet Maple Leaf
- Count all 24 foundation stitches before shaping. Missing one foundation stitch can move the final lower lobe away from the stem centerline and produce an obviously asymmetric leaf.
- Keep the center lobe approximately 10–20% taller than the large side lobes. Equal-height upper points make the finished motif resemble a five-pointed star instead of a maple leaf.
- Use slip stitches at every major valley. Replacing a valley slip stitch with hdc or dc fills the indentation and reduces separation between adjacent lobes.
- Do not tighten the ch-2 and ch-3 points excessively. A compressed picot folds toward the wrong side instead of extending into a clean leaf tip.
- Pin every major point during blocking. Stretching only the center and outer edges can leave one lobe several millimetres shorter than its mirrored partner.
- Keep stem slip stitches loose. Tight stitches shorten the stem, cause twisting and can pull the lower center of the leaf out of alignment.
- Weave the final tail for at least 4–5 cm through dense stitches. Open lobe edges provide less friction, so a short tail positioned near a point can work loose more easily.
Ways to Use Crochet Maple Leaves
A flat crochet maple leaf appliqué can be attached without adding significant thickness to the finished project. Sew one onto a hat, scarf, cardigan, tote bag or blanket using the same yarn color and small stitches around the center and several outer points.
For a fall garland, crochet multiple leaves in rust, orange, yellow, burgundy and brown. Thread a separate chain through the stems rather than sewing directly through the leaf points. This allows individual motifs to be repositioned.
The leaves can also be used for table decorations, wreaths, gift wrapping, place settings and seasonal wall hangings. Cotton yarn gives the motif more stitch definition, while acrylic provides a lighter appliqué.
Finishing the Crochet Maple Leaf
Check the motif from the front before cutting any remaining tails. The center lobe should align with the stem, the two upper side lobes should mirror one another, and both lower lobes should sit below the widest horizontal section.
If one point curls after blocking, dampen only that section and repin it. Correcting a single lobe is preferable to stretching the complete motif again because repeated full blocking can alter the overall dimensions.
For appliqué use, leave one long yarn tail instead of weaving in every end. A 25–30 cm tail is normally sufficient to sew the center and several outer points to another crochet or fabric surface.
Conclusion
The next step is to crochet the 24-stitch center and mark the positions of all five lobes before beginning the shaping section. That checkpoint prevents the stem from finishing off-center and keeps the two sides balanced. Block the completed motif to approximately 8.5 cm when using DK yarn and a 3.5 mm hook, adjusting only when your yarn produces a different natural gauge. Save this crochet maple leaf pattern to Pinterest and share finished autumn color combinations on Instagram with #CrochetMapleLeaf. Which version will you make first: burnt orange, maple red or mustard yellow? “`1









