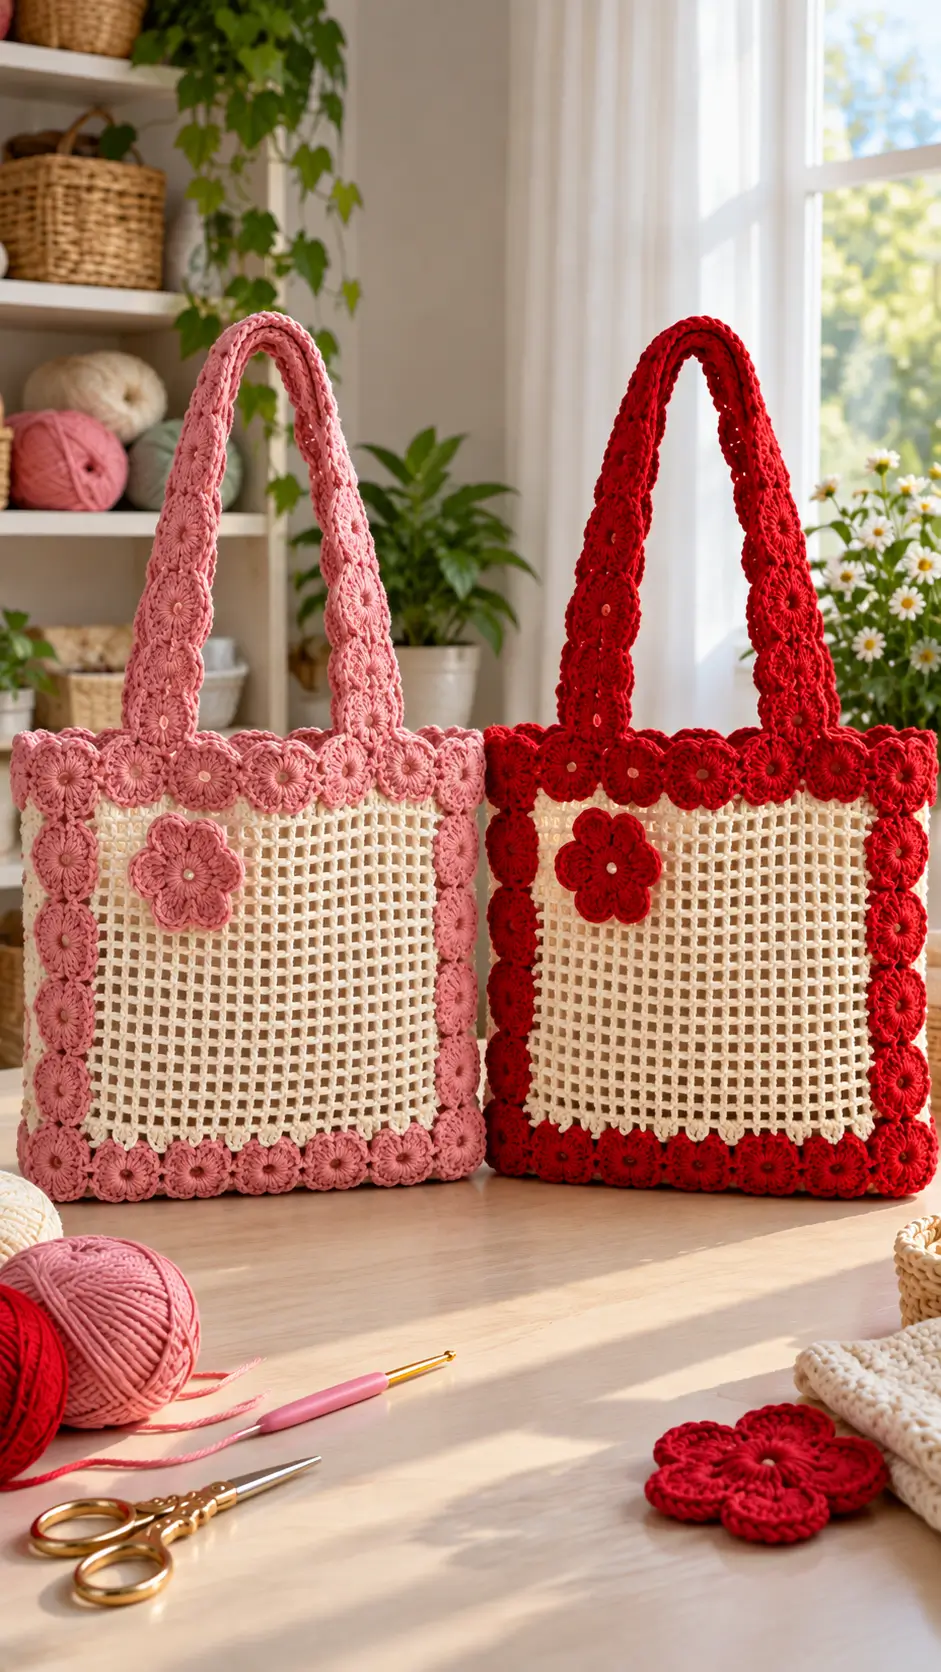
Crochet Flower Tote Bag Pattern: Mesh Bag With Floral Border
Introduction
A border of nearly three dozen flowers puts far more load on a tote edge than one front appliqué does. This crochet flower tote bag pattern solves that structural problem with reinforced cream mesh panels, firm floral edging, and wide decorated handles. Use medium-weight cotton with a 4 mm hook for a bag around 32–34 cm wide. The project suits intermediate crocheters and produces a reusable shoulder tote with controlled mesh stretch.
The Design: What Makes This Flower Tote Different
The cream center is worked as square mesh instead of dense fabric, reducing bulk while keeping the grid visible behind the flower frame. A solid perimeter matters: attaching multiple flowers directly to chain spaces can distort open mesh once the bag carries weight.
The second structural decision is the floral border. Small motifs form a nearly continuous frame rather than functioning as occasional decoration, which gives this crochet mesh tote bag its distinctive outline.
Wide straps provide the third structural feature. Flowers placed along narrow handles add weight, so the strap beneath them must resist lengthwise stretching. The large five-petal front appliqué is decorative rather than structural. A common error in a flower crochet bag is sewing every motif down before blocking the panel; uneven spacing can pull the rectangular mesh out of square.
Project Info at a Glance
| Skill Level | Time | Finished Size | Hook | Best For |
|---|---|---|---|---|
| Intermediate | Approx. 8–12 hours | 32–34 cm wide × 33–35 cm high | 4 mm | Shoulder tote / everyday carry |
Materials and Tools
Yarn
Use cotton or a firm cotton blend. Medium-weight cotton works well because the yarn needs enough structure to support the floral border without making the mesh excessively heavy.
- Cream/ecru yarn — medium/worsted cotton — approximately 150–200 g for two mesh panels, joining, and structural edging.
- Dusty pink or red yarn — medium/worsted cotton — approximately 100–150 g for flowers, handles, and the front appliqué.
- Optional flower-center yarn — approximately 5–10 g in cream, beige, or pale yellow.
The yarn quantities are working allowances. Actual consumption changes with yarn thickness, tension, handle length, and the number of flowers added to the border.
Tools
- 4 mm crochet hook
- Tapestry needle
- Locking stitch markers
- Scissors
- Pins
- Measuring tape
- Optional cotton lining fabric
- Optional magnetic snap
Abbreviations
- MR — magic ring
- ch — chain
- sc — single crochet
- hdc — half double crochet
- dc — double crochet
- tr — treble crochet
- sl st — slip stitch
- sp — space
- st/sts — stitch/stitches
- ch-sp — chain space
- RS — right side
- WS — wrong side
Invisible decreases are an amigurumi shaping technique and are not required for this flat-panel tote.
Pattern — Step by Step
The bag uses two open-mesh rectangular panels reinforced with solid crochet borders. The flowers are made separately and sewn onto those reinforced edges.
Front Mesh Panel — Make 1
Yarn: cream/ecru
Foundation: Ch 52.
Row 1: Dc in 6th ch from hook, *ch 1, sk 1 ch, dc in next ch* across. Adjust the final repeat so both edges finish with a dc.
Row 2: Ch 4, turn. The ch-4 counts as dc + ch 1. *Dc in next dc, ch 1* across; dc in final dc.
Repeat Row 2 until the panel measures approximately 29–30 cm high.
Do not cut the yarn.
Front Panel Reinforcement
The floral frame needs solid attachment points. Sewing the flowers directly to unsupported mesh chains can distort the finished panel.
Round 1: Ch 1. Sc evenly across the top, placing 1 sc in each dc and 1 sc in each ch-1 sp. Work 3 sc at the corner. Continue evenly down the side, across the foundation edge, and up the second side. Work 3 sc at each remaining corner. Join with sl st.
Round 2: Ch 1, sc in every st around, working 3 sc in each corner st. Join.
Fasten off. Leave approximately a 20 cm tail.
Back Mesh Panel — Make 1
Repeat the front mesh panel and reinforcement instructions.
Measure both panels before joining. A difference greater than 1 cm should be corrected before assembly. Block the panels or rework the taller panel rather than attempting to compensate during seaming.
Small Border Flowers — Make Approximately 30–36
Yarn: dusty pink or red
The exact number depends on the final dimensions of the blocked bag and the diameter of each flower. Make several motifs first and test their spacing around the panel.
R1: 6 sc in MR. Join with sl st. (6)
R2: Inc ×6. Join. (12)
R3: *Sl st in next st, ch 3, 2 dc in same st, 2 dc in next st, ch 3, sl st in same st.* Repeat around to create six petals.
Fasten off, leaving approximately a 20 cm sewing tail.
Five-Petal Border Flower — Alternate Version
This variation more closely reproduces the rounded floral appearance visible on the photographed tote.
R1: 6 sc in MR. (6)
R2: Work 10 sc evenly around by distributing increases. (10)
R3: *Sl st in next st, ch 2, 2 dc in same st, 2 dc in next st, ch 2, sl st in same st.* Repeat five times.
Fasten off. Leave approximately a 20 cm sewing tail.
Large Front Flower — Make 1
Yarn: accent color
R1: 6 sc in MR. (6)
R2: Inc ×6. (12)
R3: (Sc, inc) ×6. (18)
The circular center is now complete.
Petal Row 1: Attach yarn. Ch 2, work 4 dc across the designated petal section. Turn. (4 dc)
Petal Row 2: Ch 2, 2 dc in first st, dc in next 2 sts, 2 dc in final st. (6 dc)
Petal Row 3: Ch 1, sc2tog, sc in next 2 sts, sc2tog. (4)
Petal Row 4: Ch 1, sc2tog twice. (2)
Fasten off.
Repeat the petal section around the center until five petals have been formed. Work slip stitches around the outside if a firmer flower outline is required.
Handles — Make 2
Yarn: dusty pink or red
Foundation: Ch 8.
Row 1: Sc in second ch from hook and each ch across. (7)
Rows 2–95: Ch 1, turn, sc across. (7)
Measure the handles instead of depending exclusively on the row count. Each handle should measure approximately 55–60 cm before attachment.
For additional resistance to stretching, carry a strand of cotton cord inside the stitches or work a reinforced surface-slip-stitch line along the completed strap.
Fasten off with approximately a 30 cm sewing tail.
Handle Flowers — Make 10–14
Use the small five-petal flower instructions.
Position approximately five to seven flowers along the visible side of each handle. Do not permanently attach every petal until the handles have been sewn to the bag.
The handle changes curvature after installation. Sewing the flowers too early can cause the motifs to bunch together.
Side and Bottom Join
Place the front and back panels with the wrong sides together.
Attach cream yarn at one upper corner.
Work sc through both layers down the first side, across the bottom, and up the second side. At each lower corner, work 2–3 sc in the corner space according to tension.
Leave the top edges open.
Turn the bag right side out. The seam forms a firm structural perimeter underneath the decorative flowers.
Top Edge
Attach the accent yarn at a side seam.
Round 1: Sc evenly around the entire opening. Join.
Round 2: Ch 1, sc in each st around. Join.
Round 3: Work reverse sc around for a corded-looking edge. A normal sc round can be substituted when a flatter upper edge is preferred.
Fasten off.
Attaching the Floral Border
Block all small flowers before arranging them on the tote.
Position the flowers around the side edges, bottom edge, and upper edge of the front panel. The petals may overlap slightly, but maintain consistent spacing between the flower centers.
Sew through each flower center and into the reinforced panel border. Do not anchor a heavy motif exclusively to an open mesh chain.
Add one concealed tack beneath two opposite petals. These additional stitches stop the flower from rotating when the bag moves.
Repeat the flower arrangement on the back for a fully decorated tote. Another option is to decorate only the front panel and upper edge to reduce yarn consumption and overall weight.
Attaching the Front Flower
Place the large five-petal flower slightly above the vertical midpoint of the cream mesh panel.
Pin all five petals before sewing.
Secure the circular center first. Add one or two concealed stitches near the outer portion of each petal.
Do not pull the sewing yarn tightly enough to collapse the mesh openings underneath the flower.
Fasten off on the inside of the bag.
Assembly
- Block the two cream mesh panels to matching dimensions before decorative sewing.
- Reinforce every panel edge with two rounds of sc.
- Join the sides and bottom with the wrong sides facing.
- Turn the tote right side out and check that both lower corners have equal dimensions.
- Add the solid top edging around the complete bag opening.
- Position both handles an equal distance from the centerline and sew them through the reinforced upper border.
- Sew a rectangle with an internal X at each handle attachment point to distribute the load.
- Arrange the small flowers around the perimeter and stitch their centers into the solid border.
- Attach the large front flower, then position and sew the smaller flowers along the handles.
- Weave each structural yarn tail through at least 4–5 cm of dense stitches before trimming. Block the completed tote to approximately 32–34 cm wide and 33–35 cm high.
The completed bag consists of two reinforced mesh panels, two load-bearing handles, a floral perimeter, and a central five-petal flower appliqué.
7 Technical Tips for a Better Crochet Flower Tote Bag
- Prevent mesh distortion: Keep every chain space at a consistent height. Check the panel against a rectangular measurement every 5 cm because uneven chain tension can produce diagonal grid lines.
- Stop the border from ruffling: Excess sc stitches around the mesh perimeter produce waves before the flowers are attached. Remove excess stitches if the border does not lie flat after blocking rather than hiding the problem beneath the motifs.
- Control handle stretch: Cotton sc straps can lengthen once weight is placed in the tote. Measure both finished handles under similar tension and keep their lengths within approximately 5 mm of each other.
- Prevent flower rotation: A motif secured only through its center can twist outward. Add hidden stitches beneath at least two opposite petals after securing the center.
- Avoid mismatched panels: Front and back panels differing by more than 1 cm can twist the finished bag. Count mesh rows and measure both pieces before joining.
- Reinforce the handle attachment: Never attach the straps solely to open mesh spaces. Sew each handle through a solid reinforced section at least 4–5 cm wide to spread the load across several stitches.
- Secure structural yarn tails: Open mesh gives short tails very little material to grip. Weave structural tails through at least 4–5 cm of dense border stitches, reverse direction once, and then trim.
Finishing the Flower Mesh Tote
Block the panels before committing to the floral layout, then measure both handles under equal tension before sewing them in place. Those two checks control much of the distortion that can occur when a light mesh center is combined with a heavier flower frame.
Before making the complete flower set, crochet one five-petal test motif with the intended yarn and place it against the finished border. Adjust the hook size if the flowers are too large to sit beside one another without excessive overlap.
Once the measurements are confirmed, complete the remaining motifs and assemble the crochet flower tote bag pattern. Save the finished project to Pinterest or share your color version on Instagram with #FlowerMeshTote.
Which version would you make: the solid red floral border or the dusty-pink flowers shown on the second tote?









