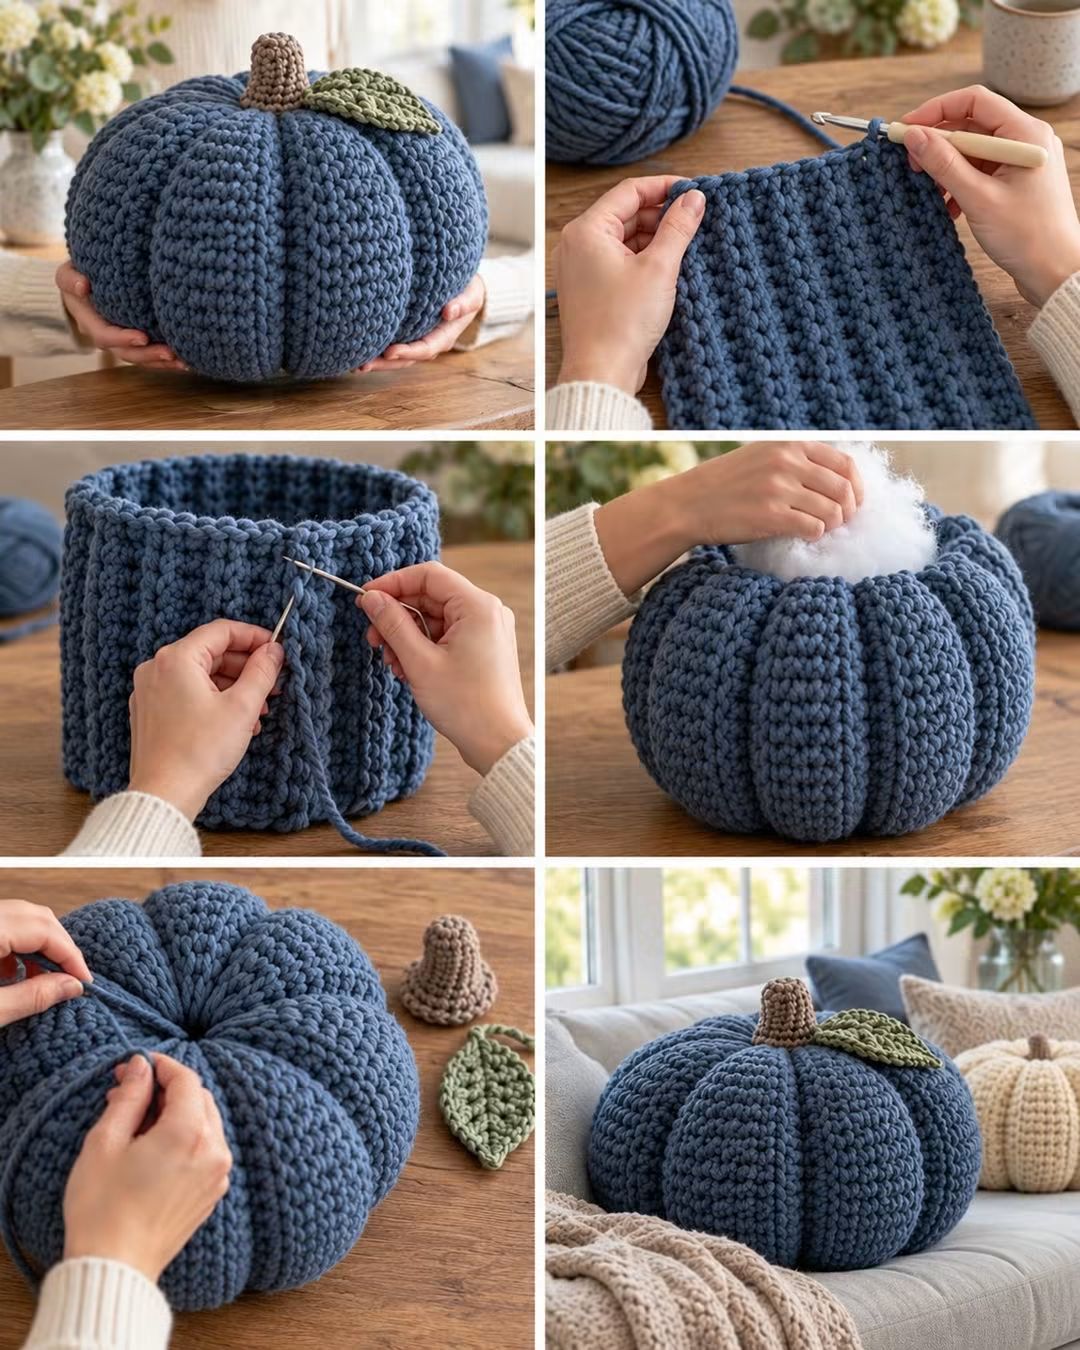
A pumpkin this wide needs deep vertical channels or the finished piece becomes a round blue cushion with a stem. This crochet pumpkin pillow pattern uses super-bulky yarn, a ribbed rectangular body, firm stuffing and eight sculpted sections to reproduce the low, segmented shape in the photo. Work with an 8 mm hook for a large decorative pumpkin approximately 35–40 cm wide.
The Design: What Makes This Pumpkin Different
The photographed pumpkin is not constructed like a conventional amigurumi sphere. Its body begins as a thick ribbed rectangle. The short edges are joined to create a cylinder, the bottom is gathered, and fiberfill converts that cylinder into the rounded pumpkin form.
The second structural feature is the pronounced segmentation. Long strands pass from the bottom center to the top and pull the surface inward at regular intervals. These sculpting strands create the deep valleys between the pumpkin lobes.
Finally, the brown stem and green leaf are made separately. Keeping those components separate makes it possible to close and shape the main body before deciding their exact position.
A common mistake with a chunky crochet pumpkin is stuffing it completely firm before sculpting. Excess stuffing resists the shaping strands and produces shallow grooves instead of the deep sections visible in the reference image.
Project Info at a Glance
| Skill Level | Time | Finished Size | Hook | Best For |
|---|---|---|---|---|
| Easy/Intermediate | 4–7 hours | Approx. 35–40 cm wide | 8 mm | Fall décor, sofa pillow, seasonal display |
The finished measurement above is a photo-inspired target rather than a measurement taken directly from the photographed pumpkin. Published super-bulky pumpkin pillow patterns commonly use an 8 mm hook, with documented sizes around 23–28 cm across for smaller versions. Larger plush pumpkin patterns can reach approximately 38 cm.
Materials and Tools
Yarn
- Dusty blue — super bulky/category 6 — approximately 350–450 g for the pumpkin body
- Medium brown — bulky or super bulky — approximately 20–30 g for the stem
- Sage green — bulky or super bulky — approximately 20–30 g for the leaf
Use a yarn with enough structure to hold pronounced ribs after stuffing. Blanket-style polyester yarn works particularly well for a large pillow because it produces substantial fabric without requiring an excessive stitch count.
Tools
- 8 mm crochet hook for the pumpkin body
- 6 mm crochet hook for the stem and leaf if tighter fabric is required
- Polyester fiberfill — approximately 700–1,000 g depending on firmness
- Large tapestry needle
- Extra-long upholstery or doll needle for sculpting
- Stitch markers
- Scissors
- Flexible tape measure
Abbreviations
- MR — magic ring
- ch — chain
- sc — single crochet
- hdc — half double crochet
- inc — increase
- dec — decrease
- sl st — slip stitch
- BLO — back loop only
- st/sts — stitch/stitches
- RS — right side
- WS — wrong side
For this pattern, an invisible decrease means inserting the hook through the front loops of the next two stitches before completing one single crochet through both loops.
Gauge
Work a body swatch before starting the full rectangle.
Foundation: Ch 13.
Row 1: Hdc in second ch from hook and across. (12)
Row 2: Ch 1, turn. Hdc BLO across. (12)
Rows 3–10: Repeat Row 2. (12)
The fabric should be thick but flexible enough to gather. If large holes appear between stitches, move down one hook size. If the rectangle becomes rigid and difficult to compress, increase the hook size.
Pattern — Step by Step
The main pumpkin is worked flat as one ribbed rectangle. It is then seamed into a cylinder, gathered at the bottom, stuffed, closed at the top and sculpted into individual pumpkin sections.
Pumpkin Body
Yarn: dusty blue.
Leave approximately 60 cm of yarn before making the foundation chain. This tail can later assist with closing the body.
Foundation: Ch 41.
Row 1: Hdc in second ch from hook and in each ch across. (40)
Row 2: Ch 1, turn. Hdc BLO in every st across. (40)
Row 3: Ch 1, turn. Hdc BLO in every st across. (40)
Rows 4–60: Repeat Row 3. (40)
Do not fasten off yet.
Measure the rectangle without stretching it. For the large pillow shown in the reference, target approximately 30–33 cm high and 75–85 cm long.
The exact number of rows can be changed to obtain the required circumference. Continue beyond Row 60 if the rectangle is too short.
The ribbing must run vertically once the pumpkin is assembled. This orientation is critical because the ribs reinforce the final sculpted channels.
Joining the Body
Bring the first and final rows together with the right sides facing outward.
Insert the hook through corresponding loops on both edges.
Join Row: Sl st through both layers across the complete edge. (40 joining sts)
Fasten off with a long tail.
The piece now forms an open cylinder.
Turn or position the seam so it sits on the inside of one future pumpkin groove. Hiding the seam inside a sculpted channel makes it much less visible on the finished pillow.
Closing the Bottom
Thread approximately 100–120 cm of strong matching yarn onto a large tapestry needle.
Run the needle through the edge stitches around one open end of the cylinder. Take small, evenly spaced bites through the fabric.
Pull gradually until the opening gathers toward the center.
Pass through the gathered stitches a second time.
Pull firmly and secure the center.
Do not trim the yarn immediately. Weave it through the dense underside of the pumpkin for at least 8–10 cm before cutting.
Stuffing the Pumpkin
Turn the body so the correct side faces outward.
Add polyester fiberfill in several smaller portions rather than inserting one large mass.
Start around the outside wall. Fill the lower perimeter, then the center, followed by the upper perimeter.
Rotate the pumpkin while stuffing to distribute the filling evenly.
The body should be firm enough to support its own weight but still compress when squeezed between both hands. Leave approximately 2–3 cm of compression at the sides for the sculpting stage.
Avoid packing the center into a hard ball. The sculpting yarn must be able to pull the top and bottom toward each other.
Closing the Top
Thread another long strand of matching blue yarn onto the tapestry needle.
Run the needle through the stitches around the upper opening.
Pull the opening partially closed.
Add small amounts of fiberfill until the upper surface has the required fullness.
Pull again until the opening measures approximately 2–3 cm.
Do not completely seal the central opening yet. A small opening makes it easier to position the sculpting strands and attach the stem.
Sculpting the First Pumpkin Section
Use strong blue yarn or a doubled strand of matching yarn.
Cut approximately 180–220 cm of yarn.
Insert an extra-long needle through the bottom center and bring it out through the top center.
Take the yarn down the outside of the pumpkin, following one vertical rib.
Insert the needle through the bottom center again and bring it back through the top.
Pull until a visible valley forms.
Do not pull hard enough to bury the yarn completely into the crochet fabric.
Creating Eight Pumpkin Sections
Divide the circumference visually into eight approximately equal sections.
Repeat the sculpting process at each division.
For every section:
Top center → outside surface → bottom center → through body → top center.
Maintain approximately equal tension on all eight channels.
Work opposite channels in pairs. After making the first groove, make the second directly opposite it. Then divide each half again.
This sequence distributes compression more evenly than working around the pumpkin in one direction.
After all eight grooves are formed, place the pumpkin on a flat surface and inspect it from above.
Adjust any strand that creates a noticeably smaller or larger lobe.
Final Top Closure
Once the segmentation is balanced, pull the upper gathering strand until the remaining opening is approximately 1–1.5 cm.
Secure the yarn.
The small center opening will be covered by the stem.
Brown Stem
Yarn: medium brown.
The stem is worked continuously in rounds.
R1: 6 sc in MR. (6)
R2: Inc ×6. (12)
R3: BLO sc around. (12)
R4: Sc around. (12)
R5: Sc around. (12)
R6: Sc around. (12)
R7: Sc around. (12)
R8: (Sc, inc) ×6. (18)
R9: Sc around. (18)
Fasten off. Leave a 35 cm tail for sewing.
Add a small quantity of fiberfill. Keep the stem considerably firmer than the pumpkin body so it remains upright.
The wider final rounds create a small base that covers the gathered opening.
Green Leaf
Yarn: sage green.
Ch 13.
Row 1: Sl st in second ch from hook, sc in next ch, hdc in next 2 ch, dc in next 4 ch, hdc in next 2 ch, sc in next ch, 3 sc in final ch.
Continue along the opposite side of the foundation chain.
Sc in next ch, hdc in next 2 ch, dc in next 4 ch, hdc in next 2 ch, sc in next ch, sl st in final ch.
Fasten off with a 30 cm tail.
For the raised center vein visible in the photograph, join green yarn at the base of the leaf and surface slip stitch along the center toward the point.
Fasten off and weave the short tail into the wrong side.
Attaching the Stem
Center the brown stem directly over the gathered top opening.
Pin it in four positions before sewing.
Using the long brown tail, stitch around the entire stem base. Pass through the pumpkin fabric approximately 1–1.5 cm away from the central opening rather than sewing only into the gathered edge.
Make a second pass around the stem if the pillow will be handled frequently.
Secure the yarn inside the pumpkin body.
Attaching the Leaf
Position the broad end of the leaf beside the stem.
Angle the point outward across one blue pumpkin lobe.
Sew approximately the first 3–4 cm of the leaf to the pumpkin.
Leave the outer portion unattached. This allows the leaf to sit above the pumpkin surface instead of appearing completely flat.
Assembly
- Crochet the complete blue ribbed rectangle and check its dimensions before joining.
- Join the short edges to convert the rectangle into a cylinder.
- Gather and securely close the bottom opening.
- Add fiberfill gradually while keeping the body compressible enough for sculpting.
- Gather the upper opening, leaving a small central gap.
- Create eight vertical sculpting channels between the top and bottom centers.
- Adjust the channels until all pumpkin lobes have similar width and depth.
- Sew the stuffed brown stem over the upper center opening.
- Attach the sage leaf beside the stem, leaving its pointed section free.
- Weave all remaining tails into dense interior stitches and reshape the pumpkin by hand.
The completed pillow should have eight distinct rounded sections, a depressed upper center, a stable brown stem and one raised green leaf.
7 Technical Tips
- Measure the body before seaming. A rectangle shorter than approximately 75 cm may produce a tall cylindrical pumpkin instead of the broad pillow profile shown in the photograph.
- Keep the seam inside a future groove. A seam positioned across the center of a lobe remains visible after stuffing; align it with one of the eight sculpting channels.
- Stop stuffing before the body becomes rigid. If the sides cannot compress by approximately 2–3 cm, the sculpting strands will struggle to create deep grooves.
- Mark all eight channels before pulling them tight. Unequal spacing produces narrow and wide lobes that become more obvious when viewed from above.
- Sculpt opposite sections in pairs. Tightening eight channels sequentially around the circumference can drag the center away from its original position.
- Use at least 35 cm of sewing tail on the stem. A short tail makes it difficult to complete two secure passes around the stem base.
- Attach only 3–4 cm of the leaf base. Sewing the entire leaf to the pumpkin removes the raised profile visible in the reference design.
How the Pumpkin Gets Its Shape
The body rectangle supplies the volume, but the sculpting strands create the recognizable pumpkin silhouette. Ribbed rectangle construction is established in crochet pumpkin patterns: the rectangle is seamed, the openings are gathered, and stuffing fills the resulting form.
For a pillow-sized pumpkin, external sculpting becomes more important because the larger stuffed body naturally tries to become round. Passing yarn between the bottom and top centers compresses the circumference into separate lobes.
The vertical crochet ribs also contribute to the effect. Back-loop-only stitches create repeated raised lines that provide visual texture before the deeper sculpted channels are added.
Adjusting the Pumpkin Size
The body rectangle controls two different dimensions.
Change the starting chain to change pumpkin height. A shorter chain produces a flatter pumpkin. A longer foundation creates a taller body.
Change the number of rows to change circumference. More rows make a wider pumpkin, while fewer rows create a narrower one.
For a smaller pumpkin, try approximately 30 body stitches instead of 40 and stop when the rectangle reaches approximately 55–65 cm in length.
For an oversized floor pillow, increase the body to approximately 48–52 stitches and continue the rectangle until it measures around 90–100 cm long. Expect a substantial increase in both yarn and stuffing consumption.
Choosing the Right Yarn
Super-bulky blanket yarn is the closest practical choice for reproducing the thick surface visible in the photograph. Published chunky pumpkin pillow patterns document Bernat Blanket with an 8 mm hook, while other designs use bulky yarn with smaller hooks.
For a firmer pumpkin, choose a smooth super-bulky acrylic or acrylic blend. For a softer pillow, chenille or blanket-style polyester produces a fuller surface.
Avoid combining different yarn thicknesses within the blue body. Even small diameter changes can alter the width of the ribbed rows and become visible after the cylinder is joined.
Stuffing and Sculpting
Large crochet pumpkins require more deliberate stuffing than small decorative pumpkins. Push filling toward the outside wall first, then build the center gradually.
Inspect the body from above before closing it. Thin areas should receive additional small pieces of fiberfill rather than one large compressed handful.
After sculpting, massage the stuffing from each groove toward the center of its neighboring lobe. This redistributes filling that may have been displaced when the shaping yarn was tightened.
If one lobe remains visibly smaller, loosen its adjacent sculpting strand slightly rather than adding more stuffing immediately. Unequal tension is often the cause.
Finishing the Pumpkin Pillow
Place the finished pumpkin on a level surface and rotate it through a full turn. The base should contact the surface evenly without one section lifting noticeably higher than the others.
Check the stem from the front and side. It should sit approximately perpendicular to the center even though the crocheted shape itself can remain slightly irregular.
Finally, inspect every sculpting groove. No strand should sit loosely above the blue crochet surface. If a strand moves when touched, tighten it from the top or bottom center and secure it again.
Conclusion
Make the ribbed body swatch first and use its measurements to control the finished dimensions rather than relying only on row count. The most important stage comes after stuffing: divide the circumference into eight equal sections and tighten opposite sculpting channels in pairs so the pumpkin remains balanced. Once those grooves hold their shape, attach the firm brown stem and position the sage leaf across one lobe. Save this crochet pumpkin pillow pattern to Pinterest or share the finished version on Instagram with #BluePumpkinPillow. For this particular design, would you keep the dusty blue body shown in the photo or work the same eight-lobe shape in cream?









