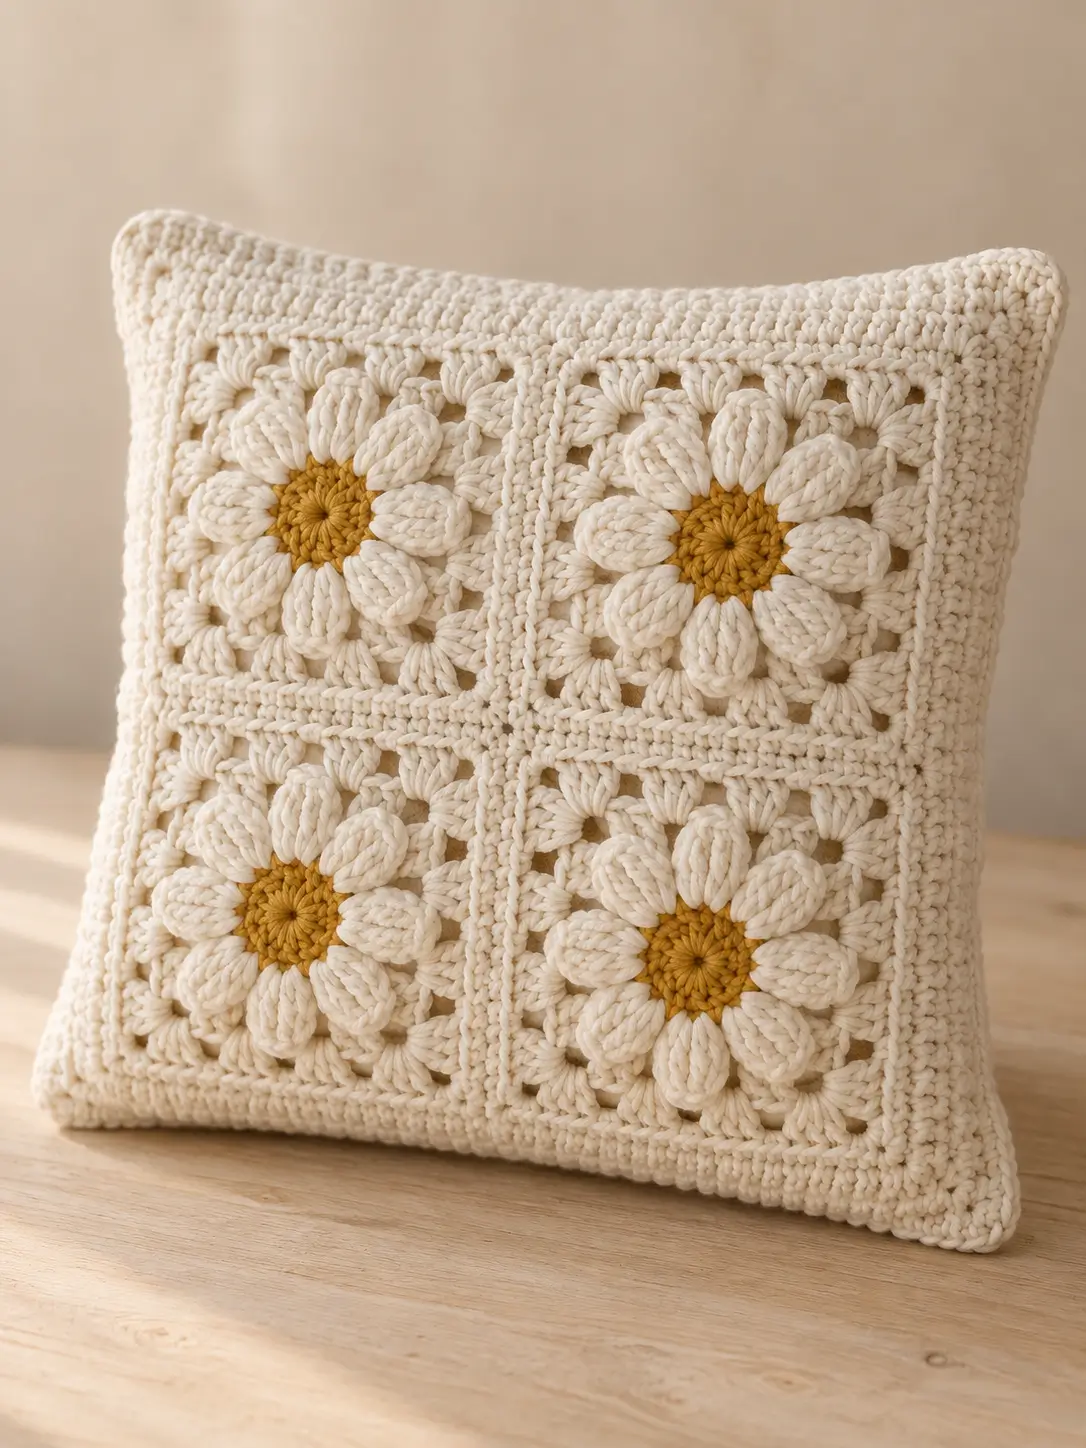
Eight raised cream petals around a mustard center give this daisy its distinctive geometry. This daisy granny square cushion uses four large floral motifs, DK yarn, a 3.5 mm hook and a 40 cm cushion insert. The project sits at intermediate level because consistent puff stitches and accurate blocking control the final fit. Its four-square construction also limits the number of joins required.
The Design: What Makes This Daisy Cushion Different
The photographed cushion depends on scale. Instead of assembling sixteen or more small motifs, four large squares form a 2 × 2 front panel, so each flower becomes a major structural element. The raised petals are worked in cream against a cream background; shadow and stitch height, rather than contrasting color, separate flower from square.
A mustard center provides the only strong color break. The puff stitch daisy square also needs a firm transition from circular flower to square corners so the finished crochet daisy cushion does not bow around the center.
A common error is joining motifs before they have been blocked to matching dimensions. Even a 5 mm difference between squares becomes visible where all four corners meet. Measure every motif before joining.
Project Info at a Glance
| Skill Level | Time | Finished Size | Hook | Best For |
|---|---|---|---|---|
| Intermediate | Approx. 8–12 hours | 40 × 40 cm target | 3.5 mm | Cushion cover / home décor |
The 40 cm target corresponds to a published daisy cushion size, while the DK and 3.5 mm hook combination is documented in comparable daisy granny square construction.
Materials and Tools
Yarn
- Cream — DK (#3) — approximately 250–300 g working allowance — cotton or cotton-blend DK.
- Mustard gold — DK (#3) — approximately 20–30 g working allowance — matching fiber and yarn family.
- Optional backing yarn — DK (#3) — include this within the cream allowance when making a crocheted back.
Exact yarn consumption changes with gauge, border depth and backing construction. Buy enough yarn from the same dye lot when possible, particularly for the cream sections that cover most of the cushion.
Tools
- 3.5 mm crochet hook
- 40 × 40 cm cushion insert
- Tapestry needle
- Scissors
- Stitch markers
- Blocking pins and mat
- Tape measure
- Optional zipper or buttons for a removable backing
Abbreviations
- MR — magic ring
- sc — single crochet
- hdc — half double crochet
- dc — double crochet
- tr — treble crochet
- ch — chain
- sl st — slip stitch
- sp — space
- st/sts — stitch/stitches
- puff — puff stitch
- RS — right side
- WS — wrong side
An invisible decrease is an amigurumi shaping technique and is not required in this flat granny-square construction.
Daisy Granny Square Cushion Pattern — Step by Step
The cushion contains four large matching motifs. Work the flower motifs in joined rounds rather than a continuous spiral. Make all four squares using the same hook, yarn and tension before joining them into the front panel.
Mustard Daisy Center — Make 4
Yarn: mustard DK.
Round 1: Make an MR, ch 1, then work 8 sc into the MR. Join with a sl st to the first sc. (8 sc)
Pull the magic ring firmly closed. The eight stitches create eight anchor points for the petals in the following round.
Fasten off and weave the mustard tail toward the center so the ring cannot reopen.
Raised Cream Petals — 8 per Square
Yarn: cream DK.
Join cream yarn in any mustard sc.
Round 2: Ch 2, work 3 incomplete hdc into the same stitch, yarn over and draw through all loops, then ch 2. This forms the first puff.
Work one 4-hdc puff followed by ch 2 in each remaining center stitch. Join with a sl st. (8 puffs, 8 ch-2 spaces)
Keep every puff approximately the same height. Unequal loop height produces alternating narrow and oversized petals, which becomes particularly visible because the petals and background use the same color.
Fasten off.
Squaring Round
Yarn: cream DK.
Join cream in a ch-2 space behind one petal.
Round 3: Ch 3, 2 dc, ch 2, 3 dc in the same space to form the first corner. Work 3 dc in the next ch-2 space.
In the following space, work (3 dc, ch 2, 3 dc) for the second corner. Continue this sequence around the flower, placing one side cluster between consecutive corners.
Join with a sl st. The motif should now have four defined corners and read as a square rather than a circular flower.
Expansion Rounds
Round 4: Sl st to the first corner. Ch 3, 2 dc, ch 2, 3 dc in the corner. Work 3 dc in each available side space.
In every corner work (3 dc, ch 2, 3 dc). Join with a sl st.
Round 5 onward: Repeat the established granny-square expansion. Work a 3-dc cluster into each side space and (3 dc, ch 2, 3 dc) into every corner.
Each new round adds another cluster to each side. Check the square after every round rather than relying only on a fixed number of rounds because yarn thickness and personal tension affect the finished measurement.
Continue until each blocked motif measures approximately 19–19.5 cm square. Four motifs plus their joining seams and the outer border can then be adjusted toward a 40 cm finished front panel.
Fasten off. Leave a 20 cm tail when the tail will be used for seaming.
Surface Petal Definition
The pictured cushion has strongly raised oval petals. If the puff stitches do not produce enough projection with your yarn, add surface definition without changing the geometry of the square.
Join cream yarn at the base of one puff. Work slip stitches around the base or lightly tack the sides of the petal toward the flower center. Repeat the same treatment on all eight petals.
Keep the anchoring stitches relaxed. Pulling them too tightly can cup the center of the granny square and prevent the finished cushion front from lying flat.
Front Panel Join
Block all four squares before joining. Each motif should have the same finished dimensions and clearly defined corners.
Arrange the squares in a 2 × 2 grid with all flowers facing the same direction. Check the alignment of the mustard centers from both horizontal and vertical directions.
With cream yarn, join the two upper squares. Repeat with the two lower squares, then join the completed rows vertically through the center.
A slip-stitch join creates a slightly visible ridge. Mattress stitch produces a flatter seam. For a finish similar to the photographed cushion, keep the center intersection relatively flat so the flowers remain the dominant raised elements.
Outer Cushion Border
Join cream yarn at any outer corner of the assembled front panel.
Border Round 1: Ch 1 and work sc evenly around the entire 2 × 2 panel. At each outer corner work (2 sc, ch 1, 2 sc). Join with a sl st.
Border Round 2: Ch 1 and work sc in each sc. At every corner ch-1 space work (2 sc, ch 1, 2 sc). Join with a sl st.
Repeat the border round if additional width is required. Stop when the front panel reaches the dimensions needed for the cushion insert.
Lay the work flat before measuring. Stretching the panel while measuring can produce a cover that becomes too small after the crochet relaxes.
Cushion Back
For a close visual match to the cream cushion, make the backing in the same cream yarn. The back can be crocheted as a plain square, made from additional granny squares or divided into two overlapping rectangles for an envelope closure.
A plain backing reduces bulk and yarn consumption. Crochet a square in a firm stitch pattern until it matches the blocked dimensions of the floral front.
For a removable cover, use an envelope opening, buttons or a zipper. A zipper gives the flattest edge, while an overlapping crocheted back avoids additional hardware.
Assembly
- Block all four floral squares to identical dimensions before joining them.
- Arrange the motifs in a 2 × 2 layout and check that every mustard center sits on matching horizontal and vertical axes.
- Join the upper pair of squares, then join the lower pair with cream yarn.
- Join both completed rows through the middle while keeping the four-way intersection flat.
- Work the cream outer border around the assembled front.
- Block the complete front to approximately 40 × 40 cm or to the exact dimensions required by the selected insert.
- Align the cushion front and back with the intended outer faces correctly positioned.
- Seam three sides for a permanently closed cover, or attach the selected zipper, button band or envelope closure.
- Insert the 40 cm cushion form and check that the corners are filled without excessive stretching around the flower centers.
- Close the remaining edge, weave each yarn tail through several stitch directions and trim the ends after checking the seams.
The completed cover should form a square panel with four aligned raised daisies and an even cream perimeter.
7 Technical Tips for a Cleaner Daisy Cushion
- Prevent center drift: Place a stitch marker at the beginning of each motif round. A one-space starting error shifts the relationship between the petals and corners and becomes obvious at the four-square center intersection.
- Prevent collapsed puff stitches: Pull every puff loop to approximately the same height before closing it. Short loops produce compressed petals that disappear into the cream background.
- Secure the magic ring: Close the MR until no visible center hole remains and weave the tail through several mustard stitches. A center that reopens changes the spacing of all eight petals.
- Control motif dimensions: Block all four squares to within roughly 2–3 mm of one another. Joining a 19 cm square directly beside a 20 cm square creates a wave that the outer border may not correct.
- Check petal count: Every flower requires eight evenly distributed petals. Count them before starting the squaring round because correcting a missing puff after several expansion rounds requires substantial unraveling.
- Avoid pinning distortion: Pin all four corners first, followed by the midpoint of each side. Pulling only at the corners can produce concave sides instead of a square outline.
- Stop yarn tails from migrating: Weave every tail in at least two directions through matching-color stitches. A short tail woven in only one direction can work toward the surface when the cushion is repeatedly compressed.
Finishing the Daisy Granny Square Cushion
Block one completed motif before committing yarn to the remaining three; its measured width determines whether four squares plus the border will match a 40 cm insert. Record that measurement, then reproduce the same tension for every flower and check the central four-way join before adding the backing.
This construction keeps the raised cream petals aligned while preserving the mustard centers as the main color accent. Once the daisy granny square cushion is assembled, photograph the front panel square-on so the 2 × 2 motif layout remains visible.
Save the finished project to Pinterest or share the completed cushion on Instagram with #DaisyGrannySquareCushion. For your version, will the mustard centers remain the only accent color, or will you add a second shade to the outer border?









