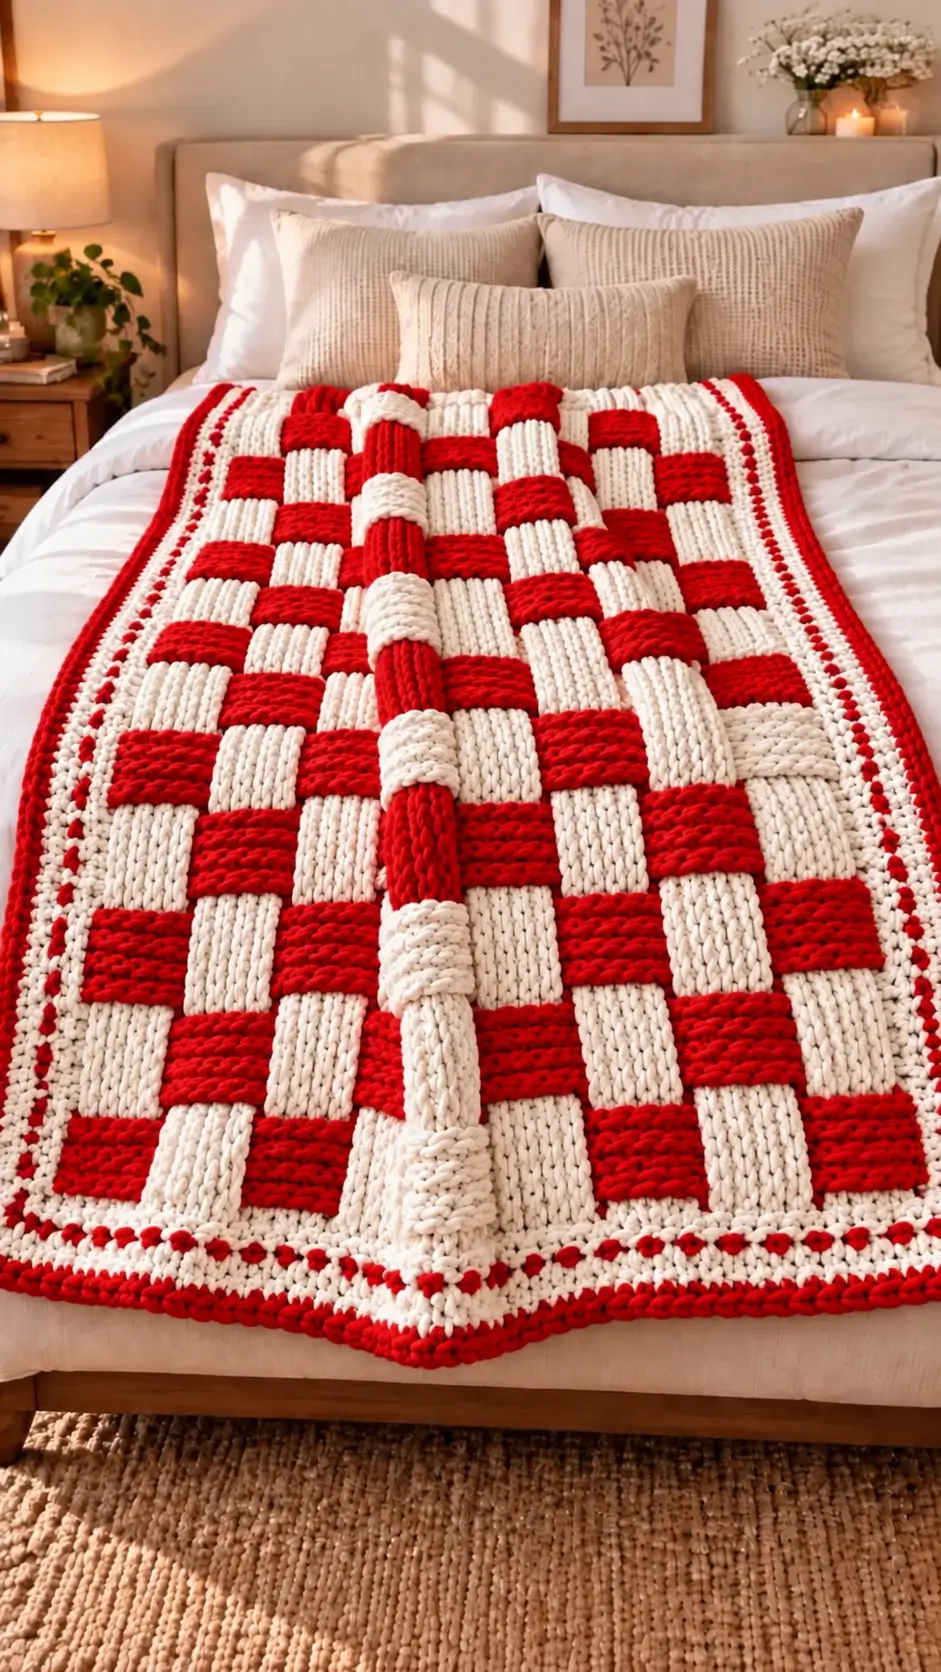
Red strips disappear under cream crossings, then reappear one block later—the construction problem that defines this blanket. This chunky basketweave crochet blanket pattern recreates that grid with super-bulky yarn, a 10 mm hook and separately crocheted strips. Target approximately 120 × 150 cm at intermediate level. The modular method also lets you correct the width before committing to the border.
The Design: What Makes This Blanket Different
Three structural choices separate this design from an ordinary basketweave stitch blanket. First, the apparent bands are treated as actual strips rather than small FPdc/BPdc groups. That gives the red and cream crochet blanket deeper crossings and a stronger block outline.
Second, back-loop half double crochet creates transverse ridges across each strip. Those ridges reproduce the heavy corded surface visible in the photograph without requiring complex cable stitches. Third, the perimeter is structural: it traps the strip ends before the decorative red details are added.
A common mistake with a woven crochet blanket pattern is weaving every neighboring strip in the same over-under sequence. The next strip must reverse the previous sequence. Otherwise the pieces stack rather than lock into a balanced grid.
Traditional basketweave crochet normally creates its texture with front- and back-post stitches; separate-strip construction provides an alternative when a deeper interlaced effect is required.
Project Info at a Glance
| Skill Level | Time | Finished Size | Hook | Best For |
|---|---|---|---|---|
| Intermediate | Approx. 18–25 hours | Approx. 120 × 150 cm | 10 mm | Bed layer, sofa throw, substantial lap blanket |
The finished size is a photo-inspired target rather than a measurement taken directly from the photographed blanket. Individual dimensions will change according to yarn diameter, hook size, strip width and weaving tension.
Materials and Tools
Yarn
Use category 6 yarn with enough body to keep the crossings clearly defined.
- Warm cream — super bulky/category 6 — approximately 1,200–1,400 g
- Bright red — super bulky/category 6 — approximately 1,000–1,200 g
Allow approximately 2,200–2,600 g total for the photo-inspired size. This allowance includes the substantial border and provides working margin for differences in gauge.
Tools
- 10 mm crochet hook
- Locking stitch markers — at least 20
- Large yarn needle
- Sharp scissors
- Flexible tape measure
- Rustproof pins or blocking combs
- Large flat surface for assembly
Abbreviations
- ch — chain
- sc — single crochet
- hdc — half double crochet
- BLO — back loop only
- sl st — slip stitch
- st/sts — stitch/stitches
- RS — right side
- WS — wrong side
- rep — repeat
FPdc and BPdc are commonly associated with basketweave crochet, but this reconstruction does not require them because the depth comes from physical interlacing rather than post-stitch relief.
Gauge and Strip Sizing
Make a test strip before starting the full blanket.
Foundation: Ch 9.
Row 1: Hdc in second ch from hook and in each ch across. (8)
Row 2: Ch 1, turn. Hdc BLO across. (8)
Rows 3–12: Repeat Row 2. (8)
Rest the swatch without stretching it. Target a strip width of approximately 9–10 cm. Exact row gauge is less important because the production strips are worked to measured lengths.
If eight hdc stitches measure less than 8.5 cm, increase the hook size or add two stitches. If they exceed 10.5 cm, move down one hook size. All production strips should finish at approximately the same width.
Pattern — Step by Step
This blanket is worked flat in separate pieces. Measurements matter more than fixed row totals because super-bulky and chenille yarns can produce substantially different gauges.
Long Vertical Strips
Yarn: alternate red and cream.
Make enough strips to create approximately 102–108 cm of central width. At a 9–10 cm strip width, expect approximately 11 strips.
A suggested sequence is:
Cream — red — cream — red — cream — red — cream — red — cream — red — cream.
For each strip:
Foundation: Ch 9.
Row 1: Hdc in second ch from hook and across. (8)
Row 2: Ch 1, turn. Hdc BLO across. (8)
Rows 3 onward: Repeat Row 2 until the strip measures approximately 136–140 cm. (8)
Do not stretch the strip while measuring.
Fasten off. Leave a 25 cm tail.
The BLO ridges should run across the strip. This orientation produces the segmented and heavily ribbed appearance required for the woven design.
Horizontal Woven Strips
Yarn: alternate red and cream.
Make enough horizontal pieces to cover the length of the vertical-strip field without substantial gaps. Approximately 14–16 horizontal strips may be required, depending on the finished strip width.
Foundation: Ch 9.
Row 1: Hdc in second ch from hook and across. (8)
Row 2: Ch 1, turn. Hdc BLO in each st across. (8)
Rows 3 onward: Repeat Row 2 until the strip measures approximately 105–112 cm. (8)
Fasten off with a 25 cm tail.
Measure the complete vertical-strip field before finishing every horizontal strip. Each horizontal piece should cross the full field with roughly 2–3 cm of working allowance at each end.
Interlacing the First Horizontal Strip
Place all long strips vertically on a large flat surface. Align their upper ends.
Take the first horizontal strip across the top of the vertical strips.
Pass it:
Over Strip 1 → under Strip 2 → over Strip 3 → under Strip 4, continuing the same sequence across the blanket.
Pull the horizontal piece through until approximately equal allowances remain at both sides.
Do not tighten the strip. It should lie flat without compressing or folding the vertical pieces.
Interlacing the Second Horizontal Strip
The second row must reverse the first.
Pass it:
Under Strip 1 → over Strip 2 → under Strip 3 → over Strip 4, continuing across the entire width.
Push the second strip upward until it sits directly below the first without bunching.
Continue alternating these two weaving sequences for every remaining horizontal piece. This produces a physical over-under grid rather than a surface that only imitates woven texture.
Squaring the Woven Field
Once every horizontal strip has been inserted, measure the rectangle at the top, center and bottom.
Target central-field width: approximately 105 cm.
Measure the left edge, center and right edge vertically. Target approximately 138–140 cm before adding the border.
Adjust individual strips until corresponding measurements differ by no more than approximately 1.5 cm.
Place locking markers around the perimeter to prevent the weave from shifting during the next stage.
Securing the Crossings
A completely loose weave can migrate during use and washing. Tack selected intersections from the wrong side.
Thread a yarn needle with matching yarn. At approximately every second crossing, pass the needle through the underside loops of both strips without piercing the visible front surface.
Make two small securing passes.
Bury the yarn ends inside the dense strip fabric. For a blanket intended for frequent machine washing, secure every crossing near the perimeter and every second crossing through the central area.
Cream Foundation Border
Yarn: cream.
Join cream at one corner.
Round 1: Ch 1. Sc evenly around the entire woven rectangle. At each corner work (sc, ch 2, sc). Join with sl st.
Do not force a predetermined stitch count along the strip ends. This round needs to capture the loose ends while producing a flat rectangular foundation.
If the border waves outward, reduce the number of stitches. If it pulls inward, add stitches along the affected section.
Cream Structural Border
Round 2: Ch 1. Sc in every st around. Work (sc, ch 2, sc) in each corner space. Join with sl st.
Round 3: Ch 1. Hdc BLO around. In each corner space work (hdc, ch 2, hdc). Join with sl st.
The BLO round forms a raised cream ridge between the woven center and the decorative outer border.
Red Accent Round
Change to red.
Round 4: Ch 1. Sc in each st around, working 3 sc in each corner space. Join with sl st.
Keep the tension slightly relaxed. A tight accent round can pull an otherwise square center inward.
Cream Decorative Round
Change to cream.
Round 5: Ch 1. Sc around. Place a red surface accent or spike stitch at regular intervals if you want to reproduce the dotted red detail visible around the photographed blanket.
For a simpler border, omit the surface accents and work plain cream sc around.
At each corner, work three stitches into the corner stitch or space.
Final Red Edge
Change to red.
Round 6: Ch 1. Sc in every st around. Work 3 sc at each corner. Join with sl st.
Round 7: Work reverse sc around the entire perimeter to create a corded outer edge.
Fasten off with a 25 cm tail. Weave the tail through several dense stitches on the wrong side.
The completed border should lie flat without flaring outward or cupping toward the center.
Assembly
- Lay the long vertical strips parallel with all upper ends aligned.
- Measure the field width at the top and bottom before inserting the horizontal pieces.
- Weave the first horizontal strip over one vertical strip and under the next.
- Reverse the sequence for the second horizontal strip.
- Continue alternating the weave while keeping every crossing square.
- Measure the assembled center at three points in each direction.
- Tack selected crossings invisibly from the wrong side.
- Capture all strip ends with the first cream single-crochet border round.
- Add the structural cream rounds, red accent and final red edge.
- Weave every remaining tail through dense border or strip stitches and trim only after the fabric has rested.
The completed blanket should form a stable rectangular woven field with no unsecured strip ends around the perimeter.
7 Technical Tips
- Mark the weaving sequence at both edges. The main failure mode is repeating the same over-under sequence on two adjacent horizontal strips. Place one marker color on rows beginning over and another on rows beginning under.
- Keep strip width within 5 mm of the target. A 1 cm difference multiplied across eleven strips can distort the finished center by more than 10 cm.
- Do not stretch chenille while measuring. A strip measured under tension can retract after assembly and pull the outer border inward.
- Tack crossings without piercing the visible face. Passing the needle completely through both layers creates visible securing dots. Catch only the wrong-side loops.
- Check squareness every three horizontal strips. Waiting until all 14–16 strips are inserted makes diagonal drift substantially harder to distribute across the blanket.
- Test the first border round after 20–25 cm. Rippling indicates excess stitches, while a raised or cupped edge indicates too few stitches along the strip ends.
- Bury tails for at least 8–10 cm. Super-bulky polyester can work short tails loose where the heavy blanket flexes during washing and regular handling.
Why This Construction Matches the Photo
The photographed blanket has crossings deep enough to read as broad bands physically passing above and below neighboring sections. Standard basketweave crochet normally obtains its effect by alternating front-post and back-post stitches. Front-post stitches project toward the surface while back-post stitches recede, producing depth without separate components.
The photographed structure appears more exaggerated. Actual strip construction provides a practical way to reproduce that pronounced woven appearance.
This method also changes how the blanket is resized. A conventional basketweave blanket is enlarged primarily through stitch multiples and row repeats. An interlaced blanket can instead be widened by adding vertical strips and lengthened by adding horizontal strips before the border is attached.
Sizing the Blanket
For a smaller lap blanket, stop when the center measures approximately 90 × 115 cm, then add the same border sequence.
For a larger bed throw, add vertical strips until the central field reaches the required width. Horizontal pieces must then be made longer so they cross the entire expanded field.
Do not calculate the final dimensions from the starting chain alone. Super-bulky yarn varies considerably between manufacturers, making physical measurements more useful for this construction.
When resizing, calculate the center first and add the border measurement afterward. This prevents a blanket intended for a specific bed or sofa width from becoming oversized once the multi-round edge is complete.
Yarn Substitution
Match weight, diameter and fabric behavior, not only the yarn category printed on the label.
A smooth super-bulky yarn makes the individual BLO ridges more visible. Chenille creates fuller crossings and can conceal joining stitches, although its pile may obscure individual loops while crocheting.
Make one complete test strip before purchasing the full quantity when changing yarn lines. Measure its width after it has rested on a flat surface.
Weighing the test piece also provides a more accurate yarn estimate. If a 30 cm sample consumes substantially more yarn than expected, calculate projected consumption before making every strip. Thick basketweave-style fabrics require considerably more yarn than flat crochet fabrics of similar dimensions.
Conclusion
Measure one eight-stitch test strip before cutting yarn for the full project; its finished width determines how many vertical and horizontal pieces the blanket needs. Keep the two weaving sequences marked, secure the assembled grid before starting the perimeter, and adjust border stitch density whenever the edge begins to wave or contract. Those controls matter more than copying an arbitrary row count when working with super-bulky yarn. Save this chunky basketweave crochet blanket pattern to Pinterest and share the finished red-and-cream version on Instagram with #RedCreamBasketweaveBlanket. For this specific grid, would you keep the alternating red crossings shown in the photograph, or make the center cream and reserve red for the border?









