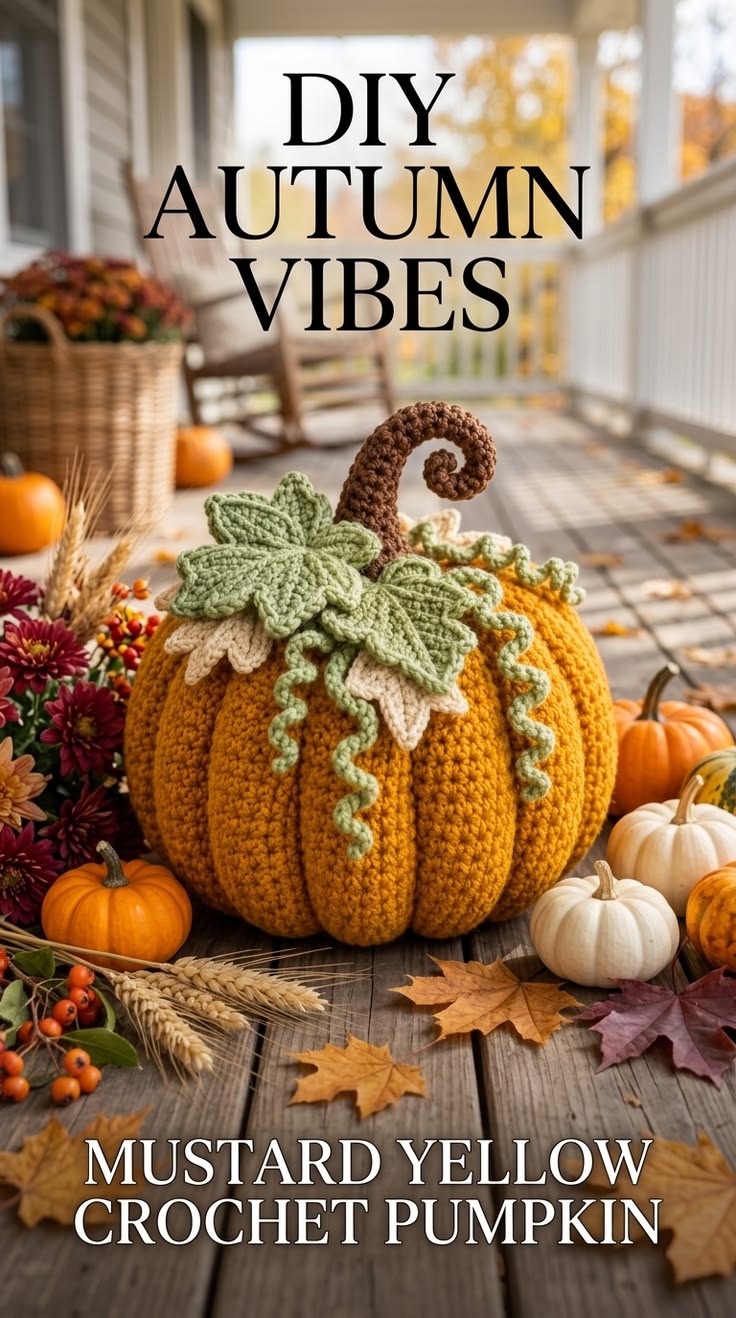
A pumpkin gets its recognizable shape from the valleys between its ribs, not from making a simple orange sphere. This mustard yellow crochet pumpkin pattern builds a stuffed pumpkin with pronounced vertical segments, a curved brown stem, layered sage-green leaves, cream accent leaves, and curling vines. The finished piece is designed as autumn table or porch decor. Use worsted-weight yarn and firm stuffing for clearly defined pumpkin ribs.
The Design: What Makes This Crochet Pumpkin Different
The main feature is the segmented body. Instead of leaving the crochet form as a plain stuffed ball, long shaping strands run from the top center to the bottom center and pull the surface inward. Six to eight evenly spaced shaping lines create the deep pumpkin valleys visible in the reference image.
The topper is deliberately oversized. A tall brown stem curves into a spiral rather than ending as a short straight stalk. Layered sage leaves spread across the top, while smaller cream leaves create separation between the mustard body and green foliage. Several crocheted vines hang down the sides.
The most common construction problem is weak segmentation. If the shaping strands are too loose, the body remains spherical. Pulling them excessively tight creates a narrow center and distorted base. Each strand should create a visible groove while allowing the stuffed body to retain its rounded profile.
Project Info at a Glance
| Skill Level | Construction | Hook | Yarn | Best For |
|---|---|---|---|---|
| Intermediate | Stuffed body with applied ribs | 4–5 mm | Worsted Weight (4) | Autumn and Thanksgiving decor |
Finished dimensions depend heavily on yarn, tension, stuffing, and the number of body rounds. For reference, published crochet pumpkin patterns range from miniature 5 cm pumpkins to larger decorative versions. Scale the body below until it reaches the diameter required for your display.
Materials and Tools
Yarn
- Mustard yellow — Worsted Weight (4) — pumpkin body
- Sage green — Worsted Weight (4) — large leaves and curling vines
- Cream — Worsted Weight (4) — small accent leaves
- Dark brown — Worsted Weight (4) — curved stem
Tools
- 4–5 mm crochet hook
- Polyester fiberfill
- Large-eye yarn needle
- Locking stitch marker
- Scissors
- Long upholstery or doll needle for shaping the ribs
- Straight pins for positioning leaves before sewing
Abbreviations
- MR — magic ring
- ch — chain
- sc — single crochet
- hdc — half double crochet
- dc — double crochet
- inc — increase: 2 sc in one stitch
- dec — decrease over 2 stitches
- sl st — slip stitch
- st/sts — stitch/stitches
- BLO — back loop only
Use an invisible decrease by inserting the hook through the front loops of the next two stitches before completing one single crochet. This reduces the visible gaps that ordinary decreases can produce in a firmly stuffed pumpkin.
Mustard Yellow Crochet Pumpkin Pattern
Work the main body in a continuous spiral unless otherwise stated. Place a stitch marker in the first stitch of every round.
Pumpkin Body
Yarn: mustard yellow.
R1: 6 sc in MR (6)
R2: inc × 6 (12)
R3: (sc, inc) × 6 (18)
R4: (2 sc, inc) × 6 (24)
R5: (3 sc, inc) × 6 (30)
R6: (4 sc, inc) × 6 (36)
R7: (5 sc, inc) × 6 (42)
R8–R18: sc around (42)
The 42-stitch plateau creates a large amigurumi-style body. Add extra 42-stitch rounds if a taller pumpkin is required, but remember that the shaping process compresses the finished height.
R19: (5 sc, dec) × 6 (36)
R20: (4 sc, dec) × 6 (30)
R21: (3 sc, dec) × 6 (24)
Begin stuffing. Place fiberfill around the outer wall first, then fill the center. The body should remain firm enough to resist collapsing when the shaping strands are tightened.
R22: (2 sc, dec) × 6 (18)
R23: (sc, dec) × 6 (12)
Add the final stuffing before closing.
R24: dec × 6 (6)
Fasten off, leaving approximately 100 cm of mustard yarn for shaping.
Creating the Pumpkin Ribs
Thread the long mustard tail onto a long needle. Insert the needle through the top center of the pumpkin and bring it out through the bottom center.
Carry the yarn externally back to the top. Pull until the strand creates a defined vertical groove.
Repeat this process around the body to create six evenly spaced segments. The reference image has particularly deep vertical divisions, so each groove should remain clearly visible from top to bottom.
For additional segmentation, create eight grooves instead of six. Keep the spacing equal. Uneven shaping strands make one section noticeably wider than its neighbors.
Secure the yarn at the bottom center and hide the remaining tail inside the pumpkin.
Curved Brown Stem
Yarn: dark brown.
R1: 6 sc in MR (6)
R2–R12: sc around (6)
For a taller stem like the one in the reference image, continue:
R13–R18: sc around (6)
Do not stuff the upper section firmly. A lightly filled stem bends more easily.
To create the curved profile, place slightly more tension along one side while sewing, or bend the completed stem into an arc before attachment.
For the spiral tip, continue with a chain:
Spiral: ch 16. Starting in the second chain from the hook, work 2 sc in each chain across.
The concentrated increases force the chain to curl naturally.
Fasten off, leaving a 25 cm tail for attaching the stem.
Large Sage Leaves — Make 3
Yarn: sage green.
Foundation: ch 13.
Starting in the second chain from the hook:
Side 1: sl st, sc, hdc, dc in next 5 sts, hdc, sc, sl st.
Work 3 sc into the final chain to turn around the tip.
Continue along the unused side of the foundation chain:
Side 2: sl st, sc, hdc, dc in next 5 sts, hdc, sc, sl st.
For the pointed leaf tip, ch 2 and sl st back into the same end stitch.
Fasten off, leaving approximately 25 cm for sewing.
For the broad maple-like appearance in the image, make two additional small lobes along each side by attaching sage yarn near the center of the leaf, chaining 5–7 stitches, and working back toward the main leaf with sl st, sc, hdc, and dc.
Cream Accent Leaves — Make 2
Yarn: cream.
Foundation: ch 9.
Starting in the second chain:
Side 1: sl st, sc, hdc, dc, dc, hdc, sc.
Work 3 sc into the final chain.
Continue down the opposite side:
Side 2: sc, hdc, dc, dc, hdc, sc, sl st.
Fasten off and leave a 20 cm tail.
These leaves should remain smaller than the sage leaves. Their purpose is to create a second foliage layer rather than cover the main green shapes.
Curly Green Vines — Make 4
Yarn: sage green.
Vine 1: ch 31.
Starting in the second chain from the hook, work 2 sc in each chain across.
The repeated increases produce the corkscrew automatically.
For variation, make the remaining vines different lengths:
- Vine 2: ch 26, then 2 sc in each chain.
- Vine 3: ch 34, then 2 sc in each chain.
- Vine 4: ch 22, then 2 sc in each chain.
Leave approximately 20 cm at the beginning or end of every vine for attachment.
If a vine curls too tightly, stretch it gently and allow it to retract. If it remains nearly straight, increase the number of stitches worked into each chain.
Assembly
- Place the mustard pumpkin body on a flat surface and confirm that all six shaped segments have similar widths.
- Position the brown stem directly over the top-center opening.
- Sew around the base of the stem several times, keeping the upper portion free to curve.
- Pin the three large sage leaves around the stem so they overlap the top of the pumpkin.
- Sew the center and inner portion of each sage leaf to the body while leaving the outer tips slightly raised.
- Position the two cream leaves beneath the sage layer and sew them in place.
- Attach the four green vines around the stem and foliage rather than fastening all of them at one point.
- Arrange the vines so at least two descend over separate pumpkin ribs.
- Hide all remaining yarn tails inside the pumpkin body or beneath the leaf layer.
- Set the pumpkin upright and adjust the stem curve, leaf positions, and vines until the base sits flat.
The finished pumpkin should have a stable base, six defined mustard segments, layered foliage, multiple hanging vines, and a tall curved brown stem.
7 Technical Tips for a Defined Crochet Pumpkin
- Do not under-stuff the center. Weak stuffing allows the shaping strands to collapse the pumpkin vertically. Add enough fiberfill that the body pushes back when a rib strand is tightened.
- Measure the six rib positions before pulling them tight. Each segment should occupy approximately one-sixth of the circumference. Unequal spacing produces one oversized lobe that remains visible from the front.
- Keep the 42-stitch plateau consistent. Accidentally adding or losing one stitch during R8–R18 shifts the decrease placement. Move the stitch marker after every completed round.
- Use invisible decreases on the upper body. Ordinary decreases can leave holes between R19 and R24. Those gaps become more visible after the stuffing pushes against the fabric.
- Do not over-stuff the stem. A densely packed six-stitch stem becomes difficult to bend into the curved shape shown in the reference image. Keep its upper third only lightly filled.
- Pin every leaf before sewing. The largest sage leaves should extend beyond the cream leaves by roughly 2–4 cm. Sewing immediately can leave one side of the topper visually heavier than the other.
- Secure vine tails beneath the foliage. Hanging vines place repeated tension on their attachment stitches. Pass each tail through the pumpkin body at least twice before hiding it beneath a leaf.
Adjusting the Pumpkin Size
The pattern can be resized without changing its basic construction.
For a smaller pumpkin, stop increasing at 30 stitches. Work the middle section at 30 stitches, then decrease by six stitches per decrease round.
For a medium pumpkin, stop at 36 stitches.
For the larger photographed style, use the 42-stitch plateau written above.
Changing yarn thickness also affects the dimensions. A published worsted-weight pumpkin pattern uses a 5 mm hook for decorative pumpkins, while other amigurumi-style pumpkin designs use smaller hooks for denser fabric.
How to Keep the Pumpkin Base Flat
A heavily stuffed crochet pumpkin can roll onto one side unless the bottom is shaped deliberately. Before tightening the final rib strands, press the bottom center upward slightly with your thumb.
Run the shaping needle from the top center through this recessed bottom point. As the six strands are tightened, the center pulls inward while the surrounding lobes form the supporting base.
Test the pumpkin on a hard surface before tying the final knot. If it rocks, identify the lowest lobe and redistribute a small amount of stuffing rather than tightening one rib excessively.
How to Position the Leaves and Vines
Start with the largest sage leaf pointing toward the front-left side of the pumpkin. Place the second large leaf toward the front-right and the third toward the rear. This arrangement creates broad coverage without hiding the mustard body.
Slide the smaller cream leaves beneath the green layer. Only their pointed ends need to remain visible.
Attach the vines last. One long vine can fall down the front, another along the right side, while the shorter curls remain close to the stem. Do not place every curl at identical lengths. Variation prevents the topper from forming a rigid symmetrical fringe.
Conclusion
Finish the body shaping before permanently attaching the topper because the rib tension determines the pumpkin’s final height and circumference. Check all six segments from above, then sew the curved stem into the center and layer the cream and sage foliage around its base. The next practical step is to make one test leaf and one vine so their scale can be compared directly with the completed pumpkin. Save this mustard yellow crochet pumpkin pattern to Pinterest or share the finished autumn decoration on Instagram with #MustardCrochetPumpkin. Would you keep the sage-green leaves shown here or replace them with darker olive foliage? “`1









