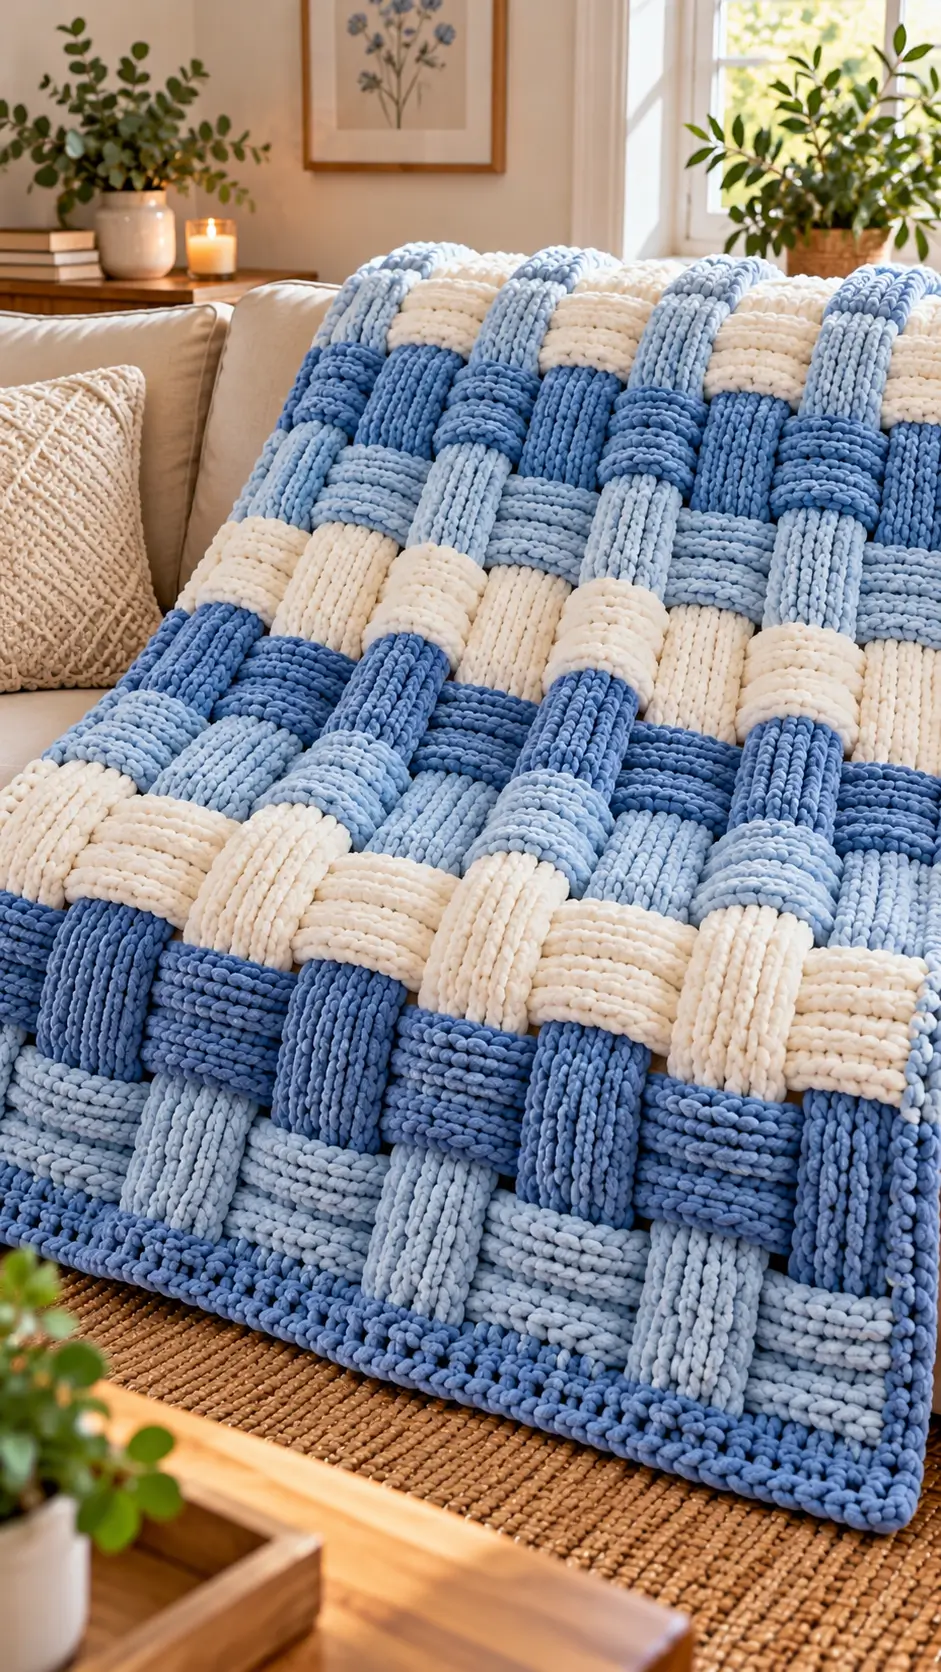
Those oversized blue bands need to cross visually before they can resemble the blanket in the photograph. This chunky basket weave crochet blanket uses super bulky chenille yarn, a 9 mm hook reference, and alternating post-stitch blocks to build that effect. Plan for an intermediate project measuring about 127 × 144.5 cm. The dense structure makes it practical as a sofa throw that avoids the loose, open surface of ordinary double crochet.
The Design: What Makes This Woven Blanket Different
The photograph depends on three structural decisions: oversized-looking bands, strong color separation, and a firm rectangular edge. Standard basketweave crochet stitch construction creates relief by moving double-crochet posts toward or away from the viewer. Groups are then reversed after several rows, which makes the blocks appear to cross.
For this chenille crochet blanket, the blue palette does additional work. Medium blue establishes the deepest visual layer, powder blue separates neighboring blocks, and ivory breaks up the larger field.
A frequent error is treating post stitches like ordinary double crochet. The hook passes around the post, not through the usual top loops. Another problem is contraction: basketweave fabric can pull narrower because post stitches compress the fabric horizontally.
Project Info at a Glance
| Skill Level | Time | Finished Size | Hook | Best For |
|---|---|---|---|---|
| Intermediate | Multi-session throw project | Approx. 127 × 144.5 cm | 9 mm | Sofa throw / textured bed layer |
The dimensions and hook are based on a comparable super-bulky basket-weave blanket specification.
Materials and Tools
Yarn
Use Super Bulky (6) chenille-style polyester blanket yarn. Bernat Blanket or another yarn producing comparable gauge works for this construction.
- Medium denim blue — Super Bulky (6) — approximately 960 g
- Powder blue — Super Bulky (6) — approximately 720 g
- Ivory/cream — Super Bulky (6) — approximately 720 g
The color quantities are planning estimates for the three-color adaptation. Allow approximately 2,400 g total yarn for a throw around the stated dimensions. Actual consumption changes with yarn, hook size, tension, and border depth.
Tools
- 9 mm crochet hook
- Large-eye yarn needle
- Locking stitch markers
- Scissors
- Tape measure
- Row counter
- Blocking mats — optional
Abbreviations
- ch — chain
- sc — single crochet
- dc — double crochet
- FPdc — front post double crochet
- BPdc — back post double crochet
- sl st — slip stitch
- st/sts — stitch/stitches
- RS — right side
- WS — wrong side
FPdc is made around the post from the front of the fabric, while BPdc approaches the post from the back. This difference moves crochet columns forward or backward and creates the basketweave relief.
Chunky Basket Weave Crochet Blanket Pattern
The photographed blanket has an unusually deep woven appearance. The instructions below use established basketweave crochet construction to reproduce that broad blue, powder-blue, and cream visual style.
Gauge Swatch
Yarn: Super Bulky (6). Reference gauge: approximately 8 stitches × 5 rows = 10 cm using a 9 mm hook in basketweave pattern.
Foundation Row: Dc across.
Row 1: Work groups of 4 FPdc and 4 BPdc across.
Rows 2–4: Maintain the raised and recessed blocks.
Row 5: Reverse the blocks, working BPdc where the preceding section used FPdc and FPdc where it used BPdc.
Rows 6–8: Maintain the reversed blocks.
Repeat the eight-row sequence for the swatch.
Measure the center of the swatch without stretching it. If the fabric is considerably narrower than the intended gauge, increase the hook size before calculating the full foundation.
Main Blanket Panel
A four-stitch block structure creates the broad woven units. Four FPdc followed by four BPdc forms an eight-stitch texture repeat.
For a custom blanket, calculate the starting chain from the measured gauge swatch. The target finished width for this version is approximately 127 cm.
Foundation: Chain enough stitches to produce approximately 127 cm after accounting for the eight-stitch pattern repeat and edge stitches.
Row 1: Dc across to establish posts for the textured rows. Turn.
Row 2: Ch 2. Work FPdc around each of the next 4 posts, BPdc around each of the next 4 posts. Repeat across. Dc in the final edge stitch.
Row 3: Repeat the established post arrangement so each raised block remains raised from the intended face.
Row 4: Repeat the established arrangement.
Row 5: Repeat once more to complete the first deep basketweave section.
Row 6: Reverse the relief. Work BPdc over the former raised blocks and FPdc over the former recessed blocks.
Row 7: Maintain the new block orientation.
Row 8: Maintain the new block orientation.
Row 9: Maintain the new block orientation.
Row 10: Return to the first block orientation.
Continue alternating the direction of the blocks at the same interval until the blanket approaches approximately 144.5 cm long, allowing room for the final border.
Color Sequence
Colors: medium denim blue, powder blue, and ivory/cream.
The photographed blanket does not read as a conventional one-row striped blanket. The colors form substantial rectangular sections, so changes should occur at planned basketweave boundaries.
Begin the first major texture section with medium denim blue.
Change selected neighboring sections to powder blue. Keep each color section large enough to remain visually distinct after the basketweave texture contracts.
Introduce ivory/cream between blue-dominant sections. This lighter yarn separates the two blue shades and increases the visibility of the woven structure.
Avoid carrying all three super-bulky yarns continuously along the edge. That creates a thick side seam. Cut an inactive color when its next section is sufficiently distant, leaving a long tail for secure weaving.
Repeat the medium-blue, powder-blue, and ivory distribution while shifting the placement of the blocks. The objective is an interlaced appearance rather than regular horizontal stripes.
Creating the Woven Relief
The over-and-under appearance comes from the direction of the post stitches.
For FPdc, insert the hook from the front, pass it around the post of the stitch, and return to the front. Complete the double crochet normally. The post is pushed toward the viewer.
For BPdc, approach the post from behind. Complete the stitch around the post so the column sits farther toward the back of the fabric.
Across four neighboring stitches, this difference creates a substantial raised or recessed band. Reversing the positions after several rows makes adjacent blocks appear to cross each other.
Keep the post-stitch groups consistent. One misplaced FPdc inside a BPdc group interrupts the woven geometry and becomes increasingly visible as additional rows are added.
Side Edges
Place a locking stitch marker in the first and last working stitch of each row.
Keep the turning method identical throughout the project. Chenille yarn can conceal the top loops, so a missed edge stitch may remain unnoticed for several rows.
Count complete four-stitch groups periodically instead of judging the stitch count from the blanket width alone.
If the sides begin pulling inward, examine the tension around the posts. Post stitches naturally compress the fabric. Loosening the working tension or moving to a slightly larger hook can correct excessive contraction.
Outer Border
Yarn: medium denim blue.
The darker blue border frames the powder-blue and ivory sections and corresponds closely with the outer edge visible in the reference photograph.
Border Round 1: Join medium denim blue in one corner. Ch 1 and sc evenly around all four sides. Work 3 sc into each corner.
When working along row ends, distribute stitches evenly. Do not automatically place one sc into every visible chenille loop because the side edge may begin to ripple.
Border Round 2: Ch 1. Sc in each stitch around. Work 3 sc into the center corner stitch at each corner.
Border Round 3: Repeat Border Round 2.
For a deeper frame, add one or two additional sc rounds while maintaining three stitches at each corner.
Fasten off. Leave a tail approximately 15–20 cm long and weave it through the medium-blue border.
Finishing and Assembly
- Lay the completed blanket flat without stretching the post-stitch texture.
- Check all four edges for skipped stitches, loose chenille loops, and exposed yarn tails.
- Confirm that each FPdc/BPdc section remains aligned with its intended four-stitch group.
- Thread each yarn tail onto a large-eye yarn needle.
- Weave each tail through a section of matching color.
- Reverse the direction of the tail before trimming it so normal movement cannot pull it directly out.
- Square the four corners by hand and compare the two diagonal measurements.
- Shape the blanket according to the yarn manufacturer’s care instructions. Avoid exposing polyester chenille to excessive heat.
- Lay the blanket flat so the post-stitch relief can settle without being compressed.
- Measure the finished width and length after the fabric has relaxed.
The completed blanket should have a rectangular outline, a defined medium-blue border, and alternating raised and recessed blocks across the center.
7 Technical Tips for Better Basketweave Texture
- Mark both edge stitches. Missing one edge stitch on repeated rows gradually narrows the blanket. Thick chenille makes this failure difficult to detect from the top loops alone.
- Count every four-stitch group. A basketweave section containing three or five post stitches shifts every block that follows. Check the count before beginning the next relief reversal.
- Control fabric density. If the blanket becomes stiff enough to hold its own shape when lifted, the working tension is too tight for this construction. Test the 9 mm hook on a swatch before starting the full width.
- Measure after at least 10 cm. Basketweave post stitches can contract compared with the foundation row. Do not calculate the final width solely from the unstressed starting chain.
- Mark the right side. Attach one locking marker to the intended front of the blanket. Losing track of the working face can reverse a post-stitch block in the wrong section.
- Plan color boundaries before changing yarn. Moving a blue or cream change by one four-stitch block alters the over-and-under appearance. Map the large color areas before working the complete row.
- Keep yarn tails inside matching colors. A cream chenille tail woven through a dark-blue section can remain visible between the large stitches. Weave each tail through its own color and reverse direction before trimming.
Conclusion
Measure a four-block swatch before committing the full yarn quantity to the blanket. That check establishes the actual width, post-stitch contraction, and color-block scale produced by your tension. A finished measurement around 127 × 144.5 cm provides a practical throw-size target, but complete pattern repeats can be added or removed for other dimensions. Keep medium denim blue around the outer edge and distribute powder blue and ivory through the center to maintain the photographed contrast. Save this chunky basket weave crochet blanket for your crochet board on Pinterest or share the finished version on Instagram with #ChunkyBasketWeaveBlanket. Which blue would you use for the raised blocks?










Would love to knit this