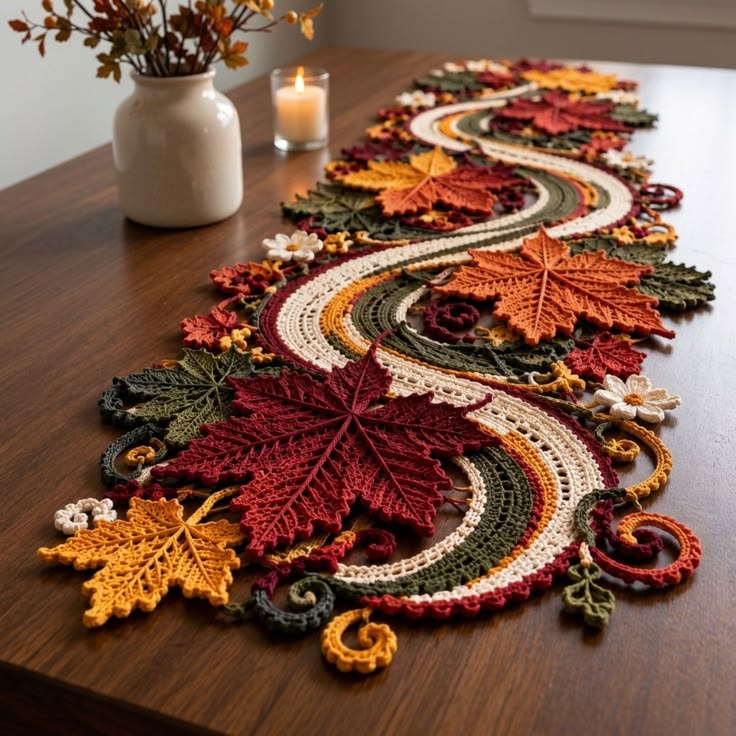
A maple leaf has to keep its five dominant lobes visible even when it sits beside curves, flowers, and smaller foliage. This autumn maple leaf crochet table runner pattern interprets the reference as a flowing S-shaped runner with large burgundy and burnt-orange maple leaves, mustard accents, olive foliage, cream flowers, spiral tendrils, and striped curved bands. The construction is modular, making the finished length easy to adapt to a dining table.
The Design: What Makes This Autumn Runner Different
The central feature is not a conventional rectangular foundation. Instead, broad curved crochet bands travel down the table in alternating cream, olive, mustard, and burgundy. Their changing direction produces the river-like S shape visible in the reference.
Large maple leaves then overlap those curves at selected points. Five-lobed silhouettes and pronounced center veins keep the foliage recognizable even where motifs overlap. Smaller leaves, flowers, berries, and spiral tendrils fill the outside edges without closing every gap.
This approach creates an S-curve crochet table runner with substantial negative space. A common construction error is attaching the maple leaves before the curved bands have been blocked. That can lock an unwanted twist into the entire runner. Build and shape the curved foundation first; attach botanical motifs afterward.
Project Info at a Glance
| Skill Level | Construction | Suggested Size | Hook | Best For |
|---|---|---|---|---|
| Intermediate/Advanced | Curved bands + separate motifs | Approx. 117 × 36 cm | 3.5–4 mm | Fall dining tables, Thanksgiving, sideboards |
The photograph provides no physical scale, so its exact dimensions cannot be measured from the image. A current S-curve maple-leaf runner pattern documents a standard finished size of approximately 117 × 36 cm, while another published maple-leaf table runner measures approximately 132 × 36 cm. A mosaic version measures about 94 × 30 cm. These dimensions provide practical reference points for adapting the pictured design.
Materials and Tools
Yarn
- Deep burgundy — DK or light-worsted cotton — approximately 150–200 g.
- Burnt orange — DK or light-worsted cotton — approximately 150–200 g.
- Mustard ochre — DK or light-worsted cotton — approximately 100–150 g.
- Dark olive green — DK or light-worsted cotton — approximately 180–230 g.
- Warm cream — DK or light-worsted cotton — approximately 150–200 g.
- Brown — DK or light-worsted cotton — approximately 30–50 g for small details.
These quantities are working allowances for the photo-inspired version rather than measured consumption from the pictured runner. Published maple-leaf projects demonstrate substantial yarn variation according to finished dimensions; for example, a 7 × 6 inch sport-weight cotton maple leaf uses approximately 32–34 m, while a larger 10 × 9 inch worsted cotton leaf can use about 85 m.
Tools
- 3.5 mm crochet hook for leaves and small motifs
- 4 mm crochet hook for the curved foundation bands
- Tapestry needle
- Scissors
- Stitch markers
- Flexible measuring tape
- Blocking mats
- Rust-resistant pins
Abbreviations
- MR — magic ring
- ch — chain
- sl st — slip stitch
- sc — single crochet
- hdc — half double crochet
- dc — double crochet
- tr — treble crochet
- dtr — double treble crochet
- inc — increase
- dec — decrease
- sp — space
- st/sts — stitch/stitches
- FO — fasten off
Invisible decreases are unnecessary for the flat botanical components because shaping is produced through edge increases, decreases, and changing stitch heights.
Autumn Maple Leaf Crochet Table Runner Pattern
Make the curved foundation first. Block it to the required S shape, then make and position the large leaves. Small foliage, flowers, berries, and curls are added only after the major components have been arranged.
Curved Foundation Band
Begin with dark olive.
Ch 181.
Row 1: Hdc in second ch from hook and in each ch across. Turn. (180)
Row 2: Ch 1, hdc in each st across. Turn. (180)
To begin forming a gradual curve, use short-row sections rather than maintaining identical row lengths throughout every band.
Row 3: Ch 1, hdc in next 150 sts. Turn.
Row 4: Ch 1, hdc back across those 150 sts.
Row 5: Hdc across all 180 sts.
Repeat a short-row sequence approximately every 3–5 full rows, alternating which end receives the shortened section. This creates a long, controlled wave rather than a straight strip.
Do not attempt to produce the entire S curve through aggressive increases at one edge. Gentle short-row shaping is easier to block and creates a smoother line.
Mustard Stripe
Change to mustard.
Work one full row of sc across.
For the next row, work hdc across while following the existing curved edge.
Add a second hdc row if a broader mustard stripe is desired.
Keep this stripe narrower than the cream and olive sections.
Cream Openwork Stripe
Change to warm cream.
Row 1: Ch 3, dc in each st across.
Row 2: Ch 4, skip next st, dc in next st, *ch 1, skip 1 st, dc in next st*. Repeat across.
Row 3: Ch 3, dc in each dc and each ch-1 space across.
Row 4: Ch 1, sc in each st across.
The open row gives the light-colored stripe the perforated appearance visible through the center of the reference runner.
Burgundy Outer Stripe
Change to burgundy.
Work 2–3 rows of hdc along the cream edge.
On the outermost row, add small decorative bumps:
*Sc in next 3 sts, ch 3, sl st in first ch, sc in next 3 sts.*
Repeat across where the band remains visible.
The botanical motifs will cover many sections, so the decorative edge does not need to remain uninterrupted along the full runner.
Large Five-Lobed Maple Leaf — Make 5 to 7
Use burgundy, burnt orange, olive, and mustard. The largest leaves should measure approximately 18–25 cm depending on yarn and gauge.
A published sport-weight cotton maple leaf made with a 3.5 mm hook measures about 18 × 15 cm, while a worsted cotton version using the same hook can reach approximately 25 × 23 cm. This range suits the prominent motifs in the reference.
Maple Leaf Center
Use selected leaf color.
R1: 6 sc in MR. Join with sl st. (6)
R2: Inc ×6. (12)
R3: (sc, inc) ×6. (18)
R4: (2 sc, inc) ×6. (24)
The 24-stitch center acts as the hub for the five shaped lobes.
Central Lobe
Ch 15.
Starting in second chain from hook work:
sc, hdc, dc, dc, tr, tr, dtr, dtr, tr, tr, dc, dc, hdc, sc.
Work 3 sc into the terminal attachment area.
Rotate and mirror the stitch progression down the opposite side of the foundation chain.
Sl st into the center hub.
This becomes the longest point of the leaf.
Upper Side Lobe — Make 2
Move several stitches around the center hub.
Ch 12.
Starting in second chain work:
sc, hdc, dc, tr, tr, dtr, tr, dc, dc, hdc, sc.
Work around the end and mirror the sequence along the second side.
Sl st into the hub.
Repeat symmetrically on the opposite side.
Lower Side Lobe — Make 2
Ch 9.
Starting in second chain work:
sc, hdc, dc, tr, tr, dc, hdc, sc.
Work around the tip and mirror the sequence down the opposite side.
Sl st into the hub.
Repeat for the opposite lower lobe.
Joining the Five Lobes
Join matching yarn near the base of the first lower lobe.
Work sc evenly around the outer edge.
At every major tip work:
sc, ch 3, sl st in second ch from hook, sl st in next ch, sc.
At each valley between lobes use one or more sl sts to pull the outline inward.
This contrast between pointed tips and tight valleys creates the recognizable maple silhouette.
Serrated Maple Edge
On the next edging pass, introduce small teeth between the five major points.
Work:
*sc in next 2 sts, ch 2, sl st in second ch from hook, sc in next 2 sts.*
Repeat selectively along each lobe.
Do not place teeth directly inside the deepest valleys.
Fasten off.
Raised Central Vein
Join matching yarn at the base of the leaf.
Surface sl st from the lower center toward the tip of the largest lobe.
Stop approximately 1 cm before the terminal point.
Fasten off on the wrong side.
Side Veins
Return to the lower center.
Surface sl st toward the first upper lobe.
Repeat for the opposite upper lobe and both lower lobes.
Keep all five vein lines relaxed enough for the leaf to remain flat.
Maple Leaf Stem
Join at the leaf base.
Ch 12–18.
Sl st back through every chain.
Fasten off with a long tail for assembly.
Medium Maple Leaf — Make 6 to 10
Use mustard, orange, burgundy, and olive.
Work the same five-lobe construction but reduce the chains:
Central lobe: Ch 11.
Upper side lobes: Ch 9.
Lower lobes: Ch 7.
Adjust the stitch-height sequence proportionally, keeping the tallest stitch near the middle of every lobe.
Add the same surface-crochet vein structure.
These smaller motifs should fill spaces around the large leaves rather than compete with them.
Small Olive Leaf — Make 10 to 14
Ch 13.
Starting in second chain from hook work:
sl st, sc, hdc, dc, dc, tr, tr, dc, dc, hdc, sc, sl st.
Work 3 sc into the end.
Continue down the opposite side using the mirrored stitch sequence.
Join at the base.
Surface sl st along the foundation chain to create the central vein.
Fasten off with a 15 cm tail.
Small Cream Daisy — Make 4 to 6
Use mustard for the center.
R1: 6 sc in MR. (6)
R2: Inc ×6. (12)
Change to cream.
For each petal:
Ch 6, starting in second ch work sl st, sc, hdc, dc, hdc; sl st into next center stitch.
Repeat until 10–12 petals surround the center.
Fasten off with a long tail.
Small Burgundy Flower — Make 5 to 8
R1: 6 sc in MR. (6)
R2: In each stitch work sl st, ch 4, 2 dc, ch 3, sl st.
Repeat around to form six compact petals.
Fasten off.
These flowers should remain much smaller than the maple leaves.
Autumn Berry Clusters
Make small berry knots in burgundy and mustard.
Ch 3.
Work 5 dc into the first chain.
Remove the hook from the working loop, insert it through the top of the first dc, catch the loop, and pull through to close the cluster.
Ch 1 to secure.
Make groups of three or five berries and attach them to short olive stems.
Spiral Tendrils — Make 10 to 16
The curled motifs around the perimeter are important because they extend the design without adding another large solid component.
Ch 25.
Starting in the second chain from the hook, work 2 sc in every chain.
The strip will curl naturally.
For a tighter spiral, work 3 sc in selected chains.
Fasten off with a 20 cm tail.
Make curls in mustard, olive, burnt orange, and burgundy.
Long Curved Accent Cord
Ch 60–90 depending on the available space.
Sl st in second chain and in every remaining chain.
For a thicker cord, turn and work one sc into each slip stitch.
Shape the cord into a broad spiral or loose S curve during assembly.
These cords reproduce the narrow curling lines visible beside the main striped foundation.
Planning the Full Runner
Block the striped foundation first. Aim for an overall length near 110–120 cm for a medium dining-table runner, or adjust it to the intended table.
Shape the foundation into three broad alternating curves. The runner should not resemble a tightly coiled spiral. Each bend needs enough length for the large maple leaves to sit partly inside and partly outside the curve.
Place the largest burgundy leaf near the front third.
Position a large burnt-orange leaf around the middle.
Add another large orange, burgundy, or mustard leaf farther toward the opposite end.
Rotate neighboring leaves so their central lobes point in different directions.
Building the Botanical Edges
Place olive leaves underneath the large maple motifs first.
Add medium maple leaves along the outside of each curve.
Use mustard motifs near burgundy sections and burgundy motifs near cream sections to maintain visible contrast.
Insert cream daisies into smaller gaps.
Add berry clusters only after the large foliage is fixed.
Finish with spiral tendrils extending into the open table space.
The runner should retain irregular openings. Filling every space with crochet removes the light, botanical structure visible in the reference.
Assembly
- Block the multicolor foundation into a long S curve and allow it to dry completely before adding motifs.
- Block every large maple leaf separately, pinning all five primary points and the valleys between them.
- Place the largest burgundy and orange leaves along the major curves without sewing them immediately.
- Add medium maple leaves and olive foliage beneath the larger motifs until both sides have balanced width.
- Sew each large leaf at a minimum of three contact points while leaving most pointed edges free.
- Attach the medium and small foliage, checking the runner after every 20–30 cm of assembly for unwanted twisting.
- Add cream and burgundy flowers to openings where additional color separation is needed.
- Sew berry clusters and long curved cords into the smaller spaces around the botanical motifs.
- Attach spiral tendrils last, leaving most of each curl free so it retains its circular shape.
- Weave all structural tails through at least 4–5 cm of matching stitches and lightly block the complete runner.
The completed piece should form a continuous S-shaped composition with visible curved stripes, overlapping five-lobed maple leaves, smaller foliage, flowers, and free-standing spiral accents.
7 Technical Tips for the Autumn Maple Leaf Runner
- Curve becoming a circle: Keep each major bend broad. If the inside radius becomes smaller than approximately 10–12 cm, the foundation begins to look coiled rather than river-shaped.
- Maple leaves losing their silhouette: Pin all five major points during blocking. A folded lower lobe can make a five-lobed maple motif look like an ordinary three-point leaf.
- Surface veins puckering: Work surface slip stitches with slightly more tension allowance than ordinary crochet. A vein even 5–10 mm shorter than the leaf can make the motif curl.
- Runner twisting: Attach every large motif at three separated points. A single attachment allows the weight of a 20 cm leaf to rotate the foundation when the runner is lifted.
- Overcrowded edge: Leave several gaps measuring approximately 3–6 cm between smaller motifs. Negative space is part of the pictured design rather than an area that must be filled.
- Spirals opening: Use 2 sc per foundation chain for moderate curls and 3 sc for tighter curls. Do not stretch the spiral while sewing its base to the runner.
- Uneven overall width: Measure from the center of the foundation to the furthest motif on both sides. Correct differences greater than approximately 4 cm before attaching the final leaves.
How to Crochet a Recognizable Maple Leaf
Five points alone are insufficient. The relative size of those points determines whether a motif reads as maple foliage.
Keep the central lobe longest. The two upper side lobes should be substantial but slightly shorter, while the two lower lobes should remain smaller and angle outward.
Deep valleys are equally important. Use slip stitches between lobes to pull the perimeter inward before climbing toward the next point.
Add a visible central vein after completing the outer structure. Published maple-leaf patterns frequently emphasize the vein because it divides the broad surface and reinforces the botanical shape.
Block each lobe individually rather than pinning only the outside corners.
Choosing Yarn for an Autumn Table Runner
Cotton is a practical choice because the runner needs defined leaf points and relatively stable curved bands. Published maple-leaf patterns use both sport and worsted cotton successfully, with hook sizes around 3.5 mm producing dramatically different finished dimensions according to yarn thickness.
A current 7 × 6 inch maple leaf pattern uses category 2 mercerized cotton and a 3.5 mm hook. A larger 10 × 9 inch version uses worsted cotton with the same nominal hook size. For the reference-style runner, DK or light-worsted cotton offers a useful middle ground.
Use the same yarn family across colors whenever possible. A thicker burgundy yarn beside a thinner cream yarn can alter the width of the curved foundation and change the blocked shape.
Creating the S-Shaped Crochet Foundation
Short rows are the main shaping tool. Working fewer stitches temporarily on one side adds fabric selectively, causing the opposite edge to travel farther and creating a curve.
Alternate the side receiving short rows when the direction needs to reverse. Mark the beginning and end of each shaping zone so the second curve does not accidentally become much tighter than the first.
Lay the strip flat after every several rows. A gentle curve can be refined during blocking; a severe ruffle indicates too much added fabric.
Once the desired S profile is established, add the narrow color bands while following the existing edge rather than attempting to reshape every stripe independently.
How to Arrange the Large Leaves
The largest motifs function as anchors. Positioning them at regular intervals creates a repetitive garland, so vary both their spacing and orientation.
Place one large leaf partly over the inside of a curve and another on the outer edge of the next bend. Rotate the central points approximately 20–60 degrees from the direction of the foundation.
Allow a limited amount of overlap. Approximately 1–3 cm is enough to visually connect adjacent motifs without hiding their vein structures.
Do not sew every point down. Securing the center and several lower edges allows the pointed lobes to remain visually distinct.
Making the Runner Longer or Shorter
Modular fall runners are particularly adaptable. A current commercial S-curve maple runner lists a standard size of approximately 46 × 14 inches / 117 × 36 cm and builds its design from separate leaf components. Other published runners offer repeated sections to reach approximately 27, 55, 81, or 108 inches.
For a shorter centerpiece, use two broad foundation curves and approximately three large maple leaves.
For a long dining table, add another complete S section before attaching the botanical motifs. Increase the leaf and flower quantities proportionally rather than stretching the spaces between existing components.
Always measure the table before assembly because the outer leaves can add substantial width beyond the central bands.
Color Planning for the Fall Palette
Burgundy and burnt orange should carry most of the visual weight. Olive provides the darker neutral, mustard creates small bright sections, and cream separates colors that would otherwise merge.
Avoid placing every large orange leaf on an orange stripe. Contrast makes the five-point silhouette easier to read.
Use cream sparingly in the botanical layer. Several small cream flowers are enough to connect the pale stripe with the foliage without changing the overall autumn palette.
Spiral tendrils can repeat colors from nearby motifs, but vary them across the full length so no single end becomes dominated by one shade.
Blocking the Finished Runner
Block the central foundation and botanical motifs separately before final assembly, then perform a lighter second block after joining.
During the final block, pin the central S curve first. Do not begin with the leaves because they can pull the foundation away from its intended line.
Next position the large maple leaves. Pin their central lobe, upper side lobes, and lower points individually.
Shape the smaller foliage and flowers afterward. Spiral tendrils need only minimal pinning because stretching them can remove their curl.
Check the overall dimensions before the piece dries. The runner should fit comfortably within the table surface without interfering with place settings.
Using the Runner for Fall Table Décor
The irregular outline works best as a decorative centerpiece rather than as protection from hot cookware. Use appropriate trivets beneath heated serving dishes.
Place tall decorations in the wider openings between large leaves instead of directly on top of the raised vein work. Candles should remain in suitable holders and away from yarn and other combustible decorations.
For storage, roll the runner loosely around a clean tube or fold it only at the open curved sections. Hard folds through blocked maple leaves can flatten their veins and distort the points.
Before the next seasonal use, a light reblocking is usually enough to restore the leaf shapes and broad S curve.
Conclusion
Build the curved striped foundation before making final decisions about foliage placement because its blocked S shape controls the entire composition. Keep the central lobe longest on every maple leaf, add relaxed surface-crochet veins, and secure large motifs at several points without sewing down every tip. Use flowers and spiral tendrils only after the major leaves are balanced across both sides. To resize the project, add or remove a complete curved section rather than stretching the joins. Save this autumn maple leaf crochet table runner pattern to Pinterest and share the finished runner on Instagram with #AutumnMapleRunner. Which anchor leaf will you place closest to the table end: burgundy or burnt orange? “`0









