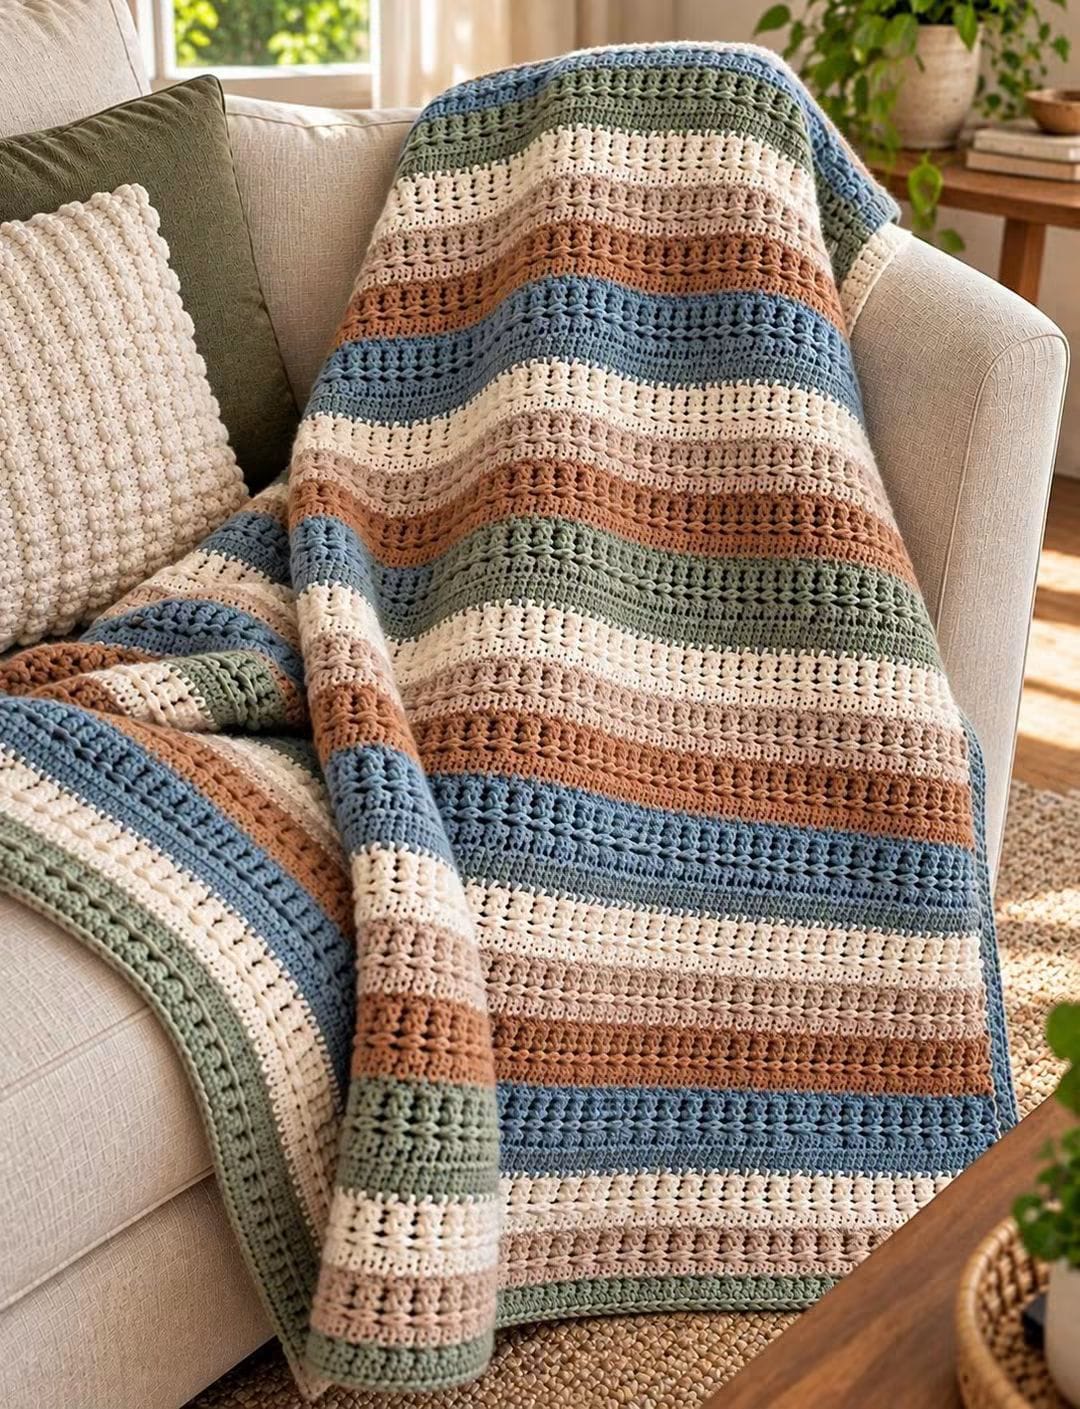
The alternating openwork bands are what separate this blanket from an ordinary striped throw. This striped crochet blanket pattern combines dusty blue, sage green, warm cream, beige, and camel with solid rows, eyelet sections, clustered texture, and decorative lace. Worked flat in one piece with worsted-weight yarn and a 5 mm hook, the construction suits an intermediate crocheter who can maintain a consistent stitch count across changing stitch patterns.
The Design: What Makes This Striped Blanket Different
The blanket uses color and stitch structure at the same time. Instead of repeating one stitch in different shades, each broad stripe contains a combination of solid double crochet, open chain spaces, and clustered stitches. This creates horizontal texture without requiring separate panels.
Unequal stripe depths are another important feature. Dusty blue, cream, sage, beige, and camel appear in changing proportions, preventing the surface from looking mechanically striped. A narrow transition row between textured sections also stabilizes the fabric before the next stitch pattern begins.
The main technical risk in a textured crochet blanket is changing the total width when switching between dense and openwork rows. Every decorative repeat must consume the same foundation width. Count stitches after each transition row rather than waiting until several bands have been completed.
Project Info at a Glance
| Skill Level | Construction | Finished Size | Hook | Yarn Weight |
|---|---|---|---|---|
| Intermediate | Worked flat in rows | Approx. 127 × 152 cm | 5 mm / H | Worsted #4 |
The exact dimensions of the photographed blanket cannot be calculated from the image alone. A finished size around 127 × 152 cm is a practical sofa-throw target. Published sampler-style worsted blankets use the same 5 mm hook and 127 × 152 cm format, while another documented striped worsted lapghan measures approximately 102 × 139 cm.
Materials and Tools
Yarn
- Dusty blue — worsted #4 — approximately 400–500 g.
- Sage green — worsted #4 — approximately 300–400 g.
- Warm cream — worsted #4 — approximately 350–450 g.
- Light beige — worsted #4 — approximately 300–350 g.
- Camel — worsted #4 — approximately 300–350 g.
Allow approximately 1,700–2,000 g total for a generously sized throw when using worsted yarn. Exact consumption depends on gauge, stripe distribution, stitch density, and finished dimensions. Buy each color from the same yarn line where possible so changes in fiber thickness do not alter the width of individual sections.
Tools
- 5 mm / H crochet hook
- Large-eye tapestry needle
- Scissors
- Locking stitch markers
- Flexible measuring tape
- Blocking mats and rust-resistant pins
Abbreviations
- ch — chain
- sc — single crochet
- hdc — half double crochet
- dc — double crochet
- tr — treble crochet
- sl st — slip stitch
- sk — skip
- sp — space
- st/sts — stitch/stitches
- RS — right side
- WS — wrong side
- FO — fasten off
Invisible decreases are not used in this project because the blanket is constructed as a flat rectangle with a constant working width.
Gauge and Finished Measurements
Make a swatch using the solid double-crochet section before starting the full blanket. A useful starting target with worsted yarn and a 5 mm hook is approximately 14–16 stitches per 10 cm, but matching the desired finished width matters more than reproducing an exact gauge.
The pattern below targets approximately 127 cm wide × 152 cm long. Crochet additional complete stripe sections for a longer blanket or reduce the foundation width for a lap blanket.
Measure the swatch after it has rested. Openwork sections can stretch more than solid rows, so avoid measuring the fabric while pulling it sideways.
Striped Crochet Blanket Pattern — Step by Step
The blanket is worked from one short edge to the other in horizontal rows. Maintain the same stitch count throughout all solid transition rows.
Foundation
Begin with dusty blue.
Ch 181 loosely.
The foundation is based on a multiple that accommodates the openwork sections. If your gauge produces a substantially different width, adjust the foundation in complete pattern repeats rather than removing random individual chains.
Row 1: Dc in 4th ch from hook and in each ch across. Turn.
Count the completed stitches and record that number. Use it as the width checkpoint for every subsequent solid row.
Dusty Blue Solid Band
Row 2: Ch 3, dc in each st across. Turn.
Row 3: Ch 3, dc in each st across. Turn.
Row 4: Ch 1, sc in each st across. Turn.
The single-crochet row acts as a transition between the dense foundation and the first decorative section.
Dusty Blue Openwork Band
Row 5: Ch 4, sk next st, dc in next st, *ch 1, sk next st, dc in next st*. Repeat across. Turn.
Row 6: Ch 1, sc in first st, *ch 3, sc in next ch-1 sp*. Repeat across, ending with sc in final stitch. Turn.
Row 7: Ch 3, work 2 dc into each ch-3 sp across, adjusting the final repeat if necessary to restore the original stitch count. Turn.
Row 8: Ch 3, dc in each st across. Turn.
Count the row. The stitch total must match the foundation checkpoint before changing colors.
Warm Cream Lace Band
Change to warm cream.
Row 9: Ch 1, sc in each st across. Turn.
Row 10: Ch 3, *sk 2 sts, 5 dc in next st, sk 2 sts, sc in next st*. Repeat across.
Row 11: Ch 4, dc in center dc of first shell, *ch 2, sc in next valley, ch 2, dc in center dc of next shell*. Repeat across. Turn.
Row 12: Work dc groups into the chain spaces, distributing them evenly until the original working width is restored.
Row 13: Ch 1, sc in each st across. Turn.
The cream stripe in the photograph contains relatively tall open sections. Keep these rows relaxed so the lace does not contract compared with the solid bands.
Light Beige Textured Band
Change to light beige.
Row 14: Ch 3, dc in each st across. Turn.
Row 15: Ch 3, *dc in next 3 sts, ch 1, sk 1 st*. Repeat across. Turn.
Row 16: Ch 1, sc in each dc and sc in each ch-1 sp across. Turn.
Row 17: Ch 3, dc in each st across. Turn.
Row 18: Ch 1, sc in each st across.
Fasten off beige or carry it only if the same color will be used again within a short distance. Avoid carrying five unused colors continuously along the edge.
Camel Cluster Band
Change to camel.
Row 19: Ch 3, dc in each st across. Turn.
Row 20: Ch 3, *sk 2 sts, work 3 dc in next st, ch 1, 3 dc in same st, sk 2 sts, sc in next st*. Repeat across. Turn.
Row 21: Ch 3, work dc evenly across the shells and valleys while returning to the established stitch count. Turn.
Row 22: Ch 1, sc in each st across. Turn.
The camel stripe should form a visible textured band without becoming wider than the neighboring beige section.
Dusty Blue Chain-Link Band
Change to dusty blue.
Row 23: Ch 3, dc in each st across. Turn.
Row 24: Ch 1, sc in first 2 sts, *ch 4, sk 3 sts, sc in next 3 sts*. Repeat across. Turn.
Row 25: Ch 1, sc in first st, *ch 4, sc around the center of the previous ch-4 loop*. Repeat across.
Row 26: Ch 3, work dc evenly across, placing stitches into both the chain spaces and anchoring stitches until the original stitch count is restored.
Row 27: Ch 3, dc in each st across. Turn.
Row 28: Ch 1, sc in each st across.
This open linked section reproduces the elongated horizontal texture visible through several blue and green bands in the reference.
Second Warm Cream Band
Change to warm cream.
Row 29: Ch 3, dc in each st across.
Row 30: Ch 4, sk next st, dc in next st, *ch 1, sk next st, dc in next st*. Repeat across.
Row 31: Ch 3, work dc in each dc and each ch-1 sp across.
Row 32: Ch 1, sc in each st across.
Beige Flower-Cluster Band
Change to light beige.
Row 33: Ch 3, dc in each st across.
Row 34: Ch 1, sc in first st, *sk 2 sts, work 5 dc in next st, sk 2 sts, sc in next st*. Repeat across.
Row 35: Ch 3, *dc in center of shell, ch 3, sc in valley, ch 3*. Repeat across.
Row 36: Work dc evenly across, returning to the recorded stitch count.
Row 37: Ch 1, sc across.
Sage Green Openwork Band
Change to sage green.
Row 38: Ch 3, dc in each st across.
Row 39: Ch 1, sc in first 2 sts, *ch 5, sk 3 sts, sc in next 3 sts*. Repeat across.
Row 40: Ch 3, work 5 dc into each ch-5 space with sc between groups.
Row 41: Ch 4, dc in center of each 5-dc group with ch 2 between groups.
Row 42: Work dc evenly across until the original width is restored.
Row 43: Ch 1, sc in each st across.
Full Stripe Sequence
After completing the first sage section, repeat the established stitch bands while rotating the colors. The photograph uses irregular color placement rather than a strict five-color cycle, so the following schedule produces a similar balanced distribution:
| Section | Color | Texture |
|---|---|---|
| 1 | Dusty blue | Solid + openwork |
| 2 | Warm cream | Lace shells |
| 3 | Light beige | Eyelet texture |
| 4 | Camel | Cluster texture |
| 5 | Dusty blue | Chain-link openwork |
| 6 | Warm cream | Eyelet lace |
| 7 | Light beige | Flower clusters |
| 8 | Sage green | Open shells |
| 9 | Warm cream | Lace shells |
| 10 | Camel | Cluster texture |
| 11 | Dusty blue | Chain-link openwork |
| 12 | Warm cream | Eyelet lace |
| 13 | Light beige | Flower clusters |
| 14 | Camel | Open shells |
| 15 | Dusty blue | Solid + openwork |
| 16 | Sage green | Open shells |
Continue until the blanket measures approximately 148–150 cm before adding the finishing rows and border.
Final Rows
Finish the last decorative band completely before beginning the edging.
Final Row 1: With sage or dusty blue, ch 1 and sc in every stitch across.
Final Row 2: Ch 3, dc in every stitch across.
Final Row 3: Ch 1, sc in every stitch across.
Fasten off and weave the tail through at least 5 cm of matching stitches.
Crochet Blanket Border
The photographed blanket uses a restrained edge rather than a deep decorative border. A compact border stabilizes the changing stitch patterns without competing with the stripes.
Use sage green, dusty blue, or another color already present in the blanket.
Border Round 1: Join yarn in any corner. Ch 1 and sc evenly around all four sides.
Along the top and bottom, work one sc into each stitch. Along the row ends, distribute stitches evenly rather than automatically placing one stitch into every visible gap.
Work 3 sc in each corner.
Join with sl st.
Border Round 2: Ch 1, sc in each stitch around, working 3 sc in each corner stitch.
Border Round 3: Ch 1, hdc in each stitch around. Work 3 hdc in each corner.
Join and fasten off.
If the border waves outward, too many stitches have been placed along the row ends. If the corners curl inward, add more corner stitches or loosen the tension.
Assembly and Finishing
- Count the stitches across the final row and compare the number with the foundation checkpoint.
- Lay the blanket flat and check that both long edges remain approximately parallel.
- Weave color-change tails horizontally through stitches of the matching stripe for at least 5 cm.
- Inspect every openwork section for missed chain spaces or unsecured loops.
- Measure the blanket before adding the border and record both dimensions.
- Work the first border round while counting stitches along corresponding sides.
- Add the remaining border rounds only after confirming that the first round lies flat.
- Wash or dampen the blanket according to the yarn manufacturer’s care instructions.
- Block the blanket to approximately 127 × 152 cm or to your chosen finished dimensions.
- Allow the blanket to dry completely before removing it from the blocking surface.
The completed throw should form a rectangular fabric with stable edges, clearly separated color bands, and alternating solid and openwork texture.
7 Technical Tips for a Textured Striped Blanket
- Width creep: Count the stitches after every solid transition row. Losing only one stitch in several consecutive sections can reduce the blanket width noticeably before the error becomes obvious.
How to Keep the Blanket Edges Straight
Sampler-style blankets require more edge control than a throw worked entirely in one stitch. Double crochet, single crochet, shells, and chain-space rows all have different heights, making the first and final stitch less visually obvious.
Place a locking marker into the first actual stitch of every row. Move it upward as the work progresses. Place another marker in the final stitch if necessary.
Count after every transition row. Solid single-crochet or double-crochet rows provide the best checkpoints because each working position is clearly visible.
Measure the blanket width every 15–20 cm. If the width changes by more than approximately 2 cm, identify the affected section before adding additional stripes.
How to Change Colors Cleanly
Work the final stitch of the old stripe until two loops remain on the hook. Yarn over with the new color and pull it through those loops. Turn and begin the next row with the new shade.
Leave approximately 15 cm of yarn at each color change. That gives enough length to weave the tail securely through several stitches.
Do not knot the colors tightly at the side edge. A hard knot can create a visible indentation after the border is added.
Because this blanket uses five colors separated by substantial sections, cutting and weaving the yarn is generally cleaner than carrying unused strands along the entire edge.
How to Adjust the Blanket Width
For a narrower lap blanket, reduce the starting chain while retaining the stitch multiple required by the decorative repeats. Make a sample of the widest openwork section before committing to the full foundation.
For a larger bed blanket, add complete repeats to the starting chain. Do not enlarge the width by switching to a substantially larger hook unless you also want looser stitches and larger openings.
A published worsted striped lapghan provides a useful smaller reference at approximately 102 × 139 cm with a 5 mm hook. A larger sampler-style throw around 127 × 152 cm requires more yarn but gives proportions closer to the full sofa blanket shown in the reference.
How to Adjust the Blanket Length
Length is simpler to change because the blanket grows one stripe at a time. Stop after any complete decorative section once the required measurement has been reached.
For a short lap blanket, target approximately 120–140 cm. A general sofa throw can be worked to roughly 150–170 cm depending on the intended coverage.
Do not stop halfway through an openwork section. Complete the decorative band and its stabilizing solid row before beginning the final border.
If adding substantial length, purchase extra yarn in all five colors before beginning. Matching a dye lot later may be difficult.
Choosing Yarn for the Striped Blanket
Worsted-weight #4 yarn is a practical match for this construction. Published striped blankets using this weight commonly pair it with a 5 mm hook, while individual patterns adjust hook size according to the desired drape.
Use the same yarn line for all five colors when possible. Even yarns carrying the same weight classification can differ in diameter, twist, and elasticity.
Acrylic makes the finished blanket easier to wash and generally keeps the total cost lower for a large project. Cotton produces sharper openwork but adds weight. Wool and wool blends provide elasticity but may require more specific washing instructions.
Whatever fiber is selected, make a swatch containing both a solid section and an openwork section. The difference between those two fabrics is more informative than measuring a solid swatch alone.
Planning the Color Sequence
The reference depends on muted colors with similar visual intensity: dusty blue, sage, cream, beige, and camel. None of the stripes uses an extremely dark value, so the stitch texture remains more prominent than the color contrast.
Place cream between darker blue, sage, or camel sections to create separation. Avoid repeating every color in an identical order throughout the entire blanket.
A practical method is to photograph the yarn skeins together before starting. Convert the photograph to grayscale on a phone. If one color appears dramatically darker than every other yarn, it will become a stronger visual stripe than the reference design.
Keep a written record of completed colors. With a long multi-section project, relying on memory makes accidental repetition more likely.
Blocking the Finished Crochet Blanket
Check the yarn label before choosing a blocking method. Natural fibers can often be wet blocked, while acrylic usually responds better to careful washing and shaping without direct high heat.
Lay the blanket on a clean flat surface. Measure both diagonals before pinning. Equal diagonals indicate that the rectangle is square rather than skewed.
Position the four corners first, followed by the centers of each side. Add additional pins only where needed to straighten the edges.
Do not stretch openwork rows until they become wider than the solid sections. The goal is a consistent rectangular outline, not maximum lace expansion.
Allow the blanket to dry fully before folding or placing it on furniture.
Conclusion
Count stitches at every solid transition row because width control is the central technical requirement in this design. Complete each lace or cluster section before changing color, and use the narrow solid rows to return the fabric to its established stitch count. For another size, adjust the foundation in complete repeats and change the length by adding or removing full stripe sections. Record the final foundation count, yarn quantities, and blocked dimensions for future versions. Save this striped crochet blanket pattern to Pinterest and share the finished throw on Instagram with #TexturedStripeCrochetBlanket. Which section will you repeat most often: the dusty-blue chain texture or the sage openwork band?









