Introduction
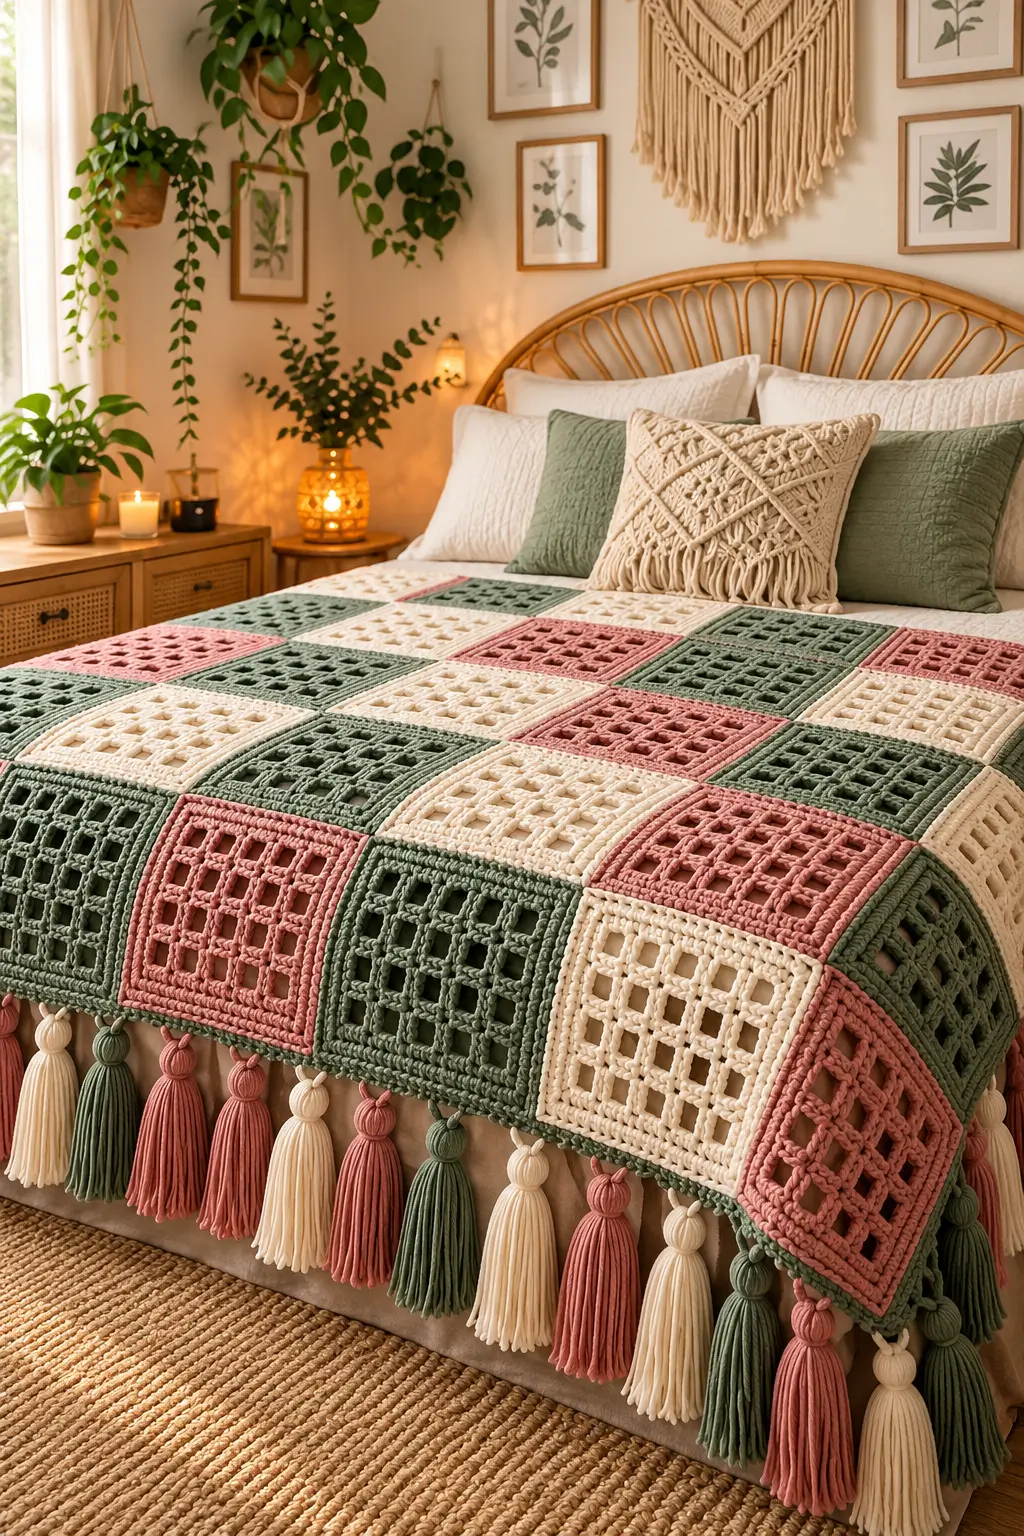
The alternating sage, cream and dusty-rose squares are what control this blanket’s checkerboard geometry. This granny square blanket crochet pattern uses worsted yarn, a 5.5 mm hook, modular openwork motifs and long tassels, with a target bed-throw size of about 150 × 180 cm. It suits an intermediate crocheter because consistent motif gauge matters. Separate squares also make damaged sections easier to repair later.
The Design: What Makes This Granny Square Blanket Different
The photograph depends on three structural decisions. First, every motif has a pronounced outer frame, which gives the open centers enough visual weight to survive joining. Second, sage green appears frequently enough to function as the dominant color while cream and dusty rose interrupt the grid. Third, oversized tassels extend the vertical lines of the crochet granny square blanket instead of adding another stitched border.
Square dimensions matter more than raw stitch tension. A five-round worsted-weight granny motif can finish around 12–13 cm in one published pattern, while other designs use blocked motifs around 15 cm. For this version, the target is a consistent 15 × 15 cm blocked square.
The common mistake is joining motifs before blocking. Small dimensional differences then accumulate across an entire three color granny square blanket, producing rippled seams and uneven outside edges.
Project Info at a Glance
| Skill Level | Time | Finished Size | Hook | Best For |
|---|---|---|---|---|
| Intermediate | 30–45 hours, approximate | 150 × 180 cm target | 5.5 mm | Bed throw / large sofa blanket |
The finished dimension above is the target for this photo-inspired version rather than a measurement extracted directly from the photograph. Final measurements depend on yarn, tension, blocking and joining width.
Materials and Tools
Yarn
Use one category-4 worsted yarn family across all three shades so the motifs block to approximately the same dimensions.
- Sage green — worsted/category 4 — approximately 900–1,200 g — choose a smooth, low-fuzz acrylic, wool blend or cotton blend.
- Warm cream — worsted/category 4 — approximately 650–900 g.
- Dusty rose — worsted/category 4 — approximately 650–900 g.
These quantities are planning estimates for the larger blanket shown here. Actual consumption changes with square count, fiber density, gauge, border depth and tassel size.
Before buying the full quantity, crochet one complete square, weave in the ends and weigh it. Multiply that weight by the planned number of motifs, then add yarn for seams, border, swatching and fringe.
Tools
- 5.5 mm crochet hook
- Locking stitch markers
- Tapestry needle
- Sharp scissors
- Blocking mats
- Rustproof blocking pins
- Tape measure
- Kitchen scale for yarn planning
- 15–18 cm tassel template
Abbreviations
- ch — chain
- sc — single crochet
- dc — double crochet
- sl st — slip stitch
- sp — space
- st/sts — stitch/stitches
- rep — repeat
- RS — right side
- FO — fasten off
Traditional amigurumi abbreviations such as MR, inc and dec are unnecessary here because this project expands from four square corners rather than six-stitch circular shaping.
Gauge and Layout
Make one complete test motif before beginning the full blanket.
The target blocked square is 15 × 15 cm. For a target blanket measuring approximately 150 × 180 cm before substantial border expansion, arrange approximately 10 motifs across × 12 motifs down.
This produces a total of 120 granny squares.
Exact dimensions depend on joining width. Measure ten blocked squares laid side by side before committing to all 120 motifs.
For an evenly distributed three-color arrangement, make approximately:
- 40 sage green squares
- 40 warm cream squares
- 40 dusty rose squares
Shift the colors from row to row instead of stacking identical shades vertically. This creates the diagonal color movement visible in the blanket design.
Granny Square Blanket Pattern — Step by Step
This blanket is worked as separate motifs. Each square is completed and blocked before joining.
Openwork Granny Square — Make 120
Yarn: sage green, warm cream or dusty rose.
Foundation: Ch 4. Join with sl st to the first ch to form a ring.
Round 1: Ch 3, 2 dc into ring, ch 2. Work 3 dc into ring, ch 2 three more times to establish four cluster groups. Join with sl st to the top of the beginning ch-3.
You should now have four clearly defined corner spaces.
Round 2: Sl st across to the first corner sp. Ch 3, 2 dc, ch 2, 3 dc in the same corner. Ch 1. Work 3 dc, ch 2, 3 dc in the next corner, ch 1. Repeat around. Join.
Round 3: Move to a corner. Work 3 dc, ch 2, 3 dc in the corner. Ch 1, work 3 dc into the next side space, ch 1. Repeat the corner-and-side sequence around. Join.
At this stage, one side cluster sits between each pair of corners.
Round 4: Work 3 dc, ch 2, 3 dc into each corner. Place one 3-dc cluster into every ch-1 side space, separating neighboring clusters with ch 1. Join at the end of the round.
Two side clusters now sit between adjacent corners.
Round 5: Repeat the established expansion. Each corner receives 3 dc, ch 2, 3 dc. Every side ch-1 space receives 3 dc. Place ch 1 between neighboring clusters.
Fasten off.
Measure the square before blocking. If your motif is significantly smaller or larger than the target size, adjust the hook before producing the remaining squares.
Framing Round — Work on Every Square
Yarn: same shade as the motif.
Attach yarn in any corner.
Round 6: Ch 1. Work 1 sc into each dc and ch-1 space across each side. In every corner ch-2 space work 2 sc, ch 2, 2 sc. Continue around. Join with sl st.
Fasten off and weave in the tail.
The framing round creates a firmer perimeter for joining. If the square begins to cup, the edge tension is too tight. If the frame develops waves, the outside edge contains too much length relative to the center motif.
Blocking the Granny Squares
Block every completed square to 15 × 15 cm before joining.
Pin the four corners first. Measure both diagonals, then add pins along each side. All squares should dry to approximately the same dimensions.
Do not stretch a noticeably undersized motif until it matches the others. Correct the hook size or remake the square instead. Forced blocking can temporarily disguise a gauge problem, but the difference may return after washing.
Joining the Squares
Lay out ten motifs across and twelve motifs down.
Use a repeating sequence such as sage, cream and dusty rose across the first row. Shift the starting color by one position on each subsequent row.
Place two motifs with wrong sides together. Join corresponding edge stitches with slip stitches, keeping the working yarn behind the seam.
Do not skip stitches simply to make two differently sized motifs fit. If the edge counts or measurements do not match, correct the motifs before continuing.
Join individual motifs into horizontal rows first. Once all twelve rows are complete, connect the long horizontal seams.
Periodically spread the blanket on a flat surface. The grid should remain rectangular without tension lines running through the joins.
Outer Border
Yarn: sage green.
Attach the yarn at one blanket corner.
Border Round 1: Ch 1. Sc evenly around the entire blanket. Work 3 sc at each outside corner. Where two motifs meet, treat the seam as one transition point rather than inserting unnecessary extra stitches.
Border Round 2: Ch 1. Sc in each st around, working 3 sc into the center stitch of each corner. Join.
Border Round 3: Ch 1. Work another sc round if the blanket edge remains flat. At each corner, work 3 sc into the center corner stitch.
Fasten off.
Lay the blanket flat after each border round. A border that flares has too many stitches. An edge that curls inward usually has too few stitches or excessive tension.
How to Make the Tassels
Yarn: sage green, warm cream and dusty rose.
Cut a rigid cardboard template approximately 18 cm long.
Wrap the yarn around the template 20–30 times. Use the same number of wraps for every tassel so the finished fringe remains consistent.
Thread a separate strand underneath the wraps at the upper edge and tie firmly.
Cut through the yarn loops at the opposite end and remove the cardboard template.
Wrap another strand around the bundle approximately 2 cm below the top knot. Wrap six to eight times, tie firmly and hide the ends inside the tassel.
Trim the completed tassel to approximately 15–17 cm.
Repeat the process in sage, cream and dusty rose. Attach the tassels at equal intervals along the blanket edge, maintaining the three-color sequence.
Assembly
- Block every completed motif to the same 15 × 15 cm measurement before arranging the blanket.
- Sort the squares into sage, cream and dusty-rose stacks so the color distribution can be counted.
- Arrange ten squares across and twelve rows down for the proposed 120-square bed throw.
- Shift each new row by one color position to prevent long vertical columns of a single shade.
- Photograph the complete layout before moving the motifs. Keep the photograph as an assembly reference.
- Join individual squares into horizontal strips while matching every corner and edge stitch.
- Connect the twelve completed strips, checking the blanket diagonally after every second seam.
- Work the sage outer border after all joining tails have been woven into the seam structure.
- Make equal-length tassels and attach them at measured intervals rather than estimating the spacing by eye.
- Block the completed blanket to square the corners, align the seams and set the outside border.
The completed blanket should form a flat modular grid with consistent motif dimensions, a stable perimeter and evenly spaced fringe.
7 Technical Tips for a Flatter Granny Square Blanket
- Mark the beginning of every framing round. Losing the first stitch shifts a corner position and can leave one side with a different edge count.
- Measure every tenth square. A 5 mm gauge difference multiplied across ten motifs creates approximately 5 cm of unwanted width.
- Do not add decreases to correct an oversized square. A decrease removes structural width locally and can turn a square motif into a distorted trapezoid.
- Check all four corners before fastening off. An omitted corner chain changes the geometry and can prevent the motif from blocking square.
- Maintain the same tension across all three yarn colors. Changing tension when switching shades creates different motif sizes even when the stitch counts match.
- Pin opposite corners first during blocking. Set the finished width and height to 15 cm before placing additional side pins so one diagonal does not become longer than the other.
- Leave at least 12–15 cm yarn tails at structural joins. Very short tails can work loose where four square corners meet and the blanket receives repeated movement.
Color Placement Strategy
The three shades do not carry the same visual weight. Sage is the darkest color, so it functions as the structural shade. Cream produces the strongest contrast, while dusty rose provides the intermediate value.
For a ten-square row, use the following sequence:
Row A: Sage, Cream, Rose, Sage, Cream, Rose, Sage, Cream, Rose, Sage.
Row B: Cream, Rose, Sage, Cream, Rose, Sage, Cream, Rose, Sage, Cream.
Row C: Rose, Sage, Cream, Rose, Sage, Cream, Rose, Sage, Cream, Rose.
Repeat the A–B–C sequence throughout the blanket.
This creates controlled diagonal movement instead of random color placement. It also makes an incorrectly positioned square easier to identify before the seams are completed.
How Much Yarn Do You Need?
Do not calculate a bed-sized blanket only from a generic skein recommendation. Yarn consumption changes according to fiber, yarn weight, hook size, individual tension, motif construction and tassel density.
A sample-based calculation gives a more useful estimate.
Crochet one complete six-round motif and weave in its ends. Weigh the finished square on a kitchen scale.
For example, if one finished motif weighs 20 g, then 120 motifs require approximately 2,400 g before adding yarn for seams, borders and tassels.
Next, make one finished tassel and weigh it. Multiply that figure by the total number of tassels required.
Add a reserve for joining, edging, swatching and normal gauge variation. When the yarn manufacturer uses dye lots, purchase the main quantity from the same dye lot to reduce visible shade changes across the blanket.
Blocking and Size Control
Blocking is a structural step in a modular crochet blanket because every motif contributes directly to the dimensions of the finished grid.
Wash the test square according to the yarn manufacturer’s care instructions before producing the full set if the selected fiber changes noticeably after washing.
Record three measurements: width before blocking, width immediately after blocking and width after the motif is completely dry.
If the finished square is substantially below 15 cm, move up a hook size or modify the motif before producing the complete batch.
If the square exceeds 15 cm, use a smaller hook or calculate the final blanket dimensions from the larger motif rather than aggressively stretching or compressing it during blocking.
Consistency across all 120 motifs matters more than forcing every yarn and tension combination to match an arbitrary measurement.
Conclusion
Finish one complete test motif before purchasing yarn for the full bed-size project. Block it to 15 cm, weigh it, record the yarn consumption and use those figures to calculate the final quantity. That process gives this granny square blanket crochet pattern a reliable scale while preserving the sage, cream and dusty-rose layout visible in the reference design. Pin the complete grid before joining, then add the border and measured tassels last. Save the finished blanket to Pinterest and share your version on Instagram with #SageGridBlanket. For your version, will sage remain the dominant shade, or will you make cream the repeating anchor color?









