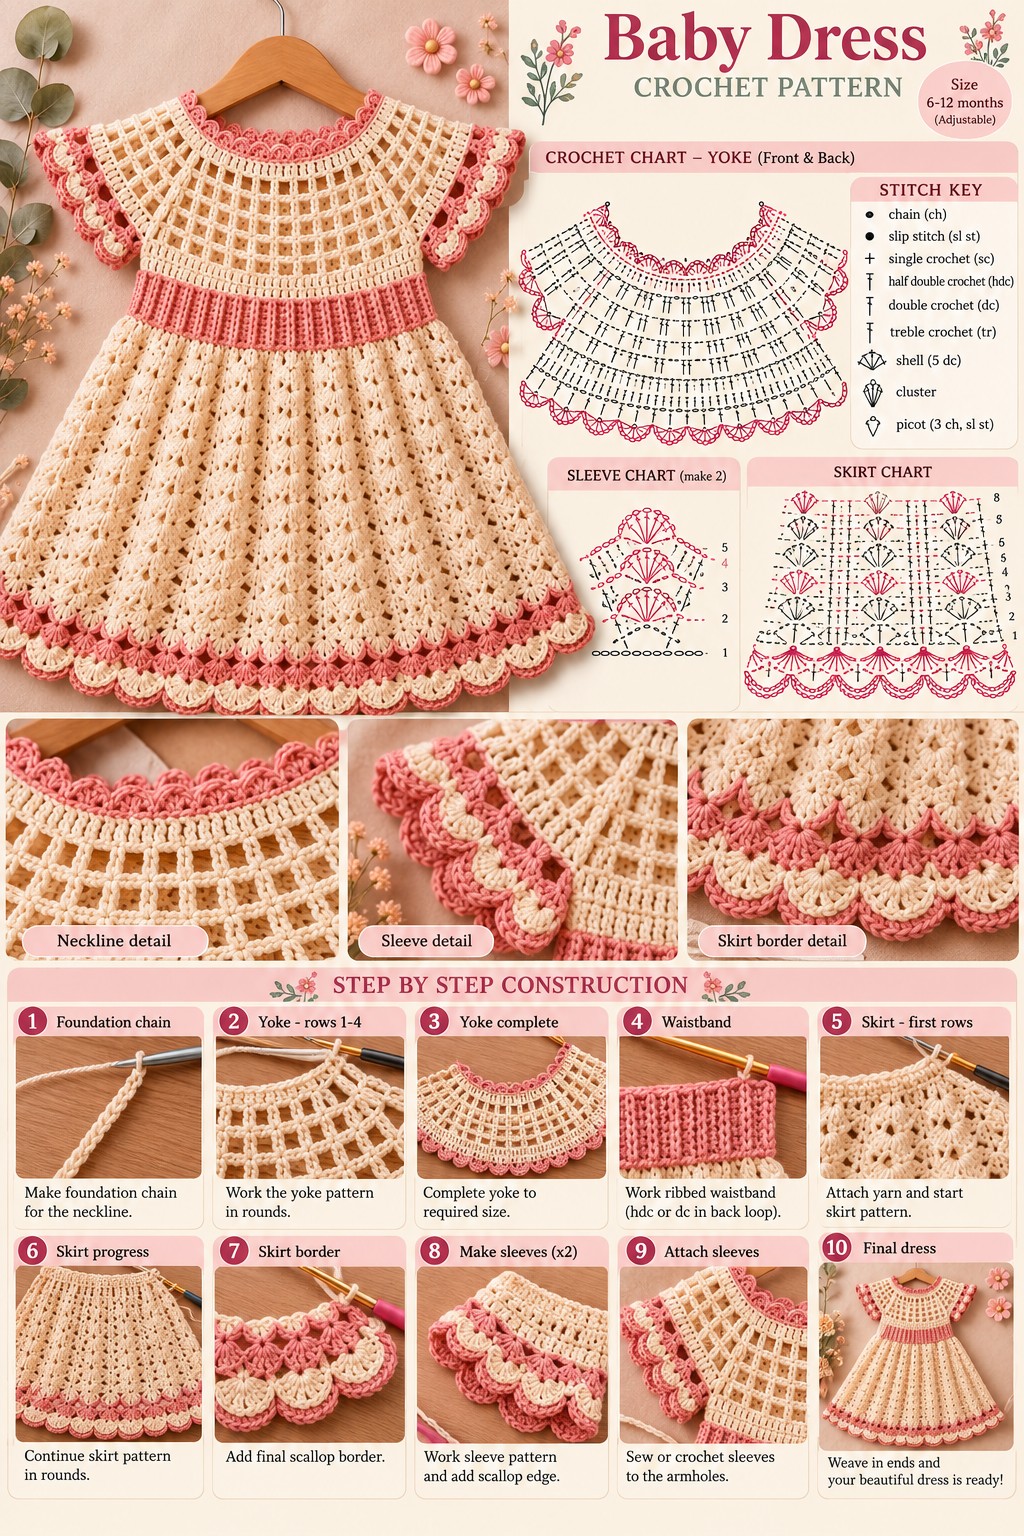
A circular baby-dress yoke has one unforgiving measurement: if the neckline expansion is wrong, every shell below it shifts. This crochet baby dress pattern recreates the pictured cream-and-pink design with an open lattice yoke, flutter sleeves, ribbed rose waistband, flared lace skirt and layered scalloped hem. The construction is sized as an adjustable 6–12 month starting point and should be checked against the child’s actual measurements.
The Design: What Makes This Crochet Baby Dress Different
The dress is built around three contrasting stitch structures. The upper yoke uses open chain spaces separated by double-crochet posts, which creates a lightweight circular framework without making the neckline bulky. A dense pink ribbed waistband interrupts that open texture and gives the skirt a stable attachment line.
Below the waist, repeated lace fans expand gradually into an A-line skirt. The same shell language returns at the sleeves and hem, but pink accent rounds separate the cream sections and make the scallops more visible.
The critical construction mistake is adding increases randomly through the yoke. Uneven expansion produces a wavy neckline or tight armholes. Marking the front, back and sleeve sections before dividing the yoke keeps this crochet baby dress balanced.
Project Info at a Glance
| Skill Level | Suggested Size | Construction | Hook | Best For |
|---|---|---|---|---|
| Intermediate | 6–12 months, adjustable | Top-down yoke with attached skirt | 3–3.5 mm | Baby dress, photo outfit and summer garment |
The size label visible in the reference image is 6–12 months, but age labels are not sufficient for garment fitting. Check neckline, chest, armhole depth and finished length against the intended wearer before continuing beyond the yoke.
Materials and Tools
Yarn
- Cream — DK/light-weight cotton or cotton blend — approximately 250–300 g.
- Dusty rose pink — DK/light-weight cotton or cotton blend — approximately 70–100 g.
Choose a smooth yarn that gives clear chain spaces and shell stitches. Cotton or a soft cotton blend works well for the pictured lace construction because the scallops need enough definition to remain separated after blocking.
Tools
- 3–3.5 mm crochet hook
- Stitch markers
- Tapestry needle
- Scissors
- Tape measure
- Blocking mat
- Optional small buttons for a back-neck opening
Abbreviations
- ch — chain
- sc — single crochet
- hdc — half double crochet
- dc — double crochet
- tr — treble crochet
- sl st — slip stitch
- BLO — back loop only
- sp — space
- sk — skip
- rep — repeat
- st/sts — stitch/stitches
- shell — multiple dc worked into one space
- picot — ch 3, sl st into first ch
Garment shaping does not require invisible decreases in this construction; decreases should be placed visibly and symmetrically when adjusting the neckline or armholes.
Crochet Baby Dress Pattern — Step by Step
This is a photo-inspired construction based on the visible garment structure. Because baby sizing varies, treat stitch counts as a starting sample and compare the work with actual measurements before separating the sleeves.
Foundation Neckline
Yarn: cream.
Ch 72 loosely.
Join with sl st to form a ring, taking care not to twist the chain.
If a back opening is preferred, work the first several yoke rows back and forth instead of joining immediately.
Round 1: Ch 3, dc in each ch around (72).
Join with sl st.
The neckline should pass comfortably over the child’s head. Increase the starting chain in multiples of 4 if additional circumference is required.
Decorative Neckline Round
Change to dusty rose pink.
Round 2: Ch 1, sc in first st, *ch 3, sk 1 st, sc in next st*. Repeat around.
Join with sl st.
Round 3: Sl st into first ch-3 sp, *sc, hdc, 3 dc, hdc, sc* in same sp. Repeat in each ch-3 sp.
Join and fasten off pink.
This creates the small scalloped pink neckline visible in the reference dress.
Yoke Setup
Return to cream.
Join yarn beneath the decorative neckline.
Round 4: Ch 3, dc evenly around, increasing approximately every 5–6 stitches.
The exact increase spacing should be adjusted so the round lies flat.
Round 5: Ch 3, *dc in next 2 sts, ch 2, sk 1 st*. Repeat around.
Join.
Open Lattice Yoke
The pictured upper section contains vertical posts separated by rectangular chain spaces.
Round 6: Sl st to first ch-2 sp, ch 3, dc in same sp, ch 2, *2 dc in next ch-2 sp, ch 2*. Repeat around.
Round 7: Sl st to first ch-2 sp, ch 3, 2 dc in same sp, ch 2, *3 dc in next ch-2 sp, ch 2*. Repeat around.
Round 8: Work 3 dc in each ch-2 sp with ch 3 between groups.
Round 9: Work 3 dc in each ch-3 sp with ch 3 between groups, adding an extra dc to selected groups if additional circumference is required.
Rounds 10–12: Continue the established lattice, increasing evenly enough that the yoke remains flat.
Stop when the yoke reaches the required armhole depth.
Checking Yoke Size
Fold the yoke in half with the back centered.
Measure the circumference at the lower edge. It should provide the required finished chest measurement plus approximately 4–6 cm of ease.
Check the vertical measurement from neckline to underarm. Do not continue adding rounds merely to increase chest circumference if the armhole depth is already correct.
Divide Front, Back and Sleeves
Place four stitch markers to identify:
- Front section
- First sleeve section
- Back section
- Second sleeve section
The front and back should each receive approximately one-third of the available circumference. The remaining third is divided between the two sleeves.
Work across the back section.
Ch enough stitches to bridge the first underarm, usually approximately 4–6 cm.
Skip the sleeve section.
Work across the front.
Make the second underarm chain and skip the remaining sleeve section.
Join to work the body in rounds.
Lower Yoke Band
Yarn: cream.
Round 1: Ch 3, dc in each stitch and underarm chain around.
Round 2: Ch 1, sc in each stitch around.
Round 3: Ch 3, dc around.
This firm band stabilizes the open yoke before the waistband is attached.
Pink Ribbed Waistband
Yarn: dusty rose pink.
The photographed waistband is noticeably denser than the surrounding lace.
Join pink yarn at a side seam.
Ch 9.
Row 1: Hdc in second ch from hook and across (8).
Sl st into the next 2 stitches of the cream body.
Turn.
Row 2: Skip the 2 sl sts, hdc BLO across (8).
Row 3: Ch 1, turn, hdc BLO across, sl st into next 2 body stitches.
Repeat Rows 2–3 around the entire waist.
Join the first and final ribbing rows with slip stitches or a sewn seam.
The finished waistband should measure approximately 3–4 cm deep.
Skirt Setup Round
Return to cream.
Join yarn along the lower edge of the waistband.
Round 1: Sc evenly around, placing enough stitches for a multiple of 6.
Round 2: Ch 3, dc in each st around.
Round 3: *Dc in next 5 sts, 2 dc in next st*. Repeat around.
This adds initial fullness without producing abrupt gathers.
Lace Skirt — First Motif Section
Round 1: Ch 3, *dc in next 2 sts, ch 2, sk 2 sts, dc in next 2 sts*. Repeat around.
Round 2: Ch 3, dc in next dc, *ch 2, 3 dc in ch-2 sp, ch 2, dc in next 2 dc*. Repeat around.
Round 3: Sl st to ch-2 sp, ch 3, 4 dc in same sp, *ch 3, 5 dc in next ch-2 sp*. Repeat around.
Round 4: Sl st to center of first shell, ch 3, 4 dc in same position, *ch 3, 5 dc in center of next shell*. Repeat around.
Round 5: Ch 3, dc across each shell, ch 4 between shells.
Round 6: Work a 5-dc shell into each ch-4 space with ch 3 between shells.
Continuing the Flared Skirt
Repeat the lace motif while keeping the shell columns vertically aligned.
After approximately every 4–6 rounds, add additional chain spaces or increase selected shells from 5 dc to 6 dc.
Distribute increases evenly around the skirt.
Continue until the skirt reaches the required length from the waistband.
For a 6–12 month starting size, check the garment frequently rather than relying on a fixed number of lace repeats.
Pink Hem Accent
Change to dusty rose pink.
Join yarn at the beginning of a round.
Round 1: Ch 1, sc around.
Round 2: Sl st to the first shell position, *work 5 dc in shell center, ch 1, sl st between shells*. Repeat around.
Fasten off.
Cream Scalloped Hem
Change to cream.
Join yarn at the center of one pink shell.
Round 1: *7 dc around the top of the pink shell, sl st between shells*. Repeat around.
Round 2: *Sc in first dc, hdc in next, dc in next, picot, dc in next, hdc in next, sc in next*. Adjust across each shell as required.
Join with sl st.
Fasten off.
The final hem should form a repeating cream-and-pink scalloped edge rather than a straight band.
Left Flutter Sleeve
Begin with cream.
Join yarn at the center of the underarm.
Round 1: Sc evenly around the sleeve opening.
Round 2: Ch 3, *2 dc in next st, dc in next st*. Repeat around to create controlled fullness.
Round 3: *Sk 1 st, 5 dc in next st, sk 1 st, sl st in next st*. Repeat around.
Change to dusty rose.
Round 4: Work sc around each cream shell, placing a picot at the center of each shell.
Fasten off.
Right Flutter Sleeve
Repeat the left sleeve instructions.
Count the number of shells on the first sleeve and use the same number on the second.
Check that both sleeves extend the same distance from the shoulder before weaving in the tails.
Optional Back Neck Opening
If the neckline does not pass comfortably over the child’s head, add a short back opening.
Work the upper yoke back and forth for approximately 4–5 cm before joining.
Finish one edge with sc.
On the opposite edge make one or two chain loops sized to the selected buttons.
Sew buttons securely to the other side.
For garments intended for babies, inspect buttons and other attached components frequently and stop using the garment if any attachment becomes loose.
How to Adjust the Dress Size
Measure the intended wearer rather than changing the pattern according to age alone. Four measurements control most of the fit: neckline circumference, chest circumference, neckline-to-underarm depth and total dress length.
Make a blocked gauge swatch before calculating the neckline. If 20 stitches measure 10 cm and the required starting neckline is 36 cm, the mathematical starting point is:
20 × 3.6 = 72 stitches.
Adjust the result to the stitch multiple required by the yoke.
For the chest, add approximately 4–6 cm of positive ease. Increase through the yoke until both the chest circumference and armhole depth are correct.
Controlling the Circular Yoke
Place the yoke on a flat surface after every two rounds. The outer edge should expand without forming waves or pulling into a bowl.
A wavy outer edge indicates excessive increases. Reduce the number of increase points in the following round.
A yoke that cups upward needs additional circumference. Add increases evenly rather than placing several extra stitches in one section.
Do not judge the yoke solely by stitch count. Yarn thickness, hook size and personal tension can change the diameter substantially even when two crocheters follow identical numbers.
Building an Even Lace Skirt
Use stitch markers to identify the beginning of each round and several major repeat positions. Open lace makes missed stitches harder to detect because the error may not become visible until several rounds later.
Count the shell motifs at the end of every repeat round. If the pattern begins with 18 shell columns, all non-increase rounds should preserve those 18 structural positions.
When extra flare is required, add new motifs symmetrically. Increasing repeatedly at one side creates a skirt that hangs longer or fuller in that area.
Allow the skirt to hang vertically while checking length. Measuring lace while it is spread flat can underestimate the amount of vertical stretch produced by its own weight.
7 Technical Tips for a Better Crochet Baby Dress
- Prevent a tight neckline. Check the foundation chain around the intended neckline measurement before completing several yoke rounds. A starting edge that is even 2 cm too small can make the finished pullover difficult to dress.
- Stop yoke rippling. Lay the work flat after every two rounds. If the outer edge forms multiple waves, remove some increases from the next expansion round rather than trying to block them away later.
- Keep both armholes equal. Count the exact number of yoke groups assigned to each sleeve before joining the body. A one-group difference can make the two flutter sleeves visibly different in width.
- Avoid an overstretched waistband. Measure the ribbed pink band after joining it to the bodice. It should sit flat without reducing the chest circumference or adding more than approximately 1 cm of unwanted flare.
- Control skirt expansion. Add new shell motifs at evenly distributed positions. Concentrated increases create vertical folds instead of the balanced A-line shape shown in the reference dress.
- Match the sleeve scallops. Count the shells on the completed first sleeve before starting the second. Both sides should have the same shell count and approximately the same finished depth.
- Check length after blocking. Lace can lengthen when wet. Block the garment before deciding that additional skirt rounds are necessary, particularly when the dress is already within 1–2 cm of the target length.
Choosing the Cream and Pink Color Placement
Cream should remain the dominant color if you want the result to resemble the reference image. It covers the yoke, main skirt and most of the shell structure.
Dusty rose works as an architectural accent rather than a random stripe. Concentrate it at the neckline, sleeves, waistband and lower border. Repeating the same accent at those four locations ties the garment together without interrupting every lace repeat.
A pale pink produces a softer contrast, while coral creates a more pronounced border. Sage, lavender or light blue can replace the rose yarn without changing the construction.
Keep both colors in the same yarn weight and fiber family. Switching to a substantially thicker accent yarn can tighten the neckline and make the waistband heavier than the skirt.
Blocking the Finished Dress
- Weave in every yarn tail before wet blocking.
- Dampen the dress according to the yarn manufacturer’s care instructions.
- Lay the yoke flat and shape the neckline into an even curve.
- Match the left and right armhole dimensions.
- Straighten the pink waistband without stretching it horizontally.
- Spread the skirt evenly from the waist to the hem.
- Align all major lace columns vertically.
- Shape every cream-and-pink hem scallop individually.
- Match the two flutter sleeves and arrange their scallops evenly.
- Allow the garment to dry completely before moving or hanging it.
The finished dress should have a flat circular yoke, equal armholes, a level waistband and an evenly expanding skirt.
Finishing the Crochet Baby Dress
Inspect the inside of the garment before use. Weave cream tails into cream stitches and pink tails into the accent sections so contrasting ends do not show through the open lace.
Pay particular attention to the underarms and waistband joins. These areas experience more movement than the decorative hem and should have secure tails woven in multiple directions.
Check every shell around the lower border. Replace a distorted scallop before the final blocking rather than attempting to stretch it into the correct shape.
If buttons are used, sew them through multiple yarn strands and inspect their attachment regularly. Avoid loose beads or other small decorative components on a baby garment.
Conclusion
Begin with the neckline and stop to measure before extending the circular yoke; correcting its circumference later changes the armholes, waistband and skirt attachment simultaneously. Once the yoke fits, divide the sleeves symmetrically, build the pink ribbed waist and expand the lace skirt gradually rather than adding fullness in one round. Finish one flutter sleeve before the second so its shell count becomes an exact reference. Block the completed crochet baby dress pattern before making final length adjustments. Save the design to Pinterest or share the finished cream-and-pink version on Instagram with #PinkLaceBabyDress. For this dress, would you keep the dusty-rose waistband or work it in cream and reserve pink only for the scalloped edges?









