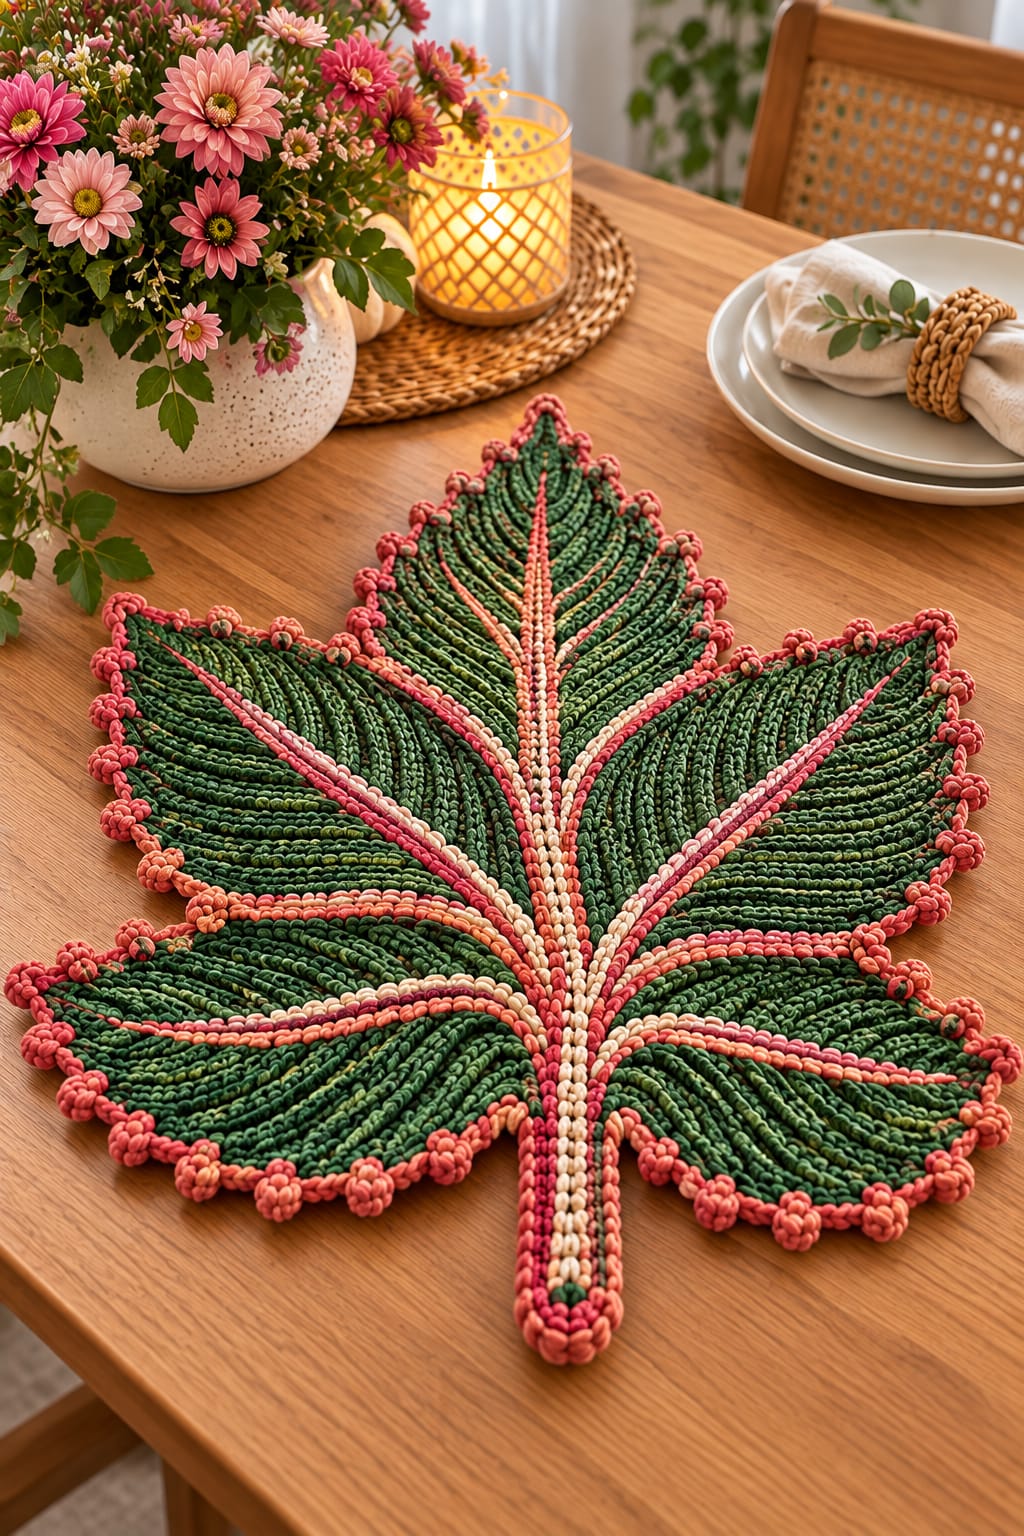
A green maple leaf with pink veins reverses the usual autumn palette, so its identity has to come from structure rather than color. This crochet maple leaf placemat pattern uses a tall central point, paired side lobes, deep valleys, raised coral-pink veins and a knotted border. Worked in medium-weight cotton with a 4–5 mm hook, the finished table mat targets approximately 35–38 cm across.
The Design: What Makes This Maple Leaf Different
The photographed design is dominated by directional texture. Dense green ridges travel outward from the center toward each lobe, making the fabric resemble the growth lines of a real leaf rather than a flat crochet motif.
Coral, blush and cream surface stitches form a branching vein system. The central vein continues into the stem, while paired side veins divide the broad green fabric into recognizable sections. This contrast is particularly important because the body uses one dominant dark-green color.
The outer edge adds a third structural feature: small coral knots positioned around the pointed perimeter. These details emphasize the serrated outline without adding a wide lace border. The main construction risk is excessive edge stitching. Too many stitches around the points will make a green crochet maple leaf ripple instead of lying flat.
Project Info at a Glance
| Skill Level | Time | Finished Size | Hook | Best For |
|---|---|---|---|---|
| Intermediate | Approx. 7–10 hours | Approx. 35–38 cm wide | 4–5 mm | Placemats, spring tables and decorative centerpieces |
The photographed object cannot be physically measured from the image, so the dimensions above are a target for this photo-inspired version. Published maple-leaf placemats provide useful scale references: one medium-weight design measures approximately 14.5 × 15 inches with a 5 mm hook, while a smaller worsted-cotton maple leaf measures approximately 10 × 9 inches with a 3.5 mm hook.
Materials and Tools
Yarn
- Dark forest green — medium/worsted-weight cotton — approximately 100–120 g.
- Medium leaf green — medium/worsted-weight cotton — approximately 20–30 g for tonal texture.
- Coral pink — medium/worsted-weight cotton — approximately 20–25 g.
- Blush pink — medium/worsted-weight cotton — approximately 10–15 g.
- Cream — medium/worsted-weight cotton — approximately 10–15 g.
A published 14.5 × 15-inch maple-leaf placemat uses medium-weight yarn with a 5 mm hook. Another current maple-leaf pattern uses worsted 100% cotton, a 3.5 mm hook and approximately 85–91 m for a smaller 25.5 × 23 cm piece. Those references support medium-weight cotton as a practical starting point for a structured table mat.
Tools
- 4–5 mm crochet hook
- 3.5–4 mm hook for compact vein and border details
- Stitch markers
- Tapestry needle
- Scissors
- Tape measure
- Blocking mat
- Rust-resistant blocking pins
Abbreviations
- ch — chain
- sc — single crochet
- hdc — half double crochet
- dc — double crochet
- tr — treble crochet
- sl st — slip stitch
- inc — increase
- dec — decrease
- sc2tog — single crochet two stitches together
- st/sts — stitch/stitches
- sp — space
- BLO — back loop only
Keep decreases tight inside the valleys between lobes. Loose decreases round those indentations and reduce the definition of the maple-leaf silhouette.
Green Crochet Maple Leaf Placemat Pattern — Step by Step
This is an original photo-inspired construction rather than a transcription of a published pattern. The leaf is formed from a central foundation and shaped lobe sections, followed by surface-crochet veins, a long stem and coral border details.
Central Foundation
Yarn: dark forest green.
Ch 17.
Row 1: Sc in second ch from hook and across (16).
Row 2: Ch 1, turn, sc across (16).
Row 3: Ch 1, turn, 2 sc in first st, sc across to final st, 2 sc in final st (18).
Row 4: Ch 1, turn, sc across (18).
Row 5: Ch 1, turn, 2 sc in first st, sc across to final st, 2 sc in final st (20).
Row 6: Ch 1, turn, sc across (20).
Place a marker at the exact midpoint. This marker establishes the axis for the main vein, tallest lobe and stem.
Central Upper Lobe
Yarn: dark forest green.
The central lobe must remain the longest section of the finished leaf.
Row 1: Join yarn across the designated center section and sc across.
Row 2: Ch 1, turn, 2 sc in first st, sc across to final st, 2 sc in final st.
Row 3: Ch 1, turn, sc across.
Row 4: Repeat Row 2.
Rows 5–9: Sc across.
Begin shaping the pointed tip.
Row 10: Ch 1, turn, sc2tog, sc across to final 2 sts, sc2tog.
Row 11: Sc across.
Rows 12–19: Repeat Rows 10–11 four times.
Continue decreasing at both edges every other row until 3 stitches remain.
Final Row: Sc3tog.
Fasten off.
The final point should sit directly above the center marker.
Upper Left Lobe
Yarn: dark forest green.
Join yarn to the upper-left section, leaving a narrow valley between this lobe and the central lobe.
Row 1: Sc across the selected stitches.
Row 2: Ch 1, turn, 2 sc in first st, sc across to final st, 2 sc in final st.
Row 3: Sc across.
Row 4: Repeat Row 2.
Rows 5–8: Sc across.
Row 9: Ch 1, turn, sc2tog, sc across to final 2 sts, sc2tog.
Row 10: Sc across.
Repeat Rows 9–10 until 3 stitches remain.
Final Row: Sc3tog.
Fasten off.
Upper Right Lobe
Repeat the upper-left lobe on the opposite side.
Count the rows rather than estimating the length visually. Both tips should finish at matching distances from the center.
Fasten off.
Middle Left Lobe
Yarn: dark forest green.
Join yarn below the upper-left section.
Row 1: Sc across the selected stitches.
Row 2: Ch 1, turn, 2 sc in first st, sc across, 2 sc in final st.
Row 3: Sc across.
Row 4: Repeat Row 2.
Rows 5–7: Sc across.
Row 8: Ch 1, sc2tog, sc across to final 2 sts, sc2tog.
Row 9: Sc across.
Repeat Rows 8–9 until 3 stitches remain.
Final Row: Sc3tog.
Fasten off.
Middle Right Lobe
Work the same instructions as the middle-left lobe.
Lay the piece flat after every few rows and compare both sides. Correct a length discrepancy before finishing the pointed tip.
Lower Left Lobe
Yarn: dark forest green.
Join yarn at the lower-left side of the foundation.
Row 1: Sc across the selected section.
Row 2: Ch 1, turn, 2 sc in first st, sc across, 2 sc in final st.
Row 3: Sc across.
Row 4: Repeat Row 2.
Rows 5–6: Sc across.
Row 7: Ch 1, sc2tog, sc across to final 2 sts, sc2tog.
Row 8: Sc across.
Repeat Rows 7–8 until 3 stitches remain.
Final Row: Sc3tog.
Fasten off.
Lower Right Lobe
Repeat the lower-left lobe instructions on the opposite side.
These two sections should angle slightly downward toward the future stem instead of extending horizontally.
Adding the Ribbed Leaf Texture
The reference image contains pronounced green ridges that radiate from the central vein. Surface crochet provides a practical way to reproduce this effect without making every lobe separately.
Yarn: medium leaf green or dark forest green.
Join yarn near the center of the leaf.
Work a line of surface slip stitches outward toward the perimeter, following the natural direction of one lobe.
Fasten off approximately 5–8 mm before the outer border.
Move approximately 5–7 mm to one side and work another parallel line.
Repeat across each lobe.
Keep the ridges close together but do not pull them tight. Surface stitches that are shorter than the underlying fabric will make the leaf cup.
Central Coral Vein
Yarn: coral pink.
Join the coral yarn at the lower center of the leaf.
Work surface slip stitches in a continuous line toward the tip of the central lobe.
Keep the line centered between the green ridges.
Stop approximately 1 cm before the final point.
Fasten off.
Cream Central Highlight
Yarn: cream.
Join cream yarn beside the coral central vein.
Work a second line of surface slip stitches from the lower center toward the upper lobe.
The cream line should remain narrower visually than the surrounding coral.
Fasten off before reaching the upper point.
Upper Side Veins — Make 2
Yarn: coral pink.
Begin near the central vein junction.
Surface crochet diagonally toward each upper side lobe.
Follow the center of each lobe and stop approximately 1–2 cm before the point.
Fasten off.
Middle Side Veins — Make 2
Repeat the same technique toward the middle left and middle right lobes.
Keep the beginning of each vein close to the center junction. The branching lines should appear to grow from one central spine.
Lower Side Veins — Make 2
Work coral surface slip stitches toward the two lower lobes.
These lines should curve slightly downward rather than extending horizontally.
Fasten off.
Blush and Cream Vein Highlights
Yarn: blush pink and cream.
Add selected parallel lines beside the major coral veins.
Do not outline every vein identically. The photograph uses coral as the dominant contrast, with lighter lines concentrated around the center.
Keep each highlight approximately 1 stitch away from its neighboring vein to preserve the green background.
Maple Leaf Stem
Yarn: dark forest green.
Join yarn at the lower center.
Ch 28.
Beginning in the second chain from the hook, sc in each chain back toward the leaf.
Turn around the foundation chain and work sc along the opposite side.
At the bottom end, work 3 sc around the tip.
Join the stem securely to the leaf with sl st.
Fasten off.
Stem Vein
Continue the color arrangement from the main leaf into the stem.
Work one cream line of surface slip stitches along the center of the stem.
Add a coral line beside the cream stripe.
The two lines should connect visually to the central leaf vein at the stem junction.
Coral Edge Round
Yarn: coral pink.
Join yarn at the bottom of the stem.
Work sc evenly around the complete stem and leaf.
At each large outer point work:
(Sc, ch 2, sc) in the same point stitch.
At each deep valley work sc2tog when required to pull the edge inward.
Continue around the complete perimeter.
Join with sl st.
Do not fasten off if working the knotted border immediately.
Knotted Pink Border
The photograph uses rounded pink details at regular intervals around the edge.
Work approximately 2–3 sc between decorative knots, adjusting the spacing near points and valleys.
For each small knot work:
Ch 3, 3 hdc in third ch from hook, ch 1, sl st into the same base stitch.
Continue in sc to the next knot position.
At a major lobe point, work a slightly larger knot:
Ch 4, 4 hdc in third ch from hook, sl st into the point stitch.
Repeat around the leaf.
Fasten off and weave the tail through the coral border.
How to Keep the Raised Texture Flat
The large number of surface-crochet lines creates a specific technical problem: every added line can shorten the underlying fabric slightly. Several tight lines eventually cause the entire leaf to curl.
Place the leaf on a flat table after every three or four ridges. The surface stitches should rest on top of the green fabric without pulling the perimeter inward.
If a lobe begins to cup, remove the most recent ridge and work it again with a larger hook or looser tension. Do not rely on aggressive blocking to correct severely tight surface crochet.
Keep approximately 5–8 mm between neighboring green ridges. Consistent spacing creates the dense botanical texture visible in the reference image without covering the base fabric completely.
Blocking the Green Maple Leaf Placemat
- Dampen the completed placemat according to the cotton yarn’s care instructions.
- Lay it face up and straighten the cream-and-coral central vein before pinning any outer points.
- Pin the central upper lobe so its point aligns directly with the stem.
- Position the upper left and upper right lobes at equal angles.
- Pin the middle side lobes to establish the maximum width of the placemat.
- Pull both lower lobes outward and slightly toward the stem.
- Pin every valley inward so the individual maple lobes remain distinct.
- Shape the coral border knots individually without stretching them away from the green fabric.
- Straighten the stem and confirm that its cream stripe connects visually with the central vein.
- Allow the cotton to dry completely before removing the pins.
The finished placemat should lie flat with a straight central axis, symmetrical paired lobes and evenly distributed surface texture.
7 Technical Tips for a Better Crochet Maple Leaf Placemat
- Prevent a crooked central lobe. Mark the exact midpoint before beginning the upper section. Even a two-stitch offset becomes obvious after the central vein and stem are added.
- Stop the surface ridges from puckering. Check the leaf after every three or four raised lines. If the edge lifts more than approximately 5 mm from the table, loosen the next surface stitches.
- Control border ruffling. Do not add an increase beside every decorative knot. Reserve extra stitches for convex points and decrease inside the deepest valleys.
- Match paired lobes accurately. Write down the row count of every completed left lobe and repeat that number on its right-side partner. Visual estimation becomes unreliable once the raised texture is added.
- Keep the vein junction compact. Start the side veins within approximately 1–2 cm of the central junction but avoid placing every yarn tail under the same stitches. Excess bulk can create a raised lump at the center.
- Protect the pointed silhouette. Pin both the outer tips and inner valleys during blocking. Pinning only the tips stretches the perimeter but leaves the valleys too shallow.
- Keep the stem proportional. Target a stem width of approximately 2–3 cm for a 35–38 cm placemat. A much wider stem changes the balance of the two lower lobes.
Choosing Colors for This Maple Leaf
Dark forest green should remain the dominant color because it provides enough contrast for the coral and cream vein system. A lighter green can be introduced through selected ridges, but alternating every row between two greens will create stripes rather than botanical texture.
Coral works as the primary contrast because it remains visible against dark green without the visual weight of a very dark border. Blush pink softens selected vein sections, while cream creates the highest-contrast line through the center.
For a more botanical version, replace coral with tan and cream. For a Christmas table setting, use dark green with burgundy veins and an ivory center line. A spring version can use sage green with dusty pink and cream.
Keep the border color connected to the vein palette. Introducing an unrelated sixth color around the perimeter weakens the visual link between the edge and center.
How to Adjust the Finished Size
For a standard dining placemat, aim for approximately 35–38 cm across the widest lobes. A published medium-weight maple-leaf placemat measures approximately 14.5 × 15 inches, or about 36.8 × 38.1 cm, using a 5 mm hook.
For a smaller decorative mat, worsted cotton with a 3.5 mm hook can produce a maple leaf around 25.5 × 23 cm. That scale works better beneath a vase, candle holder or small centerpiece than beneath a full dinner plate.
Do not resize only the central lobe. Change the dimensions of every paired lobe, the stem and the spacing between surface ridges proportionally.
When making a complete set, finish and block the first leaf before beginning the others. Record its hook size, lobe row counts, final width and stem length.
Using the Green Maple Leaf as Table Decor
For place-setting use, center the dinner plate over the junction of the veins and allow the upper and side points to remain visible. Position the stem toward the diner when you want the complete maple silhouette to remain readable.
The leaf can also function as a centerpiece mat beneath a vase or decorative arrangement. Several smaller leaves can be combined into a table runner by alternating the direction of their stems.
Use 100% cotton if the placemat will be used around warm tableware. A decorative crochet mat should not automatically be treated as a trivet for cookware directly from an oven or stovetop.
Finishing the Raised Veins and Border
Turn the leaf over and inspect the reverse side before the final blocking. Weave coral tails into nearby coral stitches wherever possible, and keep cream tails away from the dark-green areas where they could show through.
Reverse direction once while weaving every structural tail. Surface-crochet ends experience more movement during washing and blocking than yarn tails buried inside dense conventional rows.
Check every border knot individually. A loose knot can enlarge during blocking and become noticeably different from the neighboring details.
After all tails are secured, complete one final blocking session and measure from the farthest left point to the farthest right point. Record that measurement if additional matching placemats will be made.
Conclusion
Complete the green body before adding any contrast lines because the lobe proportions determine where every coral and cream vein must travel. Next, establish the central vein and stem as one continuous visual axis, then branch the remaining lines toward matching side lobes. Add the knotted border only after the leaf lies flat; border stitches cannot correct distorted surface crochet underneath. For a matching table set, record the measurements of the first blocked crochet maple leaf placemat pattern before starting another. Save the design to Pinterest or share the finished table setting on Instagram with #GreenPinkMapleLeaf. For this green version, would you keep the coral-pink veins or change them to cream and burgundy?









