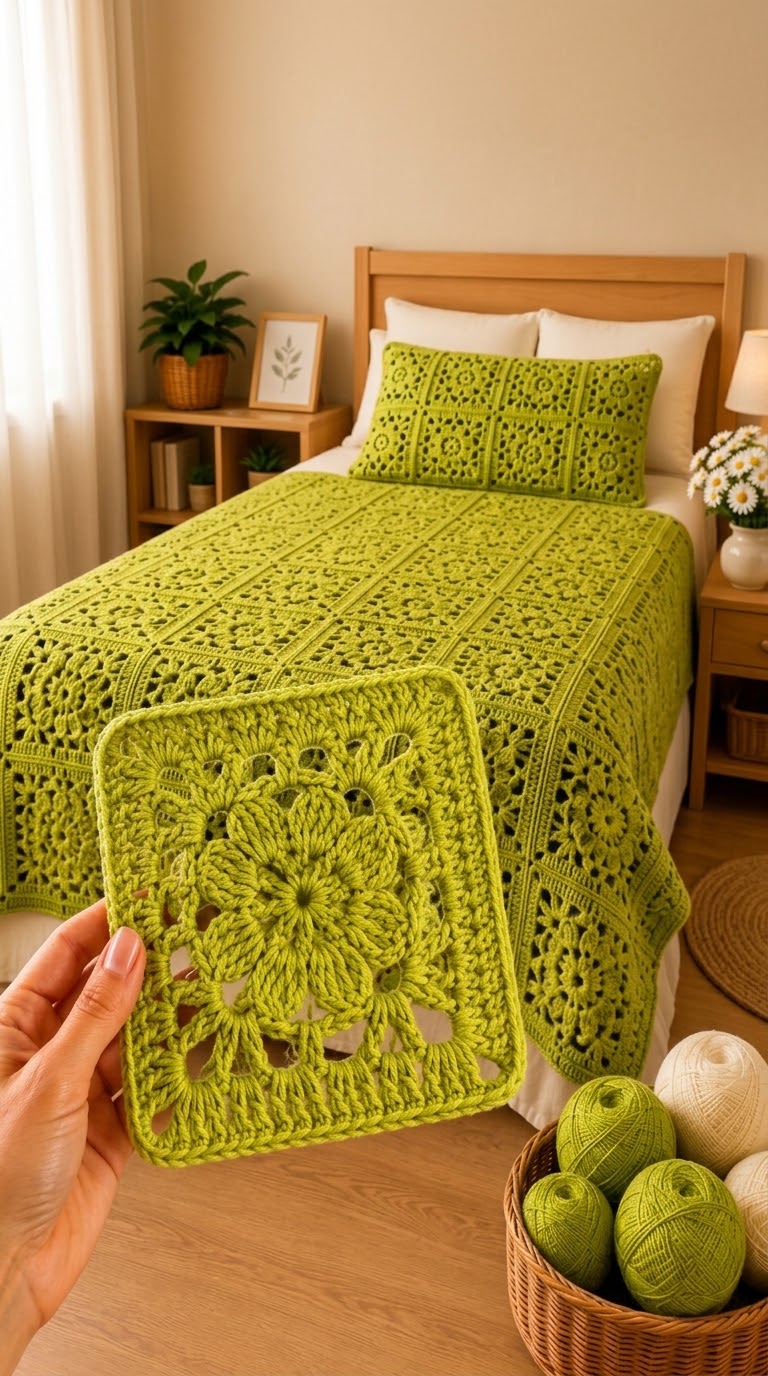
A flower that must become four mathematically equal corners is the central problem in this bedspread. This flower granny square blanket crochet pattern uses DK yarn, a 4.0 mm hook, repeated floral blocks, and a flat joining method to reproduce the photographed structure at bed scale. It suits intermediate crochet skills. Modular construction also lets you replace a damaged square without rebuilding the entire blanket.
The Design: What Makes This Flower Blanket Different
The photographed blanket depends on three structural decisions. First, the flower occupies most of each square instead of sitting as a small center decoration; that produces the pronounced radial pattern visible across the bed. Second, open chain spaces separate the flower from the outer frame, preventing the monochrome floral granny square blanket from reading as a solid sheet. Third, relatively narrow joins keep the square grid visible without creating heavy ridges.
The matching pillow repeats the same visual language at a smaller scale. A common error in a crochet flower blanket is joining motifs before their dimensions match. A difference of only 5 mm per square can become several centimeters across a bed. Block every motif to one template measurement before assembly.
Project Info at a Glance
| Skill Level | Time | Finished Size | Hook | Best For |
|---|---|---|---|---|
| Intermediate | 35–55 hours, estimated | Custom; 110 × 145 cm reference size | 4.0 mm | Bedspread, throw, matching cushion |
The 110 × 145 cm measurement is a published reference size for a DK cotton flower-granny blanket. The exact physical dimensions of the photographed blanket cannot be determined from the image alone.
Materials and Tools
Yarn
- Chartreuse/lime-olive DK cotton or cotton blend — DK/#3 — approximately 1,500–1,800 g for a bed-scale version. Calculate the final quantity from one completed and blocked motif.
- Optional cream DK yarn — DK/#3 — 50–100 g if you want contrasting joins or edging. Omit this yarn to reproduce the monochrome appearance shown in the photograph.
Yarn requirements vary substantially with motif dimensions, fiber, gauge, and final blanket size. Make and weigh one complete blocked square before purchasing the full quantity.
Tools
- 4.0 mm crochet hook
- Tapestry needle
- Scissors
- Locking stitch markers
- Measuring tape
- Blocking mats
- Rust-resistant blocking pins
Abbreviations
- MR — magic ring
- ch — chain
- sc — single crochet
- hdc — half double crochet
- dc — double crochet
- tr — treble crochet
- sl st — slip stitch
- sp — space
- st/sts — stitch/stitches
- BLO — back loop only
- RS — right side
- rep — repeat
Invisible decrease is an amigurumi technique and is not required for this flat motif; shaping comes from stitch height, chain spaces, and corner increases.
Flower Granny Square Pattern — Step by Step
The following motif is a photo-inspired construction. Make one test square first. Block and measure it before calculating how many squares you need for the finished bedspread.
Flower Center — Make One Per Square
Yarn: chartreuse DK.
Round 1: Make an MR. Ch 3, then work 15 dc into the ring. Join with a sl st to the top of the beginning ch-3. (16 dc)
Pull the magic ring firmly closed.
Round 2: Ch 1, sc in the same st, *ch 3, skip 1 dc, sc in next dc*. Repeat around, ending with ch 3. Sl st to the first sc. (8 ch-3 loops, 8 sc)
The eight loops establish eight evenly spaced petal positions.
Raised Flower Petals
Round 3: Sl st into the first ch-3 sp. In each ch-3 sp work (sc, hdc, 3 dc, hdc, sc). Repeat around. (8 petals)
Keep all eight petals on the same side of the work. Avoid pulling the final slip stitch excessively tight because this can cause the flower center to cup.
Round 4: Working behind the petals, *ch 4, sc around the Round 2 sc between petals* eight times. Join with a sl st. (8 ch-4 spaces)
Round 5: In each ch-4 space work (sc, hdc, 4 dc, hdc, sc). Repeat around. (8 larger back petals)
This second petal layer increases the diameter of the flower and gives the center enough visual weight for a large granny-square bedspread.
Flower-to-Square Transition
Round 6: Working behind Round 5, attach yarn at a petal junction. *Ch 5, sc at the next petal junction*. Repeat around and join. (8 ch-5 spaces)
Round 7: Sl st to the middle of the first ch-5 sp. Ch 3, 3 dc in the same space, ch 2, 4 dc in the same space. This forms the first corner.
In the next ch-5 sp, work 4 dc. In the following space work (4 dc, ch 2, 4 dc). Continue this sequence around so every second space becomes a corner. Join with a sl st.
Round 7 total: 4 corners and 4 side groups.
Place the motif on a flat surface before continuing. The four corners should sit at approximately 90-degree angles.
Openwork Square Frame
Round 8: Sl st to the first corner space. Work (3 dc, ch 2, 3 dc) in the corner. Ch 2, 3 dc in the next side space, ch 2, 3 dc in the next side space, ch 2. Repeat around, maintaining the same corner construction at all four corners. Join.
Round 9: Sl st to the corner. Work (3 dc, ch 2, 3 dc) in the corner. Work *ch 1, 3 dc in the next ch-space* across the side. Ch 1 before the next corner. Repeat around and join.
Round 10: Repeat the established Round 9 structure. Each side gains an additional working space as the square expands.
Round 11: Repeat the established pattern once more, keeping all four sides identical.
Count the groups on every side before proceeding. All four sides must contain the same number of groups.
Final Stabilizing Round
Round 12: Ch 1. Sc in every dc and ch-1 space. In each corner ch-2 space work (sc, ch 2, sc). Join with a sl st.
Fasten off. Leave approximately 15 cm of yarn for weaving.
The final single-crochet round creates a predictable joining edge and makes differences between individual motif dimensions easier to identify.
Blocking the Granny Squares
Block every square before assembly. Pin the four corners first, then pin the midpoint of each side. Measure both the width and height rather than relying on appearance.
Choose the finished dimensions of your first successful test motif as the template for all remaining squares.
The photograph suggests medium-to-large floral motifs rather than small traditional granny squares. Perspective, however, prevents an accurate physical measurement from being taken directly from the image.
Do not mix blocked and unblocked motifs during the final measurement stage. The dimensions must be compared under the same conditions.
Calculating the Blanket Layout
Arrange all blocked squares on a clean, flat surface before joining them.
Required blanket width ÷ blocked square width = number of columns
Required blanket length ÷ blocked square height = number of rows
Round the result upward when full bed coverage is required.
For example, if one blocked square measures 20 cm, a layout of seven squares across and nine squares long creates a motif field measuring approximately 140 × 180 cm before the outer border. Joining can change that measurement slightly.
This example is a sizing calculation, not the verified measurement of the blanket shown in the photograph.
How to Join the Granny Squares
Flat Slip-Stitch Join
Yarn: chartreuse DK.
Place two blocked squares next to each other with their right sides facing upward.
Insert the crochet hook through the corresponding back loops of both squares. Attach the yarn and work a slip stitch through both loops.
Continue across the complete edge, matching one stitch from the first square with one stitch from the second square.
Fasten off at the end of the seam.
Join individual motifs into horizontal rows first. Once the rows are complete, connect them with continuous vertical seams.
This method keeps the grid visible while limiting the amount of bulk created between motifs.
Check every seam intersection before continuing. Four corners should meet cleanly without one motif being stretched farther than its neighbors.
If two squares have different edge counts, correct the affected motif before joining. Do not distribute unexplained extra stitches through the seam because the resulting distortion becomes more obvious as the blanket grows.
Crochet the Outer Border
Border Round 1: Attach chartreuse yarn in any blanket corner. Ch 1 and sc evenly around the entire perimeter. At each blanket corner work (sc, ch 2, sc). Join.
Border Round 2: Ch 3. Dc in each stitch around. In every ch-2 corner work (2 dc, ch 2, 2 dc). Join.
Border Round 3: Ch 1. Sc in the BLO of each stitch. At each corner work (sc, ch 2, sc) in the corner space. Join.
Border Round 4: Repeat Border Round 3.
Border Round 5: Sl st loosely in each stitch around. At each corner work (sl st, ch 1, sl st).
Fasten off.
Weave the final yarn tail at least 7–10 cm through stitches on the wrong side. Change direction while weaving instead of passing the tail through a single straight line.
Matching Flower Granny Square Pillow
The photographed bedspread includes a matching rectangular pillow or cushion cover. It can be constructed from the same floral motifs rather than requiring a separate decorative pattern.
Make enough blocked motifs to cover the width and height of your pillow insert. Depending on the dimensions of the square and cushion, arrangements such as 2 × 3 or 2 × 4 motifs can produce the elongated shape visible in the photograph.
Join the floral squares using the same flat slip-stitch seam used for the blanket.
For the reverse side, crochet a plain rectangular panel in hdc or dc until it matches the dimensions of the completed floral front.
An envelope closure can also be made using two overlapping rectangular back panels. This construction allows the cushion insert to be removed without adding a zipper.
Place the front and back with wrong sides together. Sc through both layers around the required edges, leaving the envelope opening accessible. Finish with a loose slip-stitch round.
Assembly
- Block every completed floral square to the same target measurement before arranging the blanket.
- Lay all motifs into the required number of rows and columns with their right sides facing upward.
- Photograph the final arrangement or label the rows so the grid remains in the intended order during joining.
- Join neighboring squares across each horizontal row using the flat slip-stitch method.
- Connect the completed rows vertically, checking every four-square intersection before continuing.
- Lay the assembled blanket flat and inspect all four outer edges for sections that pull inward or flare outward.
- Work Border Round 1 around the complete blanket, keeping the four corner spaces separate from the straight edges.
- Complete the remaining border rounds without adding unnecessary stitches along the straight sides.
- Weave all yarn tails through several stitch directions on the wrong side rather than trimming immediately beside a knot.
- Block the assembled blanket to its final rectangular dimensions and allow it to dry completely before taking the final measurement.
The completed project consists of a blocked floral motif field, visible flat grid joins, a stabilized border, and an optional matching cushion cover.
7 Technical Tips for a Flatter Flower Granny Square Blanket
- Control motif drift. Mark the first stitch or working space of each round with a locking stitch marker. A one-space shift during the flower-to-square transition moves the corner positions and can turn a square into a diamond.
- Reject blocking mismatches early. Recheck any motif that differs from the target dimensions by more than approximately 5 mm. Small differences multiply when seven or more squares are joined across one row.
- Watch for petal cupping. Chains worked too tightly behind the petals pull the flower center upward. Loosen the chain tension while maintaining consistent tension in the petal stitches.
- Prevent raised joining ridges. A slip-stitch seam worked too tightly shortens the shared edge. Check the joined section after every two motifs rather than waiting until the entire row has been assembled.
- Correct border flare at its source. Excess stitches along a straight border edge create visible waves. Place deliberate increases at the four corners unless a measured edge discrepancy requires correction elsewhere.
- Measure both diagonals during blocking. Equal side measurements alone do not prove that a motif is square. Compare the two diagonal measurements to identify skew before joining.
- Leave enough yarn for secure tails. Keep approximately 15 cm at motif ends and weave each tail in more than one direction. Large blankets place repeated movement and weight on every joining point.
Final Notes
A bed-scale floral blanket depends on repeatable geometry. Make one complete motif first, block it, record its finished width, and calculate the required grid from your mattress or throw dimensions before purchasing the full yarn quantity.
That measurement controls the motif count, yarn estimate, joining length, and finished border dimensions. For the monochrome effect visible in the reference image, keep the flower center, square frame, joining seams, and edging in the same chartreuse or lime-olive color family.
After completing your flower granny square blanket crochet pattern, photograph the blanket laid flat so the complete motif grid is visible. Save the project to Pinterest or share the finished version on Instagram with #FlowerGrannySquareBedspread.
For the flower center, would you keep the raised eight-petal construction or replace it with a flatter radial flower?









