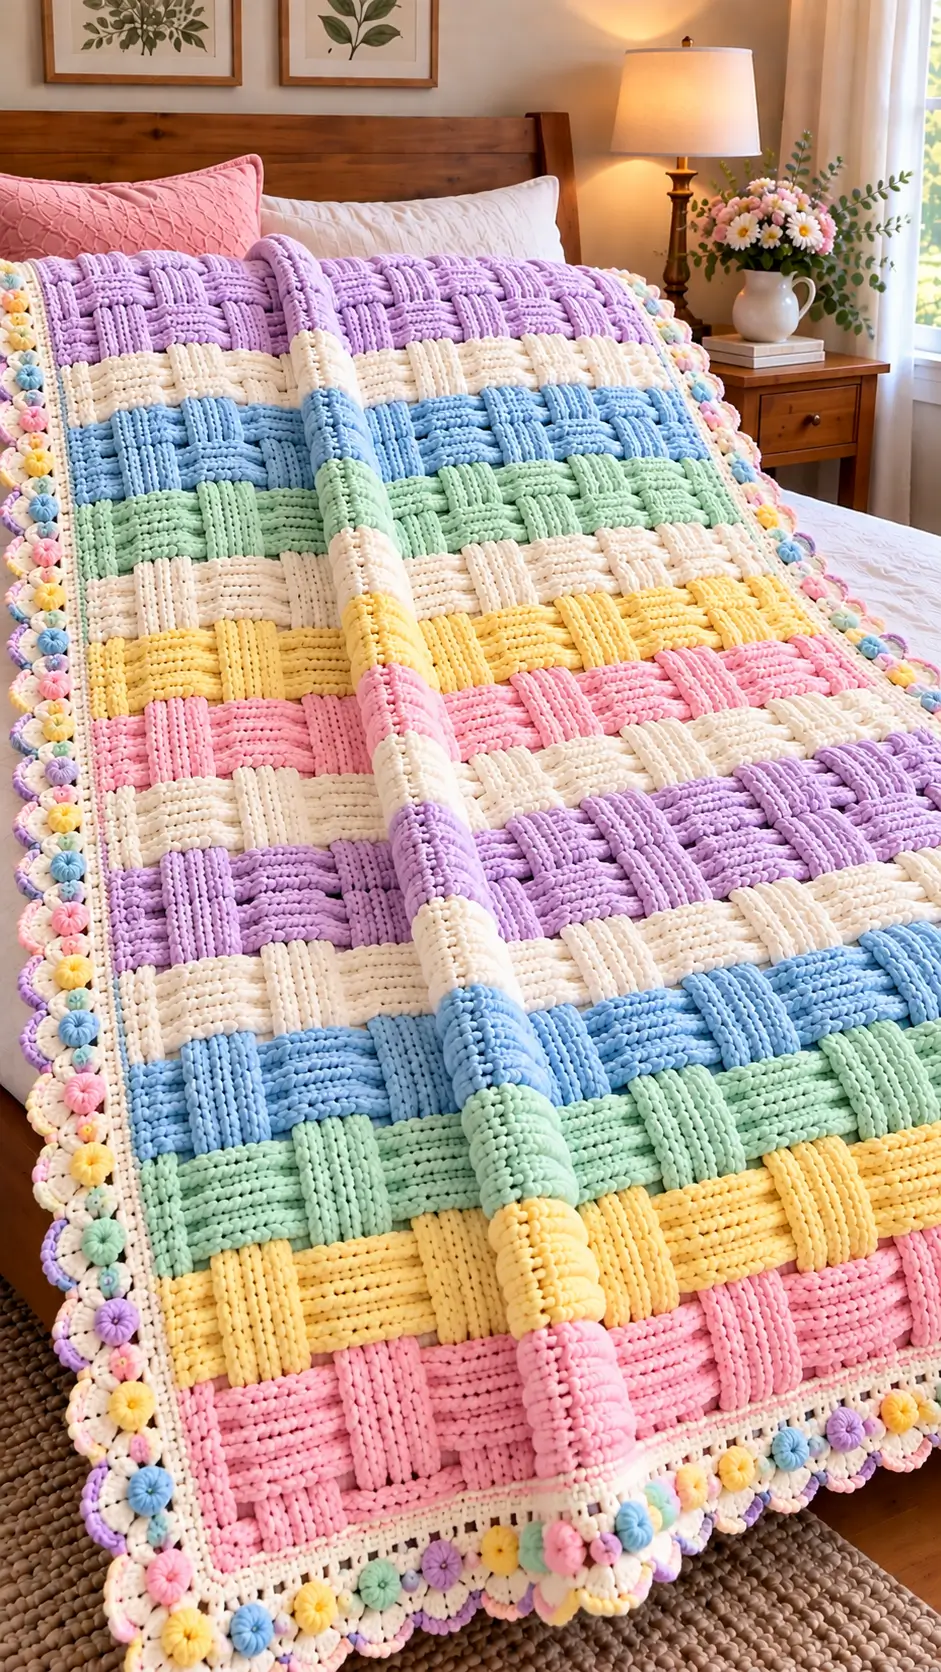
Pastel Basketweave Crochet Blanket Pattern With Flower Border
Basketweave blocks turn six pastel stripes into what looks like overlapping padded ribbons. This pastel basketweave crochet blanket uses super-bulky chenille-style yarn, an 8 mm reference hook, raised post stitches, and a dimensional flower border. A comparable published blanket measures about 140 × 114 cm. The project suits an intermediate crocheter and produces a substantial bed or sofa blanket with one main piece rather than joined squares.
The Design: What Makes This Pastel Blanket Different
The first structural decision is scale. Thick chenille yarn needs broad blocks because tiny basketweave repeats lose definition under the yarn’s pile. Alternating groups of front-post and back-post double crochet make neighboring sections project in opposite directions, producing the woven appearance.
Second, the color changes happen in horizontal bands rather than individual blocks. That separates color structure from stitch structure: pink, yellow, mint, blue, cream, and lilac establish the stripes while the post stitches establish the relief.
The third element is the flower edging. It creates a narrow transition from the heavy chunky basketweave crochet blanket center to smaller decorative motifs. A frequent mistake in a chenille crochet blanket is tightening the post stitches, which reduces width and distorts the rectangular blocks.
Project Info at a Glance
| Skill Level | Time | Reference Finished Size | Hook | Best For |
|---|---|---|---|---|
| Intermediate | Multi-session project | 140 × 114 cm | 8 mm | Large throw / bed accent |
The dimensions and hook size are based on a comparable published super-bulky basketweave blanket. Finished measurements depend on yarn, hook, tension, and gauge.
Materials and Tools
Yarn
The photographed blanket appears to use a plush chenille-type yarn. A #6 super-bulky polyester chenille yarn is a practical choice for reproducing its thick, raised texture.
- Lilac — #6 super-bulky chenille-style yarn
- Cream — #6 super-bulky chenille-style yarn; allow extra for the border
- Powder blue — #6 super-bulky chenille-style yarn
- Mint green — #6 super-bulky chenille-style yarn
- Pale yellow — #6 super-bulky chenille-style yarn
- Pink — #6 super-bulky chenille-style yarn
- Flower colors — smaller quantities of pink, blue, mint, yellow, lilac, and cream
- Border yarn — cream yarn compatible with the main blanket yarn
A comparable 55 × 45-inch super-bulky basketweave blanket uses approximately 2,126 g of yarn. Treat this as a planning reference rather than an exact requirement because changing the dimensions, yarn, gauge, or border will alter consumption.
Tools
- 8 mm crochet hook
- Tapestry needle
- Locking stitch markers
- Sharp scissors
- Flexible measuring tape
- Pins or removable markers for border spacing
Abbreviations
- ch — chain
- sc — single crochet
- hdc — half double crochet
- dc — double crochet
- FPdc — front-post double crochet
- BPdc — back-post double crochet
- sl st — slip stitch
- st(s) — stitch(es)
- sp — space
- rep — repeat
- RS — right side
- WS — wrong side
FPdc is worked around the post from the front, while BPdc is worked around the post from the back. Alternating these stitches produces the raised and recessed sections that form the basketweave effect.
Pastel Basketweave Crochet Blanket Pattern
This blanket is worked flat. The instructions below provide a construction method based on the visible structure of the photographed blanket rather than claiming to reproduce an unidentified original pattern stitch for stitch.
Gauge Swatch
Yarn: #6 super-bulky chenille-style yarn.
Work a minimum 20 × 20 cm swatch using the planned basketweave repeat. Measure only the central section of the swatch.
Do not establish the final foundation-chain count until the swatch has rested. Post stitches can contract horizontally compared with ordinary double crochet, so a chain that initially appears wide enough can produce a narrower finished fabric.
Measure the swatch without stretching it. Calculate how many complete basketweave repeats are needed for the required blanket width.
Foundation
With pink or the desired first stripe color, chain loosely to the required blanket width.
For a six-post visual block, construct the center in multiples that accommodate alternating groups of six FPdc and six BPdc, then add the stitches required for the two edge sections.
Planning repeat: 6 FPdc followed by 6 BPdc.
The exact starting chain should be calculated from your gauge rather than copied as a universal number. This allows the same construction to be adapted for a throw, twin-bed blanket, or larger bedspread.
Setup Row
Work one standard double-crochet row across the foundation chain. This row creates stable posts around which the first textured basketweave row will be worked.
Turn.
Count the stitches before proceeding. From this point onward, the stitch total must remain constant throughout the rectangular blanket center.
Basketweave Block A
Begin the row using your preferred turning-chain method.
Work the edge stitch normally.
Repeat across: FPdc around each of the next 6 posts, then BPdc around each of the following 6 posts.
Continue the repeat across the center and finish with the established edge stitch.
Turn.
On the following rows, work the post stitches so that the same blocks remain visually raised. A four-row block height provides a useful starting proportion for thick super-bulky yarn.
Basketweave Block B
After completing the first block-height section, reverse the post orientation.
Where a section previously projected forward, change the post stitches so that section becomes recessed. Bring the neighboring recessed block forward.
Continue for the same number of rows used for Block A.
This repeated reversal creates the characteristic over-and-under basketweave illusion.
Pink Stripe
Work complete basketweave blocks using pink yarn.
Change colors only at the side edge. Avoid changing color halfway through a basketweave block-height sequence because the resulting horizontal break can interrupt the woven geometry.
Leave a sufficiently long yarn tail for secure weaving.
Yellow Stripe
Join pale yellow at the side edge and continue without changing the stitch count.
Maintain the established six-post grouping and the same number of rows per basketweave block.
The yellow band acts as a transition between stronger pink, cream, and mint sections.
Mint Stripe
Join mint green.
Repeat the established basketweave sequence, reversing raised and recessed blocks at exactly the same row interval used in the previous sections.
Measure the width after completing a full block. If the sides begin pulling inward, check whether the post stitches are being worked more tightly than the setup row.
Powder Blue Stripe
Change to powder blue and continue the basketweave geometry.
Keep the first and last stitches clearly separated from the textured repeat. Marking both edge stitches can prevent accidental decreases.
The photographed design repeats blue in several sections rather than restricting it to one isolated stripe.
Cream Stripe
Join cream yarn and work the same basketweave repeat.
Cream provides visual separation between the pastel bands and also connects the center of the blanket with the cream perimeter.
Keep the stripe height consistent with the corresponding colored sections unless intentionally modifying the stripe sequence.
Lilac Stripe
Join lilac.
Continue the FPdc and BPdc repeat with the same block width and block height.
Check that every raised block aligns vertically with the established basketweave structure.
Repeat the complete pastel sequence until the blanket reaches the required length. Finish the center only after completing an entire block-height section.
How to Crochet the Blanket Border
Straightening Round
Before adding dimensional flowers, create a controlled foundation around the entire blanket.
Join cream yarn at a corner.
Work sc evenly around all four sides. Along the top and bottom, work into the existing stitches. Along the vertical sides, distribute stitches evenly across the row ends.
At each corner, add enough stitches to turn the corner without pulling the fabric inward.
Join with a sl st.
Lay the blanket flat before continuing. A border that ripples has too many stitches; a border that pulls inward has too few.
Cream Foundation Border
Continue with cream yarn to create the narrow frame visible between the thick basketweave center and the dimensional flowers.
Work another round of sc if additional stability is required.
A following round may incorporate regularly spaced chain loops if the flowers will be attached directly to border anchor points.
Keep the corner construction identical on all four corners.
Dimensional Crochet Flower Border
The photograph shows numerous small pastel flowers distributed around the cream perimeter. The precise flower stitch cannot be confirmed from the image alone, so this section provides a compatible dimensional flower construction.
Small Flower Motif
Make multiple flowers in pink, yellow, blue, mint, lilac, and cream.
Round 1: Create a small center ring and work evenly spaced stitches around it.
Round 2: Work repeated petal groups around the center. Use puff or cluster stitches for a thicker dimensional appearance.
Keep each flower compact enough that neighboring motifs do not overlap excessively.
Fasten off and leave a tail long enough for attachment if the flowers are being made separately.
Flower Centers
Use yellow, cream, or a contrasting pastel for the flower centers.
Keep the center proportionally smaller than the petals. An oversized center can pull the petals inward and make the motif curl away from the border.
Attaching the Flowers
Place removable markers around the entire border before attaching any flowers permanently.
Measure the distance between markers so the final gap does not become noticeably larger or smaller than the others.
Rotate the flower colors. For example:
Pink → Yellow → Blue → Mint → Lilac → repeat.
Avoid placing identical colors directly beside one another unless a deliberate paired arrangement is being used.
At each corner, either center one flower directly on the corner or maintain an equal gap on both sides of it.
Assembly and Finishing
- Complete the entire rectangular basketweave center before beginning the decorative border.
- Lay the blanket flat and measure its width at the top, center, and bottom.
- Check the first and last stitch of every row so gradual stitch loss has not narrowed either side.
- Weave the major stripe-change tails into matching color sections before adding the border.
- Work the cream straightening round around all four sides.
- Add the remaining cream border rounds while keeping every corner flat.
- Mark all planned flower positions before making permanent attachments.
- Attach or crochet the flowers in a repeating pastel sequence around the perimeter.
- Secure chenille yarn tails through several dense stitches and change direction before trimming.
- Lay the finished blanket flat, square the corners, and measure it without stretching the fabric.
The completed construction consists of one striped basketweave rectangle, a stabilizing cream perimeter, and a dimensional multicolor flower edging.
7 Technical Tips for Better Basketweave Crochet
- Count the edge stitches on every row. Missing one turning-edge stitch can eventually remove an entire post from a basket block and create a diagonal blanket edge.
- Keep FPdc and BPdc loops at the same height. Pulling a BPdc even 5–10 mm tighter than neighboring FPdc stitches can visibly compress the recessed sections.
- Mark every texture reversal. Place a marker on the first row whenever the basket direction changes so a four-row block does not accidentally become three or five rows.
- Do not compensate for thick yarn by tightening the stitches. Excessively tight chenille post stitches make the fabric stiff and can reduce the finished width considerably.
- Pin every flower position before attachment. A spacing difference of only 2 cm repeated across a long side can produce a conspicuous oversized gap near the final corner.
- Check the border for waves after each round. Rippling indicates excess perimeter stitches, while an edge that cups inward usually indicates too few.
- Weave plush-yarn tails at least 8–10 cm through dense fabric. Change direction while weaving because a short straight chenille tail can work its way out more easily than tightly spun cotton or wool.
Adjusting the Blanket Size
The safest way to resize this pastel basketweave crochet blanket is to work from the basketweave repeat rather than adding an arbitrary number of chains.
First make a swatch containing at least two complete horizontal repeats. Measure the width of one full repeat after the fabric has rested.
Divide the desired center width by that measurement. Round the result to a whole repeat, then add the required edge stitches.
For length, continue complete basketweave block sections until the center reaches the target measurement. Stop after a full block rather than halfway through the post-stitch sequence.
Remember that the flower border adds extra width and length. Measure the center separately if the final blanket must fit a particular mattress or piece of furniture.
Color Placement
The photographed version depends on repetition rather than random color placement. Lilac, cream, powder blue, mint, cream, yellow, and pink bands recur across the blanket, creating continuity from one end to the other.
Write the stripe sequence down before crocheting the first section. A written sequence prevents an accidental duplicate stripe after several long rows.
Cream can appear more frequently because it also connects visually with the outer border. Keep the brighter pastel colors separated if you want the woven blocks to remain individually readable.
Working With Chenille Yarn
Chenille-style yarn produces thick basketweave relief, but the pile can hide the top loops and posts of individual stitches. Use the post itself as the primary visual reference when working FPdc and BPdc.
Stitch markers are particularly useful at the two edges. Place one in the first true stitch and another in the last true stitch so the turning chain is not accidentally treated as an additional stitch.
Check the fabric frequently rather than waiting until a complete stripe has been worked. Correcting one basketweave block is much faster than removing several rows of super-bulky post stitches.
Conclusion
A pastel basketweave crochet blanket depends on three controlled variables: consistent post-stitch blocks, planned stripe changes, and an evenly distributed decorative border. Begin with a large gauge swatch before calculating the foundation width because that measurement is more useful than copying a starting chain from a blanket made with different yarn. Once the center is finished, mark every flower position around the perimeter before attaching the first motif. Save the finished blanket to Pinterest and share the completed color sequence on Instagram with #PastelBasketweaveBlanket. For this specific design, would you keep the lilac, cream, blue, mint, yellow, and pink sequence or rearrange the six pastel bands?









