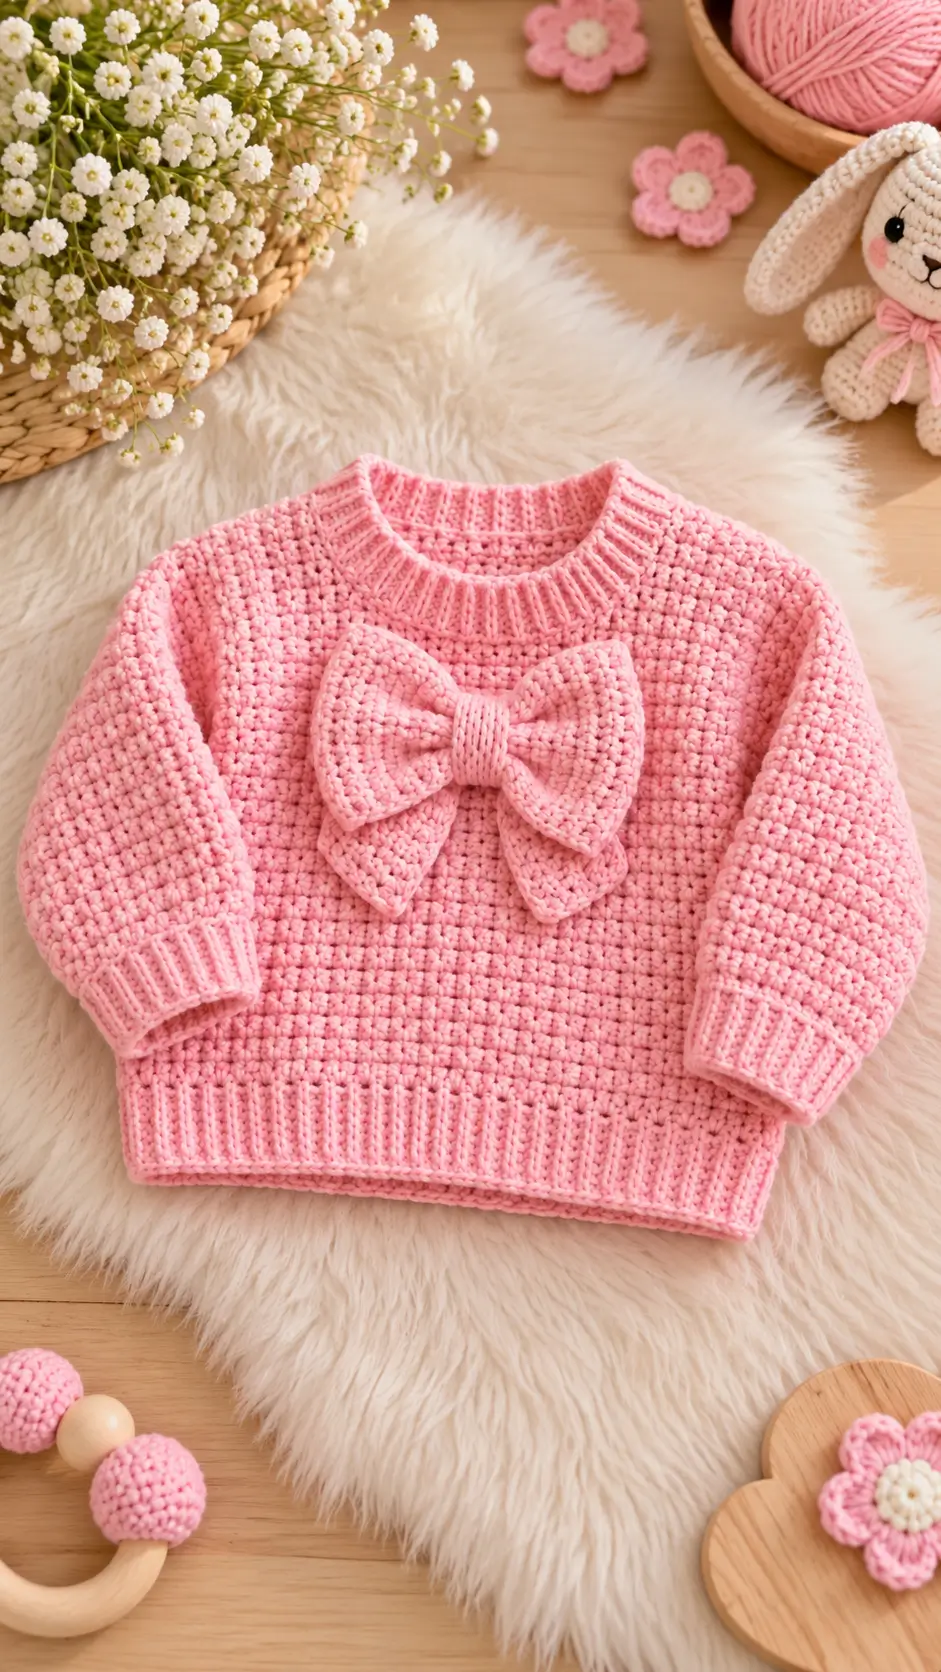
The oversized bow occupies nearly half the chest width, so its scale controls the entire design. This crochet baby sweater with bow pairs a DK-weight pink pullover with ribbed edges and a dimensional crochet appliqué. A 3.5 mm hook suits the referenced DK construction, while sizing can be adjusted from actual chest measurements. The project is intermediate-level and works well when a pullover needs decoration without buttons.
The Design: What Makes This Bow Sweater Different
Three structural choices define this sweater. First, the neckline is compact and ribbed rather than finished with a loose decorative border; that keeps the large chest bow visually dominant. Second, the sleeves carry substantial texture but finish in narrower ribbed cuffs. That transition prevents a pink crochet baby sweater from becoming equally wide from shoulder to wrist.
The third decision is scale. This is not a small crochet bow appliqué placed near the collar. The bow spans a large section of the front panel and uses layered pieces to create depth.
A frequent mistake is attaching the bow before the sweater has been blocked or measured. If its center is positioned from an unfinished neckline, the appliqué can appear too high after the ribbing settles.
Project Info at a Glance
| Skill Level | Time | Finished Size | Hook | Best For |
|---|---|---|---|---|
| Intermediate | Several sessions | Approx. 26.7 cm wide × 30.5 cm high for reference 9–12M sizing | 3.5 mm | Baby/toddler pullover |
The finished measurement is based on a documented 9–12 month crochet sweater. The exact dimensions of the photographed garment cannot be established from the image alone. A 3.5 mm hook is a practical starting point for DK/#3 baby yarn, but the blocked gauge should determine the final stitch calculations.
Materials and Tools
Yarn
- Dusty pink DK/#3 yarn — approximately 120–150 g as a starting range for a small baby sweater.
- Dusty pink DK yarn for the bow — use the same yarn so the appliqué matches the sweater fabric.
A smooth, washable baby yarn with clear stitch definition works best for the textured body and ribbing. Purchase additional yarn rather than assuming the basic sweater quantity will also cover the oversized layered bow.
Tools
- 3.5 mm crochet hook
- Yarn needle
- Locking stitch markers
- Scissors
- Flexible tape measure
- Blocking mat and pins
- Waste yarn for marking stitches
Abbreviations
- ch — chain
- sc — single crochet
- hdc — half double crochet
- dc — double crochet
- sl st — slip stitch
- st/sts — stitch/stitches
- BLO — back loop only
- RS — right side
- WS — wrong side
- rep — repeat
Invisible decrease is primarily an amigurumi shaping method and is not required for the main construction of this sweater.
Pattern — Step by Step
Important Sizing Note
A photograph cannot establish gauge, age size, chest circumference, or exact stitch count. For a wearable baby garment, invented stitch counts can produce an incorrectly sized neckline, body, or sleeves.
Begin by making a gauge swatch in the selected body stitch. Wash it as the finished sweater will be washed and dry it flat before measuring.
Calculate the number of stitches per centimetre. If the blocked fabric produces 2 stitches per centimetre and the required panel width is 27 cm, for example, the target width is approximately 54 stitches before adjusting for the multiple required by the chosen stitch pattern.
This measurement-first approach allows the sweater to be adapted to different baby and toddler sizes.
Front Panel
Yarn: dusty pink DK.
Work the front panel to the required chest width according to the blocked gauge.
The reference sweater has a dense and regular surface texture. Half double crochet or another compact textured stitch can create a similar appearance.
Keep the lower section rectangular until reaching the underarm area. Continue until the panel reaches the required body length to the underarm.
Shape the upper section according to the chosen shoulder construction. Keep the neckline centered and make the front neckline lower than the back neckline.
Check both shoulder sections for equal width before fastening off.
Back Panel
Yarn: dusty pink DK.
Make the back panel to the same width and lower-body length as the front.
Maintain exactly the same gauge. Even a small difference in tension can cause the side seams to twist after assembly.
Continue to the shoulder level while keeping the back neckline higher than the front neckline.
Compare the shoulder widths directly with the front panel before fastening off.
First Sleeve
Yarn: dusty pink DK.
Measure the finished armhole before calculating the upper sleeve circumference. The sleeve should be designed around the actual armhole rather than an unrelated standard stitch count.
Work from the upper arm toward the wrist. Reduce the width gradually so the sleeve follows the proportions visible in the reference image.
The upper section should remain fuller while the lower sleeve narrows before reaching the cuff.
Stop the main sleeve fabric before reaching the complete wrist-to-underarm measurement because the ribbed cuff adds extra length.
Second Sleeve
Repeat the first sleeve using exactly the same number of rows and the same shaping intervals.
Lay both sleeves together during construction. Their upper edges, shaping points, lower edges, and total lengths should align.
Do not rely on visual estimation for the second sleeve. A difference of even 1–2 cm can become obvious once the sweater is assembled.
Ribbed Hem
The wide lower ribbing is one of the most visible structural details in this sweater.
Make a strip of single crochet worked through the back loop only.
Row 1: Chain to the required depth of the hem. Work 1 sc in the second chain from the hook and in each chain across. Turn.
Row 2: Ch 1. Work 1 sc BLO in each stitch across. Turn.
Following Rows: Repeat Row 2 until the strip fits around the lower circumference of the sweater.
Join the short ends of the ribbing. Pin the band evenly around the lower sweater edge before attaching it.
Avoid stretching the ribbing excessively during attachment because this can pull the body into a balloon shape.
Sleeve Cuffs — Make 2
Yarn: dusty pink DK.
Use the same BLO ribbing technique as the lower hem, but make the cuffs narrower.
Row 1: Chain to the required cuff depth. Work sc across.
Row 2: Ch 1, turn. Work sc BLO across.
Following Rows: Repeat Row 2 until the strip fits around the wrist opening with light stretch.
Join the short ends to form a ring.
Attach one cuff to each sleeve, distributing the sleeve stitches evenly around the ribbing.
Neck Ribbing
Yarn: dusty pink DK.
The photographed sweater uses a relatively narrow crew-neck band.
Create another BLO ribbing strip using the same basic technique as the hem. Make this strip narrower than the lower band.
Pin the ribbing around the completed neckline before sewing it permanently.
The neckline should lie flat. Excess ribbing length creates waves, while insufficient length can make the opening too tight.
Join the short ends at the back neckline and attach the band evenly.
Main Crochet Bow
Yarn: dusty pink DK.
The oversized bow is the defining feature of this crochet baby sweater with bow. Its width should be calculated from the completed sweater rather than from an unrelated fixed measurement.
For proportions similar to the reference image, the bow should occupy roughly the central half of the front chest area.
Begin by making a rectangle.
Row 1: Chain to the selected bow width. Work sc or hdc across.
Row 2: Ch 1, turn. Work evenly across.
Following Rows: Repeat Row 2 until the rectangle reaches the required height.
Fasten off and leave a long sewing tail.
Bring the short ends toward the center and overlap them slightly. Secure the overlap with several stitches.
Pinch the middle of the rectangle into folds. Pass the yarn through the folds several times to hold the bow shape.
Bow Center Wrap
Yarn: dusty pink DK.
Make a small rectangular strip for the center.
Row 1: Chain to the required width. Sc in the second chain from the hook and across.
Rows 2–6: Ch 1, turn. Sc across.
Add or remove rows depending on the thickness of the finished bow.
Wrap the strip firmly around the pinched middle section. Join its ends at the back of the bow so the seam remains hidden.
Lower Bow Layer
The reference image appears to use a second bow-shaped section behind the primary bow rather than two narrow hanging ribbons.
Make another rectangular bow using the same basic method. The lower layer can be slightly wider or flatter depending on the desired proportions.
Shape the center and position this piece behind the main bow.
Rotate the lower layer slightly so its lower corners remain visible beneath the primary bow.
Tack the two layers together securely at the center.
Attaching the Bow
Finish the sweater body, neckline, and ribbing before deciding the final bow position.
Lay the sweater flat and measure the center of the chest.
Place the bow horizontally and measure from each side seam to confirm that it is centered.
Pin the center first. Add four more pins near the outer sections of the bow.
Sew the center securely to the sweater using matching yarn. Add smaller hidden stitches toward the outer edges so the bow cannot rotate or fold forward during wear.
Avoid pulling the attachment yarn tightly enough to gather the sweater fabric underneath the appliqué.
Assembly
- Block or relax the front and back panels to their intended dimensions before permanent assembly.
- Join the shoulder seams while keeping the front neckline lower than the back neckline.
- Join the side seams from the lower body toward each underarm.
- Close both sleeve seams and confirm that the finished sleeves have equal lengths.
- Attach each sleeve to its corresponding armhole with the sleeve seam positioned at the underarm.
- Add the lower ribbing and check that it lies flat without pulling the body inward excessively.
- Attach both sleeve cuffs and compare their finished circumference and length.
- Add the neck ribbing, distributing the neckline edge evenly around the band.
- Center the layered crochet bow on the chest and pin the center plus four outer points before sewing.
- Weave all yarn tails through several stitches on the wrong side and inspect the seams, neckline, cuffs, and bow attachment.
The completed sweater should lie flat with symmetrical sleeves, an ungathered neckline, even ribbing, and a centered dimensional bow.
7 Technical Tips for a Better Crochet Bow Sweater
- Mark every shaping point. Losing one sleeve or neckline shaping position can shift a shoulder by several stitches. Place a locking marker at each shaping boundary and move it as the work progresses.
- Check ribbing stretch before attachment. A hem band made substantially shorter than the body circumference can pull the lower sweater inward and cause the fabric above it to balloon.
- Control bow thickness. Repeatedly sewing through every bow layer can produce a hard central lump. Concentrate structural stitches in the middle and use smaller anchoring stitches toward the outer sections.
- Measure sleeve length from the underarm. Measuring from the neckline introduces shoulder-width variation. Compare both sleeves directly before attaching the cuffs.
- Pin the bow at five points. Use one center pin and four outer pins. Attaching the bow from the center alone can allow it to rotate while being sewn.
- Test the neckline before hiding yarn tails. An overly tight neck opening is a sizing problem. Check the completed circumference before permanently finishing the ribbing seam.
- Weave tails away from exposed edges. A yarn tail ending directly beside a cuff, neckline, or bow edge can work outward after repeated stretching. Route each tail through multiple stitches on the wrong side before trimming.
Finishing the Pink Crochet Baby Sweater
A successful crochet baby sweater with bow depends on proportion more than decoration alone. Finish the pullover first, verify the neckline and sleeve measurements, and calculate the bow width from the completed chest rather than an unfinished panel.
The next practical step is to make and wash a DK-yarn gauge swatch with the 3.5 mm hook. Use the blocked swatch to calculate the body width for the required baby or toddler measurements.
Once the sweater is complete, photograph it flat from directly above so the ribbing and layered bow remain clearly visible. Save the finished project to Pinterest or share it on Instagram with #PinkBowBabySweater.
Would you keep the oversized double-layer bow shown in this design, or make the bow smaller for the next sweater?









