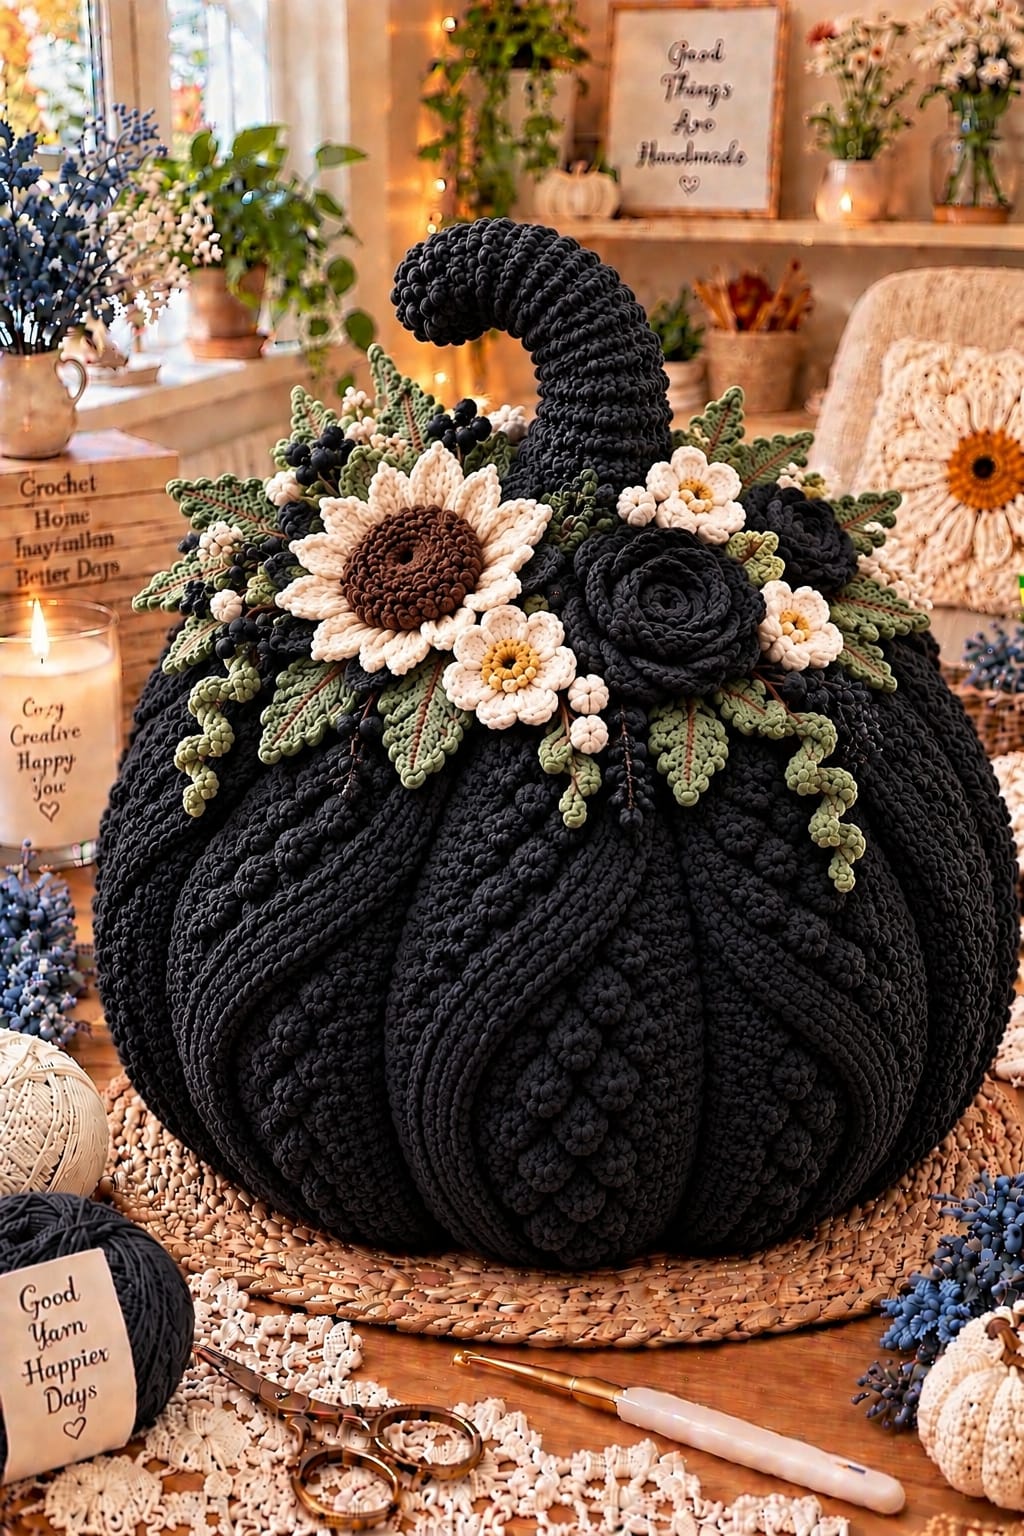
A black pumpkin this large needs deep ribs or the floral crown visually overwhelms the body. This black crochet pumpkin pattern combines a heavily textured stuffed pumpkin with a curved stem, cream sunflower, black roses, small ivory flowers, sage-green foliage and dark berry clusters. The pumpkin is worked from super-bulky yarn, shaped after stuffing, then decorated with separately crocheted botanical motifs concentrated around the stem.
The Design: What Makes This Floral Pumpkin Different
The reference piece uses an oversized black pumpkin as a structural base rather than a small seasonal ornament. Deep vertical ribs divide the body into pronounced segments, while additional raised texture keeps the black surface from appearing flat. A long curved stem creates height above the floral arrangement.
The flower placement is deliberately asymmetrical. One large cream sunflower sits slightly left of center, black roses occupy the right side, and smaller cream blossoms fill the gaps. Sage leaves extend beyond the flower line and soften the transition between the floral crown and pumpkin body.
The main construction risk is insufficient stuffing. A large pumpkin with a heavy flower arrangement can collapse around the top opening, so the center needs firm fiberfill while the outer ribs remain compressible enough for shaping.
Project Info at a Glance
| Skill Level | Time | Finished Size | Main Hook | Construction |
|---|---|---|---|---|
| Intermediate | 12–18 hours | Approx. 38–45 cm wide | 9 mm | Stuffed ribbed pumpkin with sewn floral motifs |
Published chunky pumpkin patterns commonly use #6 super-bulky yarn with a 9 mm hook. Finished examples range from approximately 5 inches wide for small versions to about 9 inches wide for large versions, and the same rectangle-and-cinch construction can be scaled further for an oversized decorative pumpkin.
Materials and Tools
Yarn
- Black super-bulky #6 yarn — approximately 500–650 g for the pumpkin body
- Black super-bulky #6 yarn — approximately 80–100 g for the curved stem
- Black DK or worsted yarn — approximately 50 g for roses and berries
- Cream worsted yarn — approximately 60–80 g for the sunflower petals and small flowers
- Dark brown worsted yarn — approximately 30–40 g for the sunflower center
- Sage green DK yarn — approximately 70–90 g for leaves and trailing foliage
- Mustard or gold yarn — approximately 10 g for small flower centers
A #6 super-bulky yarn gives the pumpkin enough mass to support the floral crown. Published ribbed pumpkin patterns use the same yarn category with 9 mm hooks, while smaller botanical details are easier to control in DK or worsted yarn.
Tools
- 9 mm crochet hook for the pumpkin
- 6.5 mm crochet hook for the stem
- 3.0–4.0 mm crochet hook for flowers and foliage
- Polyester fiberfill — approximately 700–1,000 g
- Large tapestry needle
- Long upholstery needle
- Strong black yarn or cord for shaping
- Stitch markers
- Scissors
- Rustproof pins
Abbreviations
- MR — magic ring
- ch — chain
- sc — single crochet
- hdc — half double crochet
- dc — double crochet
- tr — treble crochet
- inc — increase
- dec — decrease
- sl st — slip stitch
- BLO — back loop only
- st / sts — stitch / stitches
Back-loop half-double crochet creates the repeated ridges used to form the pumpkin’s vertical segments.
Gauge and Finished Size
Gauge is less restrictive for a stuffed pumpkin than for a garment, but the fabric must be dense enough to conceal the filling.
A useful target is approximately 8 stitches per 10 cm in the main ribbed fabric with #6 yarn and a 9 mm hook.
Published super-bulky pumpkin patterns also use 9 mm hooks, while another #6 version uses approximately 80 yards with a 10 mm hook. The hook can therefore be adjusted according to the actual thickness of the chosen yarn.
The large version below is designed to finish at approximately 38–45 cm wide and 28–34 cm high before the stem and flowers are counted.
Black Crochet Pumpkin Pattern
Main Pumpkin Body
Use black #6 super-bulky yarn and a 9 mm hook.
The pumpkin begins as one long ribbed rectangle. Published chunky pumpkin patterns use this same basic construction: crochet a rectangle, seam the short ends, cinch the bottom, stuff the body and close the top.
Foundation: Ch 31.
Row 1: Hdc in second ch from hook and in every ch across. (30)
Row 2: Ch 1, turn. Hdc BLO in every st across. (30)
Rows 3–60: Repeat Row 2. (30)
Do not fasten off.
Lay the rectangle flat. It should measure approximately 38–42 cm from the foundation edge to the final stitch edge and approximately 75–85 cm along the ribbed direction, depending on yarn and tension.
If a wider pumpkin is required, add rows rather than increasing the 30-stitch height. Additional rows increase circumference while preserving the height of the pumpkin.
Joining the Pumpkin Body
Fold the rectangle so the first and final rows meet.
Slip stitch through corresponding loops of both edges from bottom to top.
Keep the seam firm but flexible. Pulling the joining stitches too tightly creates one narrow pumpkin segment that remains visible after stuffing.
Fasten off with a tail at least 80 cm long.
Closing the Bottom
Thread the long yarn tail onto a tapestry needle.
Weave the yarn in and out around the entire lower opening, catching approximately one stitch from each ridge.
Pull gradually until the opening closes.
Pass through the gathered center several times and knot securely on the inside.
Turn the pumpkin right side out.
Stuffing the Pumpkin
Add fiberfill in several layers rather than inserting one large mass.
Begin around the outer wall and fill the spaces behind the ribs. Add firmer stuffing through the central area only after the circumference has developed its rounded shape.
Continue until the pumpkin measures approximately 38–45 cm across.
The body should feel firm enough to recover after being pressed but not so rigid that shaping cords cannot pull between the ribs.
Closing the Top
Cut approximately 100 cm of strong black yarn.
Thread the tapestry needle and weave through the upper edge exactly as for the bottom.
Pull the opening closed in stages.
Add a final handful of stuffing before the opening becomes too small if the center still feels soft.
Close the remaining hole, leaving an opening of approximately 2–3 cm for the stem base.
Knot securely.
Creating Deep Pumpkin Segments
The photographed pumpkin has pronounced vertical grooves. Ribbing alone may not create enough depth on an oversized body, so add external shaping.
Cut a length of strong black yarn approximately four times the pumpkin circumference.
Pass the yarn through the bottom center and bring it up through the top center.
Run the yarn down the outside between two crochet ribs.
Pass through the bottom center again and pull until a visible groove forms.
Repeat around the pumpkin to create approximately 8 major segments.
Keep the tension similar on every pass. One excessively tight shaping strand can distort the entire pumpkin.
Optional Raised Texture
The reference pumpkin contains additional raised lines inside the major segments.
Thread a long strand of black yarn onto the tapestry needle.
Work surface chain stitches vertically along selected crochet ridges, beginning approximately 4 cm above the bottom and stopping 4 cm below the top.
Repeat on alternate ribs.
This additional surface work creates more visible relief without changing the structure of the stuffed body.
Curved Black Pumpkin Stem
Use black super-bulky yarn with a 6.5 mm hook.
The stem is worked as a tapered tube. A smaller hook keeps the fabric dense.
R1: 6 sc in MR. (6)
R2: Inc ×6. (12)
R3: [Sc, inc] ×6. (18)
R4–8: Sc around. (18)
R9: [Sc, dec] ×6. (12)
R10–18: Sc around. (12)
R19: [Sc 2, dec] ×3. (9)
R20–30: Sc around. (9)
Stuff the lower half firmly.
Add less stuffing through the upper half so the stem can bend.
Fasten off with a 40 cm tail.
Curve the stem while positioning it. For a permanent pronounced curve, insert a covered craft wire into the stem before final attachment. Omit wire when the decoration will be handled by children.
Attaching the Stem
Insert the lower 2–3 cm of the stem into the top opening.
Sew around the base several times with strong black yarn.
Pass the needle through the pumpkin body at different angles so the stem cannot rotate under the weight of the flowers.
The stem should lean slightly forward or sideways rather than standing vertically.
Large Cream Sunflower – Make 1
Use dark brown and cream worsted yarn with a 3.5–4 mm hook.
Sunflower Center
With dark brown:
R1: 6 sc in MR. (6)
R2: Inc ×6. (12)
R3: [Sc, inc] ×6. (18)
R4: [Sc 2, inc] ×6. (24)
R5: [Sc 3, inc] ×6. (30)
R6: [Sc 4, inc] ×6. (36)
R7: Sc around. (36)
Fasten off.
A 36-stitch circular center is also used in published crochet sunflower construction and gives enough circumference for a substantial decorative bloom.
Sunflower Petals
Join cream yarn to any stitch of the brown center.
Petal 1: Ch 9. Starting in second ch from hook, sl st, sc, hdc, dc in next 3 ch, hdc, sc. Sl st into the next stitch of the center.
Repeat around, spacing petals evenly.
For a fuller flower, add a second layer of petals behind the first.
Second layer: Ch 11 for each petal and work sc, hdc, dc, tr, tr, dc, dc, hdc, sc back toward the center.
Fasten off with a 30 cm sewing tail.
The finished flower should measure approximately 14–18 cm across when made with worsted yarn.
Black Crochet Rose – Make 2 or 3
Use black worsted yarn and a 4 mm hook.
Ch 51.
Row 1: Dc in fourth ch from hook, ch 1, dc in same ch. *Skip one ch, work (dc, ch 1, dc) in next ch.* Repeat across.
Row 2: Ch 3, turn. Work 5 dc into each ch-1 space across.
Fasten off with a 40 cm tail.
The strip will naturally curl.
Beginning at one end, roll the strip tightly for the first few centimeters to create the rose center. Continue rolling more loosely as the flower expands.
Sew through the base repeatedly so every layer is secured.
Make one large rose approximately 10–12 cm wide and one or two smaller roses approximately 7–9 cm wide.
Small Cream Flowers – Make 5 to 7
Use cream worsted yarn.
R1: 6 sc in MR. Join. (6)
R2: In each stitch work: sl st, ch 3, 2 dc, ch 3, sl st.
Repeat around to create six petals.
Fasten off.
Using mustard or gold yarn, embroider several French knots in the center.
Keep these flowers approximately 4–6 cm across so they remain secondary to the sunflower and roses.
Small Ivory Buds – Make 6 to 10
R1: 6 sc in MR. (6)
R2: Inc around. (12)
R3: Sc around. (12)
R4: Dec ×6. (6)
Add a tiny amount of yarn scrap before closing.
Fasten off with a sewing tail.
Cluster the buds in groups of two or three between leaves.
Sage Green Pointed Leaf – Make 10 to 14
Use sage DK yarn with a 2.5–3 mm hook.
Published crochet fern patterns commonly use DK yarn with approximately a 2.5 mm hook, which provides enough definition for fine foliage.
Ch 17.
Starting in second ch from hook:
Sl st, sc, hdc, dc in next 8 ch, hdc in next 3 ch, sc, sl st.
Work 3 sc into the final chain.
Continue along the opposite side of the foundation chain and mirror the stitch sequence.
Join at the base.
Surface sl st along the foundation chain from base to tip to create the central vein.
Fasten off with a 25 cm tail.
Textured Fern Frond – Make 4 to 6
Ch 25.
Sl st in second ch from hook.
*Ch 6, starting in second ch work sl st, sc, hdc, dc, hdc. Sl st into next 2 foundation chains.*
Repeat along one side of the stem, gradually reducing the leaflets near the tip.
Turn and work corresponding leaflets along the opposite side.
Finish with a small pointed leaflet at the top.
Fasten off.
The fronds should extend beyond the flower arrangement by approximately 5–8 cm.
Trailing Green Sprig – Make 3 to 5
Ch 30.
Sl st in second ch and next 2 ch.
*Ch 5, work sc, hdc, dc, hdc back along the chain, sl st into next 3 foundation chains.*
Repeat to the end.
Allow the finished piece to twist naturally.
These trailing sections should hang slightly over the pumpkin ribs rather than lying completely flat.
Black Berry Clusters – Make 5 to 7
Make three berries for each cluster.
R1: 6 sc in MR. (6)
R2: Inc ×6. (12)
R3: Sc around. (12)
R4: Dec ×6. (6)
Stuff lightly.
Fasten off and close.
Sew three berries together and attach them near the base of a leaf group.
Planning the Floral Crown
Complete every flower and leaf before attaching anything permanently.
Place the large cream sunflower slightly left of the stem.
Position the largest black rose on the right.
Add a second black rose behind or below the first, allowing part of it to disappear beneath the foliage.
Arrange sage leaves around both sides of the composition. Point several leaves outward and allow the lower foliage to follow the pumpkin’s curved surface.
Use the small cream flowers to fill gaps between the sunflower, roses and stem.
Add black berries only after the larger pieces are pinned in position.
Assembly
- Complete the black pumpkin body, stuff it firmly and shape approximately eight deep vertical segments.
- Insert and sew the curved black stem into the top opening, testing its stability before adding flowers.
- Pin the large cream sunflower slightly left of the stem and sew through its center and several hidden points around the brown disc.
- Position the largest black rose to the right of the sunflower and attach it through the base without flattening the outer petals.
- Add the remaining black rose or roses behind the primary flowers to increase depth.
- Arrange sage leaves beneath the flowers, angling the leaf tips approximately 30–45 degrees away from the center.
- Add trailing fern sections along the outer edges and allow selected tips to extend down the pumpkin body.
- Sew the small cream flowers into visible gaps without covering the sunflower petals or rose edges.
- Add black berry clusters and ivory buds at junctions between leaves, then weave every attachment tail into the pumpkin surface.
- Place the finished pumpkin on a flat surface and adjust the stem, petals and foliage until the floral crown remains balanced without tipping the pumpkin forward.
The completed decoration should have a deeply ribbed black body, curved stem and asymmetrical floral crown dominated by one cream sunflower and several black roses.
7 Technical Tips for a Better Floral Crochet Pumpkin
- Prevent stuffing gaps. A 40 cm pumpkin can expose white fiberfill through loose black stitches. Use a hook that produces dense fabric and check the stretched swatch before beginning the full body.
- Control segment depth. One shaping strand pulled 2 cm deeper than the others can make the pumpkin lean. Tighten all eight shaping passes gradually instead of completing one groove at full tension.
- Reinforce the stem base. A long curved stem creates leverage against the top opening. Sew through at least four different points around its lower 2–3 cm.
- Keep the sunflower below 18 cm. A much larger flower can hide the stem and dominate the complete arrangement. Measure the brown center before adding the second petal layer.
- Do not flatten the roses. Sewing through outer petals destroys the layered spiral. Attach each rose through its base and one hidden inner point only.
- Pin foliage before sewing. Leaves attached one at a time can accumulate on one side and shift the visual weight. Pin the full crown first and check it from the front and both sides.
- Secure heavy motifs with long tails. A short 5 cm attachment tail can work loose when the pumpkin is moved. Leave at least 25–30 cm on large flowers and weave the tail in two directions after sewing.
Making a Smaller Black Pumpkin
For a tabletop version approximately 23 cm wide, reduce the main body to approximately 20 stitches high and 40 ribbed rows.
Use the same construction method: seam the rectangle, gather the bottom, stuff, close the top and add external shaping strands.
Reduce the floral crown at the same time. One sunflower, one small rose, four leaves and three small cream flowers are enough for the smaller body.
Making an Extra-Large Pumpkin
Increase the rectangle height to approximately 36–40 stitches and continue the ribbed rows until the long edge measures roughly twice the desired finished width.
Published super-bulky pumpkin construction scales effectively by changing the dimensions of the starting rectangle. Large published versions use approximately 141 yards of #6 yarn for a 9-inch pumpkin, so a centerpiece approaching 40 cm wide requires substantially more yarn and stuffing.
Add at least eight external shaping strands to a large body. Ten can be used when narrower segments are preferred.
Choosing Black Yarn
Texture disappears more easily in black yarn than in pale colors. Select a yarn with a matte or lightly twisted surface rather than a highly fuzzy finish when the raised ribs are important.
Super-bulky wool blends produce pronounced ridges and hold the stuffed form well. Thick acrylic is lighter and generally easier to wash. Plush polyester produces a softer body but can hide individual stitch structures.
Inspect the yarn in daylight before buying the full quantity. Some shades sold as black have visible blue, brown or charcoal undertones that become more apparent beside cream and sage.
Flower Color Placement
The cream sunflower provides the strongest light-dark contrast, so keep it near the visual center without placing it directly beneath the stem.
Black roses need lighter foliage or flowers around at least part of their edges. A black rose positioned directly against the black pumpkin with no green or cream separator can disappear into the body.
Sage leaves perform that separating function. Place them beneath the rose edges and behind the sunflower petals.
Small ivory flowers should appear in several locations rather than one concentrated cluster. This repeats the cream color through the complete crown.
How to Keep the Pumpkin Upright
Concentrating flowers at the top can make a lightweight pumpkin unstable.
Use dense stuffing through the lower third and press the bottom against a flat surface while filling it. This creates a wider contact area.
Keep the heaviest flowers close to the top center rather than attaching them to the outermost edge.
If the pumpkin is strictly decorative, a small fabric pouch containing plastic craft pellets can be positioned at the bottom center before the final stuffing is added. Keep weighted filling fully enclosed inside its own sewn pouch.
Care and Storage
Remove surface dust with a soft brush or low-suction upholstery attachment. Pay particular attention to the black roses because dust is more visible on dark raised petals.
If the yarn requires washing, follow its label and account for every fiber used in the flowers and foliage. Spot cleaning is generally more practical for a large stuffed decoration containing multiple attached motifs.
Store the pumpkin in a container large enough that the stem does not need to be folded sharply. Place acid-free tissue or clean fabric around the floral crown to prevent the leaves and petals from being crushed.
Conclusion
The deep ribs and curved stem establish the structure of this black crochet pumpkin pattern before a single flower is attached. Finish and shape the stuffed body first, then build the botanical crown from the largest motifs outward: cream sunflower, black roses, sage leaves, small ivory flowers and berry clusters. Pin the complete arrangement before sewing so the dark flowers remain visible against the black body. Your next practical step is to crochet a 15 cm ribbed swatch with the chosen #6 yarn and 9 mm hook to check fabric density. Save the finished pumpkin to Pinterest or share it on Instagram with #BlackFloralCrochetPumpkin. Would you keep the sunflower cream or make its petals black too?









