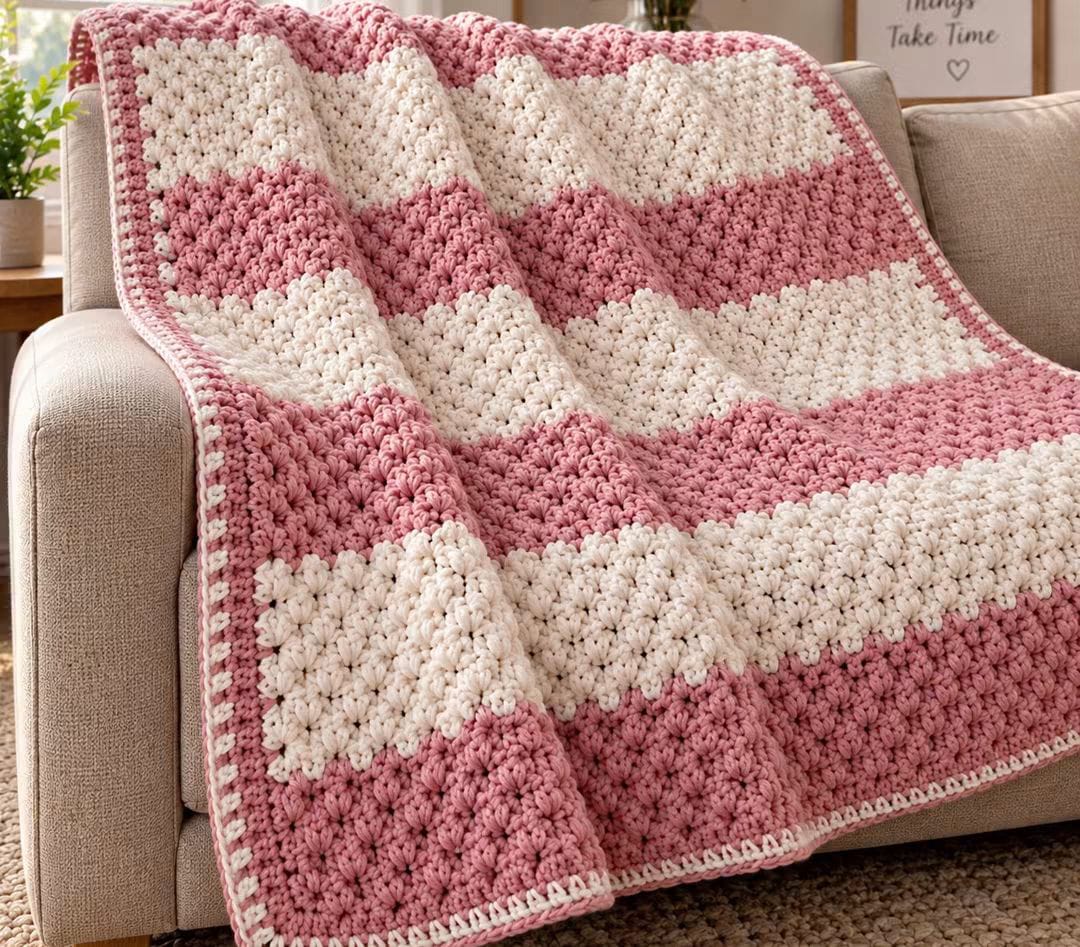
Wide blush-pink bands separated by cream are what give this blanket its distinctive horizontal rhythm. This pink and cream chunky crochet blanket uses a dense textured stitch, oversized color sections and a narrow two-color edging to reproduce the structure visible in the reference image. Worked flat in rows with bulky yarn and an 8 mm hook, the finished throw measures approximately 122 × 152 cm (48 × 60 inches).
The Design: What Makes This Striped Blanket Different
This design depends on stripe proportion rather than frequent color changes. Each broad section is deep enough to become a structural part of the blanket instead of reading as a narrow decorative stripe. Dusty pink and warm cream alternate across the full width, producing the large horizontal bands visible in the reference.
The second decision is texture. A compact moss-style stitch gives the surface small raised clusters while keeping the fabric flexible enough to drape over a sofa. Bulky yarn exaggerates that texture without requiring complicated stitch combinations.
Finally, the border stays narrow. A heavy frame would compete with the broad stripes, so the blanket finishes with cream and pink edging instead. The most common failure point is inconsistent row width after a color change. Count the stitch spaces regularly rather than relying on the visible edge alone.
Project Info at a Glance
| Skill Level | Time | Finished Size | Hook | Yarn Weight |
|---|---|---|---|---|
| Easy | 10–15 hours | Approx. 122 × 152 cm | 8 mm | Bulky #5 |
A 48 × 60 inch throw is also used for a published three-color chunky striped blanket from Lion Brand/Jewels and Jones. That pattern uses bulky #5 yarn and moss stitch, with a documented gauge of 12 stitches × 12 rows per 4 inches. Actual dimensions will still depend on your yarn and tension.
Materials and Tools
Yarn
- Dusty pink bulky #5 yarn — approximately 900–1,000 g
- Warm cream bulky #5 yarn — approximately 700–800 g
Plan for approximately 1,600–1,800 g total when making a full sofa throw in a dense bulky yarn. Buy all skeins for each color from the same dye lot when possible.
The reference photograph has a thick, rounded surface. A soft bulky acrylic or acrylic-wool blend will produce good stitch definition. Plush polyester can also be used, although its gauge should be tested separately because highly compressible yarn changes both row height and yardage.
Tools
- 8 mm crochet hook
- Large-eye yarn needle
- Scissors
- 2 locking stitch markers
- Flexible measuring tape
Abbreviations
- ch — chain
- sc — single crochet
- hdc — half double crochet
- sl st — slip stitch
- ch-sp — chain space
- st / sts — stitch / stitches
- RS — right side
- WS — wrong side
Moss stitch alternates single crochet and chain spaces, with each new single crochet worked into the chain space from the previous row.
Gauge
Work a test swatch before beginning the full blanket.
Target gauge: approximately 12 stitches × 12 rows = 10 × 10 cm (4 × 4 inches) in the established pattern.
A published bulky striped moss-stitch blanket uses this same 12-stitch × 12-row gauge. Another published super-bulky moss-stitch blanket uses 10 stitches × 8 rows per 4 inches with an 8 mm hook, showing why yarn choice needs to be checked before calculating the foundation chain.
If your swatch is substantially narrower than 10 cm, move up a hook size. If it is wider, move down a hook size.
Pink and Cream Chunky Crochet Blanket Pattern
Finished target: approximately 122 × 152 cm / 48 × 60 inches.
Construction: worked flat from the bottom upward.
The starting chain must be an odd number. To change the width, add or remove chains in multiples of two.
Foundation
With dusty pink, ch 145.
Lay the chain on a flat surface before beginning Row 1. It should measure close to the intended blanket width without being stretched.
Row 1
Sc in the 4th ch from hook.
*Ch 1, skip next ch, sc in next ch.*
Repeat from * to * across.
Ch 2 and turn.
Row 2
Sc in the first ch-1 space.
*Ch 1, sc in next ch-1 space.*
Repeat across, placing the final sc into the turning-chain space.
Ch 2 and turn.
Row 3 and Following Rows
Repeat Row 2 throughout the blanket.
Place one locking stitch marker in the first stitch and another in the final stitch of the row. Move the markers upward every few rows. This makes accidental edge decreases easier to identify.
Stripe Sequence
The photograph uses broad alternating sections rather than narrow repetitive stripes. For a throw approximately 152 cm long, work the following sequence.
Stripe 1 – Dusty Pink
Continue in dusty pink until the first section measures approximately 20 cm / 8 inches.
Finish the final stitch of the last row with the cream yarn so the color transition remains clean.
Stripe 2 – Cream
Work the established moss stitch in cream for approximately 20 cm / 8 inches.
Keep the first and final stitches at the same tension as the center stitches. Loose edge stitches become especially visible against contrasting stripes.
Stripe 3 – Dusty Pink
Change to dusty pink.
Continue the established pattern for approximately 20 cm / 8 inches.
Stripe 4 – Cream
Change to cream and work approximately 20 cm / 8 inches.
Stripe 5 – Dusty Pink
Change to dusty pink.
Work approximately 20 cm / 8 inches.
Stripe 6 – Cream
Change to cream and work approximately 20 cm / 8 inches.
Stripe 7 – Dusty Pink
Finish with dusty pink, working until the complete blanket body reaches approximately 145–147 cm before the border.
Fasten off only after checking the total length on a flat surface.
How to Change Colors Cleanly
Work the final single crochet of the old color until two loops remain on the hook.
Drop the old yarn behind the work. Yarn over with the new color and pull the new strand through both loops.
Continue the next row with the new yarn.
Leave a tail of at least 15 cm at every color transition. Short tails are more difficult to secure in bulky fabric and may work toward the surface after washing.
Because each stripe is wide, cut the yarn at every color change instead of carrying the unused color along the edge.
Optional Raised Texture Variation
The reference image has a strongly textured surface. If standard moss stitch looks too flat with your yarn, replace every fourth moss-stitch row with a half-double-crochet texture row.
Texture Row: Ch 1, hdc in each sc and each ch-1 space across. Turn.
Next Row: Return to the established moss-stitch sequence, distributing the single crochets and chain spaces evenly across the row.
Make a swatch before using this variation throughout the blanket. The additional hdc rows increase both height and yarn consumption.
Preparing the Blanket for the Border
Lay the completed blanket on a flat surface.
Measure the width at the top, center and bottom. Then measure the length along both side edges and through the center.
A difference of approximately 1–2 cm can usually be distributed during the first border round. A larger discrepancy should be corrected before adding the edging.
Mark all four corners with locking stitch markers.
Cream Foundation Border
Join cream yarn in any corner.
Round 1: Ch 1. Sc evenly around the complete blanket.
Along the top and bottom edges, work approximately one sc into each stitch or chain space.
Along the side edges, distribute the stitches evenly rather than forcing one stitch into every row end.
Work 3 sc in each corner.
Join to the first sc with sl st.
Place the blanket flat and inspect the edge. If the border waves outward, too many stitches were added. If the corners pull inward, additional edge stitches are required.
Pink Border Round
Change to dusty pink.
Round 2: Ch 1. Sc in every stitch around.
Work 3 sc in the center stitch of each corner group.
Join with sl st.
Cream Contrast Edge
Change back to cream.
Round 3: Ch 1. Work one sl st loosely in each stitch around.
At each corner, work 3 loose sl sts into the center corner stitch.
Do not tighten the slip stitches. A tight final round can pull an otherwise square blanket inward.
Fasten off.
Optional Final Pink Edge
For a stronger pink outline similar to the reference image, join dusty pink behind the cream slip-stitch round.
Work one loose sc in each stitch around, placing 3 sc at each corner.
Fasten off and leave a 20 cm tail.
Assembly and Finishing
- Lay the completed blanket flat and confirm that the broad pink and cream sections remain approximately parallel.
- Measure the top, middle and bottom widths before beginning the border.
- Mark all four corners so border increases remain in the same positions.
- Work the cream foundation border without stretching the side edges.
- Add the dusty-pink round and check the blanket for rippling before continuing.
- Work the narrow cream contrast edge with deliberately loose slip stitches.
- Add the optional final pink round if a stronger frame is wanted.
- Thread every color-change tail onto a large-eye yarn needle and weave through at least 5 cm of dense fabric.
- Reverse direction and weave the tail through a second section before trimming.
- Measure the finished blanket and record the yarn, hook, gauge and final dimensions for the next version.
The completed throw should have broad horizontal pink and cream bands, a dense textured surface and a narrow contrasting frame.
7 Technical Tips for Better Stripes
- Prevent width loss. Missing the final chain space gradually narrows the blanket. Keep a locking marker in both edge stitches and count the pattern spaces every 10 rows.
- Measure stripe depth. A difference of three or four rows can become obvious when broad stripes are stacked. Measure each color section through the center and use approximately 20 cm as the target.
- Control color-change tension. Pulling the new yarn too tightly creates a notch in the side edge. Complete the first three stitches of every new stripe at normal working tension.
- Do not stretch the foundation chain. A chain measured under tension produces a blanket narrower than expected. Place it flat and relaxed before checking the starting width.
- Check border density. Too many side-edge stitches create ruffles. After the first border round, place the blanket flat before adding another round.
- Secure bulky yarn tails. Thick yarn can work free if it is woven only in one direction. Weave each tail for at least 5 cm, reverse direction, then pass through a second section.
- Watch chenille loops. Plush yarn worked too loosely can form projecting loops after handling. Make a 15 cm test swatch and manipulate it firmly before choosing the final hook.
How to Make a Smaller Blanket
Keep the foundation chain odd and reduce it in multiples of two.
For a baby or stroller blanket, aim for approximately 75 × 90 cm. Use fewer foundation stitches and reduce each broad stripe to approximately 10–12 cm.
Do not simply stop a full-width blanket early. Width and length should be reduced proportionally if you want the same broad-striped appearance.
How to Make a Larger Blanket
For a larger sofa blanket, increase the foundation chain in multiples of two until the relaxed chain reaches the required width.
A throw measuring approximately 127 × 155 cm is another documented size for a bulky moss-stitch striped blanket.
For a bed-size version, make a gauge swatch first and calculate the required number of pattern repeats from the desired width. Expect yarn consumption to rise substantially because this is a dense textured fabric.
Choosing the Right Yarn
Bulky #5 yarn is a practical match for this design. Current yarn guidance generally places #5 bulky yarn with hooks around 6.5–9 mm, while #6 super-bulky yarn commonly uses approximately 9–15 mm hooks.
An 8 mm hook therefore provides a useful starting point for bulky yarn, but the swatch should make the final decision.
Acrylic produces a lighter, easier-care blanket. Acrylic-wool blends add more body. Plush polyester produces rounder-looking stitches but may require more attention to tension.
Use the same yarn line for pink and cream whenever possible. Two yarns carrying the same weight number can still have different diameters and create visibly different stripe widths.
Adjusting the Pink and Cream Stripe Sequence
The reference design relies on wide bands, so changing their proportions will alter the overall appearance more than changing the stitch itself.
For stronger pink dominance, make the pink sections approximately 22 cm and the cream sections approximately 16 cm.
For equal color balance, keep every stripe at approximately 20 cm.
For a mostly cream blanket, reverse the proportions and reserve dusty pink for narrower 12–15 cm bands.
Always finish a stripe at the end of a complete row. Never change colors halfway across unless a deliberate color-block design is intended.
Keeping the Blanket Rectangular
Place the project flat after every two major color sections. Measure from the first stitch to the last stitch at several points.
If one edge begins moving inward, check whether the final chain space has been skipped. If an edge moves outward, inspect the first and final spaces for accidental extra stitches.
Moss stitch can make errors less obvious than solid single crochet because chain spaces blend into the fabric. Edge markers therefore remain useful throughout the entire project.
Correct stitch-count problems immediately. Adding extra stitches several rows later may restore the numerical count but will leave a visible change in the side profile.
Washing and Finishing
Follow the care instructions printed on the yarn label. When the blanket uses two different yarn lines, follow the more restrictive washing instructions.
Wash a pink-and-cream swatch before washing the completed blanket if color transfer is a concern. This is especially important with highly saturated pink yarn beside cream.
After washing, arrange the blanket on a flat surface and square the corners without aggressively stretching the fabric.
Store a heavy chunky blanket folded rather than hanging it from one edge. Prolonged hanging can stretch the upper rows and distort the border.
Conclusion
The stripe proportions determine the appearance of this pink and cream chunky crochet blanket more than complicated stitch changes. Start with a gauge swatch, establish the width from an odd-number foundation chain, and measure every broad color section before switching yarn. Once the final pink stripe is complete, check all four edges before adding the narrow cream-and-pink frame. Record the finished measurements and actual yarn consumption if you plan to reproduce the throw in another color combination. Save the finished blanket to Pinterest or share your version on Instagram with #PinkCreamChunkyBlanket. For another version of this specific design, would you make the center stripe pink or cream?









