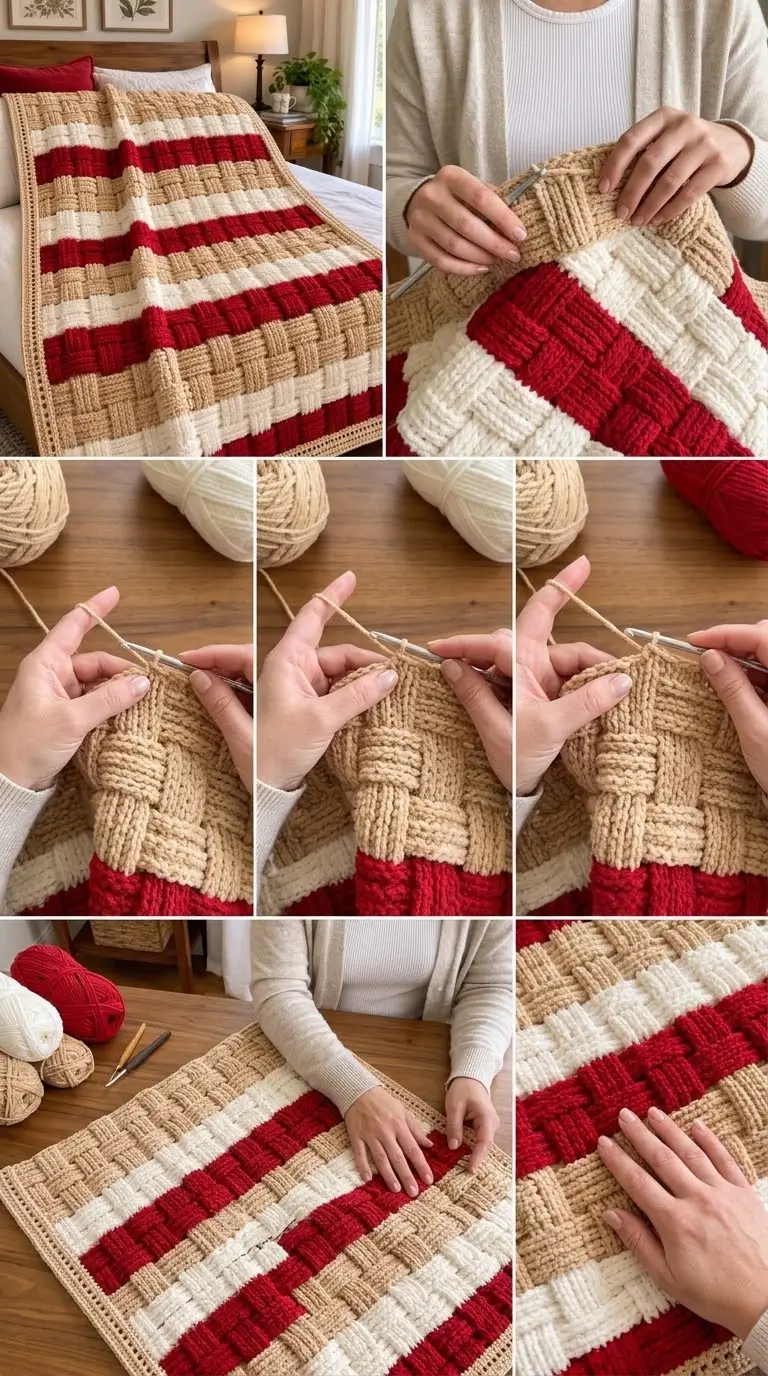
Basketweave blocks only resemble interlaced strips when the raised posts reverse direction at disciplined intervals. This chunky basketweave crochet blanket pattern uses super-bulky tan, cream and red yarn with a 10 mm hook to target a roughly 120 × 150 cm throw. It suits an intermediate crocheter familiar with post stitches. The dense structure produces a substantial bed or sofa layer without separate motifs or joining.
The Design: What Makes This Basketweave Blanket Different
Three decisions define this blanket. Large post-stitch blocks replace a fine basket texture, allowing the raised sections to remain visible across a bed-sized surface. Broad red, cream and tan bands interrupt the texture without changing the underlying stitch architecture, so the red and cream crochet blanket retains one continuous structural rhythm.
The second decision is density. Front-post and back-post double crochet produce a thicker fabric than ordinary double crochet because the hook works around stitch posts rather than simply through the top loops.
Finally, a restrained border controls the perimeter. A common error in a basketweave crochet blanket is allowing post-stitch tension to contract the center while the edging remains loose, producing flared sides.
Project Info at a Glance
| Skill Level | Time | Finished Size | Hook | Best For |
|---|---|---|---|---|
| Intermediate | Approx. 18–25 hours | Approx. 120 × 150 cm | 10 mm | Bed layer / large sofa throw |
The dimensions are the specification for this image-inspired version rather than a direct measurement of the photographed blanket. Always make a gauge swatch before calculating the final foundation chain.
Materials and Tools
Yarn
Use Super Bulky (6) yarn with consistent thickness across all three colors. Basketweave fabric consumes more yarn than many flat crochet stitches because the hook travels around the posts of previous stitches.
- Warm tan: Super Bulky (6), approximately 900 g
- Cream/ivory: Super Bulky (6), approximately 750 g
- Deep red: Super Bulky (6), approximately 750 g
Purchase additional yarn when dye-lot matching matters. The exact quantity will change with gauge, blanket dimensions and yarn construction.
Tools
- 10 mm crochet hook
- Locking stitch markers
- Large-eye yarn needle
- Sharp scissors
- Tape measure
- Blocking mats or a clean flat surface
The 10 mm hook is a starting point for the chunky fabric shown. Change hook size after swatching if your fabric is excessively stiff or loose.
Abbreviations
- ch — chain
- sc — single crochet
- dc — double crochet
- FPdc — front-post double crochet
- BPdc — back-post double crochet
- sl st — slip stitch
- st/sts — stitch/stitches
- rep — repeat
- RS — right side
- WS — wrong side
An invisible decrease is unnecessary for this flat blanket construction. The main panel maintains a rectangular shape without amigurumi-style decreases.
Chunky Basketweave Crochet Blanket Pattern
Construction: This blanket is worked flat in rows. The basketweave texture is created by alternating groups of front-post and back-post double crochet stitches.
Gauge Swatch
Yarn: tan.
Foundation: Ch 27.
Row 1: Dc in 4th ch from hook and each ch across. Turn.
Row 2: Ch 2, then work alternating groups of 4 FPdc and 4 BPdc across the patterned section. Turn.
Row 3: Repeat the established FPdc and BPdc groups. Turn.
Row 4: Repeat the established FPdc and BPdc groups. Turn.
Rows 5–7: Reverse the groups so BPdc stitches are worked over the previous raised section and FPdc stitches are worked over the recessed section.
This creates one complete basketweave cycle.
Measure the swatch after allowing the fabric to rest flat. Increase the hook size if the fabric is rigid. Reduce the hook size if the blocks lack definition or the fabric has oversized gaps.
Main Blanket Panel
Yarn: tan, cream and deep red.
Use the gauge swatch to calculate a foundation that produces approximately 112–116 cm of width before the border.
Super-bulky yarn can vary considerably in diameter, so calculating the foundation from your own gauge is more reliable than using a fixed chain count.
Foundation Row: Chain to the calculated width while maintaining the required basketweave repeat.
Row 1: Dc across. Turn.
Rows 2–4: Ch 2. Maintain the edge stitches, then work alternating groups of 4 FPdc and 4 BPdc across the patterned section. Turn after every row.
Rows 5–7: Ch 2. Reverse the post-stitch groups by working 4 BPdc over the previous raised section and 4 FPdc over the previous recessed section.
Rows 8–10: Repeat Rows 2–4.
Rows 11–13: Repeat Rows 5–7.
Continue repeating this sequence until the first tan section reaches the required depth.
Cream Basketweave Band
Yarn: cream.
Change to cream during the final yarn-over of the last stitch in the preceding row. This produces a cleaner color transition than fastening off after completing the stitch.
Continue the existing FPdc/BPdc sequence without restarting the basketweave repeat.
Work approximately 18–22 cm in cream.
The color sequence and basketweave sequence should be treated separately. The stripe controls the color placement, while the FPdc/BPdc sequence controls the texture.
Restarting both systems simultaneously can create an obvious horizontal interruption in the woven effect.
Red Basketweave Band
Yarn: deep red.
Join the red yarn at the beginning of the next scheduled row.
Continue with the established basketweave pattern, maintaining four-stitch post groups and the same tier depth used throughout the blanket.
Work approximately 16–20 cm in red.
Count every four-stitch group. The strong contrast between red and cream makes a misplaced FPdc or BPdc particularly visible.
Repeating the Three-Color Body
The photographed blanket uses repeated horizontal color sections instead of random changes.
A practical sequence is:
Tan → Cream → Red → Tan → Cream → Red → Tan
Continue the basketweave structure through every color transition.
Adjust the depth of the final tan section until the main panel reaches approximately 142–145 cm before the border.
Do not force every stripe to contain exactly the same number of rows when doing so would produce an incorrect finished length. Complete color changes at the edge while maintaining the established FPdc/BPdc phase.
The horizontal bands provide the large-scale pattern. The raised and recessed post stitches create the smaller woven blocks.
Edge Preparation
Yarn: tan.
Place the blanket flat before starting the border. Check that the opposite sides are approximately equal in length.
With the right side facing, join tan yarn at one corner.
Round 1: Ch 1 and sc evenly around the entire blanket. Work 3 sc into each corner.
Along the row-end edges, distribute the single crochet stitches evenly rather than automatically placing one stitch into every visible space.
Too many stitches will cause the border to ripple. Too few will pull the blanket inward.
Join with a sl st to the first sc.
Structured Border
Yarn: tan.
Round 2: Ch 2. Dc in each stitch around. Work 3 dc in each corner stitch. Join.
Round 3: Ch 1. Sc in each stitch around. Work 3 sc in each corner. Join.
Round 4: Repeat Round 2.
Place the blanket on a flat surface before continuing.
If the border waves outward, the perimeter probably contains too many stitches. Remove the affected round and reduce the stitch frequency along the sides.
If the border pulls inward, use a slightly larger hook for the border or adjust the stitch distribution.
Optional Openwork Border Detail
The narrow openings around the reference blanket can be interpreted with a simple eyelet-style round.
Round 5: Ch 1, sc in first stitch, then repeat ch 1, skip 1 stitch, sc in next stitch around. Adjust the repeat near the corners as required.
Use enough chain space at each corner for the border to turn without pulling.
Round 6: Ch 1. Sc in each sc and each ch-1 space around. Work 3 sc at each corner.
Join and fasten off.
Leave approximately 15 cm of yarn for weaving in.
Finishing
Weave every color-change tail through stitches of the same color on the wrong side of the blanket.
Reverse direction at least once when securing slippery polyester or chenille-style yarn. This reduces the chance of short tails working free.
Lay the blanket flat and compare the length of opposite sides. Shape minor distortion by hand.
Do not apply aggressive heat to synthetic blanket yarn. Follow the washing and drying instructions printed on the yarn label.
Assembly and Finishing Order
- Complete the entire three-color basketweave panel.
- Lay the blanket flat and inspect every FPdc/BPdc reversal.
- Secure the red-to-cream, cream-to-tan and tan-to-red yarn tails on the wrong side.
- Measure the top and bottom edges before beginning the border.
- Add the tan single-crochet preparation round around all four sides.
- Check each corner for cupping or flaring.
- Add the double-crochet and single-crochet border rounds.
- Work the optional openwork detail only after confirming that the perimeter lies flat.
- Weave the remaining tails through matching-color stitches and reverse direction once.
- Lay the finished blanket flat, square the four corners and record the final dimensions.
The blanket is finished when the central panel lies flat and the border shows no significant contraction or flare.
7 Technical Tips for a Better Basketweave Blanket
- Mark every post-stitch reversal. Place a stitch marker at the start of each FPdc/BPdc transition. Missing one four-stitch group can shift the following blocks and create a diagonal defect.
- Keep the project flat rather than adding filling. No stuffing or batting is required for this construction. Adding internal filling would alter the drape and thickness of the blanket.
- Watch for accidental decreases. The main rectangle should retain its stitch count from one row to the next. Missing an edge stitch repeatedly will cause one side to narrow.
- Separate color counting from texture counting. Record the stripe row and basketweave tier independently. A color change made one row before the post-stitch tier finishes can make the stripe appear misaligned.
- Measure every 15–20 cm. Chenille and super-bulky yarn can encourage tighter BPdc stitches. Regular measurements expose gradual width loss before dozens of rows need to be removed.
- Check the border on a flat surface. Pin all four corners before deciding whether another round is needed. Visible waves usually indicate excessive border stitches.
- Leave 15 cm tails at color changes. Short tails are difficult to secure inside thick post-stitch fabric. Weave each tail through matching-color stitches and reverse direction before trimming.
Conclusion
Before committing the full yarn quantity, work one complete FPdc/BPdc basketweave repeat and measure it after the fabric relaxes. Use that swatch to calculate the foundation width, then record the hook, yarn, block width and rows per tier. This approach makes the chunky basketweave crochet blanket pattern easier to resize while retaining the red, cream and tan proportions shown in the reference. Once finished, photograph the blanket flat so the complete block arrangement is visible, then save the project to Pinterest or share it on Instagram with #ChunkyBasketweaveBlanket. Would you keep the deep-red bands at this width, or make them narrower than the cream and tan sections?









