Introduction
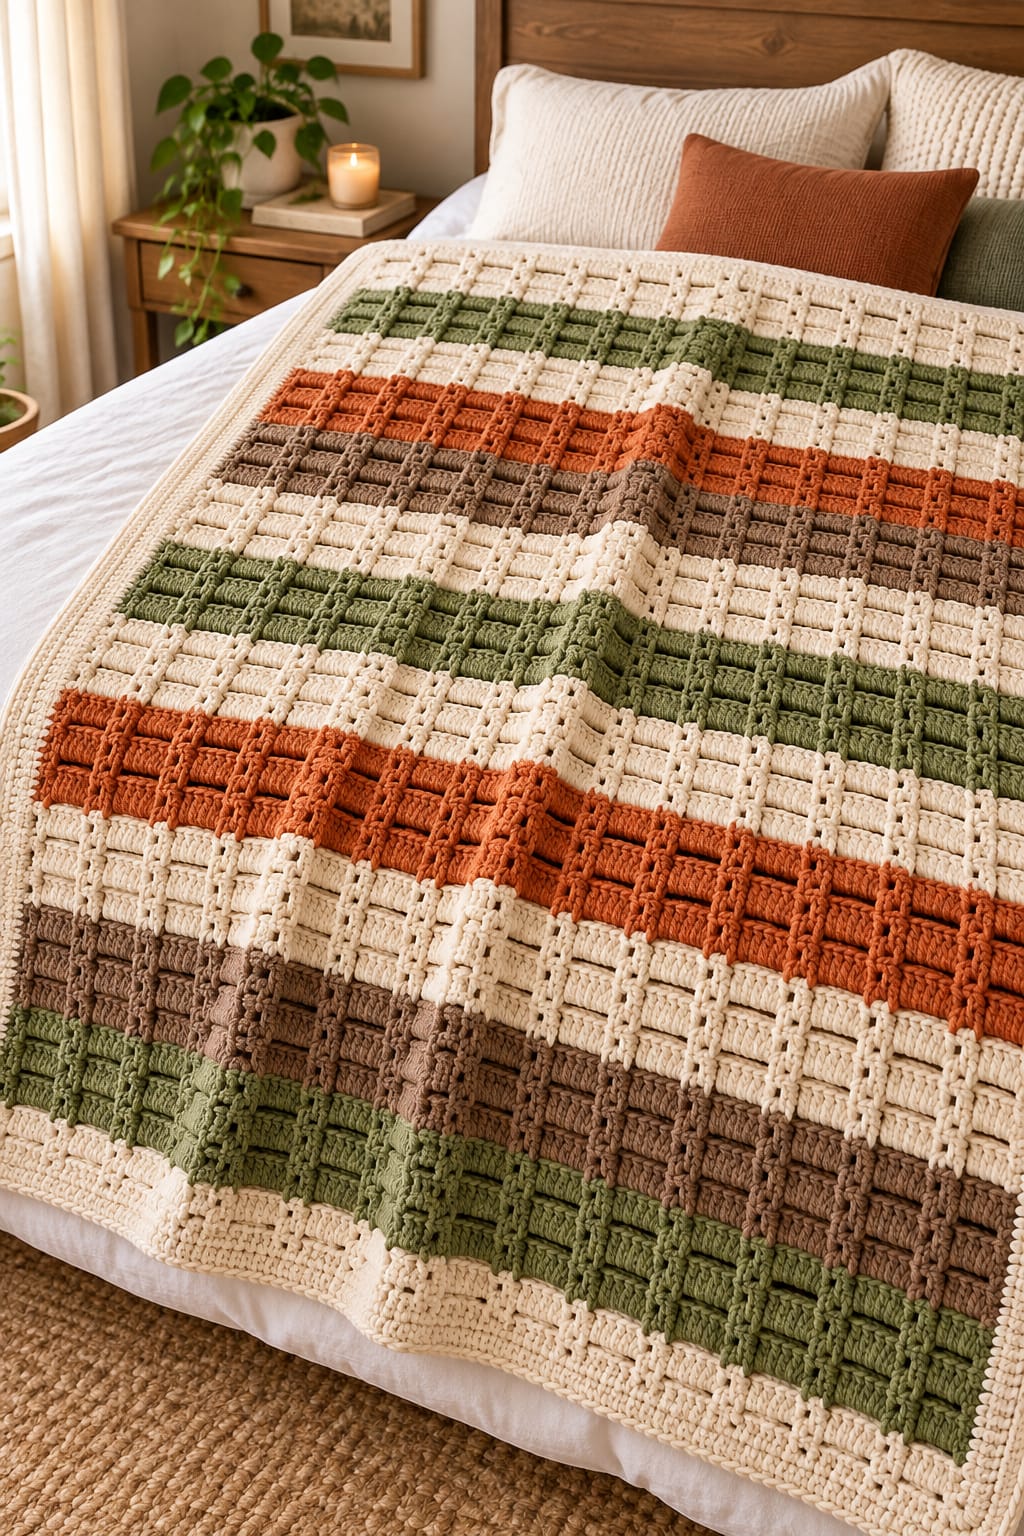
Plaid only works when its narrow vertical lines cross the color bands without disappearing into them. This plaid crochet blanket pattern uses broad cream, olive, rust, and taupe stripes with raised vertical surface lines to create the woven grid visible in the design. Worked in worsted or Aran-weight yarn, the finished blanket is substantial enough for a bed throw while keeping the construction repetitive and measurable.
The Design: What Makes This Plaid Crochet Blanket Different
The blanket is constructed in two visual directions. Horizontal color bands are crocheted first, creating the main fabric. Narrow vertical lines are added afterward through evenly spaced channels, converting ordinary stripes into a structured plaid grid.
Texture matters as much as color. The horizontal rows use raised stitch groups that resemble padded bars, while the vertical lines sit above those bars instead of disappearing into the fabric. Cream remains the dominant background, allowing olive green, burnt orange, and taupe to read as separate bands.
A common mistake with a crochet plaid blanket is changing both the stitch structure and color sequence too frequently. The photographed design avoids that problem by repeating one grid system across every stripe. The result is geometric even when the color bands vary in width.
Project Info at a Glance
| Skill Level | Time | Finished Size | Hook | Best For |
|---|---|---|---|---|
| Intermediate | 20–30 hours | Approx. 125 × 160 cm | 5.5–6.0 mm | Bed throw, sofa blanket, guest room |
The 125 × 160 cm measurement is a practical target for the photo-inspired throw rather than a measurement taken directly from the image. Adjusting the foundation chain and repeating complete stripe sections makes the design suitable for smaller lap blankets or larger bed covers.
Materials and Tools
Yarn
- Warm cream — worsted/Aran #4 — approximately 1,000–1,200 g.
- Olive green — worsted/Aran #4 — approximately 350–450 g.
- Burnt orange — worsted/Aran #4 — approximately 300–400 g.
- Taupe brown — worsted/Aran #4 — approximately 300–400 g.
Allow additional cream yarn for the border and vertical grid. Exact consumption depends on gauge, blanket dimensions, fiber content, and the amount of raised surface work.
Tools
- 5.5–6.0 mm crochet hook
- Tapestry needle
- Locking stitch markers
- Scissors
- Measuring tape
- Blocking mats or a large flat blocking surface
- Rust-resistant pins
Abbreviations
- ch — chain
- sc — single crochet
- hdc — half double crochet
- dc — double crochet
- sl st — slip stitch
- FPdc — front post double crochet
- BPdc — back post double crochet
- sp — space
- st/sts — stitch/stitches
- RS — right side
- WS — wrong side
- FO — fasten off
An invisible decrease is not required for this blanket because the rectangular construction maintains the same stitch count across each body row.
Gauge and Sizing
Make a gauge swatch before beginning the full blanket. With a 5.5–6.0 mm hook and medium-weight yarn, aim for approximately 14 stitches × 10 rows = 10 cm in the main textured pattern after light blocking.
The exact gauge is less important than consistency, but it directly affects yarn consumption and final dimensions. A blanket that measures 125 cm across at the stated gauge requires approximately 175 working stitches before edge adjustments.
For this pattern, use a foundation count based on a multiple of 8 stitches plus 3. The repeating eight-stitch unit keeps the vertical grid evenly spaced.
Foundation
Yarn: warm cream. Use a 5.5–6.0 mm hook.
For a throw approximately 125 cm wide, ch 179.
Row 1: Hdc in second ch from hook and in each ch across. (178)
Row 2: Ch 2, turn. Hdc in each st across. (178)
Measure the width now. If the piece is substantially narrower or wider than the planned blanket, correct the foundation before continuing.
Main Raised Plaid Texture
The horizontal texture is created with repeated groups of ordinary stitches and front-post stitches. Vertical lines will be added later, so the base should remain rectangular.
Texture Row A
Row 3: Ch 2, turn. Hdc in first 3 sts. *FPdc around the corresponding stitch two rows below, hdc in next 7 sts.* Repeat across, ending with hdc in the final stitches as required.
The FPdc stitches establish raised markers at regular intervals.
Texture Row B
Row 4: Ch 2, turn. Hdc in each st across. (178)
Texture Row C
Row 5: Ch 2, turn. Repeat the placement of the raised stitches established in Row 3.
Texture Row D
Row 6: Ch 2, turn. Hdc in each st across.
Repeat Rows 3–6 for each color band unless another instruction is given.
Stripe Sequence
The reference blanket uses cream as the dominant neutral and separates the stronger colors with cream bands. The following sequence produces the same general balance while remaining adjustable.
| Stripe | Color | Rows |
|---|---|---|
| 1 | Cream | 12 |
| 2 | Olive | 8 |
| 3 | Cream | 8 |
| 4 | Rust | 8 |
| 5 | Taupe | 8 |
| 6 | Cream | 10 |
| 7 | Olive | 10 |
| 8 | Cream | 8 |
| 9 | Rust | 10 |
| 10 | Cream | 8 |
| 11 | Taupe | 10 |
| 12 | Olive | 8 |
| 13 | Cream | 12 |
Repeat or rearrange complete stripe groups until the blanket reaches approximately 155 cm before the final border. The border adds several centimeters to the finished length and width.
Changing Colors Cleanly
Work the final stitch of the old color until two loops remain on the hook. Drop the old yarn, pull the new color through both loops, and continue with the next row.
Do not knot the yarn at every stripe change. Leave approximately 12–15 cm tails and weave them through matching-color stitches after several additional rows have been completed.
Because the blanket uses broad stripes, carrying unused yarn along the edge for eight or ten rows creates unnecessary bulk. Cut the yarn at major color changes instead.
Creating the Vertical Plaid Grid
The horizontal stripes alone create a striped blanket. The vertical surface lines convert the fabric into the plaid crochet blanket pattern shown in the reference image.
Spread the finished rectangular body on a large flat surface with the right side facing upward.
Beginning approximately 5–7 cm from one side edge, identify a vertical path through the raised markers. Use locking stitch markers to indicate that path from the bottom to the top.
Mark additional vertical paths approximately every 7–9 cm across the width.
Vertical Surface Line
Join cream yarn at the bottom edge.
Insert the hook around or beneath the selected horizontal bars and work a surface slip stitch upward.
Keep each slip stitch loose. The surface line should sit on top of the fabric without shortening the blanket vertically.
Continue to the top edge.
Fasten off with a 15 cm tail.
Repeat across the entire blanket.
Alternative Raised Vertical Line
For the thicker grid visible in the photograph, crochet a separate narrow cord instead of using only surface slip stitches.
Ch enough stitches to match the finished blanket length.
Row 1: Beginning in second ch from hook, sl st in every ch.
Fasten off, leaving long tails at both ends.
Pin the cord along one marked vertical route. Tack it to the blanket approximately every 3–4 cm with matching yarn.
This method produces a stronger raised line and makes the woven plaid structure more visible from a distance.
Optional Horizontal Raised Bars
If additional texture is required, add narrow surface lines along selected row boundaries.
Join matching yarn at one side edge and surface sl st horizontally across the blanket.
Place these lines approximately every four rows rather than on every row. Excessive surface crochet can make the blanket rigid.
Use cream over cream areas and the matching stripe color over olive, rust, or taupe sections for the closest tonal effect.
Creating the Grid Intersections
The intersections should look continuous rather than like two unrelated decorative lines.
When a vertical surface line reaches an existing horizontal raised stitch, insert the hook beneath the horizontal bar before completing the next slip stitch.
This small change makes the vertical line appear to pass through the horizontal structure.
For separately sewn cords, tack the cord immediately above and below every intersection. Do not sew directly through the center of every crossing because that can flatten the raised texture.
Top and Bottom Border
Use cream yarn.
Join yarn at one corner after all surface lines have been completed.
Border R1: Ch 1, sc evenly around all four sides. Work 3 sc into each corner.
On the side edges, aim for approximately three sc for every four hdc rows. Adjust locally if the border begins to flare or pull inward.
Join with sl st.
Border R2: Ch 2, hdc in each st around. Work 3 hdc into each corner stitch.
Join.
Border R3: Ch 1, sc in each st around. Work (sc, ch 1, sc) into each corner.
Join and fasten off.
Optional Wide Ribbed Border
The reference blanket has a substantial cream perimeter. Add the following rounds if a wider frame is preferred.
Border R4: Ch 2, hdc around, working 3 hdc in each corner.
Border R5: Ch 2, alternate FPdc and BPdc around. At each corner, work three ordinary dc stitches to turn cleanly.
Border R6: Repeat the post stitches as established.
Border R7: Ch 1, sc around. Work 3 sc into each corner.
Fasten off and weave in the tail.
Adjusting the Blanket Width
The grid system works best when the foundation remains compatible with the repeating vertical spacing. Add or subtract complete eight-stitch sections rather than changing the width by one or two stitches.
For a smaller lap blanket, remove approximately five to seven repeats from the foundation.
For a larger bed throw, add repeats until the unblocked foundation reaches the required width.
Record the exact foundation count. Every row must retain the same number of working stitches unless the border instructions explicitly add corner stitches.
Adjusting the Blanket Length
Length is controlled entirely by the number of stripe rows.
For a shorter throw, remove one central color sequence while retaining cream at both ends. For a longer blanket, repeat a cream–olive–cream–rust–taupe section before working the final cream band.
Measure the blanket after it has rested flat for several minutes. Heavy crochet fabric can stretch vertically under its own weight, so a hanging measurement may be longer than the actual bed measurement.
Assembly and Finishing
- Complete the full rectangular striped body and confirm that the stitch count remains consistent from the first row to the last.
- Lay the blanket flat and mark every vertical grid route before attaching any surface lines.
- Add the cream vertical lines from the bottom edge to the top, maintaining identical spacing across the width.
- Inspect each vertical line for tension and remove any section that causes the blanket to gather.
- Add optional horizontal surface lines if more pronounced grid texture is required.
- Secure the intersections while keeping the raised portions visible above the main fabric.
- Work the cream border around all four edges, adding sufficient stitches along the sides to keep them flat.
- Weave every color-change tail through at least 4–5 cm of matching fabric and reverse direction once.
- Block the blanket to the target dimensions, checking that all four corners form approximately 90-degree angles.
- Allow the blanket to dry completely on a flat surface before folding or placing it on a bed.
The completed blanket should have a flat rectangular body, broad horizontal color bands, evenly spaced raised vertical lines, and a cream frame around the entire grid.
7 Technical Tips for a Better Plaid Crochet Blanket
- Wavy side edges: Accidental increases at the first or last stitch gradually widen the blanket. Count the stitches at least every four rows and keep the turning chain treatment consistent.
- Contracted vertical lines: Tight surface slip stitches can shorten the blanket by several centimeters. Keep enough slack in every vertical stitch that the fabric remains flat when the line is complete.
- Crooked grid: A vertical line that moves one stitch sideways every few rows becomes obvious across a 160 cm blanket. Mark the complete route with locking markers before beginning the surface crochet.
- Flared border: Too many stitches along the side edges cause the cream frame to ripple. Start near three border stitches for every four hdc rows and adjust only where the fabric requires it.
- Puckered color changes: Pulling the new yarn tightly at the beginning of a stripe shortens one side edge. Leave the first stitch at normal working tension and secure the yarn tail later.
- Flattened intersections: Sewing repeatedly through the center of each crossing removes the raised woven appearance. Anchor separate cords immediately above and below the crossing instead.
- Uneven finished dimensions: Heavy yarn can stretch during construction and handling. Measure the blanket flat rather than suspended, then block it to approximately 125 × 160 cm.
How the Plaid Color Sequence Works
Cream occupies more rows than any other color. That proportion prevents the finished fabric from becoming a series of equally weighted stripes and gives the olive, rust, and taupe bands enough neutral space around them.
Olive introduces the coolest color in the palette. Burnt orange supplies the strongest contrast, so it does not need to occupy every section. Taupe sits between the cream and stronger colors, producing a lower-contrast stripe that prevents the sequence from becoming overly repetitive.
Vertical cream lines then cross all four colors. Because the grid color remains constant, the eye reads separate horizontal bands as parts of one continuous plaid system.
Choosing Yarn for a Textured Bed Throw
Worsted or Aran-weight yarn gives the raised grid enough depth without producing an excessively heavy blanket. A smooth yarn also makes the post stitches and surface lines easier to distinguish than a highly fuzzy fiber.
Acrylic is practical when easy-care washing is a priority. Cotton creates stronger stitch definition but can become heavy at bed-throw dimensions. Wool and wool blends provide warmth but require care according to the manufacturer’s washing instructions.
Whichever fiber is selected, use the same yarn line for all four colors when possible. Matching fiber composition and yarn thickness keeps the stripe widths consistent after washing and blocking.
Making a Chunkier Version
A category 5 bulky yarn can be substituted to produce a thicker blanket with fewer stitches. Increase the hook size according to the yarn label and make a new gauge swatch before calculating the foundation.
Do not use the 178-stitch width automatically with bulky yarn. Measure the swatch, calculate the stitches required for the desired width, then round the result to a compatible eight-stitch repeat.
Fewer rows will also be required to reach the same finished length. Keep the proportions of the stripe sequence rather than copying the exact row counts.
Making a Neutral Plaid Version
The same construction can be worked without rust or olive. Use cream as the background and substitute oatmeal, camel, mushroom, and dark taupe for a neutral bedroom palette.
For stronger contrast, replace taupe with charcoal. A cream, charcoal, camel, and muted olive combination keeps the geometric structure while reducing the autumn emphasis.
Color substitutions do not affect the stitch pattern. Maintain a dominant background shade and use one consistent color for most vertical lines so the grid remains visually connected.
Care and Blocking
Follow the care instructions for the selected yarn. If the blanket is machine washable, use a cycle and temperature compatible with the fiber rather than assuming every worsted yarn can tolerate the same treatment.
After washing, reshape the blanket while damp. Align the vertical grid lines first, then square the corners and smooth the horizontal bands.
Avoid stretching one stripe more than another. Different colors can appear to have different widths when a wet blanket is pulled unevenly.
Dry flat when the yarn label calls for it. The raised surface lines should remain above the main fabric instead of being compressed under heavy objects.
Finishing the Modern Plaid Crochet Blanket
Inspect the finished grid from the foot of the bed rather than only at close range. The vertical lines should remain parallel, horizontal color bands should meet both side borders squarely, and no surface-crochet section should pull the fabric inward. Correct tension problems before the final blocking because the raised grid controls much of the finished geometry.
This plaid crochet blanket pattern uses cream as the structural background, olive and taupe for muted contrast, and burnt orange for stronger horizontal accents. Make a gauge swatch first, then calculate the foundation for the exact bed or sofa width required.
Share the finished blanket on Pinterest or Instagram with #ModernPlaidCrochetBlanket. For this specific grid, would you keep the burnt-orange stripes or replace them with burgundy?









