Introduction
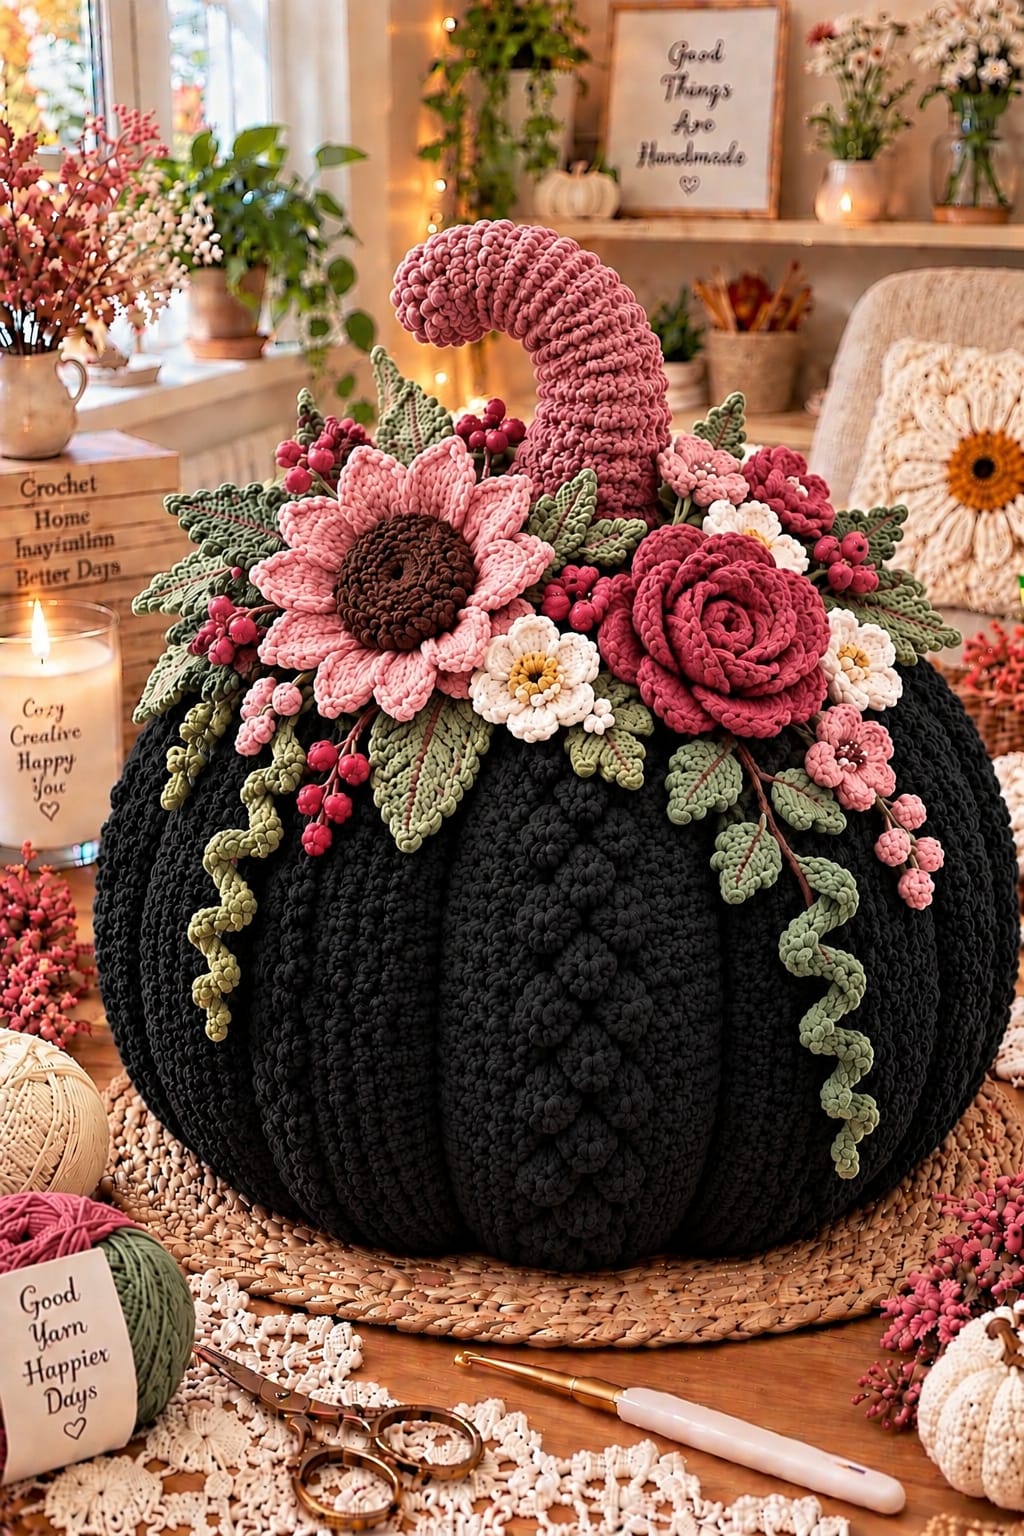
A black pumpkin this large needs deep vertical ribs before a pink floral crown can sit on top without erasing its shape. This giant black crochet pumpkin pattern combines a sculpted oversized body, dusty-pink hooked stem, large sunflower-style bloom, layered rose, cream flowers, sage leaves, berries, and trailing vines. Super-bulky yarn creates the body, while finer yarn keeps the botanical details defined.
The Design: What Makes This Black Pumpkin Different
The near-black body changes how the surface texture reads. Light cannot define shallow shaping as clearly as it does on ivory yarn, so the pumpkin uses eight pronounced channels plus optional raised cords on selected front lobes. The resulting shadows separate each section even under low indoor lighting.
The dusty-pink stem is deliberately oversized. It rises through the floral arrangement and bends forward, providing a strong color break against the dark pumpkin. Pink flowers continue that contrast while cream blossoms prevent the crown from becoming a single block of red and rose.
Sage foliage forms the transition between the flowers and body. Several leaves point upward, others spread horizontally, and long spirals hang over the ribs. A common mistake with a black crochet pumpkin centerpiece is covering too much of the body. Leave several uninterrupted black sections visible.
Project Info at a Glance
| Skill Level | Time | Finished Size | Hooks | Best For |
|---|---|---|---|---|
| Intermediate–Advanced | 12–18 hours | Approx. 40–45 cm wide | 9 mm body; 3.5–7 mm details | Fall centerpiece, Halloween décor, entry table |
The finished size above is a photo-inspired target rather than a measurement taken from the image. As a published reference point, super-chunky crochet pumpkins are commonly made with a 9 mm hook; one documented pattern finishes at 10 inches tall and 30 inches around using 180–190 yards. Other super-bulky pumpkin patterns also specify 9 mm hooks, supporting that hook-and-yarn combination for a large decorative body.
Materials and Tools
Yarn
- Black — super bulky #6 — approximately 400–550 g for the pumpkin body.
- Dusty pink — bulky #5 or doubled worsted — approximately 80–120 g for the tall stem and flowers.
- Deep rose — worsted #4 — approximately 60–90 g for the large rose, berries, buds, and accent flowers.
- Sage green — worsted #4 — approximately 80–110 g for leaves and vines.
- Dark brown — worsted #4 — approximately 20–30 g for the large flower center.
- Cream — worsted #4 — approximately 30–40 g for small flowers.
- Mustard — worsted #4 — approximately 5–10 g for flower centers.
These quantities are project estimates. The body uses considerably more yarn than a conventional shelf pumpkin because the target diameter is approximately 40–45 cm.
Tools
- 9.0 mm crochet hook for the black pumpkin
- 6.0–7.0 mm crochet hook for the stem
- 5.0 mm crochet hook for the large rose
- 4.0–5.0 mm crochet hook for flowers
- 3.5–4.0 mm crochet hook for leaves, berries, and vines
- Polyester fiberfill — approximately 600–900 g
- Long upholstery needle
- Large tapestry needle
- Stitch markers
- Scissors
- Blocking mat and pins
- Optional flexible craft wire for the curved stem
Abbreviations
- MR — magic ring
- ch — chain
- sc — single crochet
- hdc — half double crochet
- dc — double crochet
- tr — treble crochet
- inc — increase
- dec — decrease
- sl st — slip stitch
- BLO — back loop only
- FLO — front loop only
- st/sts — stitch/stitches
- FO — fasten off
For an invisible decrease, insert the hook through the front loops of the next two stitches, yarn over, pull through both front loops, then complete the single crochet.
Pattern — Step by Step
This is an original construction developed from the visible features of the reference image rather than a transcription of an existing commercial pattern. Work the pumpkin body first, sculpt the ribs, then make and attach the stem and botanical pieces.
Giant Black Pumpkin Body
Yarn: black super bulky #6. Use a 9.0 mm hook.
Work in a continuous spiral. Mark the first stitch of every round.
R1: 6 sc in MR. (6)
R2: Inc ×6. (12)
R3: (Sc 1, inc) ×6. (18)
R4: (Sc 2, inc) ×6. (24)
R5: (Sc 3, inc) ×6. (30)
R6: (Sc 4, inc) ×6. (36)
R7: (Sc 5, inc) ×6. (42)
R8: (Sc 6, inc) ×6. (48)
R9: (Sc 7, inc) ×6. (54)
R10: (Sc 8, inc) ×6. (60)
R11: (Sc 9, inc) ×6. (66)
R12: (Sc 10, inc) ×6. (72)
R13–R25: Sc in each st around. (72)
The 72-stitch plateau creates the broad middle section. A published super-chunky pumpkin using a 9 mm hook measures 30 inches around, showing how quickly a large circumference can develop with thick yarn.
R26: (Sc 10, dec) ×6. (66)
R27: (Sc 9, dec) ×6. (60)
R28: (Sc 8, dec) ×6. (54)
R29: (Sc 7, dec) ×6. (48)
Begin stuffing. Push fiberfill firmly into the lower circumference while keeping the center compressible enough for sculpting.
R30: (Sc 6, dec) ×6. (42)
R31: (Sc 5, dec) ×6. (36)
R32: (Sc 4, dec) ×6. (30)
Add additional stuffing, distributing it evenly into the outer lobes.
R33: (Sc 3, dec) ×6. (24)
R34: (Sc 2, dec) ×6. (18)
R35: (Sc 1, dec) ×6. (12)
R36: Dec ×6. (6)
Fasten off with a long tail. Thread through the final six stitches and pull closed.
Sculpting Eight Pumpkin Ribs
Cut approximately 3 m of strong black yarn and thread it onto a long upholstery needle.
Pass the needle from the bottom center through the pumpkin and out through the crown. Carry the yarn down the outside and return through the bottom center.
Pull until the strand creates a visible vertical channel.
Repeat around the circumference to create eight sections. Divide the surface visually before tightening the strands so the channels remain approximately equal.
Black yarn absorbs visual detail, so these channels should be slightly deeper than those used on a pale pumpkin. Check the silhouette from several angles before tying the sculpting yarn securely.
Raised Black Decorative Rib — Make 3 to 5
Yarn: black.
Ch 30–38, adjusting the length to the measured height of one pumpkin lobe.
Beginning in second ch from hook, sl st across.
Fasten off with a long sewing tail.
Pin the cord from the crown toward the base on one front-facing section. Create a small loop approximately every 3–4 cm, alternating the direction of the loops.
Sew through the underside of the cord so its raised profile remains visible.
Repeat on selected lobes only. The remaining plain sections provide contrast against the textured ribs.
Tall Dusty-Pink Curved Stem
Yarn: dusty pink bulky #5. Use a 6.0–7.0 mm hook.
The stem is one of the defining features of the reference piece. It rises well above the flower crown and bends forward into a broad hook.
R1: 6 sc in MR. (6)
R2: Inc ×6. (12)
R3: (Sc 1, inc) ×6. (18)
R4: (Sc 2, inc) ×6. (24)
R5–R9: Sc around. (24)
R10: (Sc 2, dec) ×6. (18)
R11–R17: Sc around. (18)
R18: (Sc 1, dec) ×6. (12)
R19–R32: Sc around. (12)
R33: Dec ×6. (6)
Stuff the lower section firmly and decrease the stuffing density toward the tip. Close the final six stitches.
For a more stable hook, insert flexible covered craft wire before closing. Fold both ends into blunt loops and surround them with stuffing so no wire end rests directly against the crochet fabric.
Bend the upper third gradually forward. Avoid a sharp 90-degree angle.
Large Pink Sunflower-Style Bloom
Yarn: dark brown and dusty pink. Use a 4.0–5.0 mm hook.
Brown Center
R1: 6 sc in MR. (6)
R2: Inc ×6. (12)
R3: (Sc 1, inc) ×6. (18)
R4: (Sc 2, inc) ×6. (24)
R5: (Sc 3, inc) ×6. (30)
Fasten off.
Large Pink Petals — Make 14
Join dusty-pink yarn around the brown center.
Petal: Ch 9. Beginning in second ch from hook work sl st, sc, hdc, dc, tr, dc, hdc, sc. Sl st into the next available center stitch.
Repeat around, spacing 14 petals evenly.
Fasten off.
Second Petal Layer
Join pink yarn behind the first petal layer.
Short petal: Ch 7. Beginning in second ch work sl st, sc, hdc, dc, hdc, sc.
Attach behind the gap between two front petals.
Repeat around.
Block the petals outward before sewing the flower to the pumpkin.
Large Deep-Rose Flower
Yarn: deep rose, worsted #4. Use a 5.0 mm hook.
Worsted yarn paired with a 5 mm hook is a documented combination for crocheted roses, making it suitable for the layered focal flower used here.
Ch 52.
Row 1: Beginning in fourth ch from hook, work 2 dc in first ch. *Dc in next ch, 2 dc in next ch.* Repeat across.
Ch 3 and turn.
Row 2: Work 5 dc in first available st, sl st in next st. *5 dc in next st, sl st in next st.* Repeat across.
Fasten off with an 80 cm tail.
Roll one end tightly to establish the flower center. Continue rolling while gradually loosening the tension so the outer shells open into petals.
Use the long tail to sew repeatedly through the bottom of every rolled layer.
Check the flower by lifting it from the base. No outer layer should unwind.
Small Cream Flower — Make 4 to 6
Yarn: cream and mustard.
R1: With mustard, work 6 sc in MR. Join. (6)
Change to cream.
R2: In each st work (sl st, ch 4, 2 dc, hdc, sl st).
Repeat six times.
Fasten off with a 20 cm attachment tail.
Small Pink Flower — Make 4 to 6
Yarn: dusty pink.
R1: 6 sc in MR. Join. (6)
R2: In each st work (sl st, ch 3, 2 dc, ch 2, sl st).
Repeat around to form six petals.
Fasten off.
Deep-Rose Berry — Make 18 to 24
Yarn: deep rose. Use a 3.5–4.0 mm hook.
R1: 6 sc in MR. (6)
R2: Inc ×6. (12)
R3: Sc around. (12)
R4: Dec ×6. (6)
Add a small pinch of stuffing.
Fasten off and close the opening.
Berry Cluster
Group three berries into a triangle.
Pass a long strand of matching yarn through the center of all three pieces twice. Secure on the back without crushing the individual berries.
Make five to seven clusters and retain several single berries for narrow gaps.
Pink Flower Bud — Make 6 to 10
Yarn: dusty pink or deep rose.
R1: 6 sc in MR. (6)
R2: Inc ×6. (12)
R3: Sc around. (12)
R4: (Sc 1, dec) ×4. (8)
R5: Dec ×4. (4)
Fasten off and close.
Add a short sage chain to the bottom to represent the stalk.
Large Sage Leaf — Make 16 to 22
Yarn: sage green. Use a 3.5–4.0 mm hook.
Ch 13.
Beginning in second ch from hook:
Side 1: Sl st, sc, hdc, dc, dc, tr, tr, dc, dc, hdc, sc, sl st.
At the end work (sc, ch 2, sc).
Continue along the opposite side of the foundation chain:
Side 2: Sl st, sc, hdc, dc, dc, tr, tr, dc, dc, hdc, sc, sl st.
Join and fasten off with a long sewing tail.
Raised Leaf Vein
Hold matching green yarn behind the leaf and bring a loop through at the base.
Surface sl st along the center toward the point.
Add two or three short diagonal vein branches on each side.
Stop before the final point and fasten off on the wrong side.
Small Sage Leaf — Make 10 to 14
Ch 8.
Beginning in second ch from hook work:
Sl st, sc, hdc, dc, hdc, sc, sl st.
Work 2 sc into the end of the foundation chain.
Repeat the stitch sequence along the opposite side.
Fasten off with an attachment tail.
Long Curly Sage Vine — Make 4 to 6
Ch 40.
Beginning in second ch from hook, work 2 sc in every chain.
The fabric will form a spiral as the additional stitches accumulate.
For a tighter section, work 3 sc into every fourth chain.
Fasten off with a 30 cm sewing tail.
Short Green Tendril — Make 6 to 10
Ch 18.
Beginning in second ch, work 2 sc in each chain.
Fasten off.
Use these smaller curls between flowers and berry clusters rather than allowing every vine to hang down the pumpkin.
Suggested Piece Count
| Component | Quantity | Color |
|---|---|---|
| Giant pumpkin | 1 | Black |
| Curved stem | 1 | Dusty pink |
| Large sunflower-style bloom | 1 | Pink / brown |
| Large rose | 1 | Deep rose |
| Cream flowers | 4–6 | Cream / mustard |
| Small pink flowers | 4–6 | Pink |
| Large leaves | 16–22 | Sage |
| Small leaves | 10–14 | Sage |
| Berry clusters | 5–7 | Deep rose |
| Flower buds | 6–10 | Pink / rose |
| Long vines | 4–6 | Sage |
Assembly
- Complete the black body, distribute the stuffing, and close the top before beginning any exterior decoration.
- Sculpt eight vertical channels and compare their spacing from above before securing the shaping yarn.
- Attach the dusty-pink stem at the crown, sewing through a broad section of its lower circumference so the tall piece cannot rotate.
- Position the large pink sunflower-style bloom left of the stem and place the deep-rose flower lower on the right.
- Add cream flowers and smaller pink blooms between the two focal flowers while leaving irregular spaces for foliage.
- Slide large sage leaves behind the flower bases, pointing several upward and allowing others to extend horizontally beyond the crown.
- Position berry clusters near the stem and between the main flowers, then use individual berries and buds to fill smaller openings.
- Attach selected leaves and flower buds along the outer edge so the botanical crown extends slightly down the pumpkin sides.
- Sew long green spirals beneath the floral crown and tack them approximately every 5–7 cm while leaving the curls raised.
- Place the pumpkin on its display surface and check the front view. The black ribs, pink stem, two focal flowers, and trailing sage vines should all remain individually readable.
The finished pumpkin should sit on a broad stable base with eight distinct black lobes, a tall pink hooked stem, an asymmetrical floral crown, and several foliage elements descending over the sides.
7 Technical Tips for a Better Black Crochet Pumpkin
- Invisible rib definition: Black yarn hides shallow contours more readily than cream yarn. Tighten each sculpting strand until an uninterrupted channel is visible from the crown to the base.
- Overcompressed body: Pulling the sculpting yarn too hard turns broad pumpkin lobes into narrow wedges. Stop tightening while each section still retains a rounded face several centimeters wide.
- Visible fiberfill: White stuffing is conspicuous through gaps in black stitches. If filling remains visible, reduce the body hook by approximately 1 mm or place a dark fabric liner behind the crochet before final stuffing.
- Unstable tall stem: A long curved stem applies leverage to its attachment point. Sew through at least 4–5 cm of the stem base and make several passes through different crown stitches.
- Collapsed hook: Uniformly firm stuffing prevents the stem from holding a smooth bend. Pack the lower two-thirds firmly and leave the upper third softer before shaping the curve.
- Lost black silhouette: Extending flowers over every rib hides the feature that identifies the base as a pumpkin. Keep at least three front-facing lobes substantially exposed below the crown.
- Flattened vines: Continuous stitching along a curly vine removes its spiral profile. Anchor a long tendril at intervals of approximately 5–7 cm and leave the sections between those points free.
Working With Black Yarn
Black yarn makes stitch identification more difficult, particularly when the body is worked in a continuous spiral. Use a contrasting locking marker in the first stitch of every round. Moving that marker immediately after completing each round reduces counting errors during the long increase and decrease sequences.
Strong directional lighting also matters. Place the work so light crosses the crochet from the side rather than shining directly from behind you. Side lighting creates small shadows between stitches, making the insertion point easier to identify.
Count every increase round before continuing. Correcting a missing increase several rounds later is difficult because the error can disappear visually into the dark fabric.
The same issue applies to decreases. Maintain the written six-repeat structure so each decrease round removes exactly six stitches.
Choosing Yarn for the Giant Pumpkin
Super-bulky yarn and a 9 mm hook are established combinations for large crochet pumpkins. For example, the Super Chunky Pumpkin by Sara Sach specifies a 9 mm hook and 180–190 yards for a pumpkin measuring 10 inches tall and 30 inches around. Other published chunky pumpkin designs also pair category 6 yarn with a 9 mm hook. :contentReference[oaicite:0]{index=0}
The botanical components benefit from a finer yarn. Worsted yarn allows the leaf points, berry shapes, and flower petals to remain more distinct than they would in the body yarn. A published crochet rose pattern, for example, pairs #4 worsted yarn with a 5 mm hook. :contentReference[oaicite:1]{index=1}
Use yarns with compatible care requirements when possible. A centerpiece combining wool-blend body yarn with cotton or acrylic flowers may require spot cleaning rather than machine washing.
How to Keep the Floral Crown Balanced
Attach the two focal flowers first. The large pink bloom should sit left of center, while the deep-rose flower occupies a lower position on the opposite side. They should not be mounted at identical height.
Place the cream flowers next. Their lighter color creates separation between the two pink families and prevents the botanical crown from reading as one uninterrupted mass.
Sage leaves should extend farther than most flower petals. Point several leaves upward behind the stem and others toward the outer sides of the pumpkin. Reserve a few long leaves for downward positions beneath the focal flowers.
Berry clusters work best in small gaps near the crown. They should remain secondary to the two major flowers.
Attach vines last. Their final positions depend on where exposed pumpkin ribs remain after the flowers and foliage have been secured.
Adding Raised Black Texture
The black-on-black surface can support additional texture without introducing another color. Narrow crocheted cords, surface slip stitches, or bobble-like branches can run down selected pumpkin lobes.
Keep these details concentrated on the front. Three decorated ribs are usually enough to break up the large black surface while leaving the remaining sections visually quiet.
When using a separate cord, pin the entire shape before sewing. Dark yarn makes repositioned stitches difficult to see, so establishing the complete line first produces a cleaner result.
A matching black decorative cord relies on shadow rather than color. This keeps the body monochromatic while adding the raised botanical appearance visible in the reference piece.
Making the Floral Crown Removable
A removable crown can simplify storage. Crochet a flat circle approximately 15–18 cm across using black or sage yarn, leaving a central opening large enough for the stem.
Arrange and sew the large flowers, small blossoms, leaves, berries, and buds to that circle. Long vines can be attached along its outer edge.
Place the finished crown around the stem and secure it to the pumpkin with several concealed yarn ties. The botanical section can then be removed before the body is stored.
For a permanent centerpiece, sewing each element directly into the body produces greater stability. This is especially useful for the large rose, which carries more weight than the flat leaves.
Changing the Color Palette
Black creates the strongest contrast with dusty pink, deep rose, cream, and sage. The same construction can support other palettes without changing the stitch instructions.
For a darker autumn version, combine black with burnt orange, mustard, burgundy, and olive. A Halloween arrangement can use black with orange flowers and dark purple berries. For a neutral design, pair charcoal with cream, taupe, muted terracotta, and eucalyptus green.
Keep at least one light or medium-value flower color when the body is black. Without that contrast, individual petals can disappear against the pumpkin when viewed from a distance.
Making a Smaller Version
To reduce the body, stop the increase sequence at 60 stitches instead of 72. Work approximately 10–12 rounds even before reversing the shaping sequence with corresponding decreases.
Another option is to use a smaller yarn weight. Published crochet pumpkin patterns demonstrate that medium, bulky, and super-bulky yarns can all produce the same general decorative form at different circumferences. One multi-size pattern lists finished circumferences of 14, 15, and 21 inches with hook sizes from 5.5 to 9 mm. :contentReference[oaicite:2]{index=2}
Scale the stem and focal flowers at the same time. A full-size hooked stem on a small pumpkin will shift the center of gravity upward and can make the finished centerpiece unstable.
Displaying the Finished Black Crochet Pumpkin
This piece is intended as decorative home décor. Set it on a broad, level surface capable of supporting the stuffed body without compressing the lower vines.
Keep the underside clear of flowers, leaves, and attachment knots. The pumpkin should rest directly on several broad body sections rather than balancing on one sculpted rib.
If flexible wire is used inside the stem, confirm that both ends remain folded, padded, and fully enclosed. The finished piece should be kept away from small children if it contains an internal wire support or other rigid craft components.
For storage, support the stem rather than folding it tightly against the flower crown. A severe bend can permanently distort both the crochet tube and any internal wire.
Finishing the Giant Black Crochet Pumpkin
Inspect the finished centerpiece under the lighting where it will normally be displayed. Black yarn can hide rib definition in dim conditions, so all eight channels should remain readable without relying on the flowers to define the body. Check the stem attachment again and reposition any foliage that covers too much of the front.
The finished giant black crochet pumpkin pattern should show three distinct layers: the broad sculpted black body, the sage foliage surrounding the crown, and the pink, rose, cream, and brown flowers above it. Start with the pumpkin body and record its finished circumference before sizing the botanical pieces.
Share the completed centerpiece on Pinterest or Instagram with #BlackFloralCrochetPumpkin. For this black version, would you keep the dusty-pink hooked stem or make the stem black and reserve pink only for the flowers?









