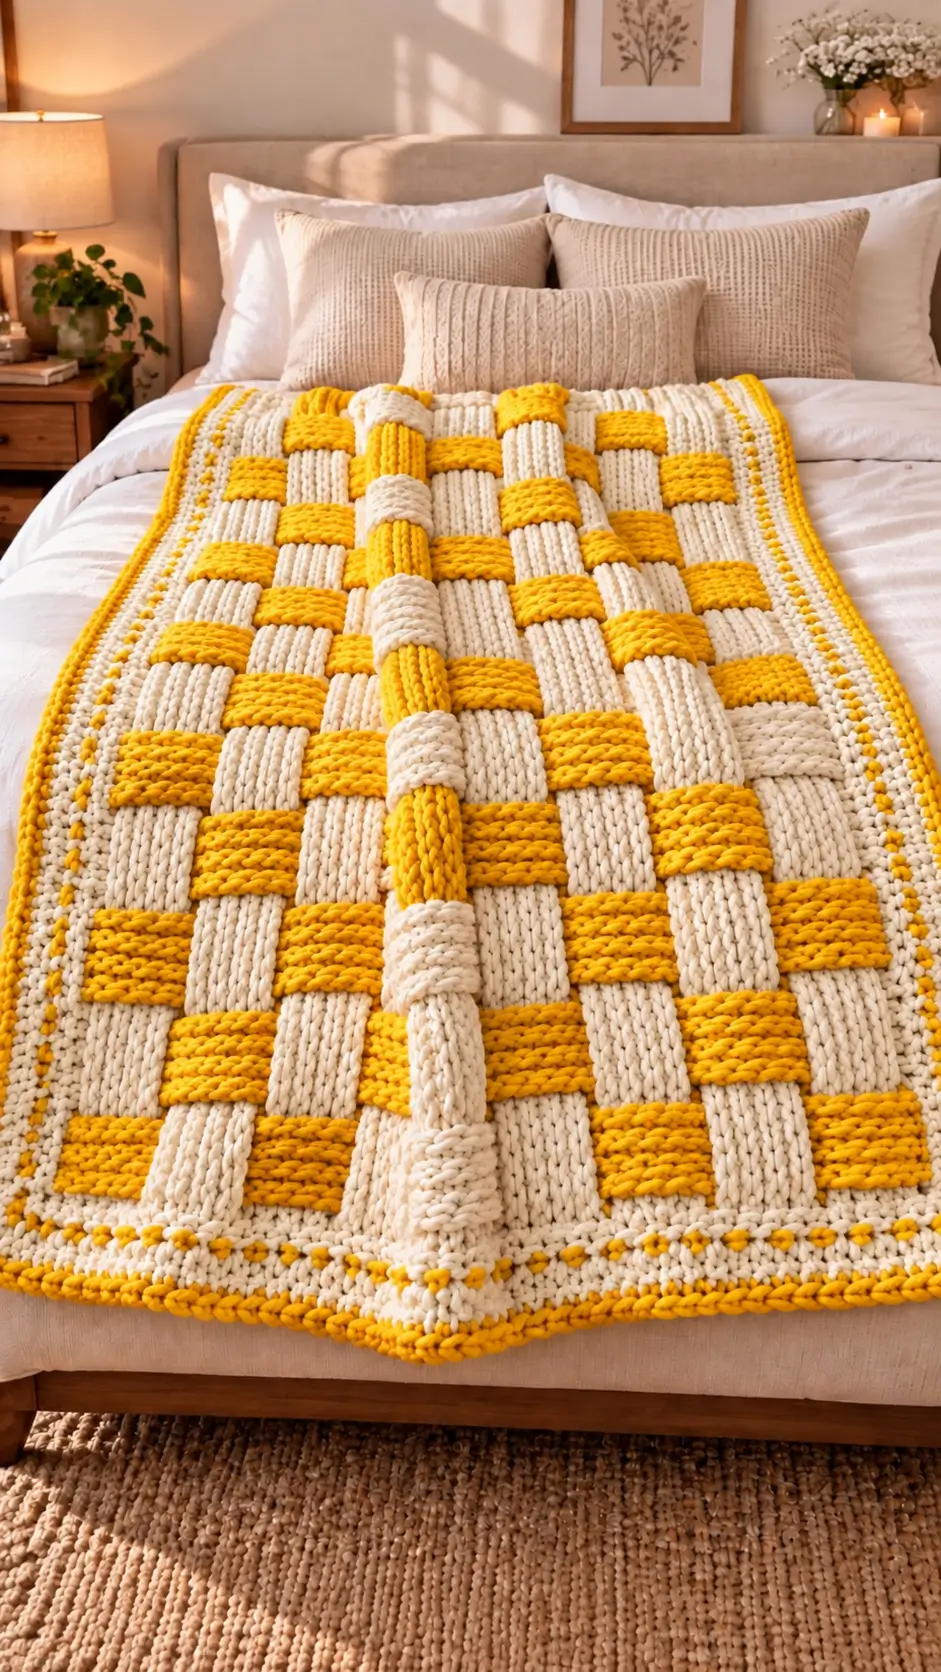
Those mustard bands have to pass visibly above and below the cream ones or the photographed grid disappears. This chunky basket weave crochet blanket pattern reconstructs that oversized structure with super-bulky yarn, a 9 mm hook and separate interlaced strips. Target approximately 120 × 150 cm at intermediate level. The modular construction also makes width and length easier to alter before the border is attached.
The Design: What Makes This Blanket Different
Three structural decisions control this yellow and cream crochet blanket. First, broad strips replace a small-scale FPdc/BPdc texture. That choice creates genuine raised crossings rather than merely suggesting them with relief stitches.
Second, alternating cream and golden-yellow sections clarify which strip passes above each intersection. The contrast makes the grid readable across a large surface.
Third, a substantial perimeter captures the strip ends and limits sideways movement. A conventional basket weave blanket crochet design can be worked entirely with front- and back-post double crochet. Here, the separate-strip approach better matches the photographed depth.
The common mistake is sewing every crossing flat. The resulting fabric becomes a checkerboard rather than an interwoven crochet blanket.
Project Info at a Glance
| Skill Level | Time | Finished Size | Hook | Best For |
|---|---|---|---|---|
| Intermediate | Approx. 20–28 hours | Approx. 120 × 150 cm target | 9 mm | Throw / bed layer |
A published super-bulky basketweave blanket uses a 9 mm hook and finishes at approximately 127 × 144.5 cm, providing a useful scale reference. The 120 × 150 cm measurement used here is a photo-inspired reconstruction target rather than a direct measurement of the photographed blanket.
Materials and Tools
Yarn
- Warm cream — Super Bulky #6 — approximately 1,200–1,500 g — choose a smooth blanket or wool-blend yarn with clear stitch definition.
- Golden yellow — Super Bulky #6 — approximately 900–1,200 g — match the cream yarn’s thickness and fiber behavior.
Allow roughly 2.1–2.7 kg of yarn for the reconstruction. Actual yarn consumption changes with strip width, border depth, hook size and individual tension.
Tools
- 9 mm crochet hook
- Large tapestry needle
- Locking stitch markers
- Sharp scissors
- Tape measure
- Rust-resistant pins
- Blocking mats, optional
Abbreviations
- ch — chain
- sc — single crochet
- hdc — half double crochet
- dc — double crochet
- FPdc — front post double crochet
- BPdc — back post double crochet
- sl st — slip stitch
- BLO — back loop only
- st/sts — stitch/stitches
- RS — right side
- WS — wrong side
Invisible decrease is not used because every major component is flat rather than shaped in rounds.
Pattern — Step by Step
This blanket differs from amigurumi construction: there is no magic ring, increase round, decrease round, head or body. The stitch mathematics therefore follow rectangular strip construction rather than the six-stitch amigurumi progression.
Gauge Swatch
Yarn: warm cream. The dimensions below are reconstruction specifications based on the photographed scale.
Foundation: Ch 9.
Row 1: Hdc in second ch from hook and in every ch across. (8)
Row 2: Ch 1, turn. Hdc BLO across. (8)
Rows 3–8: Repeat Row 2. (8)
Measure the strip without stretching it. Aim for approximately 9–11 cm in width. If eight stitches produce a substantially narrower strip, move up one hook size or add stitches symmetrically.
Long Vertical Strips
Yarn: alternate warm cream and golden yellow.
Make enough strips to produce approximately 105–110 cm of central width before the border. About 10–12 strips may be required when each strip finishes around 9–11 cm wide. Use the actual measured width of your gauge swatch to determine the final number.
Foundation: Ch 9.
Row 1: Hdc in second ch from hook and across. (8)
Row 2: Ch 1, turn. Hdc BLO across. (8)
Rows 3 onward: Repeat Row 2 until the strip measures approximately 140 cm. (8)
Fasten off. Leave a 25 cm sewing tail.
The BLO ridge runs across each strip and increases the heavy corded appearance visible in the reference design.
Horizontal Woven Strips
Yarn: warm cream and golden yellow.
Each horizontal strip must span the complete unfinished width of the blanket.
Foundation: Ch 9.
Row 1: Hdc in second ch from hook and across. (8)
Row 2: Ch 1, turn. Hdc BLO across. (8)
Rows 3 onward: Repeat Row 2 until the strip measures approximately 105–110 cm. (8)
Fasten off with a 25 cm tail.
Make enough horizontal strips to fill the complete vertical panel. Depending on actual strip width and spacing, approximately 13–16 may be required.
First Woven Row
Lay all long strips vertically on a large, flat work surface. Keep their upper ends aligned and maintain equal spacing between them.
Take Horizontal Strip 1 across the bottom of the panel.
Pass it over Vertical 1, under Vertical 2, over Vertical 3, under Vertical 4 and continue alternating across the complete panel.
Center the horizontal strip. Do not pull it tightly around the vertical pieces because excessive tension will draw the sides inward.
Second Woven Row
Reverse the sequence for the second horizontal strip.
Pass Horizontal Strip 2 under Vertical 1, over Vertical 2, under Vertical 3, over Vertical 4 and continue across the panel.
Push the second band close to the first without compressing either strip.
Remaining Woven Rows
Repeat the two-row weaving sequence across the entire blanket.
Odd-numbered horizontal strips: Begin over Vertical 1.
Even-numbered horizontal strips: Begin under Vertical 1.
Check every completed row before installing the next one. One accidental over-over or under-under crossing interrupts the basket structure and becomes increasingly difficult to correct once surrounding strips have been added.
Keep the horizontal strips parallel as the panel grows. Measure both outer edges every few rows so one side does not become longer than the other.
Securing the Crossings
Pin the completed grid before sewing anything permanently.
Measure the top, middle and bottom of the panel. Adjust individual strips until these measurements are consistent.
Secure every perimeter crossing with matching yarn. Pass the tapestry needle through hidden back loops so the attachment remains inconspicuous from the front.
For an adult throw, tack selected interior crossings rather than flattening every intersection. Small hidden stitches can be placed at approximately every second crossing.
If the blanket will receive frequent machine washing, add more hidden tacks to limit movement between the woven components.
Cream Foundation Border
Yarn: warm cream.
Join cream yarn at one corner of the assembled blanket.
Round 1: Ch 1. Sc evenly around the entire blanket. At each corner work (sc, ch 2, sc). Join with sl st.
This first round captures the ends of the woven strips and converts the loose grid into a stable rectangular perimeter.
Do not force a predetermined number of stitches along each side. Place the stitches evenly according to the actual strip edges. If the border begins to ruffle, too many stitches have been added. If the edge pulls inward, additional stitches are required.
Cream Structural Border
Round 2: Ch 1. Sc in every stitch around. Work (sc, ch 2, sc) in each corner space. Join with sl st.
Round 3: Ch 1. Hdc BLO in each stitch around. At every corner work (hdc, ch 2, hdc). Join with sl st.
The raised BLO line creates a structural break between the woven center and the decorative outer border.
Yellow Accent Border
Change to golden yellow.
Round 4: Ch 1. Sc around the complete blanket, placing 3 sc in each corner space. Join with sl st.
Change back to warm cream.
Round 5: Ch 1. Sc around. At regular intervals, work a golden-yellow accent or spike stitch into the previous round to reproduce the dotted yellow-and-cream effect visible around the reference blanket.
Keep the accent spacing identical on opposite sides. Join with sl st.
Final Golden Edge
Change to golden yellow.
Round 6: Ch 1. Sc in every stitch around. Work 3 sc at each corner. Join with sl st.
Round 7: Work reverse sc around the perimeter for a corded final edge. If reverse sc makes the border excessively rigid, substitute one ordinary sc round.
Fasten off. Leave a 25 cm tail and weave it through several dense border stitches on the wrong side.
Assembly
- Crochet every vertical strip to the same measured length rather than relying only on row count.
- Arrange the long strips parallel, alternating cream and golden yellow according to the planned color distribution.
- Clip their upper and lower ends temporarily with locking stitch markers so the foundation cannot shift.
- Weave the first horizontal strip over and under the vertical pieces.
- Reverse the sequence for the next horizontal strip and repeat across the complete blanket.
- Square the panel by measuring the top, center and bottom widths before sewing any intersections.
- Secure all outer crossings first, followed by selected interior intersections.
- Work the cream foundation and structural border rounds around all four sides.
- Add the yellow accent rounds and final corded edging.
- Weave every tail through multiple stitches on the wrong side, reshape the crossings and measure the finished blanket flat.
The completed panel should form a rectangular grid with alternating raised crossings and a stable continuous perimeter.
7 Technical Tips for a Cleaner Basket Weave Blanket
- Mark the first vertical strip. A misplaced starting point can reverse an entire horizontal row, producing two adjacent crossings with the same over-under direction. Keep one locking marker attached to Vertical 1 until assembly is complete.
- Measure strip width every few pieces. An 8-stitch strip should target approximately 9–11 cm for this reconstruction. A strip that grows wider by even 1 cm can create a substantial width difference across ten or more columns.
- Do not decrease to correct excess strip width. Decreases create tapered bands and break the rectangular geometry. Correct the tension, hook size or foundation stitch count instead.
- Inspect crossing placement before permanent attachment. Check the entire panel before sewing. Once the border captures the strip ends, repairing an incorrect central crossing requires opening part of the assembled structure.
- Monitor tension when changing colors. Measure every third strip because cream and yellow yarns can behave differently even when their labels show the same weight. A difference greater than about 5 mm should be corrected before weaving.
- Pin all four corners before starting the border. A wide woven grid can skew several centimeters while the first side is being crocheted. Compare the two diagonal measurements before securing the perimeter.
- Weave tails at least 10–12 cm through dense stitches. Short tails can work free because the heavy crossings move independently. Change direction once or twice on the wrong side rather than carrying the tail along one straight path.
Conclusion
Crochet one full-width sample strip before buying yarn for the complete throw. Its measured width determines how many vertical pieces are required and prevents the finished blanket from drifting far beyond the 120 × 150 cm target. After measuring the sample, calculate the strip count, arrange the cream and mustard sequence on paper, then crochet matching components in batches. Save this chunky basket weave crochet blanket pattern to Pinterest or share the finished grid on Instagram with #YellowBasketWeaveBlanket. Before starting the border, photograph the entire panel from directly above: can you trace every mustard strip through a complete over-under sequence without finding two identical consecutive crossings?









