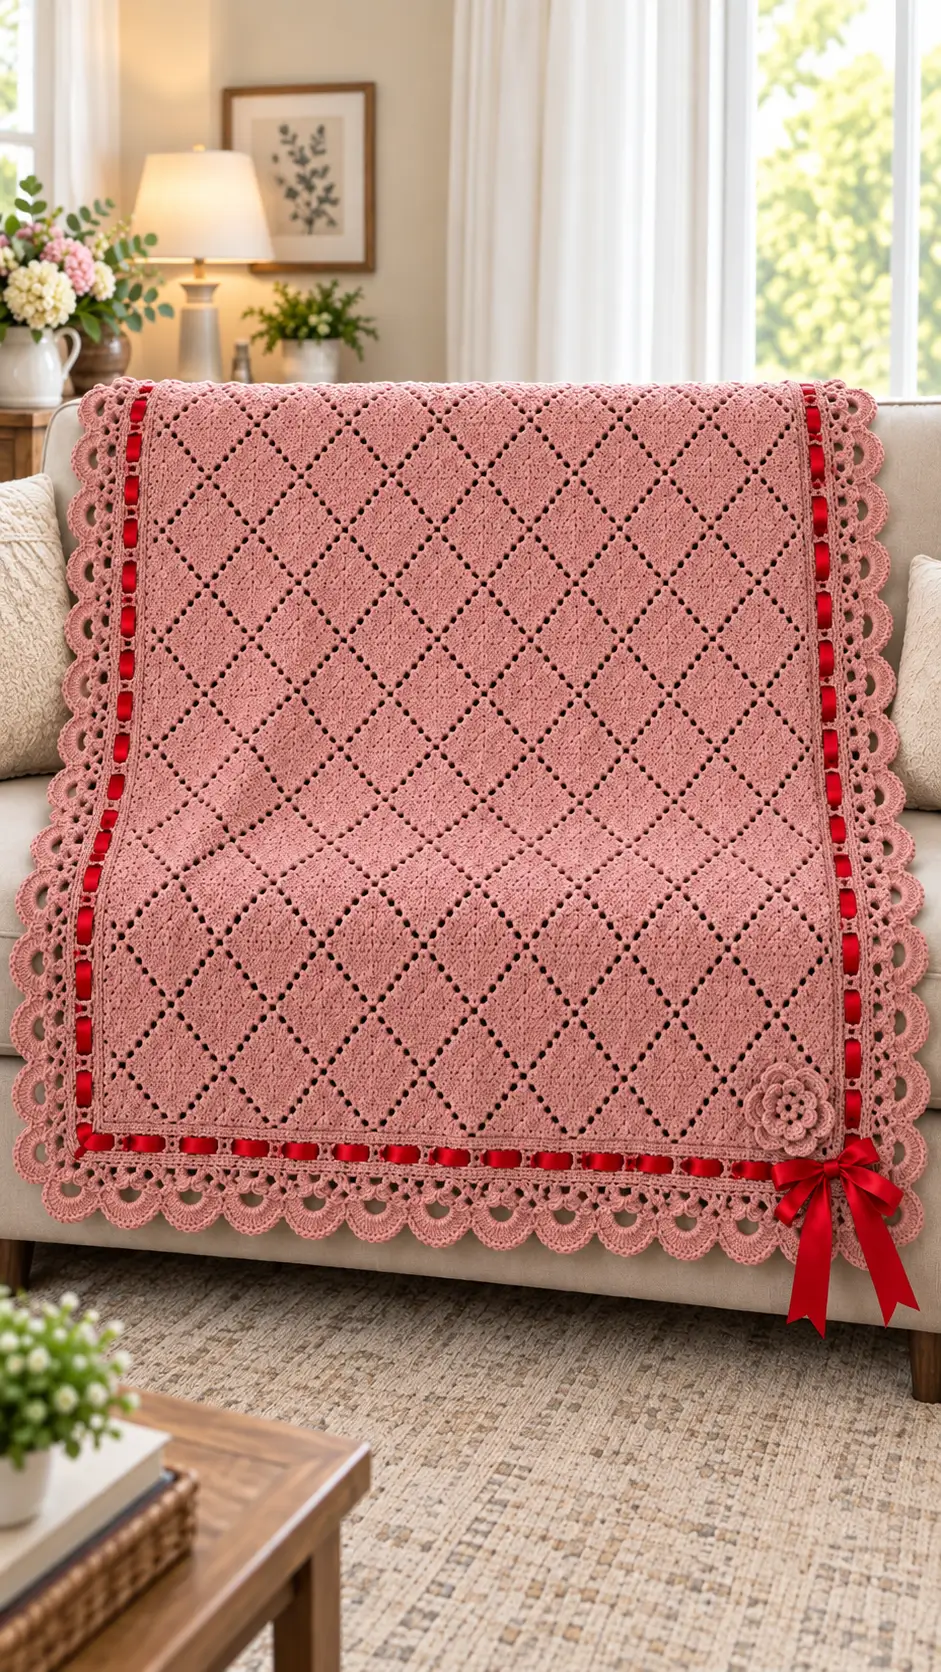
Diamonds in this blanket are separated by diagonal eyelet lines, then framed with red ribbon rather than another geometric stitch. This diamond lace crochet blanket uses #4 yarn, a 5.5 mm hook and an approximately 86 × 104 cm reference size. It suits an intermediate crocheter because repeat placement and border spacing require counting. The ribbon border also provides a practical way to introduce contrast without changing yarn throughout the main panel.
The Design: What Makes This Diamond Blanket Different
The main structural decision is the uninterrupted field of stacked diamonds. Keeping the body in one dusty-pink color lets the eyelet lines define the geometry instead of relying on colorwork. Second, a compact frame separates that openwork panel from the decorative edge; this prevents the scallops from visually merging with the diamonds.
The third decision is specific to the photographed blanket: ribbon passes through regularly spaced border openings before finishing in a bow. That treatment gives a ribbon crochet blanket stronger edge contrast while keeping the central fabric monochromatic.
A common mistake in a diamond crochet blanket pattern is losing one stitch near an eyelet and discovering the error several rows later. Each repeat should therefore be counted before beginning the following row. The scalloped crochet blanket border is added only after the rectangle has been squared.
Project Info at a Glance
| Skill Level | Time | Finished Size | Hook | Best For |
|---|---|---|---|---|
| Intermediate | Varies by crochet speed | Approx. 86 × 104 cm | 5.5 mm | Decorative throw / baby-blanket-size project |
The finished dimensions, yarn category and hook size use a comparable published diamond-lace blanket as a technical reference. Actual dimensions depend on yarn, gauge, repeat count and blocking.
Materials and Tools
Yarn
- Dusty pink yarn — #4 medium/Aran — approximately 700 g reference quantity.
- Matching dusty pink yarn — reserve approximately 75–100 g from the total supply for border swatching, scallops and the flower.
- Red satin ribbon — approximately 10–15 mm wide — enough to pass around the ribbon border plus approximately 80–100 cm for the bow.
A smooth yarn is preferable because the open spaces and diagonal lines need clear stitch definition. Highly fuzzy yarn can obscure the diamond structure.
Tools
- 5.5 mm crochet hook
- Large-eye tapestry needle
- Locking stitch markers
- Sharp scissors
- Tape measure
- Blocking mats and rust-resistant pins
- Safety pin or bodkin for threading ribbon
No stuffing or safety eyes are required because this project is worked as flat crochet.
Abbreviations
- ch — chain
- sc — single crochet
- hdc — half double crochet
- dc — double crochet
- sl st — slip stitch
- sp — space
- st/sts — stitch/stitches
- RS — right side
- WS — wrong side
- rep — repeat
- sk — skip
Invisible decrease is an amigurumi shaping technique and is not required for this flat blanket construction.
Diamond Lace Crochet Blanket Pattern
The photographed piece should be treated as design inspiration rather than evidence of an exact stitch chart. The instructions below provide a construction framework for reproducing its main characteristics: a pink diamond-lace field, compact frame, ribbon openings, scalloped border, layered flower and red bow.
Main Diamond Panel
Yarn: dusty pink #4 medium/Aran yarn. Hook: 5.5 mm.
Make a blocked gauge swatch before beginning the full foundation. Diamond-lace blankets depend heavily on repeat width, and even a small gauge difference becomes significant across the width of a blanket.
Use a repeating diamond-lace structure for the central rectangle. A multiple-of-9-plus-2 foundation is a useful reference structure for this type of openwork. For example, a 137-chain foundation satisfies that repeat calculation.
Work the selected diamond repeat until the central panel measures approximately 80–82 cm wide and 96–98 cm long. The remaining border rounds will add width and length toward the approximate finished dimensions.
Place a stitch marker after every complete diamond repeat across the first full pattern row. Move the markers upward as the work progresses.
The diagonal openings should remain aligned from one repeat to the next. Count the stitches between eyelets before starting another pattern row. A single missed stitch can shift every diamond above the error.
Measure the panel after at least four vertical repeats. If the sides begin pulling inward, check for skipped stitches. If they flare outward, inspect the rows beside each chain space for accidental increases.
Continue working the diamond pattern until the required panel length has been reached.
Do not cut the yarn if the working loop finishes at a corner suitable for starting the frame.
Inner Frame
Yarn: dusty pink.
Round 1: Ch 1. Work sc evenly around the entire panel, placing 3 sc in each corner. Join with sl st.
Round 2: Ch 1. Sc in every stitch around. Work 3 sc in the center corner stitch at each corner. Join with sl st.
Round 3: Repeat Round 2.
The compact frame gives the decorative border a stable foundation. Open lace fabric stretches more than dense single crochet, so these rounds help control the outer dimensions.
Lay the blanket on a flat surface after Round 3. The border should remain level rather than developing waves or pulling the diamond panel inward.
If the frame ripples, reduce the number of stitches picked up along the affected edge. If it contracts strongly, additional evenly spaced stitches may be needed.
Ribbon Eyelet Border
Yarn: dusty pink.
Round 1: Ch 3, dc in next st, ch 2, sk 2 sts, dc in next 2 sts. Repeat around, adjusting the final repeat before each corner.
At every corner, create sufficient chain space to turn the corner without pulling the fabric inward.
Round 2: Ch 1. Sc in each dc and work 2 sc into each ch-2 space. Add the required corner increases to keep the border flat.
The exact number of ribbon openings depends on the stitch count produced by the central panel and gauge. Count the openings on opposite sides before continuing. The top and bottom should match each other, and both side edges should contain equal numbers.
Do not insert the satin ribbon at this stage. Blocking the blanket is easier without ribbon running through the eyelets.
Scalloped Outer Border
Yarn: dusty pink.
The photographed blanket uses pronounced rounded shells around its perimeter. Test one or two shells before completing the entire edge because shell depth changes according to yarn thickness and individual tension.
Setup Round: Sc evenly around the blanket while maintaining adequate increases at all four corners.
Scallop Round: Sl st in the next suitable base stitch, skip 1–2 sts, work 7 dc into the next stitch or designated space, skip the same number of stitches, sl st in the next stitch. Repeat around.
Center a complete shell at each corner whenever the stitch distribution permits. Another option is to use a slightly larger corner shell so the border can turn without cupping.
Do not squeeze a small partial shell into the last available gap. If the repeat does not divide evenly, redistribute one or two base stitches across several earlier repeats. A gradual spacing correction is considerably less visible.
Fasten off and weave the yarn tail through at least 5 cm of dense border stitches.
Crochet Flower Appliqué
Yarn: dusty pink.
The photographed blanket includes a layered crochet flower near the lower corner, positioned immediately above the red ribbon bow.
Round 1: Ch 2. Work 10 sc into the first ch. Join with sl st. (10)
Round 2: Ch 3, 2 dc in next st, ch 3, sl st in next st. Repeat five times to create five inner petals.
Round 3: Working behind the petals, create five chain loops around the backs of the Round 2 petals.
Round 4: Into each back loop work sc, hdc, 4 dc, hdc, sc.
Round 5: Create another set of slightly longer chain loops behind the second petal layer.
Round 6: Into each loop work sc, hdc, 5 dc, hdc, sc.
Fasten off and leave approximately a 25 cm sewing tail.
Block the flower separately before attaching it. Arrange all five outer petals evenly so the appliqué remains clearly defined against the lace border.
Red Satin Ribbon
Accessory: approximately 10–15 mm red satin ribbon.
Measure the completed eyelet border before cutting the ribbon. Allow additional length for joining and for the decorative bow if the same ribbon will form both elements.
Attach a safety pin or bodkin to one end of the ribbon. Pass it alternately over and under the eyelet openings.
Keep the ribbon flat during threading. A twist can become difficult to correct once several sides have been completed.
Do not pull the ribbon tightly against the crochet. It should rest flat while allowing the blanket to retain its blocked dimensions.
Leave sufficient ribbon at the selected lower corner for the bow treatment shown in the design.
Corner Bow
The bow may be formed from the threaded ribbon tails or attached separately.
Create two equal loops and tighten the center knot only enough to hold the bow securely. Arrange the loops so they remain below the flower rather than covering its outer petals.
The photographed blanket uses long ribbon tails that extend below the scalloped edge. For a purely decorative throw, this feature can be retained.
If the project will be used as an infant blanket, removable decorative ribbon is a more appropriate construction choice than permanently attached long loose trims.
Blocking and Final Dimensions
Block according to the care instructions supplied with the selected yarn.
Start with the central rectangle rather than the scallops. Measure the top, bottom and both sides, then compare the two diagonal measurements.
A blanket can have matching side measurements while still being skewed. Equal diagonals indicate that the rectangle has been squared more accurately.
After the main panel is positioned, pin each scallop separately. Maintain similar shell width and depth around the entire perimeter.
A finished size of approximately 86 × 104 cm provides a practical reference for this design, although actual dimensions will depend on yarn, tension, foundation count and the number of diamond repeats.
Allow the crochet to dry completely before removing the pins and threading the final ribbon.
Assembly
- Block the completed diamond panel into a true rectangle before adding the decorative components.
- Check that the dense inner frame lies flat on all four sides.
- Finish the ribbon-eyelet border and recount the openings on opposite sides.
- Work the outer scallops and center the corner shells consistently.
- Block the complete blanket again and pin each scallop separately.
- Block the crochet flower and arrange the individual petals.
- Position the flower near the lower corner without covering the ribbon openings.
- Thread the red satin ribbon through the eyelet border, keeping every pass flat and untwisted.
- Form or attach the corner bow and trim its tails to the intended length.
- Weave in all remaining yarn ends and compare the diagonal measurements one final time.
The completed blanket should have a flat central diamond field, an evenly spaced ribbon channel and consistent scallops around the outer edge.
7 Technical Tips for a Cleaner Diamond Lace Blanket
- Mark every diamond repeat. A missed chain space can shift every diamond above it by one stitch. Place locking markers at repeat boundaries and recount before moving them.
- Measure both diagonals during blocking. Matching side lengths alone do not prove that a rectangle is square. Unequal diagonal measurements reveal skewing.
- Watch for excessive border stitches. A visibly rippled frame usually contains too many stitches. A border that pulls the center inward usually contains too few.
- Count ribbon openings before adding scallops. Different eyelet counts on opposite edges become conspicuous after contrasting red ribbon has been threaded through them.
- Maintain the blocked measurement while threading ribbon. If an 86 cm edge becomes noticeably shorter after the ribbon is inserted, redistribute the ribbon instead of stretching the crochet.
- Pin the flower before sewing. Placing it directly over a corner shell can compress that scallop and make one corner visually shorter than the others.
- Weave yarn tails through dense stitches. Run each tail through approximately 5 cm of the solid frame instead of passing it through open diamond spaces where the end may remain visible.
Finishing the Diamond Lace Crochet Blanket
Before committing to the complete blanket, make one full diamond repeat and a short sample of the ribbon border using the exact yarn and hook selected for the project. That sample establishes repeat width and shows whether the planned scallops will lie flat.
The 5.5 mm hook, #4 medium yarn and approximate 86 × 104 cm dimensions provide a useful reference point, but gauge determines the actual finished measurement. Adjust the number of diamond repeats rather than trying to force a finished blanket to a specific dimension during blocking.
After blocking, photograph the diamond lace crochet blanket once from directly above and again with a close view of the ribbon channel. Save the finished project to Pinterest or share it on Instagram with #DiamondRibbonLaceBlanket.
For the lower corner, would you keep both the layered pink flower and red bow shown in the design, or use the ribbon bow alone?









