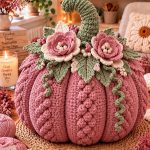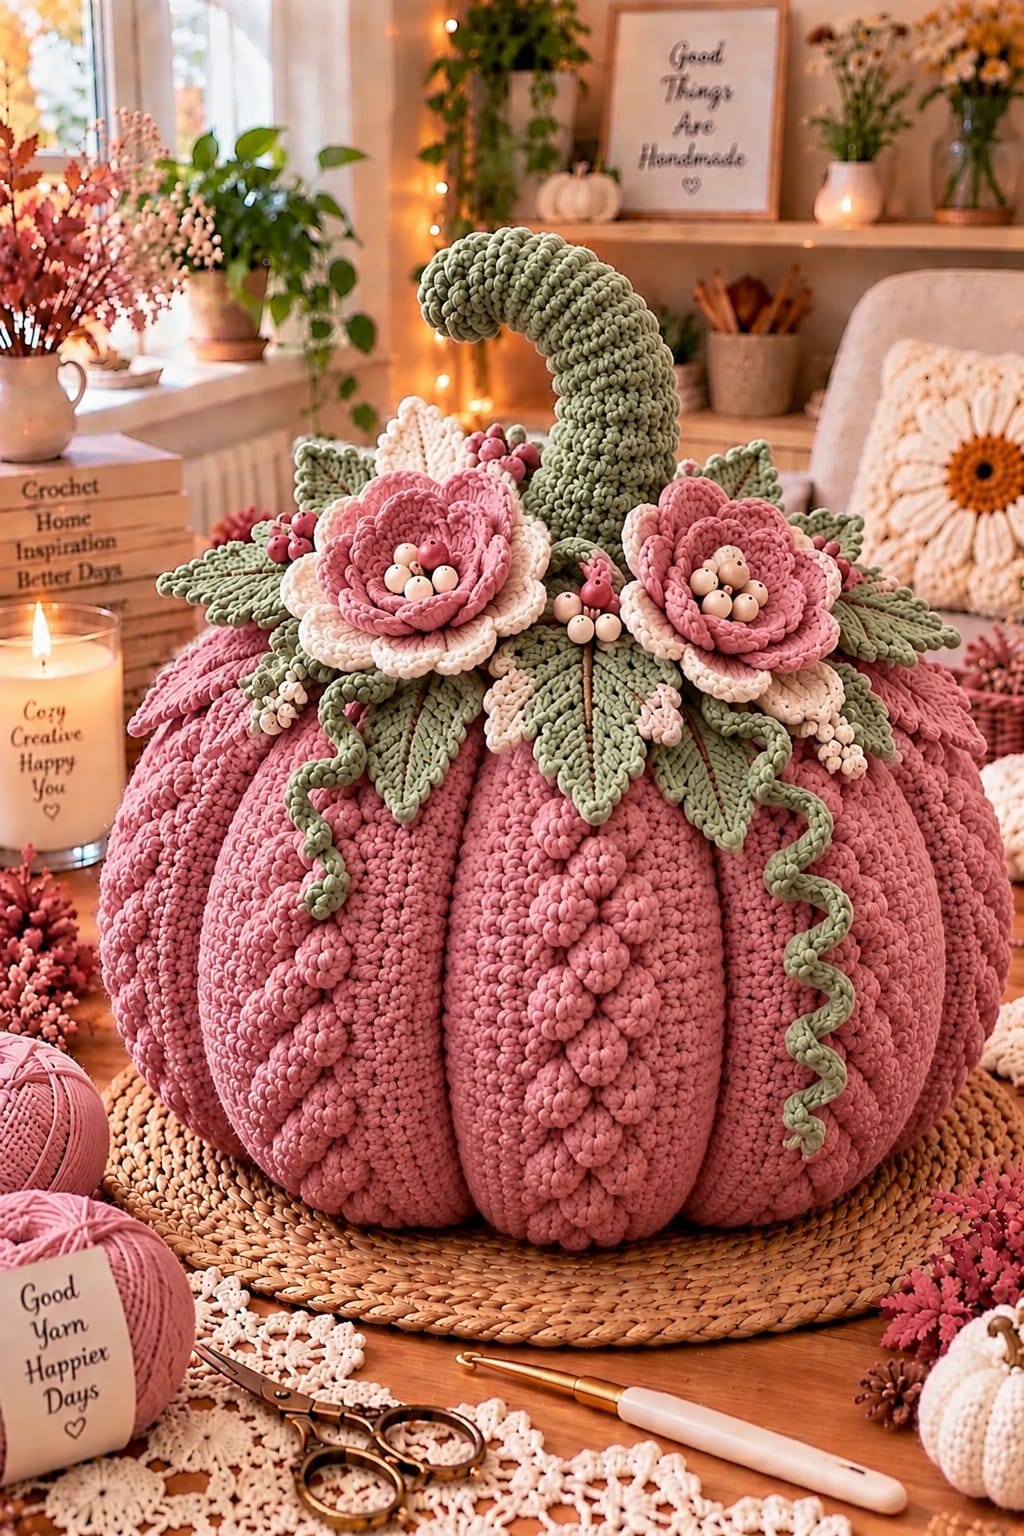
A pumpkin covered with rose-pink ribs needs a crown large enough to balance nearly half a meter of sculpted body. This giant crochet pumpkin pattern recreates the photographed design with a dusty-pink pumpkin, curved sage stem, layered cream-and-pink flowers, pointed leaves, berry clusters, curling vines and raised floral trails. Using super-bulky yarn and a 7–8 mm hook, target a finished body approximately 40–45 cm wide.
The Design: What Makes This Pink Pumpkin Different
The body is intentionally broad and low, then divided into deep vertical lobes after stuffing. That construction gives the pumpkin stronger definition than surface texture alone. Small raised motifs run down selected lobes, adding detail without hiding the sculpted channels.
The crown uses scale as a structural feature. Two large layered flowers occupy the front, while sage leaves spread horizontally beneath them and visually connect the floral arrangement to the oversized body. A tall curved stem rises behind the flowers rather than directly between them.
The main mistake with an oversized crochet pumpkin is overstuffing the center. A rigid core resists the sculpting strands, producing shallow grooves instead of the deep ribs visible in this floral crochet pumpkin.
Project Info at a Glance
| Skill Level | Time | Finished Size | Hook | Yarn |
|---|---|---|---|---|
| Intermediate | 16–22 hours | Approx. 40–45 cm wide | 7–8 mm | Super Bulky #6 |
The dimensions are targets for a photo-inspired reconstruction rather than measurements taken from the pictured object. Yarn thickness, stuffing density and sculpting tension will change the final size.
Materials and Tools
Yarn
- Dusty pink — Super Bulky #6 — approximately 750–900 g for the pumpkin body
- Sage green — Super Bulky #6 — approximately 120–160 g for the stem
- Sage green — Bulky #5 — approximately 180–220 g for leaves and vines
- Dusty pink — Bulky #5 — approximately 120–150 g for flowers and surface motifs
- Warm cream — Bulky #5 — approximately 80–110 g for flower petals and berries
Tools
- 7–8 mm crochet hook for the pumpkin body
- 6 mm crochet hook for the stem
- 4.5–5.5 mm crochet hook for flowers, leaves and vines
- Polyester fiberfill — approximately 1–1.4 kg
- Long upholstery needle
- Large tapestry needle
- Locking stitch markers
- Rust-resistant pins
- Sharp scissors
- Tape measure
Abbreviations
- MR — magic ring
- ch — chain
- sc — single crochet
- hdc — half double crochet
- dc — double crochet
- tr — treble crochet
- inc — increase
- dec — decrease
- sl st — slip stitch
- BLO — back loop only
- FLO — front loop only
- st/sts — stitch/stitches
For an invisible decrease, insert the hook through the front loops of the next two stitches, yarn over and complete one single crochet through both loops.
Gauge and Finished Measurements
Target approximately 9–10 single crochet stitches per 10 cm with super-bulky yarn. The fabric needs to be dense enough that the stuffing does not show when the body is compressed during sculpting.
The stuffed body should measure approximately 40–45 cm across before the floral crown is added. The complete pumpkin can reach approximately 50–55 cm high once the curved stem is attached.
Gauge is less important than fabric density. If the stuffing becomes visible between stitches, reduce the hook by 0.5–1 mm.
Giant Pink Crochet Pumpkin Pattern
Pink Pumpkin Body
Yarn: dusty pink. Work continuously in a spiral.
R1: 6 sc in MR. (6)
R2: inc ×6. (12)
R3: (sc, inc) ×6. (18)
R4: (2 sc, inc) ×6. (24)
R5: (3 sc, inc) ×6. (30)
R6: (4 sc, inc) ×6. (36)
R7: (5 sc, inc) ×6. (42)
R8: (6 sc, inc) ×6. (48)
R9: (7 sc, inc) ×6. (54)
R10: (8 sc, inc) ×6. (60)
R11: (9 sc, inc) ×6. (66)
R12: (10 sc, inc) ×6. (72)
R13: (11 sc, inc) ×6. (78)
R14: (12 sc, inc) ×6. (84)
R15–R31: Sc in every stitch around. (84)
The long 84-stitch section forms the broad center required for the oversized pumpkin silhouette.
R32: (12 sc, dec) ×6. (78)
R33: (11 sc, dec) ×6. (72)
R34: (10 sc, dec) ×6. (66)
R35: (9 sc, dec) ×6. (60)
Begin stuffing around the outer walls. Add small portions rather than filling the center immediately.
R36: (8 sc, dec) ×6. (54)
R37: (7 sc, dec) ×6. (48)
R38: (6 sc, dec) ×6. (42)
R39: (5 sc, dec) ×6. (36)
Continue stuffing. Keep the outer circumference firm and the central core slightly softer.
R40: (4 sc, dec) ×6. (30)
R41: (3 sc, dec) ×6. (24)
R42: (2 sc, dec) ×6. (18)
R43: (sc, dec) ×6. (12)
R44: dec ×6. (6)
Fasten off with a long tail. Thread through the remaining six front loops and close the opening.
Sculpting the Deep Pumpkin Ribs
Cut a doubled strand of strong dusty-pink yarn approximately 250–300 cm long. Thread it through a long upholstery needle.
Insert the needle through the bottom center and bring it out through the crown. Run the yarn down the exterior, return through the bottom and pull gently.
Repeat until approximately ten vertical sections surround the pumpkin.
Do not tighten the first channel fully. Establish all ten positions first and check the body from above.
Once the spacing is balanced, work around the pumpkin a second time and increase the tension gradually. Push stuffing away from each groove with your fingers as the sculpting strand sinks into the body.
Secure the yarn at the crown. The floral arrangement will conceal the final knot.
Raised Pink Floral Trail — Make 15
Yarn: dusty pink.
R1: 6 sc in MR. (6)
R2: In each stitch work (sl st, ch 2, 2 hdc, ch 2, sl st).
Fasten off with a 15 cm sewing tail.
Make approximately five motifs for each of three prominent pumpkin lobes.
Arrange the motifs vertically with 1–2 cm between them. Their outer petals should remain slightly raised rather than being stitched completely flat.
Tall Curved Sage Stem
Yarn: sage green. Use a 6 mm hook.
R1: 6 sc in MR. (6)
R2: inc ×6. (12)
R3: (sc, inc) ×6. (18)
R4: BLO sc around. (18)
R5–R9: Sc around. (18)
R10: 13 sc, sl st in next 5 sts. (18)
R11: Sc around. (18)
R12: 12 sc, sl st in next 6 sts. (18)
R13–R14: Sc around. (18)
R15: 11 sc, sl st in next 7 sts. (18)
R16–R18: Sc around. (18)
R19: (sc, dec) ×6. (12)
R20–R27: Sc around. (12)
R28: 8 sc, sl st in next 4 sts. (12)
R29–R32: Sc around. (12)
R33: dec ×6. (6)
Fasten off and close the tip.
Stuff the first 10–12 cm firmly. Reduce the stuffing toward the tip so the upper section can form the broad hook visible in the reference.
Large Layered Pink and Cream Flower — Make 2
Cream Outer Base
Yarn: warm cream.
R1: 6 sc in MR. (6)
R2: inc ×6. (12)
R3: (sc, inc) ×6. (18)
R4: Create six ch-6 loops evenly around.
R5: Into each loop work (sc, hdc, 3 dc, 2 tr, 3 dc, hdc, sc).
Fasten off.
Pink Middle Petals
Join dusty-pink yarn behind the cream petal layer.
Create six ch-5 loops around the center.
Into each loop work:
Sc, hdc, 3 dc, tr, 3 dc, hdc, sc.
Fasten off.
Pink Inner Petals
Create six ch-4 loops close to the flower center.
Into each loop work:
Sc, hdc, 3 dc, hdc, sc.
Fasten off with a 35 cm sewing tail.
Fold the inner pink petals slightly upward during assembly to create the cupped flower shape.
Small Cream Flower — Make 2
R1: 6 sc in MR. (6)
R2: inc ×6. (12)
R3: Repeat six times: (sl st, ch 3, 3 dc, ch 3, sl st).
Fasten off with a 20 cm tail.
These smaller flowers can be tucked between the larger blooms and leaf clusters.
Large Sage Leaves — Make 10
Yarn: sage green.
Foundation: Ch 17.
Starting in the second chain from the hook work:
Sl st, sc, hdc, dc, tr in next 6 chains, dc, hdc, sc.
Work 3 sc into the final chain.
Rotate and work along the opposite side of the foundation chain:
Sc, hdc, dc, tr in next 6 chains, dc, hdc, sc, sl st.
Edging: Sc around the leaf. At the tip work (sc, ch 2, sc).
Slip stitch along the central foundation chain to create the raised vein.
Fasten off with a 30 cm sewing tail.
Medium Sage Leaves — Make 8
Ch 13.
Use the same construction as the large leaf, reducing the central treble section to four stitches.
Work a pointed ch-2 tip and a raised slip-stitch center vein.
Fasten off with a 25 cm tail.
Small Sage Leaves — Make 6
Ch 9.
Starting in the second chain work:
Sl st, sc, hdc, dc in next 2 chains, hdc, sc.
Work 3 sc into the final chain and mirror the stitches along the opposite side.
Sc around once, placing (sc, ch 2, sc) at the point.
Fasten off.
Cream Accent Leaves — Make 4
Use warm cream yarn and the medium leaf instructions.
These leaves should be positioned behind the pink flowers where the pale color can separate the petals from the sage foliage.
Do not distribute them evenly around the complete crown. Concentrating the cream near the flowers matches the layered appearance of the reference.
Pink Berry Clusters — Make 10
Yarn: dusty pink.
R1: 6 sc in MR. (6)
R2: Sc around. (6)
R3: dec ×3. (3)
Add a tiny amount of yarn scrap before closing.
Fasten off with a 15 cm tail.
Arrange berries in groups of three or four around the flowers.
Cream Berry Clusters — Make 12
Repeat the pink berry pattern using warm cream yarn.
Use several cream berries in the centers of the two large flowers and place the remaining pieces between sage leaves.
Mixing cream and pink berries creates small areas of contrast without adding another major color.
Long Sage Corkscrew Vines — Make 2
Ch 50.
Starting in the second chain from the hook, work 3 sc in every chain.
For the final 12 chains, work 4 sc into every third chain to make the lower curl slightly tighter.
Fasten off with a 25 cm tail.
The finished vine should hang freely from the floral crown rather than being sewn down the pumpkin body.
Short Sage Vines — Make 3
Ch 28.
Starting in the second chain from the hook, work 3 sc into every chain.
Fasten off with a 20 cm tail.
Place the short vines between leaf layers to break up the edge of the crown.
Building the Floral Crown
Place the curved sage stem at the crown center first. Rotate the hook so its upper curve remains visible above the flowers.
Arrange the ten large sage leaves around the stem. Their points should extend beyond the flower edges and create an irregular star-shaped base.
Add medium leaves between the large pieces. Place several small leaves close to the stem where they can fill narrow gaps.
Position the two large pink-and-cream flowers across the front. One flower can sit slightly higher than the other to avoid a rigid mirrored arrangement.
Tuck the cream accent leaves beneath the flowers. Add berry clusters last so they remain visible above the surrounding stitches.
Positioning the Raised Pink Motifs
Select three pumpkin lobes that remain visible beneath the crown.
Place approximately five raised motifs vertically down each selected lobe.
Begin the first motif 5–7 cm below the leaf crown. Leave 1–2 cm between neighboring motifs.
Stop the trail before reaching the lowest curve of the pumpkin. Decorations attached directly beneath the body can prevent it from sitting level.
Sew through the center and one petal of each motif. Leave the remaining petals free.
Assembly
- Stuff and close the pink pumpkin body, then form approximately ten deep sculpted ribs with doubled matching yarn.
- Position the curved sage stem at the crown center and sew through its lower two or three rounds at multiple points.
- Arrange the large sage leaves around the stem and attach each leaf at its base plus one point approximately 2–3 cm outward.
- Add the medium, small and cream leaves, varying their angles so neighboring pieces do not completely overlap.
- Place the two large pink-and-cream flowers across the front of the crown and sew through their centers and inner petal bases.
- Add the small flowers and mixed pink-and-cream berry clusters between the large blooms and leaves.
- Sew the raised pink floral motifs down three selected pumpkin lobes while keeping their outer petals free.
- Attach the short vines beneath the leaf crown and allow the spirals to project away from the body.
- Sew one long corkscrew vine to each side of the floral arrangement, attaching only the upper 1–2 cm.
- Hide all remaining tails beneath the foliage, reshape the curved stem and separate the flower petals before display.
The completed pumpkin should have deep pink ribs, a tall sage stem and a broad floral crown that extends across several upper lobes.
7 Technical Tips for This Floral Crochet Pumpkin
- Shallow pumpkin grooves: Keep the central stuffing approximately 15–20% softer than the outer walls. A densely packed center prevents the sculpting strand from sinking deeply into the body.
- Unequal ribs: Mark all ten channel positions before tightening any strand fully. A difference of 2–3 cm between adjacent sections becomes obvious on a 40 cm pumpkin.
- Visible fiberfill: Stretch the crocheted fabric before stuffing. If pale filling shows between pink stitches, reduce the body hook by approximately 0.5–1 mm.
- Stem falling forward: Stuff the lowest 10–12 cm firmly and sew through at least two complete stem rounds. A single attachment round cannot reliably support the tall hooked shape.
- Rotating leaves: Secure every large sage leaf at two points at least 2 cm apart. A leaf sewn only at its base can turn underneath the heavy flower layer.
- Flattened flowers: Attach the flowers through their centers and inner petal bases only. Sewing around the outer perimeter removes the cupped profile visible in the photographed crown.
- Stretched corkscrews: Attach only the upper 1–2 cm of each vine. Sewing along the full spiral pulls the curl flat against the pumpkin.
How to Get Deeper Pumpkin Ribs
The body needs enough stuffing to hold its volume but enough compression to accept the sculpting strands. Concentrate fiberfill around the outer circumference and leave the central vertical core slightly softer.
Establish every channel at moderate tension first. Look down at the crown and compare the width of the ten sections.
During the second tightening pass, pull each strand only a small amount before moving to the next groove. This distributes pressure evenly.
If one groove remains too shallow, pass a second strand through exactly the same channel. A second strand placed beside the original creates an unnecessarily broad indentation.
Stuffing an Oversized Crochet Pumpkin
Add fiberfill in small portions and rotate the body frequently. Large handfuls can produce hard internal lumps that become visible after sculpting.
Start around the bottom perimeter. Build a firm outer wall, then continue upward toward the widest rounds.
Check the pumpkin on a flat surface before closing the final 18 stitches. Correct any flat or unstable area while the opening is still large enough for your hand.
Do not use the sculpting strands to compensate for an unevenly stuffed body. The underlying form should already be round and stable.
Shaping the Sage Stem
The stem should curve gradually rather than bend at one sharp point. Its lower section carries the weight, while the lightly stuffed upper portion creates the hook.
After stuffing, bend the stem over several centimeters with both hands. Rotate it slightly so the curve appears natural from the front.
If the stem begins to straighten, use matching sage yarn to make several hidden stitches across the inside of the curve. Tightening those stitches shortens the inner edge and helps hold the hooked shape.
Keeping the Floral Crown Balanced
The crown contains several layers, so weight distribution matters. Large flowers should sit toward the front while the broadest leaves extend toward the sides and back.
Pin every component before sewing. View the pumpkin from the front, both sides and directly above.
If the arrangement pulls forward, move one or two large leaves toward the back rather than adding more stitches to the front flowers.
The stem should remain visible above the flower line. If its lower half disappears completely, shift the largest blooms slightly outward.
Making the Flowers More Dimensional
Do not block the layered flowers completely flat. Shape each petal layer independently.
Turn the cream outer petals slightly outward. Position the pink middle petals more vertically and cup the smallest inner petals toward the center.
Attach the berry cluster after the flower has been sewn to the pumpkin. This lets the berries cover the central attachment stitches.
Use only enough stitches to stabilize each petal layer. Dense perimeter sewing removes the separation between colors.
Creating Clean Pointed Leaves
The leaf point is formed by the stitches placed in the end of the foundation chain and reinforced by the edging round.
Keep the foundation chain relaxed. A tight chain makes one side of the leaf shorter and forces the finished piece to curl.
When working the center vein, use slip stitches with minimal tension. Tight surface stitching can fold the leaf along its center.
Light blocking can sharpen the points before assembly.
Adjusting the Pumpkin Size
For a medium version, stop increasing at 60 stitches. Work approximately 12–14 plain rounds before beginning the corresponding decrease sequence.
For a smaller pumpkin, stop at 42 stitches and work approximately 9–11 plain rounds.
Scale the floral pieces at the same time. Large flowers designed for an 84-stitch body can overwhelm a 42-stitch pumpkin.
Reducing the hook alone is another option, but it also makes the fabric denser and changes the amount of stuffing required.
Alternative Color Combinations
The photographed palette combines dusty pink with muted sage and warm cream. The same construction works with terracotta, olive and ivory for a warmer autumn version.
Plum with eucalyptus green and oatmeal produces stronger contrast. Pale peach, moss and cream create a lighter variation.
For a neutral version, use an oatmeal body, taupe stem and ivory flowers. Keep at least a small tonal difference between the body and leaves so the crown remains visually separate from the sculpted ribs.
Care and Storage
An oversized stuffed pumpkin should be supported from underneath when moved. Do not lift it by the stem, flowers or vines.
Spot cleaning is preferable when the yarn label permits because the dense stuffing and multiple decorative layers can take considerable time to dry.
For seasonal storage, place the pumpkin in a container large enough that the stem does not need to be sharply folded. Lightly reshape the flowers and corkscrew vines after unpacking.
Avoid stacking heavy objects on top of the crown because compressed petals and leaves may require reblocking.
Finishing the Pumpkin
Inspect each sculpted groove after the crown has been attached. Added weight at the top can alter the tension of the upper channels.
Check every large leaf by lifting its tip gently. Add a second hidden stitch if the base rotates.
Separate the pink and cream petal layers with your fingers and reposition the berry clusters so they remain visible from the front.
Re-form the sage corkscrew vines without pulling them lengthwise. The final spirals should hang freely against the pumpkin rather than lying flat.
Conclusion
Complete the pink body and establish all ten sculpted ribs before making the crown, because those channels determine the placement of the raised floral trails. Crochet the sage stem and one large flower next, pin both pieces temporarily and check their scale against the 40–45 cm body. Add the leaves only after the stem position is fixed, then finish with berries and free-hanging vines. Save this giant crochet pumpkin pattern to Pinterest or share the completed version on Instagram with #PinkFloralCrochetPumpkin. For this specific design, would you keep the sage-green stem or make it dusty pink to match the pumpkin body?