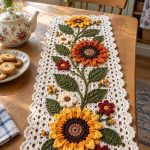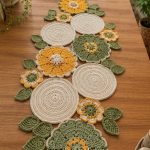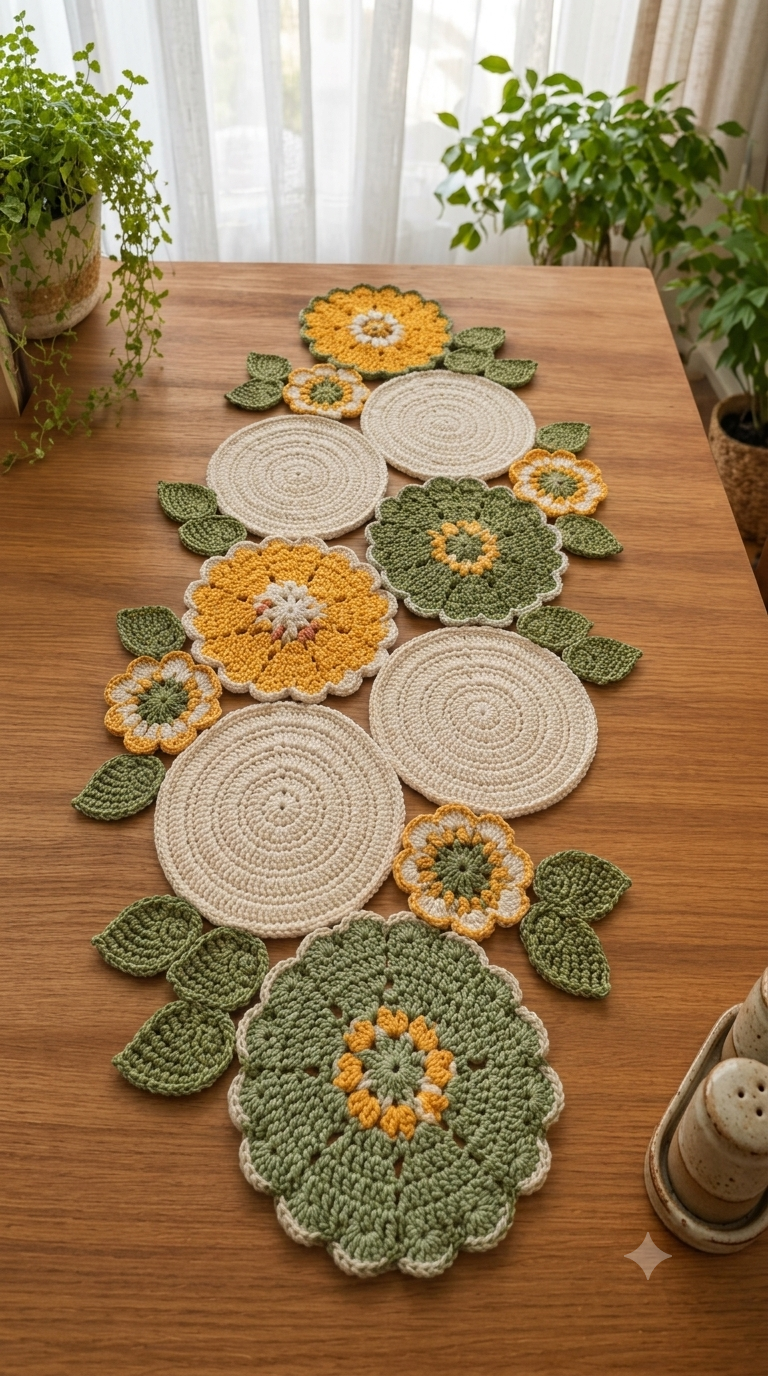
Three plain ivory discs interrupt the flower chain in this runner, preventing the botanical layout from becoming one continuous mass of petals. This crochet flower table runner pattern uses modular flowers, circular motifs and pointed leaves with DK or light-worsted cotton and a 3.75 mm hook. Expect an intermediate project measuring roughly 100–120 cm after layout adjustment. Separate motifs make damaged or stained sections replaceable.
The Design: What Makes This Floral Runner Different
The photographed runner depends on contrast between three shapes: broad scalloped flowers, restrained circular discs and narrow leaves. The discs matter structurally because they create flat resting areas while breaking up the denser floral crochet table runner composition. Large flowers use radial increases before the final scalloped edge so the petals remain broad rather than becoming individual loose appliqués.
Leaves are attached only at their bases or lower edges. That decision preserves the pointed silhouette and allows each crochet leaf applique to sit at a slight angle.
A frequent mistake with modular flower runners is joining every motif edge-to-edge. The result becomes a rigid rectangular mat. This design instead uses limited joining points and staggered motif placement, retaining the irregular botanical outline visible in the reference photograph.
Project Info at a Glance
| Skill Level | Time | Finished Size | Hook | Best For |
|---|---|---|---|---|
| Intermediate | 10–14 hours | Approx. 100–120 × 38–45 cm | 3.75 mm | Dining table centerpiece |
The overall dimensions are a photo-based target. Final measurements depend on yarn, tension, blocking and spacing between motifs.
Materials and Tools
Yarn
- Warm ivory — DK/light-worsted cotton — approximately 90–120 g
- Sage or olive green — DK/light-worsted cotton — approximately 100–130 g
- Mustard yellow — DK/light-worsted cotton — approximately 50–70 g
- Rust or peach — DK/light-worsted cotton — approximately 5–10 g
The quantities are working estimates for this photo-inspired version. Keep additional yarn available when increasing the overall runner length or adding more leaves.
Tools
- 3.75 mm crochet hook
- Yarn needle
- Scissors
- Locking stitch markers
- Rustproof blocking pins
- Blocking mat
- Tape measure
No stuffing or safety eyes are required because every component is worked flat.
Abbreviations
- MR — magic ring
- sc — single crochet
- hdc — half double crochet
- dc — double crochet
- tr — treble crochet
- inc — increase
- sl st — slip stitch
- ch — chain
- st/sts — stitch/stitches
- sp — space
- BLO — back loop only
Invisible decrease is an amigurumi shaping method and is not required for these flat motifs. Width is controlled through radial increases, stitch-height changes and chain spaces.
Crochet Flower Table Runner Pattern — Step by Step
Make the individual circles, flowers and leaves before joining the runner. Block the main motifs before final assembly so their finished dimensions can be checked against one another.
Large Ivory Circle — Make 3
Yarn: warm ivory.
R1: MR, ch 2, 12 dc into MR, sl st to first dc (12)
R2: ch 2, 2 dc in each st around, join (24)
R3: ch 2, [dc 1, 2 dc in next st] ×12, join (36)
R4: ch 2, [dc 2, 2 dc in next st] ×12, join (48)
R5: ch 2, [dc 3, 2 dc in next st] ×12, join (60)
R6: ch 2, [dc 4, 2 dc in next st] ×12, join (72)
R7: ch 2, [dc 5, 2 dc in next st] ×12, join (84)
R8: ch 2, [dc 6, 2 dc in next st] ×12, join (96)
R9: ch 1, sc in each st around, join (96)
Block each circle before assembly. If the fabric begins to ripple, omit several evenly spaced increases or finish the circle after R7. Flatness is more important than forcing an additional expansion round.
Fasten off. Leave a 25 cm tail on two circles for joining.
Large Sage Scalloped Flower — Make 2
Yarn: sage, mustard and ivory.
With sage:
R1: MR, ch 2, 12 dc in MR, join (12)
R2: 2 dc in each st around, join (24)
Change to mustard.
R3: [puff in next st, ch 1, skip next st] ×12, join (12 puffs)
Change to sage.
R4: Work 3 dc into each ch-1 sp around, join (36 dc)
R5: [dc 2, 2 dc in next st] ×12, join (48)
R6: [dc 3, 2 dc in next st] ×12, join (60)
R7: Skip 1 st, 7 dc in next st, skip 1 st, sl st in next 4 sts. Repeat around, distributing the scallops as evenly as possible.
Change to ivory.
R8: sc evenly around each scallop, placing 2 sc near each petal peak and sl st in each valley.
The flower should lie flat after blocking. A cupped center indicates tight center stitches, while a heavily ruffled outer edge indicates excessive edge stitches.
Fasten off. Leave a 25 cm tail for joining.
Large Mustard Scalloped Flower — Make 1
Yarn: mustard, ivory, sage and a small amount of rust.
With sage:
R1: MR, 12 dc in MR, join (12)
Change to ivory.
R2: Work six evenly spaced puff clusters around the center, separated by ch-1 spaces.
Add small rust stitches between selected ivory clusters to reproduce the warm accents visible in the flower center.
Change to mustard.
R3: Work 3 dc into each available center space, distributing stitches evenly.
R4: Increase evenly to approximately 36 sts.
R5: Increase evenly to approximately 48 sts.
R6: Increase evenly to approximately 60 sts.
R7: Work broad scallops using (sl st, hdc, 5 dc, hdc, sl st) across evenly spaced sections.
Change to ivory.
R8: sc around the petal edges. Work a short ch-2 point at each outer petal center.
Keep the finished diameter close to the sage flowers so the three major floral motifs remain visually balanced.
Fasten off. Leave a 30 cm joining tail.
Small Flower — Make 4
Yarn: sage center with ivory and mustard petals.
With sage:
R1: MR, 12 dc in MR, join (12)
Change to mustard.
R2: [sc in next st, ch 4, skip next st] ×6, join (6 loops)
Change to ivory.
R3: In each ch-4 sp work (sc, hdc, 3 dc, hdc, sc). Repeat ×6.
For a mustard-edged version:
R4: Join mustard at the first petal. Work sc around each petal with 2 sc at its highest point and sl st in each valley.
Fasten off. Leave a 20 cm tail.
Pointed Leaves — Make 18 to 20
Yarn: sage or olive green.
Foundation: ch 12.
R1: Starting in second ch from hook: sl st, sc, hdc 2, dc 5, hdc, sc. Work 3 sc into final chain. Continue along the opposite side of the foundation chain: sc, hdc, dc 5, hdc 2, sc, sl st.
R2: ch 1. Work sc around the first side while maintaining the leaf shape. At the tip work (sc, ch 2, sc). Continue down the second side and join at the base.
Optional vein: Surface sl st from the base toward the tip through the center foundation chain.
A finished leaf should measure approximately 7–8 cm long when made with the suggested yarn and hook. Gauge differences may produce a smaller or larger leaf.
Fasten off. Leave a 20 cm tail for sewing.
Optional Tiny Center Accent — Make 3 to 5
Yarn: rust or mustard.
R1: 6 sc in MR (6)
R2: [sl st, ch 2, sl st] in each st around (6 small points)
Fasten off with a 15 cm tail. Sew these accents selectively into the large flower centers rather than adding one to every motif.
Layout Before Assembly
Block all circles and large flowers independently before joining. Pin the circles into true rounds and correct the spacing between flower scallops while the cotton is damp.
Place the three ivory circles along an offset central line. Avoid arranging them in a perfectly straight row because the irregular positioning is part of the botanical structure.
Position one large flower between the upper circles and another beside or below the middle circle. Set the remaining large flower toward one end of the runner. Alternate sage and mustard areas instead of creating a mirrored arrangement.
Add the four small flowers to narrower gaps. Arrange the leaves last, concentrating them around the outside perimeter in groups of two or three.
Measure the complete arrangement before sewing. To lengthen the runner, increase the distance between selected motifs or add another circle-and-flower section rather than enlarging every component.
Assembly
- Block every motif separately and allow all pieces to dry completely before measuring the final layout.
- Position the three ivory circles first, keeping their centers offset rather than perfectly aligned.
- Add the three large scalloped flowers between and beside the circles without covering more than approximately 1–2 cm of a neighboring motif.
- Position the four small flowers in narrower gaps where another large flower would make the runner excessively wide.
- Pin the main motifs together at two or three contact points for each neighboring pair.
- Sew joins through the back loops with matching yarn. Keep the joining stitches on the reverse side.
- Arrange the leaves around the perimeter in pairs and small clusters, with their pointed tips facing away from the center line.
- Sew only the lower third to half of each leaf when a raised botanical outline is wanted. Sew the complete leaf edge when a completely flat runner is required.
- Weave each yarn tail through at least 4–5 cm of neighboring stitches. Reverse direction and weave another 2–3 cm before trimming.
- Block the assembled runner to its final dimensions, correcting any circle or flower distorted during joining.
The completed runner should lie flat while retaining an irregular floral perimeter and clearly separated leaf tips.
7 Technical Tips for a Flat Floral Runner
- Correct circle ruffling early. If an ivory circle develops waves by R6, its circumference has more fabric than the current gauge can support. Remove 2–4 increases from the next round and distribute those omissions evenly.
- Watch for circle cupping. A motif turning into a shallow bowl needs additional circumference. Add 2–4 evenly distributed increases instead of changing hook size halfway through the circle.
- Control flower-center thickness. A center thicker than approximately 4–5 mm can make objects placed on the runner unstable. Keep puff stitches concentrated in the decorative flowers and maintain flatter construction on the ivory circles.
- Correct curling leaves before assembly. A leaf that curls tightly after its second pass may have insufficient edge length. Block each leaf to approximately 7–8 cm long before changing its stitch sequence.
- Avoid joining distortion. Sewing neighboring motifs together across every touching stitch can create puckering. Restrict an ordinary contact area to roughly 2–3 cm and check the runner on a flat surface after several joins.
- Pin the entire composition first. Joining without a complete pinned layout can shift the final flower by several centimeters. Take a direct overhead reference photo after pinning and before removing individual pieces for sewing.
- Use long joining tails. Short tails can work loose after repeated handling. Leave approximately 20–30 cm for assembly joins and weave each tail through 4–5 cm of stitches before reversing direction.
Finishing and Blocking
Place the completed runner on a blocking surface and arrange all three circles so their edges remain round. Correct the large flower petals individually rather than stretching the complete flower outward at once.
Pin the leaf tips last. Their angles should vary slightly; identical leaf angles make the botanical arrangement appear mechanically repeated.
Allow cotton motifs to dry completely before removing the pins. Measure the final runner and record its length, widest point and total yarn consumption if another version will be made.
Conclusion
Block one large circle and one flower before committing the full yarn supply; those two samples establish the scale for every remaining motif. After assembly, record the runner’s actual length, widest point, hook size and yarn consumption so a second version can be reproduced without estimating. Pin the finished layout to Pinterest with a direct overhead photograph, then share the motif arrangement on Instagram using #BotanicalFlowerRunner. The crochet flower table runner pattern can also be shortened by removing one circle-and-flower section rather than resizing every motif. Which element would you repeat for a longer table: the plain ivory circle or the sage scalloped flower?