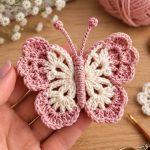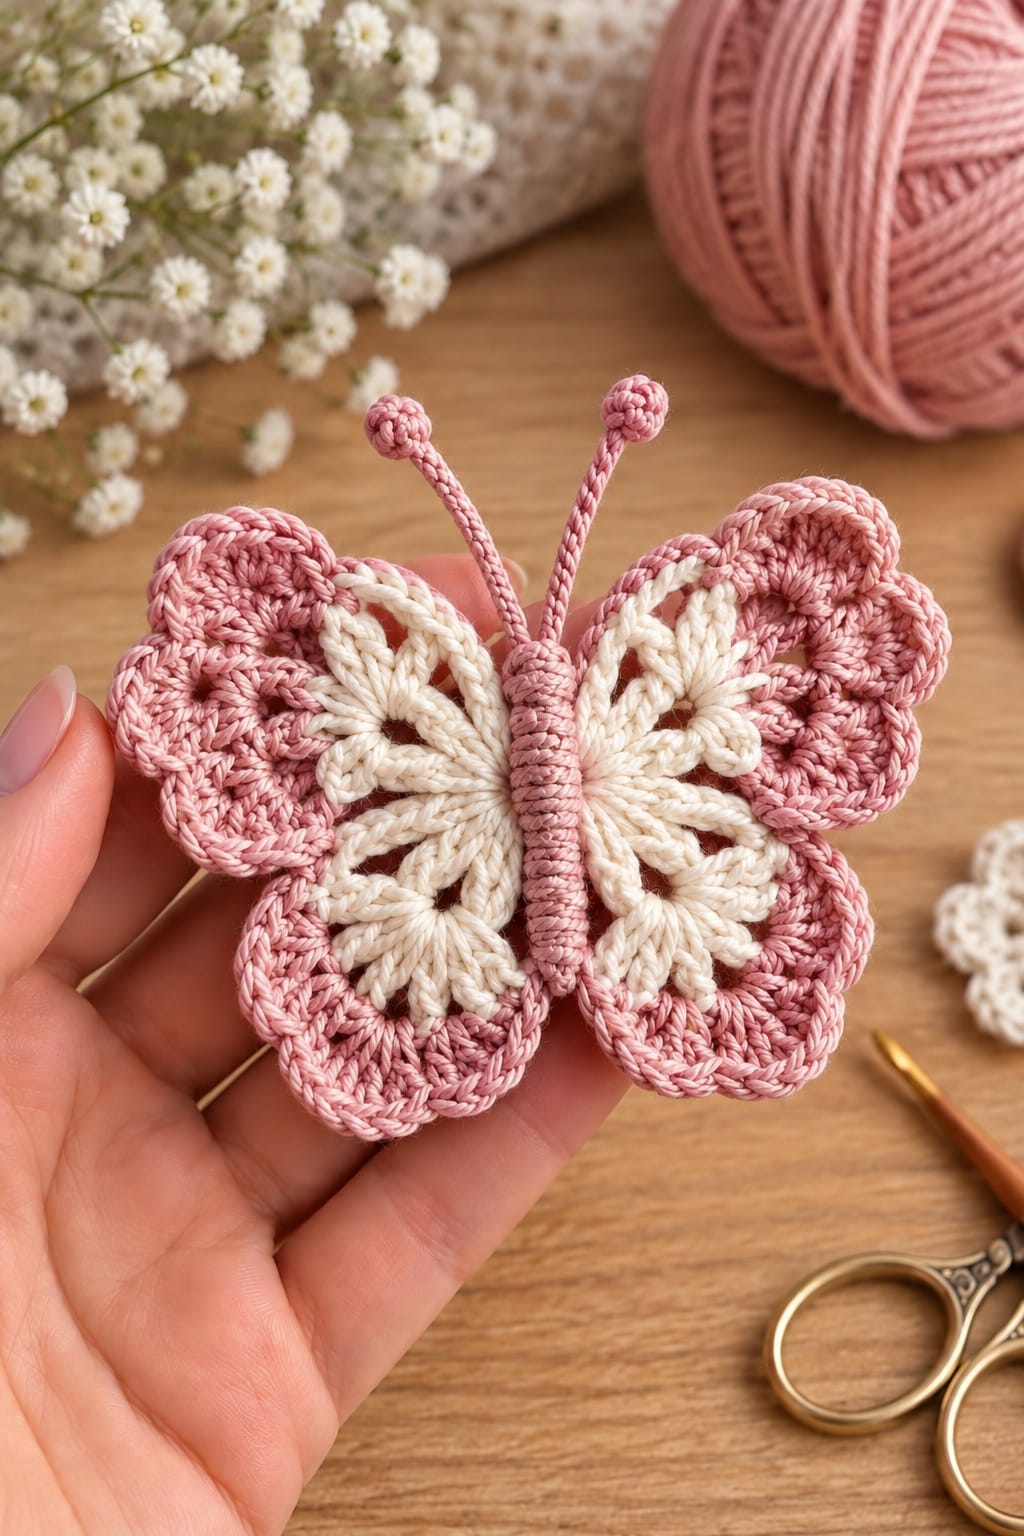
A butterfly this small depends on four clearly different wing lobes; make them equal and the silhouette immediately becomes a flower. This crochet butterfly pattern uses cream openwork centers, dusty-pink scalloped borders, a narrow wrapped body and two long antennae. Worked in smooth cotton with a 2.5–3 mm hook, the finished butterfly measures approximately 10–12 cm wide and works well as an appliqué, ornament, garland motif or decorative embellishment.
The Design: What Makes This Crochet Butterfly Different
The upper wings are intentionally broader and taller than the lower pair. That proportion gives the motif a recognizable butterfly outline while leaving enough space for the cream openwork to remain visible. A dusty-pink outer layer follows each wing independently, producing rounded scallops instead of one continuous circular border.
The second structural feature is the narrow three-dimensional body. It covers the central wing joins and provides a stable attachment point for the antennae. Cream stitches radiate outward beneath it, creating the appearance of delicate wing veins.
A frequent mistake in a crochet butterfly appliqué is tightening the cream chains too much. Short chains pull the wings inward, distort the openings and make the finished crochet butterfly motif cup instead of lying flat.
Project Info at a Glance
| Skill Level | Time | Finished Size | Hook | Yarn |
|---|---|---|---|---|
| Intermediate | 1–2 hours | Approx. 10–12 cm wide | 2.5–3 mm | Sport or DK cotton |
The measurements are targets for a photo-inspired reconstruction. Cotton thickness, hook size and blocking tension can change the final dimensions.
Materials and Tools
Yarn
- Dusty pink — Sport/DK cotton — approximately 15–20 g
- Warm cream — Sport/DK cotton — approximately 8–12 g
Tools
- 2.5–3 mm crochet hook
- Tapestry needle
- Sharp scissors
- Stitch markers
- Rust-resistant blocking pins
- Blocking mat
Abbreviations
- MR — magic ring
- ch — chain
- sc — single crochet
- hdc — half double crochet
- dc — double crochet
- tr — treble crochet
- sl st — slip stitch
- inc — 2 sc in one stitch
- dec — decrease
- sp — space
- st/sts — stitch/stitches
An invisible decrease is made through the front loops of two neighboring stitches before completing one single crochet; it is used only if the body needs additional tapering.
Gauge and Finished Measurements
Exact gauge is less important than matching both sides of the butterfly. With smooth cotton and a 2.75 mm hook, target approximately 22–24 single crochet stitches per 10 cm.
The upper wings should measure approximately 5–5.5 cm from the center to their outer edge. Lower wings should measure approximately 4–4.5 cm.
After blocking, the complete butterfly should measure approximately 10–12 cm across and 8–9 cm from the antenna bases to the bottom of the lower wings.
Pink and Cream Crochet Butterfly Pattern
The butterfly is assembled from four separate wing motifs, one narrow body and two antennae. Make the left and right wings in matching pairs, block them to equal dimensions and join them beneath the body.
Upper Cream Wing Center — Make 2
Yarn: warm cream.
R1: 6 sc in MR. (6)
R2: Ch 4, sl st in next stitch. Repeat around to create 6 small chain loops.
R3: Sl st into first ch-4 space. Work (sc, hdc, 3 dc, hdc, sc) into the space. Repeat in the next two spaces.
In the fourth space work (sc, hdc, 4 tr, hdc, sc) to create the taller outer section.
Work (sc, hdc, 3 dc, hdc, sc) into each remaining space.
Fasten off with a 20 cm tail.
The resulting motif should remain slightly elongated rather than perfectly circular.
Upper Wing Openwork Extension — Make 2
Join cream yarn near the inner lower edge of an upper wing.
Row 1: Ch 7, sl st approximately one-third of the way around the wing edge.
Row 2: Ch 9, sl st near the outer upper section.
Row 3: Ch 7, sl st near the inner upper edge.
These three arches create the elongated openings visible between the central body and pink border.
Fasten off and weave the short tail into the reverse side.
Pink Upper Wing Border — Make 2
Yarn: dusty pink.
Join pink yarn at the inner lower edge of the cream upper wing.
Work sc evenly around the cream structure, placing 3 sc around larger chain spaces where required.
For the scalloped outer section, repeat:
(Sc, hdc, 3 dc, hdc, sc) into the next suitable edge space, sl st into the following attachment point.
Make approximately five prominent scallops around the outside of each upper wing.
Keep the inner edge relatively straight because it will sit behind the body.
Fasten off with a 25 cm sewing tail.
Lower Cream Wing Center — Make 2
Yarn: warm cream.
R1: 6 sc in MR. (6)
R2: Ch 4, sl st in next stitch. Repeat around. (6 loops)
R3: Work (sc, hdc, 2 dc, hdc, sc) into each of the first two loops.
In the third loop work (sc, hdc, 3 tr, hdc, sc).
Repeat the smaller petal sequence in the remaining loops.
Fasten off.
The lower wing center should finish approximately 10–15% smaller than the upper wing center.
Lower Wing Openwork Extension — Make 2
Join cream yarn at the inner edge.
Row 1: Ch 6, sl st into the outer lower section.
Row 2: Ch 8, sl st into the outer side.
Row 3: Ch 6, sl st near the inner upper section.
Fasten off.
Keep these arches slightly shorter than those on the upper wings. The difference maintains the butterfly proportions.
Pink Lower Wing Border — Make 2
Join dusty-pink yarn at the inner edge.
Sc evenly around the cream structure.
Across the outer edge, make approximately four scallops using:
(Sc, hdc, 3 dc, hdc, sc) in one edge space, sl st at the next attachment point.
At the lowest section, substitute 4 dc for 3 dc if a fuller rounded lobe is required.
Fasten off with a 25 cm tail.
Alternative One-Piece Wing Construction
The four wings can also be joined before the pink edging is added. Arrange the cream motifs around the center, tack their inner points together and then work the pink border around each lobe.
This method reduces assembly stitches but makes individual wing adjustment more difficult.
Separate construction is preferable when exact left-right symmetry is required because each wing can be blocked independently before joining.
Butterfly Body
Yarn: dusty pink.
R1: 6 sc in MR. (6)
R2: Sc around. (6)
R3: Sc around. (6)
R4: Sc around. (6)
R5: Sc around. (6)
R6: Sc around. (6)
R7: Sc around. (6)
R8: Sc around. (6)
R9: Sc around. (6)
R10: Sc around. (6)
R11: Sc around. (6)
R12: Sc around. (6)
Do not stuff heavily. Insert a short yarn scrap only if the tube collapses completely.
Fasten off with a 30 cm tail.
Flatten the body slightly. The finished tube should measure approximately 6–7 cm long.
Butterfly Head
Join dusty-pink yarn to the upper end of the body.
R1: 6 sc around the opening. (6)
R2: inc ×6. (12)
R3: Sc around. (12)
R4: dec ×6. (6)
Add a very small amount of yarn scrap before closing.
Fasten off and pull the final six stitches closed.
The head should remain compact so it does not overpower the narrow body.
Antennae — Make 2
Yarn: dusty pink.
Ch 18.
Starting in the second chain from the hook, sl st loosely into each chain until 2 chains remain.
Fasten off with a 15 cm tail.
The finished antenna should measure approximately 4–5 cm.
Make the second antenna to the same length.
Antenna Tips — Make 2
R1: 6 sc in MR. (6)
R2: Sc around. (6)
Fasten off and close the opening around the end of one antenna.
Repeat for the second antenna.
The tiny rounded tips should measure approximately 6–8 mm across.
Optional Firmer Antennae
For a decorative butterfly that will not be used on children’s items, the crocheted antennae can be stiffened after completion with fabric stiffener.
Shape both antennae while damp and allow them to dry completely before handling.
For washable appliqués, leave the antennae unstiffened and sew the lower 1 cm of each antenna securely to the butterfly head.
Creating the Cream Wing Veins
The cream sections in the reference appear as branching structures rather than solid blocks. Additional surface chains can reproduce that effect.
Join cream yarn near the body edge of one wing.
Ch 8–10, then sl st into an outer cream section.
Return toward the center with surface slip stitches.
Create a second shorter branch at an angle.
Repeat on all four wings, mirroring the approximate position rather than counting every stitch exactly.
Keep the chains relaxed. Tight surface chains can pull a finished wing out of shape.
Adding Definition to the Pink Scallops
If the wing edges need stronger definition, work one final round of pink slip stitches around the scallops.
Insert the hook through the back loop only to preserve the raised edge.
At each scallop peak, work (sl st, ch 1, sl st) into the center stitch.
Do not tighten the slip stitches. A tight edging causes the lobes to curl toward the front.
Blocking the Four Wings
Block all four wings before assembly.
Place the two upper wings side by side and compare their outer dimensions. Pin each upper wing to approximately 5–5.5 cm from center edge to outer edge.
Pin the lower wings to approximately 4–4.5 cm.
Shape each pink scallop individually. Keep the cream openings elongated rather than stretching them into circles.
Allow the motifs to dry completely before removing the pins.
Positioning the Wings
Lay the body vertically on a flat surface.
Place one upper wing on each side. The broadest lobes should angle slightly upward.
Position the lower wings approximately 5–10 mm below the upper pair.
The lower lobes should angle outward and slightly downward.
Overlap the inner cream sections beneath the body by approximately 5–8 mm. This hidden overlap gives the center enough strength for sewing.
Pin all four wings before attaching any one wing permanently.
Assembly
- Block the two upper and two lower wings until matching pairs have equal dimensions.
- Place the upper wings side by side with their largest pink scallops angled upward and outward.
- Position the lower wings beneath them, leaving a narrow central channel for the body.
- Overlap the inner edges of all four wings by approximately 5–8 mm and tack them together with cream yarn.
- Lay the pink body over the central join and sew along both sides through the hidden inner edges of the wings.
- Attach the head firmly to the top of the body if it was made separately.
- Sew one antenna behind each side of the head, keeping approximately 8–10 mm between their bases.
- Adjust the antenna tips so both sit at approximately the same height.
- Secure loose wing sections with one hidden stitch only where movement causes the layers to separate excessively.
- Weave all remaining tails into matching colors and reshape every scallop by hand.
The completed butterfly should lie mostly flat while the body remains slightly raised above the four wing sections.
7 Technical Tips for a Crochet Butterfly
- Cupped wings: Lengthen the cream chain spaces by one stitch if the motif lifts more than approximately 5 mm from a flat surface. Chains that are too short pull the scalloped edge inward.
- Mismatched upper wings: Block the first upper wing and record its 5–5.5 cm center-to-edge measurement before shaping the second. Even a 5 mm difference is noticeable on a butterfly this small.
- Flower-shaped silhouette: Keep the lower wings approximately 10–15% smaller than the upper pair. Four equal lobes remove the visual distinction between upper and lower wings.
- Twisted body: Pin the body along the exact center line before sewing. A shift of approximately 3–4 mm makes one wing pair appear substantially larger.
- Loose antennae: Sew the bottom 8–10 mm of each antenna to the back of the head. Attaching only the final chain allows the antenna to rotate forward.
- Flattened scallops: Place blocking pins in the valleys between pink lobes rather than through their rounded peaks. Pinning the peak stretches the dense stitch cluster and changes its shape.
- Distorted cream veins: Keep surface chains loose enough to lift approximately 2–3 mm from the wing before blocking. Tight decorative chains shorten the wing and pull the pink border toward the center.
Making a Smaller Butterfly
Use sport-weight cotton and a 2–2.25 mm hook. Reduce each upper-wing chain arch by one chain and omit the final pink edging round.
Shorten the body to approximately nine rounds and make each antenna from ch 14 instead of ch 18.
The resulting butterfly should measure approximately 7–8 cm across, depending on tension.
Making a Larger Butterfly
Use DK or light worsted cotton with a 3.5–4 mm hook.
Add one extra pink scallop to the outside of each upper wing and increase the longest cream chain spaces by two chains.
Lengthen the body by two or three rounds and use ch 22 for each antenna.
A larger version can reach approximately 14–16 cm across without changing the overall construction.
Using the Butterfly as an Appliqué
For an appliqué, leave long sewing tails on the four wings and body.
Attach the body first. Next, sew only around the inner half of each wing so the pink outer scallops remain free and slightly dimensional.
When attaching the butterfly to a blanket, bag or cushion, secure the antennae at several points if the item will be washed frequently.
For framed crochet art, the wing edges can remain completely free once the central body is attached.
Using the Butterfly for a Garland
Make several butterflies in coordinated colors and block them to equal dimensions.
Thread a separate cord through the reverse side of each upper wing near the body. Do not hang the motif directly from its antennae.
Space butterflies approximately 10–15 cm apart.
Alternating pink-and-cream butterflies with cream-and-pink versions changes the color balance without requiring a second construction method.
Color Variations
The dusty-pink border and warm-cream center create a clear two-tone structure. Similar contrast can be produced with sage and ivory, lavender and cream, pale blue and white, or mustard and natural cotton.
Keep the lighter color in the open center if the branching wing structure should remain prominent.
For a more graphic result, use a dark outer border with a pale center. Black and cream create particularly strong definition, but every uneven scallop becomes more visible with high contrast.
Yarn Selection
Mercerized cotton gives the wing openings strong definition and produces crisp scallops. Softer cotton creates a less rigid motif and may require additional blocking.
Acrylic yarn can be used, but choose a smooth yarn with limited halo. Fuzzy fibers obscure the narrow cream openings and make the central vein structure less distinct.
Avoid chenille for this particular construction. The small chain spaces and surface details are easier to control with clearly visible stitches.
Finishing the Butterfly
Inspect the reverse side before trimming any tails. Weave each tail through several stitches of the same color and reverse direction once.
Check the four wing tips against one another. The upper pair should sit higher and wider than the lower pair.
Run a finger beneath the body to confirm that no loose cream joining strands remain visible.
Shape the antennae last. Their curves do not need to be perfectly identical, but both tips should remain clearly separated above the head.
If the butterfly will be sewn to another crochet project, leave the body tail untrimmed for attachment.
Conclusion
Make one upper wing first and block it before repeating the remaining pieces; its finished dimensions establish the scale for the entire motif. Keep the lower wings 10–15% smaller, then position all four pieces beneath the narrow pink body before sewing. The cream chain openings should remain visible after assembly, so correct any tight section before fastening the center permanently. Save this crochet butterfly pattern to Pinterest or share the finished motif on Instagram with #PinkLaceCrochetButterfly. For this specific butterfly, would you keep the cream wing centers or reverse the colors and place dusty pink inside a cream scalloped border?