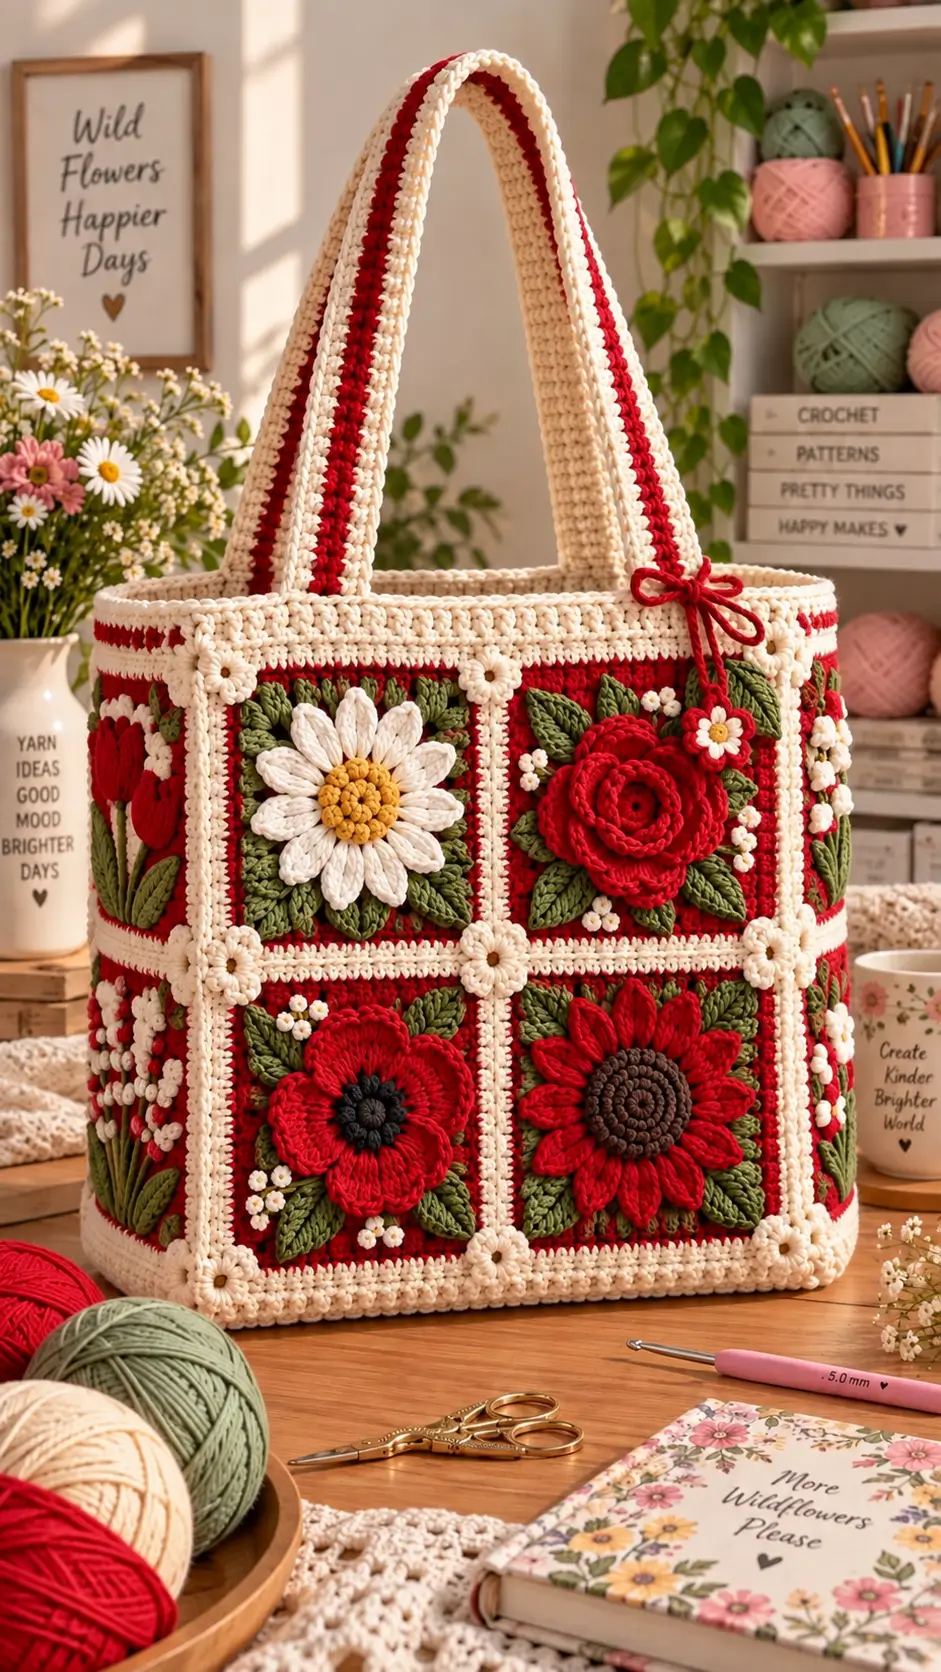
A daisy, rose, poppy and sunflower sharing one tote create four different relief heights that have to behave as one panel. This floral granny square crochet tote bag uses worsted-weight cotton, a 4.5 mm hook and joined botanical motifs to build a structured medium tote. Plan on intermediate crochet skills and roughly a 28–40 cm body, depending on square gauge. The modular construction also makes individual damaged motifs replaceable.
The Design: What Makes This Floral Tote Different
The defining decision is variation: the front does not rely on one flower repeated across every square. Raised roses, long daisy petals and denser sunflower centers create different profiles, so each motif needs a stable square background before joining. A cream frame separates the red and green sections visually while also placing stronger seams between decorative panels.
Leaves sit inside the square boundary rather than projecting far beyond it. That matters because exposed leaf tips can curl or snag when the bag is carried.
The handles are another structural element. Long straps should connect across a substantial section of the upper edge instead of hanging from a narrow decorative seam. In a flower granny square bag, one common mistake is treating dimensional appliqués as structural stitches. They are decoration; the underlying square and joining seams carry the load. The same principle applies to any 3D flower crochet bag.
Project Info at a Glance
| Skill Level | Time | Finished Size | Hook | Best For |
|---|---|---|---|---|
| Intermediate | Approx. 12–18 hours | Approx. 28–40 cm body | 4.5 mm | Shoulder tote, project bag, light everyday carrying |
The exact finished dimensions depend on square gauge, number of motifs and border width. Make one complete test square before calculating the final panel dimensions.
Materials and Tools
Yarn
A cotton or cotton-blend worsted yarn gives dimensional flowers and leaves enough definition while providing a practical fabric for the main bag.
- Cream/ivory: worsted weight, approximately 250–300 g for borders, joining and straps.
- Deep red: worsted weight, approximately 150–200 g for backgrounds, flowers and trim.
- Olive/sage green: worsted weight, approximately 100–150 g for leaves and botanical details.
- White: worsted weight, approximately 40–60 g for daisy petals and filler flowers.
- Mustard yellow: worsted weight, approximately 15–25 g for flower centers.
- Dark brown/black: worsted weight, approximately 20–30 g for poppy and sunflower centers.
The quantities above are planning estimates for this heavily embellished version. Actual consumption changes with gauge, yarn density, square count and the number of raised flowers.
Tools
- 4.5 mm crochet hook
- Tapestry needle
- Locking stitch markers
- Sharp scissors
- Blocking pins and mats
- Tape measure
- Optional fabric lining
- Sewing needle and matching thread
Abbreviations
- MR – magic ring
- sc – single crochet
- hdc – half double crochet
- dc – double crochet
- tr – treble crochet
- inc – increase
- dec – decrease
- sl st – slip stitch
- ch – chain
- BLO – back loop only
- st/sts – stitch/stitches
- sp – space
- RS – right side
- WS – wrong side
Invisible decreases are mainly useful for three-dimensional amigurumi pieces and are not required through the main flat sections of this tote.
Floral Granny Square Crochet Tote Bag Pattern
The bag combines several flower styles instead of repeating one motif. Make enough finished squares to create front and back panels plus the required side and bottom depth.
Complete one test square first. Block and measure it before making the remaining motifs so every section finishes at approximately the same dimensions.
Basic Red Background Square
Yarn: deep red and cream.
R1: MR, ch 3, 2 dc, ch 2; *3 dc, ch 2* ×3; sl st to starting ch.
R2: Sl st to corner. Ch 3, 2 dc, ch 2, 3 dc in same corner; *ch 1, (3 dc, ch 2, 3 dc) in next corner* ×3; ch 1 and join.
R3: Work 3 dc in each side ch-1 space and (3 dc, ch 2, 3 dc) in each corner. Join.
R4: Repeat the established square geometry, placing one 3-dc cluster in every side space and two clusters separated by ch 2 at every corner.
R5: Change to cream. Sc evenly around, working (sc, ch 1, sc) at each corner.
Fasten off. Leave a 20 cm tail when the motifs will be sewn together.
Block every square to the same measurements before joining.
Large Daisy Appliqué
Yarn: mustard yellow and white.
R1: With mustard, work 8 sc in MR. Join. (8)
R2: Inc in each st. (16)
R3: BLO sc around. (16)
Change to white.
Petal: Ch 7, sc in second ch from hook, hdc, dc in next 3 ch, hdc, sl st to the flower base.
Repeat around the center, spacing the petals evenly.
Fasten off with a 25 cm sewing tail. Pin the center to the red square before stitching. Leave most of each white petal unattached so the flower retains its raised profile.
Layered Red Rose
Yarn: deep red.
The rose is constructed from a crocheted spiral strip. This creates substantially more height than a flat circular flower.
Row 1: Ch 49.
Row 2: Dc in fourth ch from hook, then work 2 dc in each ch across.
Row 3: Ch 1. Work alternating groups of (hdc, 3 dc, hdc) across the strip to create scalloped petal edges.
Fasten off with a 35 cm tail.
Roll the strip from the starting end. Stitch through the underside of each layer as the rose is formed. Keep the finished base smaller than the background square so the flower does not interfere with the cream joining border.
Poppy-Style Flower
Yarn: dark center and deep red petals.
R1: With dark yarn, 6 sc in MR. (6)
R2: Inc ×6. (12)
R3: (sc, inc) ×6. (18)
Change to deep red.
Divide the 18-stitch circumference into six petal sections.
Petal Foundation: Use approximately 3 sts as the base of each petal.
Petal Row 1: Ch 2 and work 5 dc across the assigned base section.
Petal Row 2: Ch 2 and increase across the petal to create a broader outside edge.
Petal Row 3: Alternate hdc and dc groups across the outer edge.
Fasten off. Sew the center and inner sections of the petals to the square while leaving the outer petal edges raised.
Sunflower-Style Appliqué
Yarn: dark brown and deep red.
R1: 6 sc in MR. (6)
R2: Inc ×6. (12)
R3: (sc, inc) ×6. (18)
R4: (2 sc, inc) ×6. (24)
For additional center texture, work the final center round in BLO or add small surface slip stitches after completing the disk.
Change to deep red.
Each Petal: Ch 6, sc in second ch, hdc, dc, tr, dc; sl st into the next available center stitch.
Work approximately 12 elongated petals around the center.
Fasten off with a 25 cm tail.
Olive Green Leaves
Yarn: olive or sage green.
Make approximately 2–4 leaves for each major flower.
Foundation: Ch 9.
Side 1: Sc in second ch, hdc, dc in next 4 sts, hdc, then 3 sc in final ch.
Rotate the foundation chain.
Side 2: Hdc, dc in next 4 sts, hdc, sc. Join at the base.
For a more pointed leaf, work a ch-2 picot at the tip before crocheting the second side.
Fasten off with a 15 cm sewing tail.
Place the leaves behind the major flowers before permanently attaching the flower centers. This conceals the leaf bases and reduces the number of visible joining stitches.
Tiny White Filler Flowers
Yarn: white with optional mustard centers.
R1: Work 5 sc in MR. (5)
For each petal, work:
Sl st, ch 3, 2 dc in the same st, ch 3, sl st in the same st.
Repeat once in each of the five base stitches.
Fasten off with a 15 cm tail.
Position these miniature flowers in open areas between the leaves and large flowers. Keep them clear of the cream structural borders.
Cream Corner Rosettes
Yarn: cream.
R1: 8 sc in MR. (8)
For each decorative section work:
Sl st, ch 3, 3 dc in the same st, ch 3, sl st.
Repeat around.
Keep the center opening compact. The finished rosettes can be sewn over selected intersections between granny squares after the primary panels have been assembled.
Cream Structural Borders
Yarn: cream.
Join cream yarn to the edge of the completed panel.
R1: Sc evenly around the panel, placing 3 sc in each outside corner.
R2: Ch 1 and sc around, again placing 3 sc in every corner.
R3: For an optional decorative round, alternate sc and ch-1 spaces or work a compact shell-style edging.
Count the stitches along opposite edges. Matching stitch totals prevent the panel from leaning during final assembly.
Upper Red Accent Band
Yarn: deep red.
Attach the red yarn beneath the cream upper edge.
Row 1: Ch 1 and sc evenly around.
Row 2: Ch 2 and hdc in each st around.
Row 3: Ch 1 and sc around.
Join at the side seam and fasten off.
Shoulder Straps – Make 2
Yarn: cream and deep red.
The photographed bag uses wide flat shoulder straps rather than thin chain handles. Measure the desired drop before making the second strap.
Row 1: With cream, ch approximately 60 or continue until the foundation reaches the required handle length.
Row 2: Sc in second ch and every ch across.
Rows 3–4: Ch 1 and sc across.
Change to deep red.
Rows 5–6: Sc across.
Change back to cream.
Rows 7–9: Sc across.
Fasten off, leaving approximately 30 cm tails at both ends for attachment.
Measure the first completed strap before making the second. The two finished handles should match in both length and width.
Red Decorative Tie and Flower Ends
Yarn: deep red with small amounts of white and mustard.
Tie: Ch approximately 80–100, or continue until the cord measures roughly 45–55 cm.
Sl st back through every chain to create a firmer cord.
Make two miniature five-petal flowers using the filler-flower construction. Attach them near the ends of the cord or position them near the bow.
Fasten off and weave the tails into the WS.
Assembly
- Block every background square to identical dimensions before attaching the heaviest dimensional flowers.
- Arrange the squares on a flat surface and distribute the daisy, rose, poppy and sunflower motifs across the front panel.
- Sew or slip-stitch the squares together, keeping all cream borders aligned at their intersections.
- Join the front and back panels with the required side and bottom squares or rectangular crochet sections.
- Stitch the major flowers to their assigned squares, securing the centers and selected inner petal sections.
- Position the green leaves beneath and around each main flower while keeping their pointed ends inside the structural borders.
- Add the miniature white flowers and cream corner rosettes after the primary botanical elements have been attached.
- Crochet the cream upper border and deep-red accent band around the completed opening.
- Pin both straps in position and compare their placement before sewing. Stitch each handle through several rows of the structural upper border.
- Attach the red decorative tie, weave the remaining tails through several WS stitches, check all joins and trim the excess yarn.
The finished tote should have a level opening, matching shoulder straps and flat structural panels beneath the raised flowers.
7 Technical Tips for a Better Floral Granny Square Tote
- Control square mismatch. Keep blocked motif dimensions within approximately 2–3 mm of each other. A difference of 5 mm repeated across several motifs can pull an entire panel out of alignment.
- Reinforce strap attachments. Sew each handle through at least 3–4 rows of the upper structural border. Attaching a strap to one decorative row concentrates the load in too little fabric.
- Avoid bulky flower centers. Do not stack several yarn knots directly beneath the rose or sunflower. Excess bulk behind one motif can force the background square to bow outward.
- Check for twisted handles. Pin both ends of a strap before sewing either one permanently. Lay the tote flat and confirm that no half-turn appears between the two attachment points.
- Control curling leaves. Block each leaf and sew down roughly the lower one-third to one-half of its length. Attaching only the base leaves too much fabric free to flip outward.
- Mark panel intersections. Put a locking stitch marker at every square corner before joining a long row. Correct any stitch discrepancy at the affected motif rather than carrying the offset into the next square.
- Secure yarn tails. Weave each tail in at least three directions across the WS before trimming. Raised botanical motifs receive more direct handling than flat granny-square stitches.
Finishing the Crochet Tote Bag
Inspect the bag before trimming the final yarn tails. Measure both handles from the upper edge to their highest point and correct any difference while the attachment stitches are still accessible.
A fabric lining can be added after the crochet work is complete. Cut the lining according to the finished internal measurements rather than the dimensions originally planned for the bag. This accounts for changes caused by blocking and joining.
If the tote will carry heavier objects, reinforce the handle attachment areas from inside the bag. A lining can also reduce stretching by preventing small objects from pushing directly through the granny-square openings.
Place the finished tote flat and check all four structural areas: bottom seam, side seams, upper border and strap attachments. Decorative flowers should not be responsible for holding any of these sections together.
Conclusion
Finish the bag by measuring both handles from the upper edge to their highest point and correcting any difference before the final tails are trimmed. Test the seams with a light load before deciding whether to add a fabric lining. For the next version, record the blocked square width, yarn consumed per motif and completed bag weight; those figures make resizing a floral granny square crochet tote bag much more predictable. Save the finished layout to Pinterest and share the front-panel arrangement on Instagram with #FloralGrannySquareTote. Which flower would you repeat on the reverse panel: the layered red rose, white daisy, poppy or sunflower?









