Introduction
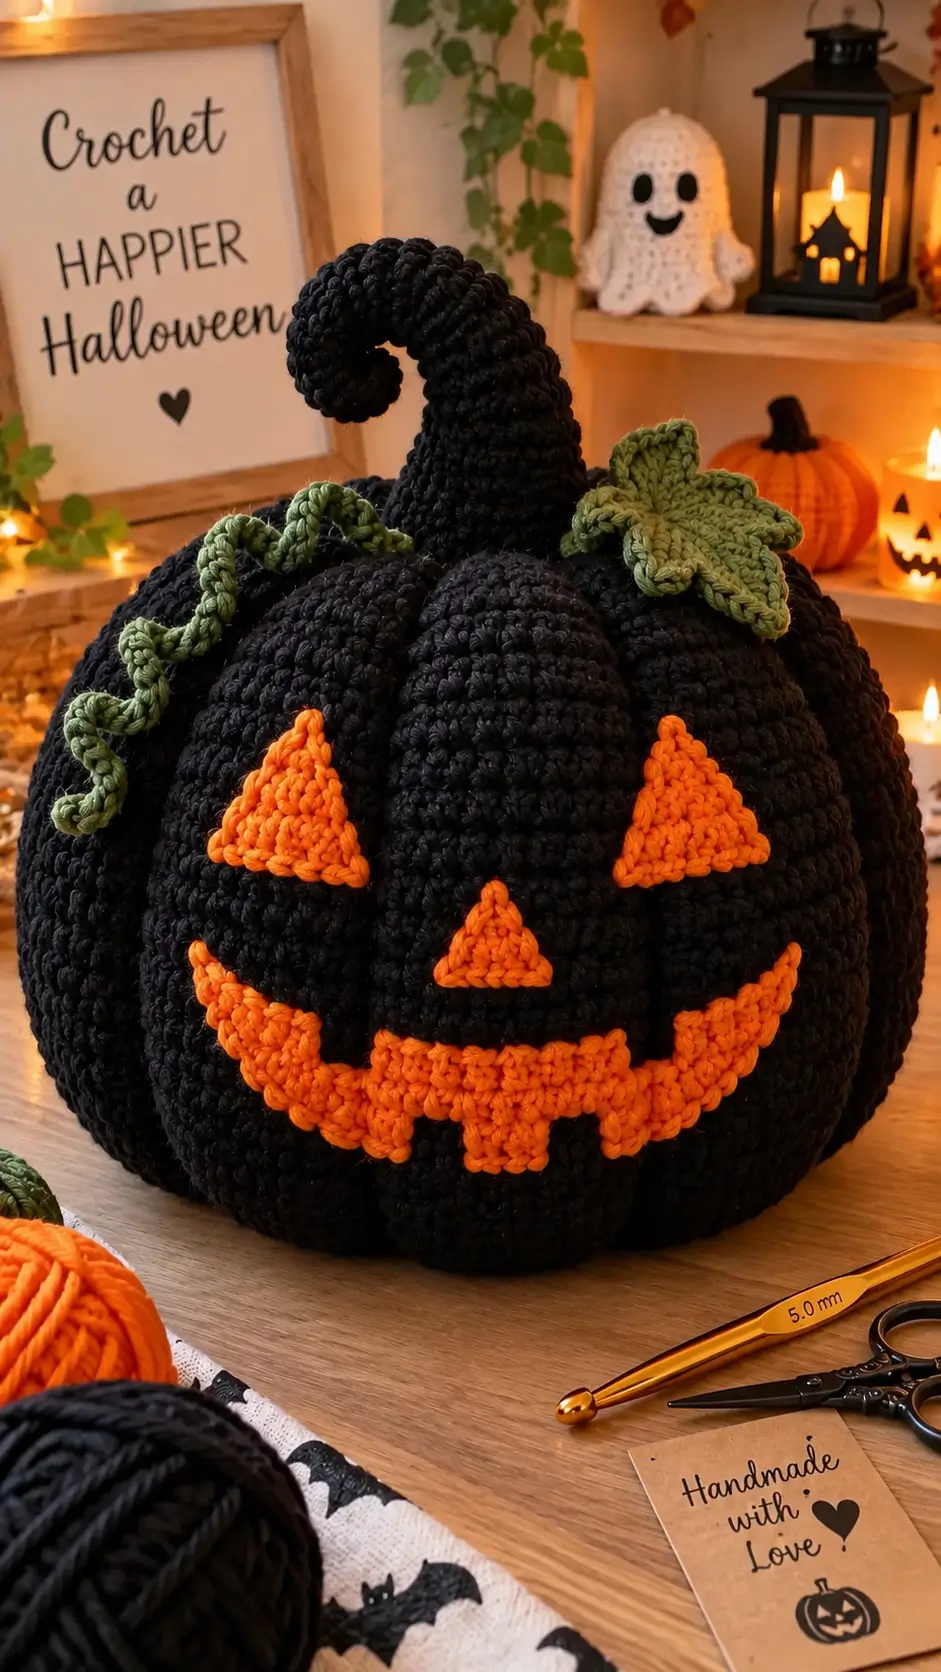
A jack-o’-lantern carved from orange light against a black pumpkin reverses the usual Halloween color structure. This black pumpkin amigurumi crochet pattern recreates that contrast with worsted yarn, a 5.0 mm hook, sculpted ribs and separate facial appliqués. Expect an intermediate project measuring roughly 25–30 cm when enlarged to match the photographed proportions. The stuffed construction produces reusable tabletop décor without requiring plastic safety eyes.
The Design: What Makes This Black Pumpkin Different
The body is built as one stuffed form rather than six individually crocheted wedges. External sculpting strands then compress the surface into deep channels, producing broad pumpkin lobes. This construction keeps the crochet jack-o’-lantern pattern structurally stable while reducing the number of seams.
The face takes a different approach. Orange triangles and mouth pieces sit on top of the black fabric instead of being embroidered through it, creating a clearly defined jack-o’-lantern silhouette. Above them, a long curved stem shifts the visual center upward while the green leaf and spiral vine spread across the crown.
A frequent mistake with a Halloween pumpkin crochet pattern is tightening the sculpting strands unevenly. One over-tightened pass creates a narrow lobe while adjacent sections expand, making the finished pumpkin asymmetric.
Project Info at a Glance
| Skill Level | Time | Finished Size | Hook | Best For |
|---|---|---|---|---|
| Intermediate | 6–9 hours | Approx. 25–30 cm including stem | 5.0 mm | Halloween tabletop décor |
The finished measurement is an image-based reconstruction estimate. Actual size depends on yarn, hook, gauge and stuffing density.
Materials and Tools
Yarn
- Black — worsted/medium #4 — approximately 150 g — tightly plied acrylic or cotton/acrylic yarn.
- Bright orange — worsted/medium #4 — approximately 20 g — for the eyes, nose and mouth.
- Olive green — worsted/medium #4 — approximately 20 g — for the leaf and spiral vine.
Tools
- 5.0 mm crochet hook
- 150–200 g polyester fiberfill
- 12–15 cm long tapestry or doll needle
- Standard yarn needle
- Locking stitch marker
- Straight pins
- Scissors
- Measuring tape
No safety eyes are required. The jack-o’-lantern face is made with orange crocheted appliqués.
Abbreviations
- MR — magic ring
- sc — single crochet
- inc — 2 sc in one stitch
- dec — single crochet decrease
- sl st — slip stitch
- ch — chain
- BLO — back loop only
- hdc — half double crochet
- dc — double crochet
- tr — treble crochet
For an invisible decrease, insert the hook through the front loops of the next two stitches, yarn over, draw through both front loops, then complete the single crochet.
Black Pumpkin Amigurumi Pattern — Step by Step
Work the pumpkin in a continuous spiral unless otherwise stated. Place a stitch marker in the first stitch of every round and move it after each completed round.
Pumpkin Body
Yarn: black. Work in a continuous spiral.
R1: 6 sc in MR (6)
R2: inc ×6 (12)
R3: (sc, inc) ×6 (18)
R4: (2 sc, inc) ×6 (24)
R5: (3 sc, inc) ×6 (30)
R6: (4 sc, inc) ×6 (36)
R7: (5 sc, inc) ×6 (42)
R8: 42 sc (42)
R9: 42 sc (42)
R10: 42 sc (42)
R11: 42 sc (42)
R12: 42 sc (42)
R13: 42 sc (42)
R14: 42 sc (42)
R15: 42 sc (42)
R16: 42 sc (42)
R17: 42 sc (42)
R18: 42 sc (42)
R19: 42 sc (42)
R20: 42 sc (42)
R21: 42 sc (42)
R22: 42 sc (42)
Begin firm stuffing. Keep the center dense while leaving enough flexibility for the sculpting strands to compress the outer surface.
R23: (5 sc, dec) ×6 (36)
R24: (4 sc, dec) ×6 (30)
R25: (3 sc, dec) ×6 (24)
R26: (2 sc, dec) ×6 (18)
Add the remaining stuffing before the opening becomes too small.
R27: (sc, dec) ×6 (12)
R28: dec ×6 (6)
R29: 6 sc (6)
Fasten off. Leave approximately 30 cm of yarn and close the remaining opening.
Pumpkin Rib Sculpting
Yarn: black.
Cut six lengths of black yarn approximately 90 cm long. Thread the first length through the bottom center of the pumpkin and bring the needle out through the top center.
Run the yarn down the outside of the pumpkin. Insert the needle through the bottom center again and pull gradually until a defined groove forms.
Secure the strand without crushing the stuffing. Repeat the process around the body at evenly spaced intervals until six rounded pumpkin sections are visible.
Compare the width of the lobes after every pass. Correct uneven tension before securing the final knots.
Curved Black Stem
Yarn: black.
R1: 6 sc in MR (6)
R2: inc ×6 (12)
R3: 12 sc (12)
R4: 12 sc (12)
R5: 12 sc (12)
R6: 12 sc (12)
R7: 12 sc (12)
R8: 12 sc (12)
R9: 12 sc (12)
R10: 12 sc (12)
R11: 12 sc (12)
R12: 12 sc (12)
R13: 12 sc (12)
R14: 12 sc (12)
R15: 12 sc (12)
R16: 12 sc (12)
R17: 12 sc (12)
R18: 12 sc (12)
Stuff the lower two-thirds firmly. Add much less stuffing to the upper third so the stem can bend into its hooked shape.
Fasten off and leave approximately 25 cm for sewing. Curve the stem forward. Hidden stitches between sections of the stem can hold a more pronounced hook.
Green Pumpkin Leaf
Yarn: olive green.
Ch 6.
Working around the foundation chain, make: sc in second ch from hook, hdc, dc, tr, 5 dc in final ch. Continue down the opposite side with tr, dc, hdc, sc. Sl st to the first sc.
Point 1: ch 5, sl st in second ch, sc, hdc, dc; sl st to leaf edge.
Point 2: ch 6, sl st in second ch, sc, hdc, dc, tr; sl st to leaf edge.
Point 3: ch 7, sl st in second ch, sc, hdc, dc, tr, tr; sl st to leaf edge.
Point 4: repeat Point 2.
Point 5: repeat Point 1.
Fasten off. Leave approximately 20 cm for attaching the leaf to the top of the pumpkin.
Spiral Pumpkin Vine
Yarn: olive green.
Ch 31.
Starting in the second chain from the hook, work 3 sc into every chain across (90).
The concentrated increases cause the strip to curl automatically. Allow the vine to follow its natural spiral rather than pulling it straight.
Fasten off. Leave approximately 20 cm for sewing.
Left Jack-O’-Lantern Eye
Yarn: bright orange.
Ch 2.
Row 1: 2 sc in second ch from hook (2)
Row 2: ch 1, turn, inc in each stitch (4)
Row 3: ch 1, turn, sc, inc, inc, sc (6)
Row 4: ch 1, turn, 6 sc (6)
Row 5: ch 1, turn, sc, inc, 2 sc, inc, sc (8)
Fasten off and leave approximately 25 cm for sewing.
Right Jack-O’-Lantern Eye
Repeat the left eye instructions.
Position both orange triangles with their broad edges at the bottom and their points facing upward. Complete the pumpkin rib sculpting before permanently sewing the eyes because the grooves affect their apparent alignment.
Triangular Nose
Yarn: bright orange.
Ch 2.
Row 1: 2 sc in second ch (2)
Row 2: ch 1, turn, inc ×2 (4)
Row 3: ch 1, turn, sc, inc, inc, sc (6)
Row 4: ch 1, turn, 6 sc (6)
Fasten off and leave approximately 20 cm for sewing.
Jack-O’-Lantern Mouth
Yarn: bright orange.
Ch 25.
Row 1: starting in second ch, 24 sc (24)
Row 2: ch 1, turn, 24 sc (24)
Row 3: ch 1, turn, 24 sc (24)
Fasten off and leave approximately 35 cm for sewing.
Mouth Teeth
Make five orange triangular teeth.
Ch 2.
Row 1: 2 sc in second ch (2)
Row 2: ch 1, turn, inc ×2 (4)
Row 3: ch 1, turn, sc, inc, inc, sc (6)
Fasten off each tooth with a sewing tail.
Curve the main mouth strip upward at both ends. Position three teeth along the lower edge and two along the upper edge to create the irregular carved jack-o’-lantern shape.
Assembly
- Place the closed pumpkin body with its flattest area at the bottom. Redistribute the stuffing until the body holds an even rounded profile.
- Complete the six black sculpting passes from the bottom center to the top center. Compare each lobe before securing the strands.
- Pin the two orange triangular eyes across the upper front. Leave a visible black section between them, then sew around each perimeter.
- Center the triangular orange nose below the eyes and stitch it flat against the body.
- Curve the orange mouth across the lower front. Pin the center, ends and intermediate points before sewing.
- Attach the five orange teeth individually, alternating their direction to form the jagged jack-o’-lantern expression.
- Sew the curved black stem over the top closure. Pass through several body stitches around its base for structural support.
- Position the green leaf beside the stem. Stitch the center and inner edges while leaving the pointed sections free.
- Attach the spiral vine close to the leaf. Secure only the first few centimeters so most of the coil remains loose.
- Weave all yarn tails through several internal stitch paths. Trim the excess and inspect the pumpkin from the front, sides and top for uneven sculpting.
The finished pumpkin has a single stuffed body, six sculpted lobes, curved black stem, green leaf, spiral vine and raised orange jack-o’-lantern face.
7 Technical Tips for a Cleaner Black Crochet Pumpkin
- Control marker drift. Missing the first stitch shifts the decrease line and can distort an entire lobe. Move the locking marker after every round and recount the 42-stitch plateau before shaping.
- Check stuffing firmness before closing. A body that collapses heavily under light pressure will lose definition when the sculpting strands are tightened. Add the final fiberfill before completing R27.
- Use invisible decreases. Conventional decreases can leave openings large enough for pale stuffing to show against black yarn. Work through the front loops during R23–R28.
- Sculpt before positioning the face. External rib strands change the usable width of the front surface. Attach the orange eyes only after the six grooves have been completed.
- Test the 5.0 mm hook against your yarn. Thin worsted yarn may create gaps at this hook size. Crochet the first six rounds and place white fiberfill behind the fabric to check coverage.
- Pin the mouth at five points. A long appliqué changes apparent length as it crosses rounded pumpkin lobes. Secure the center, both ends and two intermediate positions before sewing.
- Leave long sewing tails. Short tails can work outward when the pumpkin is compressed during storage. Keep at least 15 cm after attaching major components and weave through three different stitch directions before trimming.
Finishing the Black Pumpkin Amigurumi
Measure the spacing between the sculpted lobes before cutting the final yarn tails. If one section is noticeably narrower, release and retighten its sculpting strand rather than compensating with extra stuffing.
Check the face from approximately one meter away. The two orange eyes should appear balanced across the central black rib, while the nose remains centered below them. Adjust the mouth before its final stitches if one raised end sits noticeably higher.
The leaf should lie partly against the crown while its points remain free. Keep most of the spiral vine unattached so its coil remains visible beside the stem.
Black Jack-O’-Lantern Crochet Pattern: Final Check
Finish the pumpkin by measuring the lobe spacing and correcting any sculpting strand that pulls one section noticeably narrower than the others. Photograph the front before weaving the final facial tails; misplaced eyes or an uneven mouth are easier to correct while those tails remain accessible.
For the next version, change only one variable—yarn thickness, hook size or plateau length—so its effect on the finished proportions remains measurable. Save this black pumpkin amigurumi crochet pattern to Pinterest and share your finished pumpkin on Instagram with #BlackJackOLanternPumpkin.
Which feature would you change on your next black pumpkin: the hooked stem, the triangular orange eyes or the depth of the sculpted ribs?









