Introduction
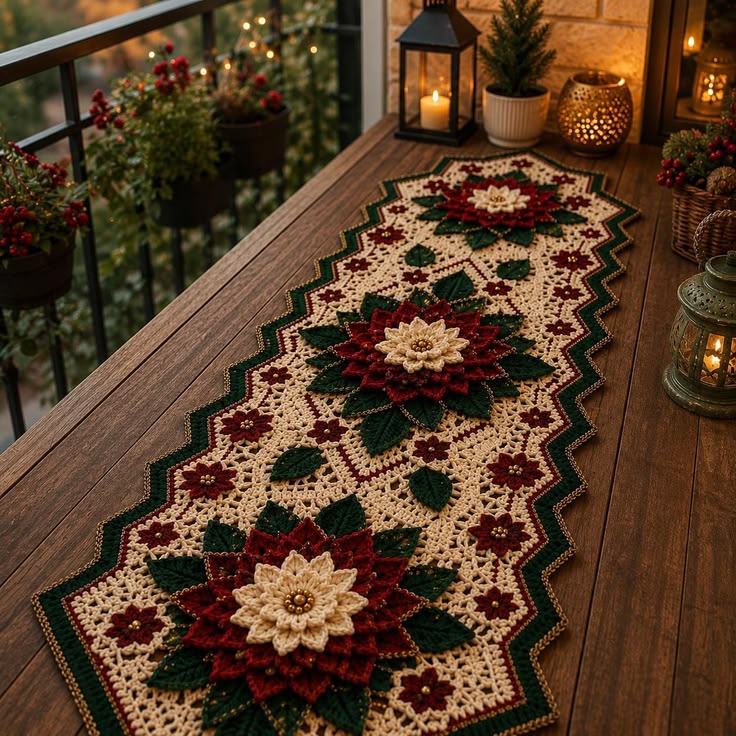
Three oversized poinsettias divide this runner into distinct holiday panels, with cream lace, burgundy star flowers, and dark green leaves filling the spaces between them. This Christmas poinsettia crochet table runner pattern uses worsted cotton, a 4 mm hook, dimensional appliqués, and a stepped green border. The intermediate reconstruction targets approximately 40 × 145 cm and keeps the central lace comparatively flat for table use.
The instructions below are an original photo-inspired reconstruction based on visible structure; published patterns cited later are used only for sizing, gauge, and material benchmarks.
The Design: What Makes This Poinsettia Runner Different
The photographed runner combines three structures rather than treating the poinsettia as a printed-looking motif. A cream openwork foundation carries the length, a burgundy-and-green stepped frame defines the perimeter, and three large layered flowers sit on reinforced sections of lace. Each poinsettia uses dark green leaves beneath burgundy bracts, then a smaller ivory flower at its center. Small burgundy stars repeat along the sides to connect the focal arrangements visually. This crochet Christmas table runner reconstruction keeps the large appliqués on the longitudinal axis so their weight is distributed symmetrically. A frequent mistake with a 3D poinsettia crochet pattern is making every bract equally large. Graduated layers are necessary; otherwise the flower becomes a flat red wheel rather than a compact dimensional poinsettia.
Project Info at a Glance
| Skill Level | Time | Finished Size | Hook | Best For |
|---|---|---|---|---|
| Intermediate | Reconstruction estimate: 24–32 hours | Reconstruction target: 38–42 × 140–150 cm | 4 mm main fabric; 3.5 mm appliqués | Christmas dining tables, sideboards, holiday displays |
Published poinsettia runners span very different constructions. Mary Maxim’s Poinsettia Table Runner specifies Aran-weight Red Heart Soft, a 5 mm hook, and approximately 1,100–1,300 yards. Regina Rioux’s three-motif runner also uses Aran yarn and a 5 mm hook, with a Tunisian gauge of 16 stitches × 14 rows per 4 inches. At the finer end, Raine Eimre’s filet runner uses size-10 cotton, a 1.75 mm hook, 320 yards, and measures approximately 22 × 10.5 inches. The supplied image is closer to a medium-yarn dimensional construction than fine filet crochet.
Materials and Tools
Yarn
- Warm cream — worsted #4 cotton or cotton blend — reconstruction estimate: 400–475 g
- Deep burgundy — worsted #4 — reconstruction estimate: 250–300 g
- Forest green — worsted #4 — reconstruction estimate: 225–275 g
- Antique gold — worsted #4 — reconstruction estimate: 25–40 g
Mary Maxim’s published Aran runner calls for approximately 513 yards of white plus 256 yards each of red/wine and green, providing a useful color-distribution benchmark. The quantities above are larger reconstruction allowances because the photographed runner appears long and includes three substantial three-dimensional flower groups.
Tools
- 4 mm crochet hook for the runner foundation
- 3.5 mm crochet hook for flowers and leaves
- Tapestry needle
- Locking stitch markers
- Blocking mats
- Rust-resistant pins
- Scissors
- Measuring tape
- Optional 6–8 mm gold beads for flower centers
Abbreviations
- MR — magic ring
- ch — chain
- sl st — slip stitch
- sc — single crochet
- hdc — half double crochet
- dc — double crochet
- tr — treble crochet
- sp — space
- st/sts — stitch/stitches
- RS — right side
- WS — wrong side
An invisible decrease is made through the front loops of two adjacent stitches before completing one single crochet; the flat runner itself does not require decreases.
Gauge and Reconstruction Scale
Make a washed and blocked cream swatch before starting.
Target approximately 17 sc × 19 rows = 10 cm with the 4 mm hook. Exact gauge matters less for an isolated poinsettia, but it matters considerably for a 140 cm runner.
PlanetJune documents a useful flower benchmark: worsted yarn with a 3.5 mm hook produces poinsettias around 5 inches for the smaller version and 6.5 inches for the large version. The focal flowers in this reconstruction target approximately 21–24 cm across because the photographed arrangements include both red bracts and projecting green foliage.
Pattern — Step by Step
Cream Foundation Panel
Yarn: warm cream. Hook: 4 mm.
Foundation: Ch 62.
Row 1: Dc in fourth ch from hook and in each chain across. The skipped three chains count as the first dc. (60 dc)
Row 2: Ch 3, turn. Dc in each dc across. (60)
Row 3: Ch 4, turn; ch-4 counts as dc + ch 1. Skip next st, dc in next; *ch 1, skip 1, dc in next* across. Finish with dc in final st.
Row 4: Ch 3, turn. Dc in first ch-1 sp; *ch 2, skip next dc, dc in next ch-1 sp* across, ending with dc in turning chain.
Row 5: Ch 3, turn. Work 2 dc in every ch-2 sp and 1 dc in every dc across, maintaining 60 working positions across the row.
Rows 6–10: Dc across. (60)
Rows 11–13: Repeat Rows 3–5.
Rows 14–18: Dc across.
Continue alternating five dense rows and three openwork rows until the panel measures approximately 128 cm, ending after a dense section.
The foundation should measure approximately 35 cm wide × 128 cm long before the decorative perimeter is added.
Creating the Stepped Long Edges
The reference has a strongly geometric perimeter rather than a simple rectangle. Add the step shaping after the central panel is complete.
Mark every 12 rows down each long edge.
Join cream at the first marker.
Step 1: Work 16 sc across the 12-row segment.
Step 2: Ch 4, turn, skip 2 sc, dc across the remaining 14 sc.
Step 3: Ch 3, turn, dc across 14 sts, ch 3, sl st into the panel edge at the next marker.
Repeat this two-row extension between successive marker pairs down both long edges.
Alternate the direction of the extension so the edge forms a controlled zigzag rather than leaning progressively in one direction.
Burgundy Frame Round
Join burgundy at one short-end corner.
Work 1 sc in each established stitch across the short end.
Along each long side, work 16 sc across each 12-row edge segment.
At an outward step point work (sc, ch 2, sc) in the corner.
At an inward step, skip the corner junction and continue into the next edge segment.
Repeat around and join.
The burgundy line should read as a narrow geometric outline rather than a wide color band.
Forest-Green Outer Border
Join forest green in any burgundy stitch.
R1: Sc in every stitch. At each outward ch-2 corner work (sc, ch 2, sc).
R2: Ch 3 and dc in every stitch. Work (2 dc, ch 2, 2 dc) into each outward corner space.
R3: Ch 1 and sc in every dc. Work (sc, ch 2, sc) in each corner space.
Fasten off.
The reconstruction target is a green border approximately 2.5–3 cm deep.
Antique-Gold Finishing Line
Join antique gold at any corner.
Sl st loosely into every green stitch around the perimeter.
At each ch-2 corner, work sl st, ch 1, sl st.
Fasten off.
This narrow line reproduces the fine warm-colored edge visible against the dark green border without adding another heavy round.
Large Burgundy Poinsettia — Make 3
Yarn: burgundy. Hook: 3.5 mm. Make the flower as separately crocheted bracts sewn to a foundation disc.
Foundation Disc — Make 3
R1: 6 sc in MR. (6)
R2: Inc ×6. (12)
R3: (Sc, inc) ×6. (18)
R4: (2 sc, inc) ×6. (24)
R5: (3 sc, inc) ×6. (30)
R6: (4 sc, inc) ×6. (36)
Fasten off with a 50 cm sewing tail.
Large Burgundy Bract — Make 18
Each focal flower uses six large burgundy bracts.
Ch 18.
Starting in second chain, work into the next 16 chains, leaving the final chain for the point:
Sl st in 1, sc in 2, hdc in 3, dc in 4, tr in 4, dc in 1, hdc in 1. (16)
Work 5 sc in the final chain.
Along the opposite side mirror the 16-stitch sequence.
Fasten off with a 30 cm tail.
Each bract contains 37 stitches: 16 + 5 + 16.
Medium Burgundy Bract — Make 18
Ch 14.
Beginning in second chain, work into the next 12 chains while retaining the final chain for the point:
Sl st in 1, sc in 2, hdc in 2, dc in 3, tr in 2, dc in 1, hdc in 1. (12)
Work 5 sc in the final chain.
Mirror the 12-stitch sequence down the opposite side.
Fasten off.
Small Burgundy Bract — Make 18
Ch 11.
Beginning in second chain, work into the next nine chains while leaving the final chain for the tip:
Sl st in 1, sc in 2, hdc in 2, dc in 2, hdc in 1, sc in 1. (9)
Work 3 sc in the final chain.
Mirror the nine-stitch sequence on the opposite side.
Fasten off.
Assembling Each Burgundy Poinsettia
Pin six large bracts around the outer section of one 36-stitch disc. Their bases should be approximately six stitches apart.
Sew each base securely while leaving the pointed outer half free.
Add six medium bracts between the first layer, rotating them approximately 30 degrees from the large layer.
Position six small bracts over the remaining center area, again offset from the layer beneath.
The completed red portion uses 18 bracts per flower.
Large Forest-Green Leaf — Make 18
Each poinsettia receives six large leaves beneath its burgundy bracts.
Ch 22.
Starting in second chain, work into the next 20 chains and leave the final chain for the tip:
Sl st in 1, sc in 2, hdc in 3, dc in 4, tr in 7, dc in 2, hdc in 1. (20)
Work 5 sc in the final chain.
Mirror the sequence along the opposite side:
Hdc in 1, dc in 2, tr in 7, dc in 4, hdc in 3, sc in 2, sl st in 1. (20)
Fasten off with a 35 cm tail.
Each leaf contains exactly 45 stitches.
Medium Forest-Green Leaf — Make 12
Ch 14.
Beginning in second chain, work the next 12 chains:
Sl st in 1, sc in 2, hdc in 2, dc in 3, tr in 2, dc in 1, hdc in 1. (12)
Work 5 sc in the final chain.
Mirror the 12-stitch sequence on the opposite side.
Fasten off with a sewing tail.
Leaf Veins
Join matching forest green at each leaf base.
Surface slip stitch along the foundation-chain ridge.
Stop approximately 1 cm before the pointed tip.
Fasten off without pulling the ridge shorter.
Ivory Center Flower — Make 3
The reference places a dimensional ivory flower directly over each burgundy poinsettia.
R1: With antique gold, 6 sc in MR. (6)
R2: Inc ×6. (12)
Change to ivory.
Petal Layer 1: *Sl st in next st, (ch 3, 3 dc, ch 3, sl st) in next st* ×6.
Create six ch-4 loops behind the first layer.
Petal Layer 2: In each loop work sc, hdc, 3 dc, hdc, sc.
Create six ch-6 loops behind Layer 2.
Petal Layer 3: In each loop work sc, hdc, 2 dc, 3 tr, 2 dc, hdc, sc.
Fasten off with a 40 cm tail.
The ivory center should measure approximately 9–11 cm after light blocking.
Gold Center Cluster — Make 3
If beads are not being used, crochet the center.
With antique gold, work 12 sc in MR.
In the next round work (sl st, ch 2, sl st) in each stitch.
Fasten off and sew the textured gold disc over the center of the ivory flower.
For a beaded version, attach approximately 7–9 small gold beads securely through the crocheted center. Keep beaded runners away from young children.
Small Burgundy Star Flower — Make 18
R1: With burgundy, ch 4 and join to form a ring. Work 10 sc into ring. (10)
R2: *Sl st in next st, (ch 3, 3 dc, ch 3, sl st) in next st* ×5.
Fasten off with a 25 cm tail.
Sew a tiny gold French knot or crocheted knot into the center.
These approximately 5–6 cm flowers repeat along the side panels without competing with the three focal poinsettias.
Small Standalone Green Leaf — Make 12
Repeat the medium-leaf pattern using forest green.
Use these leaves in the open lace sections between the three major flowers.
Arrange them in pairs with their tips pointing diagonally toward the runner ends.
Positioning the Three Focal Poinsettias
Mark the runner’s longitudinal center line.
Place the first poinsettia approximately 21 cm from the lower short edge.
Position the second at the exact midpoint.
Place the third approximately 21 cm from the opposite short edge.
Check the distance between all three centers before sewing.
The reconstructed flower arrangement should span roughly 22–25 cm at its widest foliage points.
Building Each Focal Arrangement
Pin six large forest-green leaves beneath the burgundy poinsettia, evenly spaced around the flower.
Add four medium leaves where larger gaps remain.
Place the assembled burgundy flower over those leaves.
Center the ivory flower on top.
Finish with the antique-gold center.
Do not sew all layers together before testing them on the runner. The completed arrangement is thick enough that minor rotational adjustments substantially change its silhouette.
Attaching the Leaves
Sew each large leaf through its base and approximately the lower 4–5 cm of its center ridge.
Leave the pointed half unattached.
Medium leaves need approximately 3 cm of center attachment.
Where two leaves overlap, catch both in one concealed stitch near their bases.
Attaching the Burgundy Flower
Sew the 36-stitch foundation disc through the cream runner and underlying green leaves.
Use approximately eight evenly distributed attachment points.
Add two crosswise stitches through the center of the disc.
Do not sew through the pointed outer halves of the burgundy bracts.
Attaching the Ivory Flower
Place the ivory flower over the center of the burgundy layers.
Sew through its 12-stitch center at six points.
Leave every ivory petal free beyond its base.
Add the gold center last so it conceals the primary attachment stitches.
Side-Flower Placement
Arrange nine small burgundy flowers along each long side.
Alternate their positions relative to the stepped edge rather than aligning every flower into a rigid straight row.
Keep approximately 11–13 cm between flower centers.
Pin all 18 before sewing so corresponding sections of the runner retain similar visual density.
Intermediate Green Leaf Placement
Position four pairs of standalone leaves in the cream spaces between the major poinsettias.
Use the remaining leaves near the two short ends.
Angle paired leaves away from one another by approximately 45–60 degrees.
Leave sufficient cream lace visible around each pair; the open background is part of the design rather than empty space that must be filled.
Blocking Before Appliqué Assembly
Block the cream runner and its colored border before adding flowers.
Pin every outward step to its intended point.
Check the longitudinal center line with a measuring tape or blocking-grid line.
Allow the runner to dry completely before sewing on dimensional motifs.
Block leaves and loose bracts separately, but do not flatten the assembled poinsettias.
Assembly
- Crochet and block the cream foundation panel, then add the stepped side extensions before applying any colored border.
- Add the narrow burgundy frame, forest-green outer border, and antique-gold finishing line, keeping corresponding step points aligned on both long sides.
- Make 18 large, 18 medium, and 18 small burgundy bracts, then assemble six of each size onto every 36-stitch poinsettia foundation disc.
- Crochet 18 large and 12 medium forest-green leaves, add loose center veins, and block them to symmetrical pointed shapes.
- Make three ivory layered flowers, three gold centers, 18 small burgundy star flowers, and 12 additional green leaves.
- Mark the runner center line and pin the three major poinsettias at equal visual intervals before attaching any individual leaf permanently.
- Sew the green leaves first, securing only their lower halves, then attach each burgundy foundation disc at approximately eight concealed points.
- Sew the ivory flowers over the burgundy centers and finish each focal arrangement with its crocheted or beaded antique-gold center.
- Attach nine small burgundy flowers along each long side and distribute the standalone leaf pairs through the open cream sections.
- Weave every tail through at least 5 cm of matching fabric, lightly reblock only the exposed foundation and border, and reshape all free bracts after drying.
The completed reconstruction has three dimensional poinsettia arrangements, 18 repeated side flowers, dark green foliage, a cream lace foundation, and a stepped green-and-gold perimeter.
7 Technical Tips
- The large poinsettia looks circular rather than pointed: block every large burgundy bract to a defined center axis before assembly. A tip displaced by more than about 5 mm becomes obvious when six bracts are arranged radially.
- The flower center becomes too bulky: attach the 36-stitch red foundation firmly before adding the ivory flower. Sewing all layers through one central hole concentrates three layers of yarn into a small raised knot.
- The runner twists along its length: measure both long edges after every 30 cm of foundation. Keep their difference below approximately 5 mm before starting the stepped border.
- The green leaves curl inward: stop the surface-slip-stitch vein approximately 1 cm before each point and keep it loose. A tight vein shortens the leaf’s center and forces its edges upward.
- The poinsettia sags into the open lace: attach its foundation across at least six to eight points and catch underlying leaf bases in several of those stitches. Suspending a 22–25 cm flower from two lace spaces can permanently enlarge them.
- The side flowers appear irregularly spaced: mark their centers approximately 11–13 cm apart before sewing the first one. Correcting placement after nine flowers are attached requires removing multiple concealed tails.
- The stepped border develops ruffles: compare corresponding outward points on opposite sides during blocking. A step extending more than approximately 1 cm beyond its matching point usually indicates extra edge stitches rather than a blocking problem.
Why Separate Bracts Work for This Photograph
The large red flowers show pointed layers that remain individually readable almost to the center. Separate bracts reproduce that geometry more predictably than a conventional round of shell-shaped petals.
They also permit exact rotation. Six large points establish the outer star, six medium points occupy the gaps, and six smaller points form the upper layer.
The foundation disc carries the sewing load. Individual bracts therefore need only be attached at their bases, allowing their tips to remain dimensional.
Published Poinsettia Size Benchmark
June Gilbank’s PlanetJune poinsettia uses worsted-weight yarn and a 3.5 mm hook. The published flower sizes are approximately 5 inches for the medium version and 6–6.5 inches for the large version.
The pattern also uses six-element layers: the large version calls for six pieces in each of three styles plus a center. That published geometry provides a useful benchmark for a six-part radial poinsettia, while the bract instructions above are an original reconstruction designed specifically around the supplied photograph.
Published Aran Table Runner Benchmark
Mary Maxim’s Poinsettia Table Runner uses Aran-weight Red Heart Soft and a 5 mm hook. Ravelry lists total yardage of approximately 1,100–1,300 yards / 1,006–1,189 m.
The listed color requirements are approximately 513 yards white, 256 yards red or wine, and 256 yards green. Those proportions support the cream-dominant material planning used in this reconstruction.
Three-Poinsettia Runner Benchmark
Regina Rioux’s Poinsettia Table Runner is constructed from three poinsettia motifs and uses Malabrigo Worsted with a 5 mm hook. The published gauge is 16 stitches × 14 rows per 4 inches in Tunisian simple stitch, with approximately 250–300 yards listed for the project.
Its construction is different from the cream lace runner shown here, but the use of three major poinsettia motifs provides a relevant compositional comparison.
Fine-Thread Runner Benchmark
Raine Eimre’s Poinsettia Table Runner uses size-10 mercerized cotton and a 1.75 mm hook. The published runner measures approximately 22 inches long × 10.5 inches wide and requires about 320 yards.
That design uses filet crochet rather than large dimensional appliqués. It demonstrates how dramatically fiber and hook size change the character of a poinsettia runner even when the subject remains the same.
Changing the Runner Length
For a shorter runner, use only two focal poinsettias and stop the cream foundation around 95–105 cm before adding the border.
For a longer runner, add approximately 40–45 cm of foundation and make a fourth poinsettia arrangement.
Maintain equal visual spacing between major flowers. Do not lengthen the foundation substantially while leaving all three focal motifs crowded near the original positions.
Changing the Runner Width
Reduce the starting chain from 62 to 54 chains for a narrower foundation.
Keep the focal flowers at their original dimensions only if the finished border still extends at least 5 cm beyond their foliage on both sides.
For a wider runner, increase the foundation in pairs of stitches and add equivalent width to every dense and mesh row.
Making Smaller Poinsettias
Use DK yarn and approximately a 3 mm hook for the bracts.
PlanetJune specifically notes that finer yarn or crochet thread with a correspondingly smaller hook produces a more compact flower.
Make one complete test poinsettia before changing all three because a substantial size reduction also changes the amount of empty cream lace around each arrangement.
Making a Flatter Dining-Table Version
Omit the smallest burgundy bract layer.
Use only two ivory petal layers rather than three.
Sew the lower half of each large green leaf to the runner instead of attaching only the base.
The resulting focal arrangements will be less raised and therefore more practical when serving dishes need to occupy more of the runner’s surface.
Making the Border Simpler
For a less geometric version, omit the stepped side extensions.
Work the burgundy, green, and gold borders directly around the rectangular cream foundation.
At each corner use the same corner-space increases on every round.
This modification changes the silhouette but leaves the poinsettia placement and all appliqué counts unchanged.
Yarn Planning
Complete one 20 cm section of cream foundation, one large green leaf, one complete small flower, and one full poinsettia before purchasing supplemental yarn.
Weigh each component separately.
Multiply the poinsettia weight by three, the large-leaf weight by 18, and the small-flower weight by 18. Add the measured foundation consumption and approximately 15% for border work, joining tails, gauge differences, and replacement motifs.
This sample-based method is more reliable than transferring yardage directly from either a fine-thread filet runner or a differently constructed Tunisian project.
Care and Storage
Follow the yarn manufacturer’s washing instructions. Support the runner from underneath when wet because the three layered flower arrangements absorb substantially more water than the open cream foundation.
Dry flat. Pin the stepped border first, then reshape the green leaves and red bracts by hand without crushing the ivory centers.
Store the runner flat or rolled around a wide tube. Avoid folding directly through any of the three poinsettias because repeated compression can crease the pointed bracts.
Sources
Ravelry — Poinsettia Table Runner by Mary Maxim — Aran yarn, 5 mm hook, 1,100–1,300 yards total, with published white, red/wine, and green yardage.
Ravelry — Poinsettia Table Runner by Regina Rioux — three joined poinsettia motifs, Aran yarn, 5 mm hook, 250–300 yards, and 16 × 14 stitch/row Tunisian gauge.
Ravelry — Poinsettia Table Runner by Raine Eimre — size-10 cotton, 1.75 mm hook, 320 yards, and approximately 22 × 10.5 inch finished dimensions.
HandmadebyRaine — Poinsettia Table Runner — published thread requirements, hook size, finished measurements, filet construction, and blocking information.
PlanetJune — Poinsettia by June Gilbank — worsted yarn, 3.5 mm hook, approximately 5–6.5 inch flower sizes, and six-element layered poinsettia construction benchmark.
Ravelry — Poinsettia by June Gilbank — worsted-weight ornamental flower benchmark with 3.5 mm hook and published medium/large sizing.
Ravelry — Crochet Poinsettia by Emi Harrington — worsted-weight poinsettia reference using a 6 mm hook with hook-size adjustment for smaller flowers.
LoveCrafts — Crochet Poinsettia by Natagor Finlayson — DK/light-worsted dimensional poinsettia reference and firm-stitch construction guidance.
Conclusion
The three focal flowers control both scale and balance, so finish one complete poinsettia before batch-making the remaining bracts. Check that its foliage reaches roughly 22–25 cm, then block the cream foundation and mark all three center positions before permanent assembly. Keep the burgundy points free, attach the green leaves through their lower sections, and reserve the ivory flowers for the final layer. Your next step is to crochet and block one large red bract and one 22-chain green leaf. Save this Christmas poinsettia crochet table runner pattern to Pinterest or share the finished runner on Instagram with #ChristmasPoinsettiaRunner. Would you keep all three ivory centers or make the middle poinsettia entirely burgundy? “`0









