Introduction
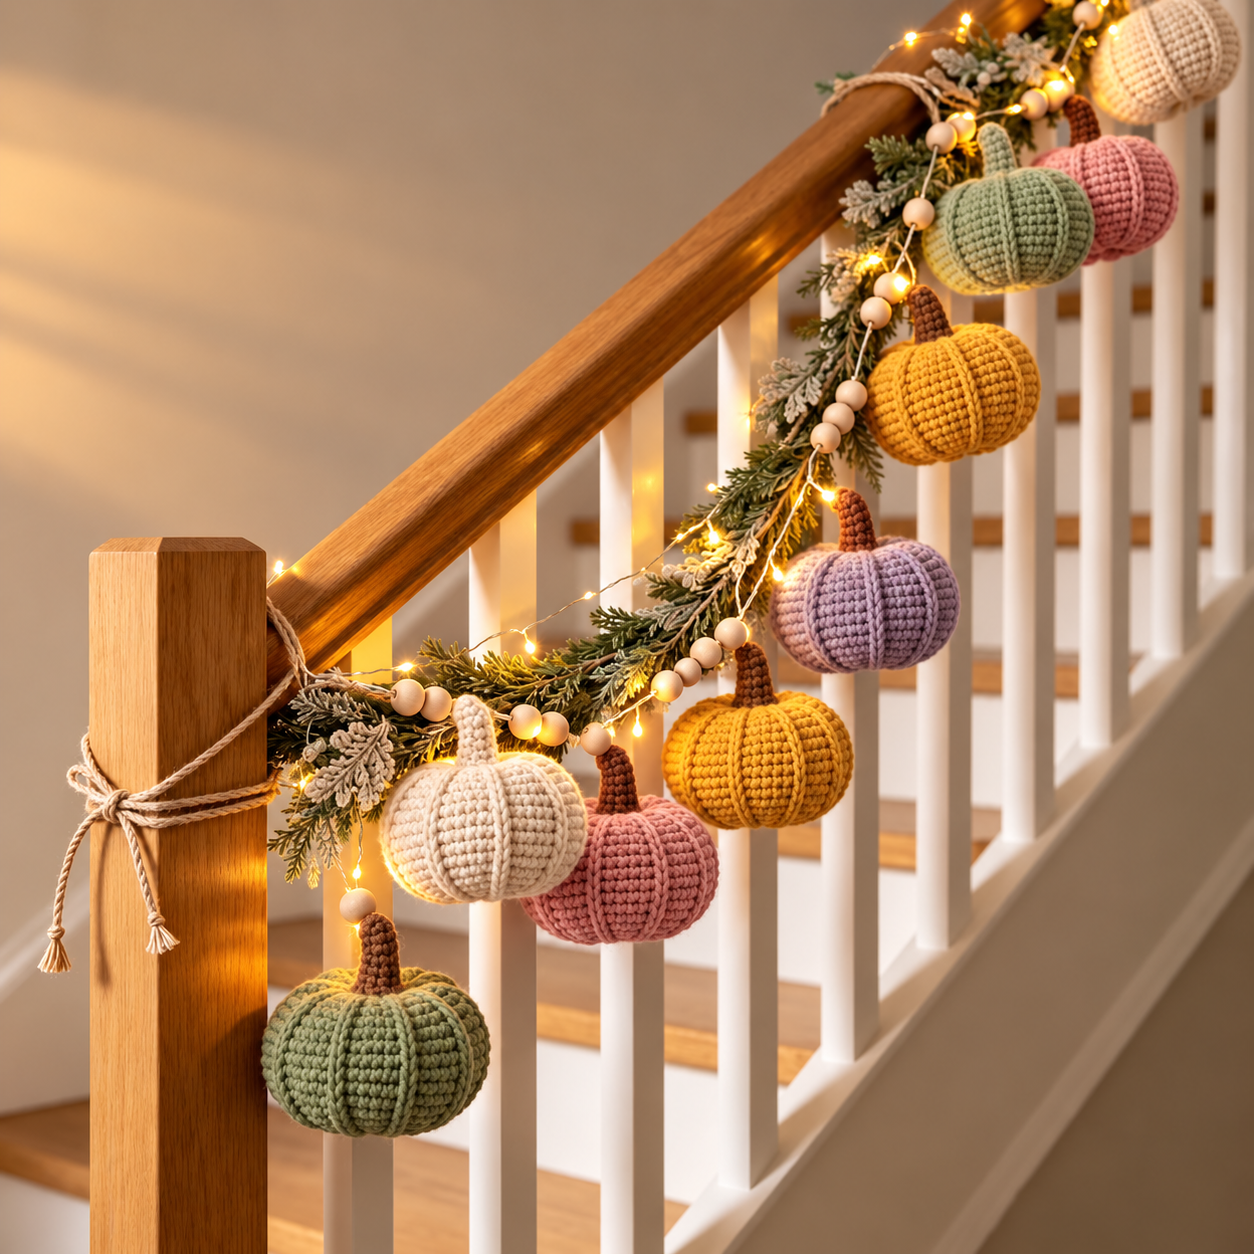
Nine plump pumpkins hang beneath the stair rail in mustard, sage, blush, lavender, and cream, each divided into six pronounced vertical lobes. This crochet pumpkin garland pattern uses worsted cotton-blend yarn, a 4 mm hook, fiberfill, brown stems, wooden beads, and a separate hanging cord. The intermediate reconstruction targets 9–11 cm pumpkins and a customizable 180–220 cm garland for banisters, mantels, or shelves.
The instructions below are an original photo-inspired reconstruction based on visible structure; published patterns cited later are used only for sizing, gauge, and material benchmarks.
The Design: What Makes This Pumpkin Garland Different
The photographed pumpkins are genuine three-dimensional ornaments rather than flat appliqués. Each body is built as a compact stuffed sphere, then six external shaping strands compress the surface into deep lobes. A narrow brown stem provides a second structural attachment point, while a hidden hanging loop carries the ornament’s weight instead of relying on the stem itself. The pastel palette also separates this design from a conventional orange mini crochet pumpkin garland: mustard, dusty rose, sage, lavender, and ivory repeat irregularly along an evergreen-style stair arrangement. The most common construction error is overstuffing before sculpting. A rigid sphere resists compression, producing shallow grooves and excessive stress at the crown. Moderate stuffing leaves enough internal movement for six evenly tensioned shaping lines.
Project Info at a Glance
| Skill Level | Time | Finished Size | Hook | Best For |
|---|---|---|---|---|
| Intermediate | Reconstruction estimate: 7–10 hours for 9 pumpkins | Reconstruction target: 9–11 cm per pumpkin; 180–220 cm garland | 4 mm body; 3.5 mm stem | Stair rails, mantels, shelves, autumn displays |
Published pumpkin-garland patterns establish a useful range. Vanessa Mooncie’s Ravelry design uses DK cotton, 2.5 and 3.25 mm hooks, approximately 14 m per pumpkin, and produces pumpkins around 6.5 cm in diameter on a roughly 130 cm garland. Jennifer Percival’s sport-weight mini pumpkins measure about 1.5 inches / 3.8 cm with a 3.75 mm hook. Heather Corinne’s worsted mini pumpkins reach approximately 3 inches / 7.6 cm wide. The image shows visibly larger ornaments, so this reconstruction targets 9–11 cm.
Materials and Tools
Yarn
- Sage green — worsted #4 cotton/cotton blend — reconstruction estimate: 60–75 g
- Mustard yellow — worsted #4 — reconstruction estimate: 60–75 g
- Dusty blush pink — worsted #4 — reconstruction estimate: 60–75 g
- Soft lavender — worsted #4 — reconstruction estimate: 30–40 g
- Warm ivory — worsted #4 — reconstruction estimate: 30–40 g
- Chocolate brown — worsted #4 — reconstruction estimate: 35–45 g
- Natural beige — worsted #4 or 3 mm cotton cord — reconstruction estimate: 20–30 g
Allow approximately 18–25 g per 9–11 cm pumpkin as a reconstruction estimate, then weigh the first finished body before producing the remaining eight. Published designs vary substantially: Mooncie’s 6.5 cm DK pumpkin uses about 14 m, while Stitchberry’s wider flat-seamed worsted pumpkin specifies about 50 yards.
Tools
- 4 mm crochet hook for pumpkin bodies
- 3.5 mm crochet hook for stems
- Polyester fiberfill — approximately 20–30 g per ornament
- Yarn needle with a large eye
- Stitch markers
- Scissors
- 15–20 mm unfinished wooden beads — approximately 18–24
- Natural cotton cord or crocheted chain — 220–250 cm
The evergreen foliage and lights visible in the photograph are styling elements rather than crocheted components. Keep electrical light strings physically separate from yarn ornaments and follow the light manufacturer’s placement instructions.
Abbreviations
- MR — magic ring
- sc — single crochet
- inc — 2 sc in one stitch
- dec — invisible single-crochet decrease
- sl st — slip stitch
- ch — chain
- BLO — back loop only
- st/sts — stitch/stitches
- R — round
For an invisible decrease, insert the hook through the front loop of each of the next two stitches, yarn over, draw through both front loops, then complete one single crochet.
Color Layout
Make 9 pumpkins for the photographed density:
- Sage green ×2
- Mustard yellow ×2
- Dusty blush ×2
- Soft lavender ×1
- Warm ivory ×2
The exact number visible in a staged photograph can be obscured by railings and foliage, so nine ornaments are used as the reconstruction set rather than claimed as a verified count from the image.
Pattern — Step by Step
Pumpkin Body — Make 9
Yarn: selected pumpkin color. Hook: 4 mm. Work continuously in a spiral. Reconstruction gauge target: approximately 17–18 sc per 10 cm in firm stuffed fabric.
R1: 6 sc in MR. (6)
R2: Inc ×6. (12)
R3: (Sc, inc) ×6. (18)
R4: (2 sc, inc) ×6. (24)
R5: (3 sc, inc) ×6. (30)
R6: (4 sc, inc) ×6. (36)
R7: Sc around. (36)
R8: Sc around. (36)
R9: Sc around. (36)
R10: Sc around. (36)
R11: Sc around. (36)
R12: Sc around. (36)
R13: Sc around. (36)
R14: Sc around. (36)
R15: (4 sc, dec) ×6. (30)
R16: (3 sc, dec) ×6. (24)
Begin stuffing. Fill the outer circumference first and keep the center slightly softer than the sides.
R17: (2 sc, dec) ×6. (18)
R18: (Sc, dec) ×6. (12)
Add the final stuffing. The body should feel full but still compress approximately 2 cm between finger and thumb.
R19: Dec ×6. (6)
Fasten off with a 100 cm tail. Thread through the six remaining front loops and close the opening.
Why the Body Stops at 36 Stitches
A 36-stitch plateau is appropriate for this medium ornament rather than the much larger counts needed for full-size decorative pumpkins. At a reconstruction gauge around 17–18 sc per 10 cm, 36 stitches provide approximately 20–21 cm of unstretched crochet circumference before stuffing and sculpting.
The resulting sphere is then compressed into a squat pumpkin. Published examples confirm the scale range: a current beginner ribbed pattern measures about 10 cm across, while worsted mini-pumpkin patterns commonly finish around 7.5–11 cm depending on construction and stuffing.
Sculpting Six Pumpkin Lobes
Thread the 100 cm body tail onto a yarn needle.
Push the needle from the bottom center through the stuffing and out at the crown.
Bring the yarn down the outside of the pumpkin and insert the needle through the bottom center again.
Pull until a distinct groove forms.
Repeat around the pumpkin until six shaping strands divide the circumference into six sectors.
Because the widest round contains 36 stitches, use approximately 6 stitches of circumference per visual sector. The shaping yarn does not need to pass through a specific stitch column, but marking six positions around R10 before sculpting makes the spacing repeatable.
After the sixth groove, pass the needle through the body once more and secure the tail beneath the crown.
Optional Raised Rib — Make 6 per Pumpkin
The photograph shows unusually crisp raised lines between the pumpkin lobes. For a closer reconstruction, add a surface ridge over each sculpting groove.
Join matching yarn near the bottom center.
Surface slip stitch upward along one groove until reaching the crown.
Fasten off and repeat for all six grooves.
Keep the surface stitches loose enough that they rest on the fabric instead of shortening the pumpkin vertically.
Brown Stem — Make 9
Yarn: chocolate brown. Hook: 3.5 mm. Work in continuous rounds.
R1: 6 sc in MR. (6)
R2: Sc around. (6)
R3: Sc around. (6)
R4: Sc around. (6)
R5: Sc around. (6)
R6: Sc around. (6)
R7: BLO sc around. (6)
R8: Inc ×6. (12)
R9: (Sc, inc) ×6. (18)
Fasten off with a 30 cm tail.
Do not stuff the narrow stem heavily. A short strand of brown yarn or a tiny amount of fiberfill is enough to prevent collapse.
The flared 18-stitch base hides the crown opening and provides a wider sewing surface. Published pumpkin patterns use several stem constructions; Crazy Cool Crochet, for example, documents separate brown worsted stems, while other amigurumi patterns crochet the stem directly into the pumpkin body.
Hidden Hanging Loop — Make 9
Do not suspend the ornament only from the crocheted stem.
Cut approximately 35 cm of natural cord or matching body yarn.
Pass it through the pumpkin crown before sewing the stem down.
Tie the two ends together inside the crown with a secure square knot, leaving an external loop approximately 7–8 cm long.
Sew the brown stem over the attachment point.
The hidden loop carries the ornament’s weight while the stem remains decorative.
Garland Cord
For a crocheted cord, use natural beige yarn and a 4 mm hook.
Foundation: Ch 401.
Row 1: Beginning in second chain from hook, sl st loosely in every chain. (400)
Fasten off.
At typical worsted tension, the cord should measure approximately 200–220 cm. Measure the intended railing before cutting or fastening off because banister lengths vary substantially.
A twisted cotton cord of comparable length can replace the crocheted version.
Wooden Bead Clusters
The image uses pale wooden beads as visual spacers along the foliage.
For a yarn-only garland cord, thread groups of 3–5 beads onto thinner natural cord and tie those bead strands separately to the main garland.
Do not force a thick crocheted chain through bead holes that are too small.
Keep wooden beads out of reach of young children; the finished decoration is not a toy or nursery mobile.
Optional Crocheted Bead Alternative — Make 18
If wooden beads are not wanted, crochet small ivory balls.
R1: 6 sc in MR. (6)
R2: Inc ×6. (12)
R3: Sc around. (12)
R4: Sc around. (12)
R5: Dec ×6. (6)
Add a small amount of stuffing before closing.
Fasten off with a 20 cm tail and sew the ball to the garland cord.
Spacing the Nine Pumpkins
Lay the finished cord flat before attaching any ornament.
Leave approximately 15 cm free at each end for tying.
Mark nine attachment positions at approximately:
20 cm, 42 cm, 65 cm, 88 cm, 111 cm, 134 cm, 157 cm, 180 cm, and 202 cm.
Adjust the last positions if the finished cord is shorter than 220 cm. The objective is roughly 20–23 cm between pumpkin centers, with enough irregularity to keep adjacent ornaments from colliding on a sloping rail.
Attaching Pumpkins to the Garland
Pass each hidden hanging loop around the main cord.
Feed the pumpkin through its own loop to create a removable lark’s-head attachment.
For permanent placement, add two sewing stitches through the loop and garland cord.
Do not sew through the brown stem as the primary suspension point.
Alternate colors rather than grouping identical shades together.
Suggested Color Sequence
From the lower stair post upward, use:
Sage → Ivory → Blush → Mustard → Lavender → Mustard → Sage → Blush → Ivory.
The sequence distributes the two warm colors, two neutrals, and cooler shades across the full length without producing a rigid repeating stripe.
Adding Faux Greenery
The photographed arrangement places the pumpkins over evergreen-style foliage. Treat that greenery as an independent decorative garland.
Attach the greenery to the rail first.
Secure the crochet cord over or beside it using removable ties.
Allow the pumpkins to hang below the foliage rather than burying their stems inside dense branches.
This separation makes the crocheted portion removable for laundering and seasonal storage.
Adjusting Pumpkin Diameter
For a smaller ornament, stop increasing at 30 stitches and work six plateau rounds before decreasing in reverse.
For a larger ornament, continue one additional increase:
R7: (5 sc, inc) ×6. (42)
Work eight to ten rounds at 42 stitches before beginning decreases.
Keep all increase and decrease transitions in multiples of six so the sphere remains symmetrical.
Vanessa Mooncie’s published DK pumpkins finish around 6.5 cm, while Made by Gootie’s mini and small pumpkins measure approximately 7 cm and 11.4 cm wide respectively, demonstrating how construction and yarn choice can move the same decorative concept across several useful sizes.
Making a Mantel-Length Version
Lion Brand’s Simply Made by Erin Pumpkin Garland uses six mini pumpkins and nine balls for a 45-inch mantel, with customizable overall length. That published example provides a useful density benchmark for shorter displays.
For a mantel around 115 cm wide, make five or six pumpkins rather than all nine.
Space them approximately 17–20 cm apart and leave tying allowance at both ends.
Making a Long Stair Garland
For a rail longer than 220 cm, add one pumpkin for approximately every 22–25 cm of extra usable length.
Continue the established color palette instead of repeating the exact nine-color sequence from the beginning.
Measure the rail along its slope rather than measuring the horizontal floor distance beneath it.
Leave enough slack that the cord follows the rail without stretching the hanging loops.
Using DK Yarn Instead
DK cotton produces smaller, lighter pumpkins. Vanessa Mooncie’s published garland uses Ricorumi DK with 2.5 and 3.25 mm hooks and produces pumpkins around 6.5 cm diameter.
For a similar scale, substitute DK yarn and use approximately a 3–3.5 mm hook, subject to your own gauge.
The smaller ornaments are particularly suitable for mantels or narrow shelf garlands where 10 cm pumpkins would appear crowded.
Using Super-Bulky Yarn
A published Lion Brand pumpkin garland uses #6 super-bulky yarn and an 8 mm hook. Its pumpkin gauge is documented as eight stitches and ten BLO single-crochet rows over 3.5 inches.
That construction produces a much chunkier visual result than the smooth worsted ornaments in the supplied image.
If substituting #6 yarn, make a single test pumpkin before calculating spacing because both diameter and hanging weight increase substantially.
Stuffing Control
The pumpkin should remain compressible before sculpting.
Insert fiberfill in small pieces rather than one dense wad.
Push stuffing into the sides first, leaving a slightly softer vertical channel through the center.
That center channel makes it easier to pass the long sculpting needle repeatedly from crown to base.
If fiberfill shows between stitches, the hook is too large for the selected yarn or the body has been packed too firmly.
Keeping the Lobes Equal
Place six temporary stitch markers around the widest round before sculpting.
On a 36-stitch body, markers can sit approximately every six stitches.
Use those marks as visual guides for the external strands.
Tighten each groove only after all six strands are positioned. Fully tightening the first groove before placing the others can pull the crown off-center.
Stem Position
The stem should cover the gathered crown without leaning far enough to twist the hanging loop.
Pin its 18-stitch base over the center.
Sew around the entire base using the brown tail.
Add one concealed stitch through the center of the stem base and pumpkin crown.
Leave the top of the stem unattached to the garland cord.
Assembly
- Crochet nine pumpkin bodies in sage, mustard, blush, lavender, and ivory, keeping every medium body at the same 36-stitch plateau.
- Stuff each body until full but compressible, then close the final six stitches securely without cutting the long sculpting tail.
- Mark six positions around the widest circumference and pass the sculpting yarn from crown to base six times to create equal lobes.
- Add six loose surface-slip-stitch ridges to each pumpkin if the photographed raised segmentation is required.
- Crochet nine brown stems, insert one hidden 7–8 cm suspension loop beneath each stem, and sew the 18-stitch stem bases to the crowns.
- Make a 200–220 cm natural garland cord or cut a comparable cotton rope, leaving approximately 15 cm free at both ends for fastening.
- Lay the cord flat and mark nine pumpkin positions approximately 20–23 cm apart before attaching any ornament permanently.
- Attach the pumpkins through their hidden loops, distribute the five colors along the full cord, and verify that neighboring bodies do not collide.
- Add separate wooden-bead strands or crocheted ivory balls between selected pumpkins, then attach the crochet garland over independently secured faux greenery.
- Hang the completed garland from secure rail points, adjust each pumpkin so its stem remains upright, and weave all remaining yarn tails into matching fabric.
The finished reconstruction contains nine stuffed pumpkins, 54 sculpted lobe divisions, nine brown stems, optional bead clusters, and one removable natural hanging cord.
7 Technical Tips
- The pumpkin looks spherical rather than lobed: leave enough stuffing flexibility for the diameter to compress approximately 2 cm. A body packed rigidly cannot form the six deep grooves visible in the reference.
- The grooves become uneven: place six markers approximately six stitches apart around a 36-stitch widest round before sculpting. Tightening strands without reference points commonly produces one narrow lobe and five wider ones.
- Fiberfill appears through the stitches: check the 4 mm hook against the selected worsted yarn before continuing the set. Visible gaps larger than roughly 2 mm usually become more obvious after the body is stuffed.
- The crown shifts sideways: position all six sculpting strands before applying final tension. Pulling the first strand to maximum depth immediately can drag the top opening away from the body’s vertical center.
- The stem bends under hanging weight: suspend the pumpkin from a hidden 7–8 cm loop beneath the stem instead of the stem itself. The 18-stitch flared stem base is designed as a decorative crown cover, not the primary load-bearing hanger.
- Adjacent pumpkins collide on the rail: maintain approximately 20–23 cm between ornament centers for 9–11 cm bodies. Reduce that interval only after testing two finished pumpkins on the actual slope of the banister.
- The garland twists after hanging: attach each ornament through the center of its crown and keep bead strands on independent ties. An off-center suspension point of even 1–2 cm can rotate a stuffed pumpkin against the railing.
Published Pumpkin Garland Benchmark
Vanessa Mooncie’s Pumpkin Garland is a particularly useful technical comparison. The Ravelry listing specifies Ricorumi DK cotton, 2.5 and 3.25 mm hooks, 23 stitches and 23 rows per 4 inches, and approximately 14 m / 15⅓ yards per pumpkin.
Her pumpkins finish at approximately 6.5 cm diameter, while the complete garland is approximately 130 cm / 51¼ inches. The published design also includes an optional 6 cm leaf. This reconstruction increases the pumpkin and garland dimensions to reproduce the larger stair ornaments visible in the photograph.
Published Super-Bulky Garland Benchmark
Lion Brand’s Simply Made by Erin Pumpkin Garland takes the opposite approach. It specifies #6 super-bulky acrylic/wool yarn and an 8 mm hook.
The documented pumpkin gauge is 8 stitches and 10 BLO single-crochet rows over 3.5 × 3.5 inches. The designer reports using six mini pumpkins and nine balls for a 45-inch mantel.
That project demonstrates that garland length and ornament scale can be altered substantially without changing the basic decorating concept.
Published Sport-Weight Mini Pumpkin Benchmark
Jennifer Percival’s 2025 Crochet to Play garland uses Scheepjes Stone Washed and a 3.75 mm hook. Each finished pumpkin measures only about 1.5 inches / 3.8 cm wide.
Those pumpkins are better suited to compact garlands. The staircase reference requires a larger visual mass, which is why the reconstructed bodies use worsted yarn and a 36-stitch circumference.
Published Worst-Weight Pumpkin Benchmark
Heather Corinne’s mini pumpkins use medium #4 worsted yarn and finish at approximately 3 inches wide × 2 inches high. The pattern works the body in continuous rounds, makes the stem separately, and creates the ridges afterward with a tapestry needle.
That combination closely supports the structural approach used here: a smooth stuffed body first, external sculpting second.
Flat Ribbed Pumpkin Alternative
Not every crochet pumpkin needs to be constructed in rounds. Stitchberry’s free mini pumpkin uses worsted #4 yarn, a 5 mm hook, and a 16-stitch rectangle worked for 33 rows, then seams and cinches the fabric.
Its approximate finished dimensions are 2 inches high × 3¾ inches diameter. That technique produces strong vertical ribbing but a somewhat different stitch orientation from the smooth spherical ornaments visible in the reference.
Why External Sculpting Works Here
The photograph shows deep grooves with relatively smooth single-crochet fabric between them. External shaping reproduces that geometry efficiently.
The pumpkin can first be crocheted as a symmetrical sphere, which simplifies counting. After stuffing, the long yarn tail becomes an adjustable structural element.
More tension creates deeper lobes; less tension produces a rounder pumpkin. The technique also lets all nine ornaments share identical crochet counts while still allowing slight handmade variation in their final silhouettes.
Why Six Lobes
Six sectors divide naturally into the 36-stitch widest round: 36 ÷ 6 = 6 stitches per visual sector.
The result gives enough separation for strong pumpkin geometry without creating many narrow ridges. Eight sculpting strands on a 9–11 cm body would make each segment noticeably slimmer.
For a 42-stitch larger version, six lobes still work because each visual sector can be centered around approximately seven stitches.
Color Planning
The reference avoids conventional bright orange. Muted sage, mustard, blush, lavender, and ivory create the seasonal effect through shape rather than one traditional color.
Keep the brown stems consistent across all ornaments. That repeated dark neutral ties otherwise unrelated body colors into one set.
If reducing the palette, sage, mustard, and ivory provide enough contrast for a three-color version.
Making the Garland Washable
Use removable lark’s-head loops for the pumpkins rather than sewing them permanently to the main cord.
Remove wooden bead strands, greenery, and decorative lights before laundering the crochet pieces.
Wash according to the yarn label and dry the pumpkins thoroughly. Reshape the six lobes while damp and allow the stuffing to dry completely before storage.
Storage
Detach the individual pumpkins from the garland cord.
Do not compress all nine ornaments tightly into one container because long storage under pressure can flatten the sculpted sectors.
Place the pumpkins loosely in a breathable box and coil the cord separately.
Wooden beads should be stored dry rather than packed against damp crochet fabric.
Sources
Ravelry — Pumpkin Garland by Vanessa Mooncie — DK cotton, 2.5/3.25 mm hooks, 6.5 cm pumpkins, approximately 14 m per pumpkin, and a 130 cm finished garland.
Lion Brand — Pumpkin Garland by Simply Made by Erin — #6 super-bulky yarn, 8 mm hook, documented BLO gauge, and a six-pumpkin mantel example.
Crochet to Play — Crochet Pumpkin Garland Pattern — sport-weight yarn, 3.75 mm hook, and approximately 1.5-inch mini pumpkins.
Ravelry — Pumpkin Garland by Jennifer E. Ryan — DK cotton, 3.75 mm hook, and three pumpkin sizes for decorative garlands.
Heather Corinne — Mini Crochet Pumpkins — worsted-weight construction, continuous rounds, separate stem, external ridge shaping, and approximately 3 × 2 inch finished dimensions.
Stitchberry — Mini Crochet Pumpkin — worsted #4 yarn, 5 mm hook, 16-stitch ribbed rectangle, and approximately 3¾-inch diameter benchmark.
Made by Gootie — Small Crochet Pumpkin — published 7 cm mini and 11.4 cm small pumpkin dimensions with a 3.5 mm hook.
Craft Passion — Pumpkin Amigurumi in Three Sizes — published pumpkin sizes of approximately 3, 4, and 5.5 inches and a suggestion for adapting small pumpkins into a garland.
Conclusion
The six sculpted lobes control the appearance of each ornament, so complete one 36-stitch pumpkin before batch-making the remaining colors. Check its 9–11 cm finished diameter, stuffing firmness, stem attachment, and suspension loop, then use that sample as the standard for the set. Space finished ornaments roughly 20–23 cm apart and keep the decorative greenery independent from the washable crochet pieces. Your next step is to make one sage test pumpkin and record its yarn weight. Save this crochet pumpkin garland pattern to Pinterest or share the finished staircase on Instagram with #PastelPumpkinStairGarland. Would you keep the single lavender pumpkin as an accent or repeat lavender farther up the rail? “`0









