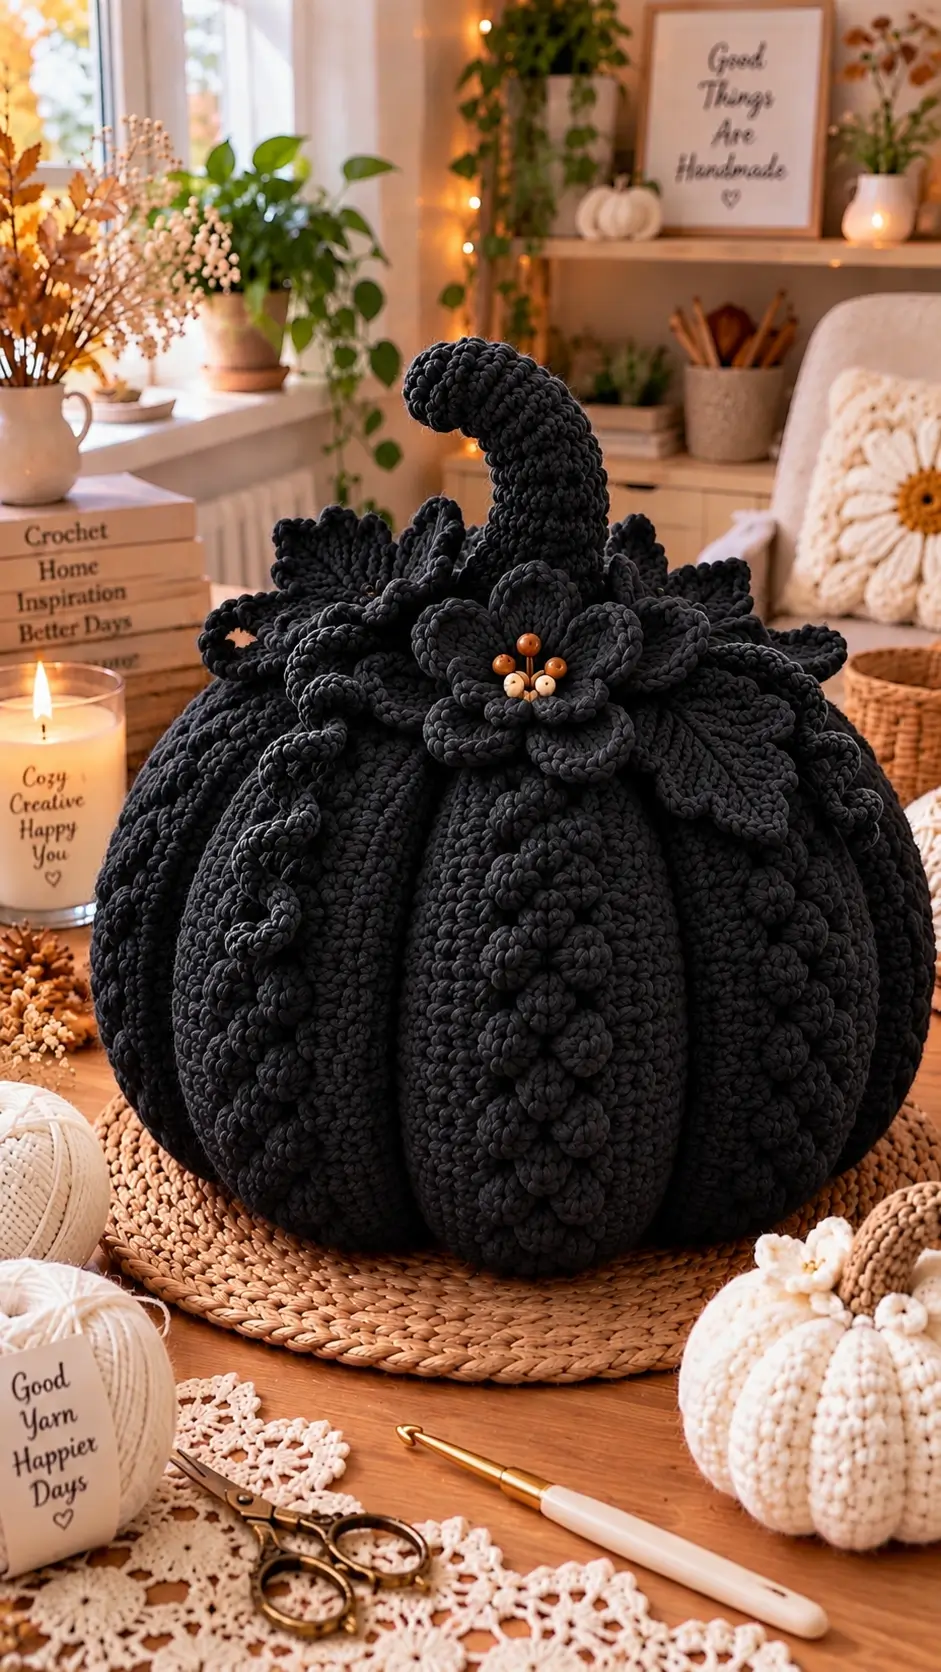
Black yarn swallows shallow pumpkin grooves, so this design needs unusually deep ribs to keep its eight-segment silhouette visible. This black crochet pumpkin pattern recreates the photographed statement pumpkin with super-bulky yarn, a tall curved stem, raised vines, layered black flowers, leaves, and bead-centered details. A 9 mm hook gives the body substantial scale. The finished piece is designed as large decorative autumn or Halloween décor rather than a toy.
The Design: What Makes This Black Pumpkin Different
The body is deliberately oversized before shaping. Eight external strands compress the stuffed form into pronounced vertical segments, a construction choice that gives dark yarn enough shadow and relief for the ribs to remain visible.
A second decision concerns proportion. The chunky crochet pumpkin needs a tall curved stem because a short stalk disappears against the large floral crown. Raised vines and flowers then repeat the dimensional surface treatment without covering every rib.
The embellishments are concentrated around the top and on selected vertical sections. This leaves enough uninterrupted crochet to preserve the pumpkin shape. A common mistake in a ribbed crochet pumpkin is overstuffing before segmentation. A rigid body resists compression, producing shallow grooves instead of the deep channels visible here.
Project Info at a Glance
| Skill Level | Time | Finished Size | Hook | Best For |
|---|---|---|---|---|
| Intermediate | 10–14 hours | Approx. 30–35 cm wide | 9 mm body / 6.5 mm details | Halloween and autumn display décor |
The 30–35 cm measurement is a photo-inspired target rather than a measurement taken from the image. Published super-bulky pumpkin patterns commonly use approximately 9 mm hooks; finished size varies substantially with yarn, construction and stuffing.
Materials and Tools
Yarn
- Black: #6 super-bulky yarn — approximately 400–500 g for body, stem and larger embellishments
- Black detail yarn: #5 bulky or #6 super-bulky — approximately 80–120 g for flowers, leaves and vines
- Strong black yarn: approximately 15–20 m for external pumpkin shaping
- Optional brown or amber yarn: small quantity if crocheted flower centers are preferred to beads
Super-bulky pumpkin patterns provide a useful technical reference for yarn selection. Published examples use #6 yarn with 9 mm hooks, while one 7-inch bulky bobble pumpkin uses approximately 85 yards of super-bulky yarn. This photographed design is substantially larger and carries multiple decorative components, so additional yarn is required.
Tools
- 9 mm crochet hook for the pumpkin body
- 6.5 mm crochet hook for stem and decorative pieces
- Polyester fiberfill — approximately 700–1000 g depending on desired firmness
- Long upholstery or doll needle
- Tapestry needle
- Stitch markers
- Sharp scissors
- Measuring tape
- Optional wooden beads: 6–10 mm for flower centers
The bead details make this project unsuitable as an unsupervised children’s toy. Omit beads and embroider or crochet the centers if the finished piece may be accessible to small children.
Abbreviations
- MR — magic ring
- sc — single crochet
- hdc — half double crochet
- dc — double crochet
- tr — treble crochet
- inc — increase
- dec — decrease
- sl st — slip stitch
- ch — chain
- BLO — back loop only
- FLO — front loop only
- sts — stitches
An invisible decrease is worked through the front loops of the next two stitches before completing one single crochet, reducing visible gaps in stuffed sections.
Black Crochet Pumpkin Pattern
This is an original photo-inspired construction rather than a transcription of a commercial pattern. The body uses a 42-stitch plateau followed by external segmentation. Published ribbed pumpkins use several different methods, including flat rectangles, back-loop ribbing and external shaping strands; this version uses a stuffed round body because it supports the large decorative crown.
Large Pumpkin Body
Yarn: black #6 super bulky.
R1: 6 sc in MR. (6)
R2: Inc ×6. (12)
R3: (1 sc, inc) ×6. (18)
R4: (2 sc, inc) ×6. (24)
R5: (3 sc, inc) ×6. (30)
R6: (4 sc, inc) ×6. (36)
R7: (5 sc, inc) ×6. (42)
R8: BLO sc around. (42)
R9: Sc around. (42)
R10: BLO sc around. (42)
R11: Sc around. (42)
R12: BLO sc around. (42)
R13: Sc around. (42)
R14: BLO sc around. (42)
R15: Sc around. (42)
R16: BLO sc around. (42)
R17: Sc around. (42)
R18: BLO sc around. (42)
R19: Sc around. (42)
R20: BLO sc around. (42)
R21: Sc around. (42)
R22: BLO sc around. (42)
R23: Sc around. (42)
R24: (5 sc, dec) ×6. (36)
R25: (4 sc, dec) ×6. (30)
Begin stuffing. Fill the outer wall first while leaving the center slightly more compressible.
R26: (3 sc, dec) ×6. (24)
R27: (2 sc, dec) ×6. (18)
Add more stuffing. The body should hold its rounded form but still compress several centimeters under firm hand pressure.
R28: (1 sc, dec) ×6. (12)
R29: Dec ×6. (6)
Fasten off with a 30 cm tail. Thread the tail through the remaining six front loops and close the opening.
Creating Eight Deep Pumpkin Segments
Cut approximately 250–300 cm of strong black yarn. Thread it onto a long upholstery needle.
Insert the needle through the bottom center and bring it out through the top center.
Run the yarn down the outside of the pumpkin and return the needle through the bottom-to-top center channel. Pull gradually until a distinct groove forms.
Repeat at eight equally spaced positions.
Do not fully tighten the first segment before making the others. Establish all eight divisions first, then work around the pumpkin a second time and increase the tension gradually.
The photographed body has exceptionally deep channels. Compress the shaping strands until each rib projects clearly, but stop if individual crochet stitches begin separating enough to expose stuffing.
Knot the shaping yarn securely at the bottom center and bury the ends inside the body.
Tall Curved Stem
Yarn: black. Use the 6.5 mm hook for a denser stem.
R1: 6 sc in MR. (6)
R2: Inc ×6. (12)
R3: (1 sc, inc) ×6. (18)
R4: BLO sc around. (18)
R5: Sc around. (18)
R6: (1 sc, dec) ×6. (12)
R7: Sc around. (12)
R8: Sc around. (12)
R9: 8 sc, 4 sl st. (12)
R10: 8 sc, 4 sl st. (12)
R11: Sc around. (12)
R12: 7 sc, 5 sl st. (12)
R13: 7 sc, 5 sl st. (12)
R14: Sc around. (12)
R15: 6 sc, 6 sl st. (12)
R16: 6 sc, 6 sl st. (12)
R17: Sc around. (12)
Stuff the lower stem firmly and the upper section lightly. The unequal stitch heights create the beginning of the curve.
R18: (1 sc, dec) ×4. (8)
R19: Sc around. (8)
R20: 5 sc, 3 sl st. (8)
R21: 5 sc, 3 sl st. (8)
R22: Sc around. (8)
R23: Dec ×4. (4)
Fasten off and close the tip.
Leave the lower opening and R1–R3 base broad enough for secure attachment to the pumpkin. Shape the stem into a hook while positioning it rather than forcing a sharp bend into one round.
Large Layered Black Flower — Make 1
Yarn: black detail yarn.
R1: 6 sc in MR. (6)
R2: Inc ×6. (12)
R3: (1 sc, inc) ×6. (18)
R4: FLO: *sl st in next st, ch 4, 3 dc in next st, ch 4, sl st in next st*. Repeat around to form six inner petals.
R5: Working behind R4, create six ch-5 spaces anchored into the unused loops.
R6: In each ch-5 space work (sc, hdc, 4 dc, hdc, sc). (6 petals)
R7: Create six ch-7 spaces behind the second layer.
R8: In each ch-7 space work (sc, hdc, dc, 3 tr, dc, hdc, sc). (6 outer petals)
Fasten off with a 30 cm sewing tail.
The flower should remain dimensional. Do not flatten the middle and inner petals during blocking.
Medium Black Flowers — Make 3
R1: 6 sc in MR. (6)
R2: Inc ×6. (12)
R3: (1 sc, inc) ×6. (18)
R4: *Sl st in next st, ch 4, 3 dc in next st, ch 4, sl st in next st*. Repeat around. (6 petals)
R5: Create six ch-6 spaces behind the first petals.
R6: In each space work (sc, hdc, dc, 3 tr, dc, hdc, sc). (6 petals)
Fasten off with a 25 cm tail.
Small Black Flowers — Make 5
R1: 6 sc in MR. (6)
R2: Inc ×6. (12)
R3: *Sl st in next st, ch 3, 2 dc in next st, ch 3, sl st in next st*. Repeat around. (6 petals)
Fasten off with a 20 cm sewing tail.
Flower Centers
The reference uses small warm-toned beads in the central flower, creating the only strong color contrast against the black crochet.
For the photographed effect, sew three or four 6–10 mm wooden beads into the center of the largest flower. Add one or two smaller natural beads between them if desired.
For an all-crochet alternative, make four tiny bobbles in amber or brown yarn and sew them into the center.
Large Black Leaf — Make 8
Yarn: black detail yarn.
Ch 15.
Starting in the second chain from the hook:
Side 1: Sl st, sc, hdc, dc, dc, tr, tr, tr, dc, dc, hdc, hdc, sc, sl st.
Ch 2 at the tip.
Side 2: Sl st, sc, hdc, hdc, dc, dc, tr, tr, tr, dc, dc, hdc, sc, sl st.
Join at the base.
Border: Ch 1 and sc evenly around. At the tip work (sc, ch 2, sc).
Fasten off with a 25 cm tail.
Small Black Leaf — Make 6
Ch 11.
Starting in the second chain work sl st, sc, hdc, dc, tr, tr, dc, hdc, sc, sl st.
Ch 2.
Work along the opposite side: sl st, sc, hdc, dc, tr, tr, dc, hdc, sc, sl st.
Join.
Work one round of sc around the leaf, placing (sc, ch 2, sc) at the point.
Fasten off with a 20 cm tail.
Raised Leaf Veins
Join black yarn at the base of a leaf.
Surface slip stitch over the original foundation chain toward the point.
Add two short diagonal veins on each side of large leaves and one on each side of small leaves.
Keep these stitches loose. A tight surface line will fold the leaf lengthwise.
Long Curly Vine — Make 3
Yarn: black.
Ch 40.
Starting in the second chain from the hook, work 3 sc in each chain across.
The piece will curl automatically as the three stitches crowd each foundation chain.
Fasten off with a 25 cm tail.
For a looser spiral, alternate 2 sc and 3 sc per chain. For the dense curls visible in the photograph, use 3 sc consistently.
Short Curly Vine — Make 4
Ch 24.
Starting in the second chain, work 3 sc in every chain.
Fasten off with a 20 cm tail.
Raised Bobble Vine — Make 3
The front of the photographed pumpkin includes thick vertical decorative clusters rather than only thin spirals.
Ch 24.
Row 1: Starting in second ch, sc across. Turn. (23)
Row 2: Ch 1, sc in first 2 sts, *work 5-dc bobble in next st, sc in next 2 sts*. Repeat across. Turn.
Row 3: Ch 1 and sc across.
Fasten off with a 30 cm tail.
The bobbles should project toward the right side. Pin the strip vertically over one pumpkin segment before sewing.
Positioning the Floral Crown
Attach the stem before the flowers. The largest decorative pieces need to sit around its base rather than underneath it.
Place the large black flower slightly forward of the stem instead of centering it directly on the pumpkin.
Position two large leaves behind the flower with their tips pointing outward.
Add medium flowers around the left and right sides. Insert smaller leaves between them to break up the petal shapes.
The crown should be widest near the pumpkin surface and narrower as it approaches the stem. Avoid covering the entire top with motifs; portions of the segmented body should remain visible.
Adding the Vertical Decorations
The photographed pumpkin uses decoration selectively rather than covering all eight ribs.
Choose three alternating segments for raised bobble vines.
Pin one strip vertically from approximately 5 cm below the floral crown toward the lower third of the pumpkin.
Allow the strip to follow the rounded body without stretching it.
Place curly vines on neighboring segments. Their spirals can cross a groove occasionally, but the deep segment channels should remain visible.
Use small flowers or leaves where a vine ends abruptly. This disguises attachment points without creating a continuous band around the body.
How to Make the Ribs Deeper
External shaping is responsible for most of the silhouette. The crochet body itself should be round before those strands are tightened.
If the grooves remain shallow, remove a small amount of stuffing from the center before increasing shaping tension.
Do not simply pull harder against an overstuffed pumpkin. Excessive tension can cut into super-bulky stitches or expose fiberfill.
Eight segments match the photographed proportion. Six segments produce wider lobes, while ten or more make the body look more finely pleated.
After shaping, rotate the pumpkin and compare all eight ribs. Adjust individual strands before securing the final knot.
Adjusting the Pumpkin Size
The body reaches a 42-stitch plateau for this large version.
For a smaller pumpkin, stop the increase sequence at 30 stitches and shorten the straight middle section.
For a medium version, stop at 36 stitches.
For the large photo-inspired version, continue to 42 stitches.
The increase progression remains:
6 → 12 → 18 → 24 → 30 → 36 → 42.
Published pumpkin patterns also demonstrate that yarn weight has a major effect on scale. One multi-size pattern reports finished circumferences of 14–21 inches across bulky and super-bulky versions, while other super-bulky patterns use 9 mm hooks for chunky decorative pumpkins.
Assembly
- Complete the black body, stuff it while retaining some compressibility, and close the final six stitches.
- Divide the body into eight equal sections and tighten the external shaping strands gradually until deep ribs form.
- Position the curved stem at the top center and sew its broad base securely through approximately 10–14 body stitches.
- Attach the largest flower slightly in front of the stem, sewing through its center and lowest petal layer.
- Place the large leaves beneath the flower crown and attach only their lower thirds so the pointed ends remain raised.
- Add medium and small flowers around the stem while leaving portions of the pumpkin body visible between motifs.
- Pin the three raised bobble vines vertically over selected pumpkin ribs and sew them down at intervals without flattening the bobbles.
- Position long and short curly vines around the floral crown and neighboring segments, attaching only selected sections of each spiral.
- Sew the wooden beads or crocheted bobbles into the main flower center and secure every small component from the wrong side of the motif.
- Weave all tails deeply into the stuffed body, reshape the eight ribs, check the base for stability, and adjust the stem curve by hand.
The completed pumpkin should stand independently with eight visible segments, a centered curved stem, a concentrated floral crown and raised decoration on selected ribs.
7 Technical Tips for This Black Crochet Pumpkin
- Mark every round. Black yarn makes the first stitch difficult to distinguish under indoor lighting, and a missed stitch shifts the decrease sequence. Move a locking marker after completing every round.
- Stop stuffing before the body becomes rigid. The center should compress approximately 3–4 cm under firm pressure before segmentation. Excessive stuffing produces shallow grooves even when the shaping strands are tight.
- Mark all eight segment positions before tightening. Unequal spacing produces one narrow lobe and several oversized sections. Use temporary markers around the circumference before inserting the shaping needle.
- Tighten the shaping strands progressively. Pulling the first groove to full depth immediately shifts stuffing toward the opposite side. Establish all eight channels lightly, then complete a second tightening pass.
- Keep the upper stem lightly stuffed. Dense stuffing through the entire stem makes the final 8–10 cm resist the required curve. Concentrate firmness near the lower attachment area.
- Attach leaves through only their lower third. Sewing an entire 12 cm leaf to the body removes its raised profile. Leave the outer two-thirds free above the pumpkin surface.
- Bury shaping knots at least 2 cm into the base. A surface knot can loosen when the pumpkin is moved. Pull the finished knot into the stuffed body with the long needle before trimming.
Working With Black Yarn
Dark yarn reduces visible stitch contrast. Strong directional lighting makes stitch identification easier, particularly when working decreases and surface details.
Place a light-colored cloth on your lap or work surface. The pale background shows through stitch openings and makes the next insertion point easier to identify.
Count stitches rather than relying entirely on visual inspection. This is particularly important through R24–R29, where the body decreases from 42 to 6 stitches.
A smooth super-bulky yarn will display the body structure more clearly than a heavily fuzzy black fiber. The photographed surface is thick but still shows individual crochet stitches.
Choosing Yarn and Hook Size
Super-bulky yarn is well documented for chunky crochet pumpkins. The Wide Ribbed Pumpkin pattern specifies super-bulky yarn, a 9 mm hook and a gauge of eight stitches by eight rows over four inches. Another chunky fall pumpkin pattern also specifies #6 yarn and a 9 mm hook.
A multi-size pumpkin pattern uses 9 mm for its #6 super-bulky version and reports a 21-inch finished circumference. Those figures provide useful reference points, but this design’s round construction, 42-stitch plateau and heavy stuffing make an exact size prediction impossible without a gauge swatch.
If your 42-stitch circumference is substantially smaller than expected, change yarn or hook rather than adding random increases after the plateau.
Alternative Color Versions
The same construction does not have to remain black. Charcoal produces slightly more visible stitch definition while retaining a dark appearance.
Deep burgundy can be paired with black flowers and bronze bead centers. Forest green works with cream flowers and wooden details, while ivory creates a high-contrast sculptural version.
For a traditional autumn palette, use burnt orange for the body, dark brown for the stem, and olive for the leaves.
Keep the external shaping strands close to the body color. Contrasting strands make the segmentation method visible rather than allowing the grooves themselves to define the form.
Finishing and Display
Set the pumpkin on a flat surface before securing the last decorative pieces. If it rocks, redistribute stuffing around the lower center and press the base into a broader shape.
Check the stem from the front and both sides. Its curve should begin above the floral crown rather than leaning from the attachment seam.
Inspect every vine. The spirals should project from the surface, while the bobble strips should follow the rounded ribs without bridging across deep grooves.
Check bead attachments individually. Each bead should be sewn through several times and tied securely behind the flower before that flower is attached to the pumpkin.
Store the finished piece without placing weight on the stem or floral crown. Compressed leaves and petals can be reshaped by hand before the next display period.
Conclusion
The finished design combines a 42-stitch stuffed body, eight deep external segments, an oversized curved stem, layered black flowers, pointed leaves, spiral vines and raised bobble details. Make the body and complete its segmentation before crocheting the full set of decorations; the finished circumference determines how many flowers and vines will fit without hiding the ribs. Next, test one large flower and leaf against the shaped pumpkin before producing the remaining pieces. Save this black crochet pumpkin pattern to Pinterest or share the finished version on Instagram with #BlackFloralCrochetPumpkin. For this specific pumpkin, would you keep the warm wooden flower centers or make every detail completely black? “`0









