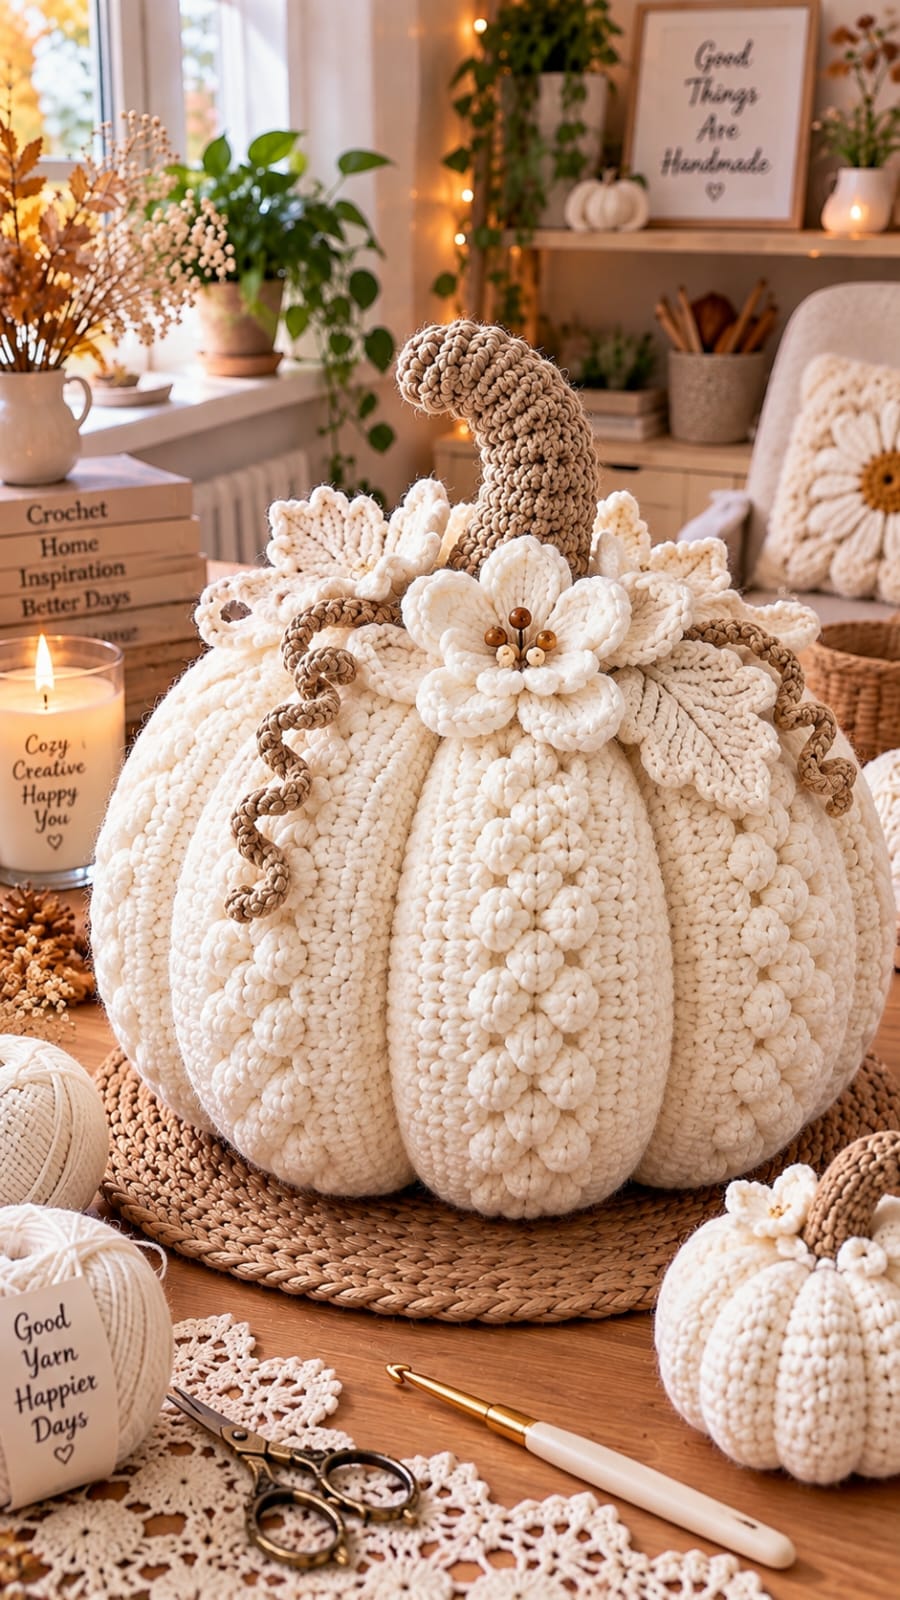
Three vertical trails of raised flowers change this ivory pumpkin from a basic ribbed sphere into a heavily textured centerpiece. This large white crochet pumpkin pattern combines a super-bulky stuffed body, eight sculpted lobes, bobble-flower embellishments, a curved taupe stem, layered leaves, spiral tendrils and one large crown flower. The target size is approximately 28–30 cm wide. Intermediate crochet skills are recommended because the decoration requires controlled placement and assembly.
What Makes This White Crochet Pumpkin Different
The body uses external sculpting rather than crocheting eight individual wedges. One large sphere is stuffed first, then strong yarn passes repeatedly through the top and bottom centers to compress the surface into broad lobes. This method keeps the segments rounded while creating the deep valleys visible in the reference.
The second structural feature is the raised floral work. Small cream bobble flowers travel vertically along selected lobes instead of covering the entire pumpkin. That placement preserves the rib structure while adding another layer of relief.
At the crown, a tall taupe stem provides contrast against the ivory body. Cream leaves, a dimensional flower and curling tendrils spread around its base.
The main failure mode is excessive stuffing. A rigid body resists the sculpting strands and produces shallow grooves.
Project Info at a Glance
| Skill Level | Time | Finished Size | Body Hook | Best For |
|---|---|---|---|---|
| Intermediate | Approx. 8–12 hours | Approx. 28–30 cm wide | 8–9 mm | Autumn centerpieces, shelves and large seasonal displays |
The dimensions are reconstruction targets based on the photographed proportions. Yarn choice, tension and stuffing density will alter the final measurement.
Materials and Tools
Yarn
- Warm ivory — super-bulky #6 yarn — approximately 250–320 g for the body
- Warm ivory — bulky or super-bulky yarn — approximately 50–70 g for leaves, flower and raised embellishments
- Taupe or light brown — bulky yarn — approximately 40–60 g for stem and tendrils
- Medium brown — small amount for the flower center
Keep additional ivory available if making a larger pumpkin. Raised floral embellishments consume more yarn than surface embroidery because each flower projects away from the body.
Tools
- 8.0 or 9.0 mm crochet hook for the pumpkin body
- 5.0–6.0 mm crochet hook for leaves and flower
- Polyester fiberfill
- Long upholstery or doll needle
- Tapestry needle
- Locking stitch markers
- Straight pins
- Scissors
- Tape measure
Abbreviations
- MR — magic ring
- ch — chain
- sc — single crochet
- hdc — half double crochet
- dc — double crochet
- tr — treble crochet
- inc — 2 sc in one stitch
- dec — single crochet decrease
- sl st — slip stitch
- BLO — back loop only
- st/sts — stitch/stitches
- BO — bobble stitch
For an invisible decrease, insert the hook through the front loops of the next two stitches and complete one single crochet through both loops.
Special Stitch: Bobble
Yarn over, insert the hook into the indicated stitch and pull up a loop. Yarn over and pull through two loops, leaving the unfinished double crochet on the hook.
Repeat four more times in the same stitch until five unfinished double crochets are held on the hook.
Yarn over and pull through all remaining loops.
Work the following single crochet firmly. This pushes the bobble toward the front of the fabric.
Large White Crochet Pumpkin Pattern
Work the pumpkin body in a continuous spiral. Place a locking stitch marker in the first stitch of every round and move it upward as the work progresses.
Large Ivory Pumpkin Body
Yarn: warm ivory super-bulky #6.
R1: 6 sc in MR. (6)
R2: Inc ×6. (12)
R3: (1 sc, inc) ×6. (18)
R4: (2 sc, inc) ×6. (24)
R5: (3 sc, inc) ×6. (30)
R6: (4 sc, inc) ×6. (36)
R7: (5 sc, inc) ×6. (42)
R8–R11: Sc around. (42)
R12: (6 sc, inc) ×6. (48)
R13–R19: Sc around. (48)
R20: (6 sc, dec) ×6. (42)
R21–R23: Sc around. (42)
R24: (5 sc, dec) ×6. (36)
R25: Sc around. (36)
R26: (4 sc, dec) ×6. (30)
Begin stuffing. Fill around the outer wall first and distribute the fiberfill evenly. Keep the center slightly softer so the body can be compressed during sculpting.
R27: (3 sc, dec) ×6. (24)
R28: (2 sc, dec) ×6. (18)
Add the remaining stuffing. Shape the body into a broad sphere rather than a tall oval.
R29: (1 sc, dec) ×6. (12)
R30: Dec ×6. (6)
Fasten off, leaving approximately 60 cm of yarn. Pass the tail through the front loops of the final six stitches and close the opening.
Sculpting the Eight Pumpkin Lobes
Cut approximately 250 cm of strong ivory yarn. Thread it through a long upholstery needle.
Insert the needle through the bottom center and bring it out through the top center. Run the yarn down the exterior of the pumpkin and insert the needle through the bottom center again.
Pull gradually until the first groove forms.
Create the second groove directly opposite the first.
Add two more sculpting lines at approximately 90-degree intervals. The pumpkin is now divided into four broad sections.
Divide each section once more to create eight lobes.
Do not fully tighten one groove before making the others. Establish all eight channels first, then work around the pumpkin again and increase their tension gradually.
Tie the sculpting yarn securely at the bottom and bury the tails inside the stuffed body.
Raised Bobble Flower Trails
The photographed pumpkin carries vertical chains of dimensional ivory flowers along selected ribs. These can be crocheted separately and sewn to the finished body, which gives better control over their placement than working them directly into the pumpkin rounds.
Small Bobble Flower — Make 18–24
Yarn: ivory.
R1: 6 sc in MR. Join. (6)
R2: Ch 1. Work one bobble in the first stitch, sl st in the next stitch. Repeat three times around to create three rounded lobes.
For a fuller four-lobed flower, work the following variation:
R1: 8 sc in MR. (8)
R2: Bobble in next stitch, sl st in next stitch; repeat four times.
Fasten off, leaving approximately 20 cm for sewing.
Make a mixture of three- and four-lobed flowers rather than forcing every embellishment to look identical.
Arranging the Flower Trails
Choose three alternating pumpkin lobes for the main floral trails.
Pin the first flower approximately 4–5 cm above the bottom edge.
Continue upward, leaving approximately 1–2 cm between neighboring flowers.
Allow some flowers to rotate slightly. A perfectly straight stack looks more geometric than the organic raised trail visible in the reference.
Sew through the center of each flower several times. Leave the outer bobbles free.
Tall Curved Taupe Stem
Yarn: taupe or light brown.
R1: 6 sc in MR. (6)
R2: Inc ×6. (12)
R3–R6: Sc around. (12)
R7: (2 sc, dec) ×3. (9)
R8–R14: Sc around. (9)
Begin stuffing lightly. Add small amounts rather than one dense plug.
R15: 4 sc, sl st in next 2 sts, 3 sc. (9)
R16: 3 sc, sl st in next 3 sts, 3 sc. (9)
R17–R20: Sc around. (9)
R21: 4 sc, sl st in next 2 sts, 3 sc. (9)
R22–R25: Sc around. (9)
R26: (1 sc, dec) ×3. (6)
R27: Sc around. (6)
Fasten off and close the upper end. Leave at least 35 cm at the base for attaching the stem.
The slip-stitch sections shorten one side and help establish the curved profile. Do not overstuff the upper stem.
Large Cream Crown Leaf — Make 4
Yarn: ivory or cream.
Ch 14.
Starting in the second chain from the hook, work:
Sc, hdc, dc, dc, tr, tr, tr, dc, dc, hdc, sc, sc.
Work 3 sc into the final chain.
Continue along the opposite side:
Sc, sc, hdc, dc, dc, tr, tr, tr, dc, dc, hdc, sc.
Join at the base.
Edging Round: Ch 1 and sc around. Place 3 sc in the leaf tip.
Fasten off, leaving approximately 30 cm for sewing.
Pointed Decorative Leaf — Make 3
Yarn: cream.
R1: 6 sc in MR. Join. (6)
R2: Inc ×6. (12)
R3: (1 sc, inc) ×6. (18)
Begin the first leaf point:
Ch 8. Starting in the second chain, work sc, hdc, dc, tr, tr, dc, hdc. Sl st into the next available stitch of R3.
For the second point, ch 7 and work sc, hdc, dc, tr, dc, hdc back toward the center.
For the center point, ch 10 and work sc, hdc, dc, tr, tr, tr, dc, hdc, sc.
Repeat the second-point instructions, then the first-point instructions.
Fasten off with a long sewing tail.
Large Layered Crown Flower
Make 1. Yarn: cream with a brown center.
Flower Center
R1: With brown, 6 sc in MR. (6)
R2: Inc ×6. (12)
Fasten off brown.
Inner Petals
Join cream.
R3: Sl st in first stitch. In the next stitch work hdc, 3 dc, hdc. Sl st in the following stitch.
Repeat around to create six rounded inner petals.
Outer Petals
Working behind R3, join cream around the base of an inner petal.
Ch 5 and sl st around the base of the next petal. Repeat around to create six chain spaces.
Into each ch-5 space work:
Sc, hdc, dc, 3 tr, dc, hdc, sc.
Repeat in all six spaces.
Fasten off, leaving approximately 35 cm for sewing.
Optional Raised Flower Center
For the beaded appearance visible in the reference, make four tiny crochet knots or bobbles with brown yarn and sew them into the center.
If using decorative beads instead, this pumpkin should be treated as adult décor rather than a toy or child-accessible item.
Spiral Taupe Tendril — Make 2
Yarn: taupe.
Ch 32.
Starting in the second chain from the hook, work 3 sc into every chain.
The stitches will force the chain into a spiral.
For a tighter curl near the lower end, work 4 sc into each of the final 8 chains.
Fasten off and leave approximately 25 cm for attachment.
Assembly
- Sculpt the stuffed pumpkin into eight lobes before attaching any decorative component.
- Place the stem over the top closing point and sew through its lower two rounds into the pumpkin body.
- Arrange the largest cream leaves around the stem, allowing their pointed ends to extend over separate pumpkin lobes.
- Position the layered flower toward the front of the crown and sew securely through its center.
- Add the remaining pointed leaves behind and beside the flower so the crown does not form a symmetrical circle.
- Pin the small bobble flowers in vertical trails along three selected pumpkin lobes.
- Sew every bobble flower through its center while leaving the outer raised sections unattached.
- Attach one taupe tendril on each side of the crown and allow the spirals to descend over different lobes.
- Bend the upper stem gradually until it forms a hooked profile, redistributing stuffing if a sharp crease appears.
- Weave every remaining tail through at least 5 cm of matching crochet fabric and reshape all eight lobes by hand.
The completed pumpkin should have eight rounded segments, several vertical trails of raised flowers, a tall curved stem, layered cream foliage, one large crown flower and two hanging spiral tendrils.
7 Technical Tips for the White Floral Crochet Pumpkin
- Shallow pumpkin grooves: keep the central stuffing slightly softer than the outer lobes. A rigid center prevents the sculpting yarn from pulling deeply enough into the body.
- Unequal lobes: establish four channels at approximately 90-degree intervals before dividing them into eight. Creating all eight consecutively makes spacing errors harder to detect.
- Visible stuffing: test the stuffed fabric before closing the body. If white fiberfill is visible between stitches, reduce the body hook by approximately 0.5–1 mm.
- Leaning stem: sew through at least two complete rounds at the stem base. Attaching only the bottom round gives the tall curved stem insufficient support.
- Flattened bobble flowers: sew each embellishment only through its center. Passing the needle through the outer lobes compresses the raised texture against the pumpkin.
- Overcrowded crown: leave at least 3–4 cm of several leaf tips visible beyond the flower. Excessive overlap hides the leaf construction and makes the crown appear as one solid mass.
- Loose tendrils: anchor the first 2 cm of each spiral at two points. One attachment stitch allows the entire tendril to rotate when the pumpkin is moved.
How to Make the Pumpkin Ribs Deeper
Deep segmentation depends more on stuffing and sculpting than on the crochet stitch used for the body.
Start with a broad, evenly stuffed sphere. The body should hold its shape when placed on a table, but you should still be able to compress the center with both hands.
Create the first four sculpting lines and inspect the pumpkin from directly above.
Those lines should divide the crown into approximately equal quarters.
Add another line halfway between each existing channel.
Once all eight grooves are established, tighten them in sequence. Pull each one a small amount rather than finishing one channel completely before moving to the next.
This distributes the compression more evenly and preserves the rounded centers of the lobes.
Placing the Raised Flower Trails
Do not attach the bobble flowers before sculpting the pumpkin. Their final position depends on the valleys created by the shaping yarn.
Choose alternating lobes rather than decorating every section.
Begin each trail several centimetres above the bottom so the embellishments do not interfere with the pumpkin’s resting surface.
Place the largest flowers near the middle of a lobe and slightly smaller flowers toward the top and bottom.
The trails do not need to be mathematically straight. A small side-to-side shift between neighboring flowers produces a more botanical arrangement while still maintaining a clear vertical direction.
How to Make the Curved Crochet Stem
The stem should be lightly stuffed rather than packed firmly.
Add small portions of fiberfill every 2–3 cm while crocheting. Push each portion into position before adding the next.
The slip-stitch sections reduce the height on one side of the tube. This introduces a gradual bend without requiring wire.
After attachment, hold the base firmly and bend only the upper portion.
If the stem folds sharply at one point, redistribute the stuffing before continuing. A broad curve is more stable than a hard crease.
Making the Spiral Tendrils
The tendrils curl because several single crochet stitches are forced into every foundation chain.
Three sc per chain creates a moderate spiral. Four sc per chain produces a tighter coil.
If a tendril twists in several directions after crocheting, hold the attached end and run your fingers toward the tip while rotating the spiral consistently in one direction.
Do not stretch the tendril when sewing it to the pumpkin. The visible length should retain its coil.
Adjusting the Pumpkin Size
The simplest method is to change yarn weight while preserving the same body construction.
Super-bulky #6 yarn with an 8–9 mm hook produces the large decorative scale used here. A bulky #5 yarn and smaller hook will produce a substantially smaller pumpkin from comparable stitch counts.
If increasing the body stitch count, continue the standard six-stitch expansion sequence before beginning the straight rounds.
For example, after 42 stitches the next standard increase round is:
(6 sc, inc) ×6 = 48 stitches.
The following increase would produce 54 stitches.
Increasing the circumference also requires more straight rounds, stuffing and sculpting yarn.
Scale the crown decorations at the same time. An oversized body paired with the original leaves and flower will make the top decoration appear too small.
Stuffing the Large Crochet Pumpkin
Fill the outside wall before packing the center.
Rotate the pumpkin every few handfuls and compare the developing shape from several angles.
Place extra fiberfill inside the future lobe centers. Use less directly beneath the eight intended valleys.
Before closing the final rounds, put the pumpkin on a flat surface. Correct any side that projects farther than the others.
After sculpting, massage stuffing toward any lobe that appears flatter than its neighbors.
Complete these adjustments before attaching the flower trails because the embellishments make later reshaping more difficult.
Choosing Colors for This Pumpkin
The photographed version relies on a restricted neutral palette. Warm ivory covers both the body and most botanical decoration, while taupe separates the stem and tendrils from the pumpkin.
Using the same ivory for the raised flowers creates texture without introducing another major color.
A slightly darker brown works for the center of the crown flower.
For another version, the body can be worked in pale oatmeal, sage, rust or charcoal while keeping the flower trails lighter than the pumpkin.
When substituting colors, maintain enough contrast between the stem and body for the curved stem to remain visible above the crown.
Finishing the Large White Crochet Pumpkin
Inspect the finished pumpkin from above first. The eight grooves should radiate from the stem with reasonably consistent spacing.
Next, view it at table height. The base should rest on several lobes rather than balancing on the bottom closing point.
Check the flower trails from the front. At least two should be clearly visible without rotating the pumpkin.
Separate the large crown petals and leaves with your fingers after all sewing is complete. They should overlap near their bases but remain independently identifiable at their outer edges.
Finally, position the tendrils so they descend over separate lobes instead of crossing the same floral trail.
Final Notes
Complete the stuffed and sculpted body before making the full set of embellishments. The actual pumpkin diameter provides the most reliable guide for leaf size, stem height and the number of bobble flowers required for each vertical trail.
For the closest match to the reference, keep the body broad, the eight grooves deep and the crown asymmetrical. The raised flowers should decorate selected lobes rather than cover the entire surface.
When the large white crochet pumpkin pattern is complete, photograph it from slightly above crown level so the sculpted ribs, floral trails and curved stem remain visible together. Save the finished project to Pinterest or share your version on Instagram with #WhiteFloralCrochetPumpkin. For another version, would you keep the flower trails ivory or make them muted sage for stronger contrast?









