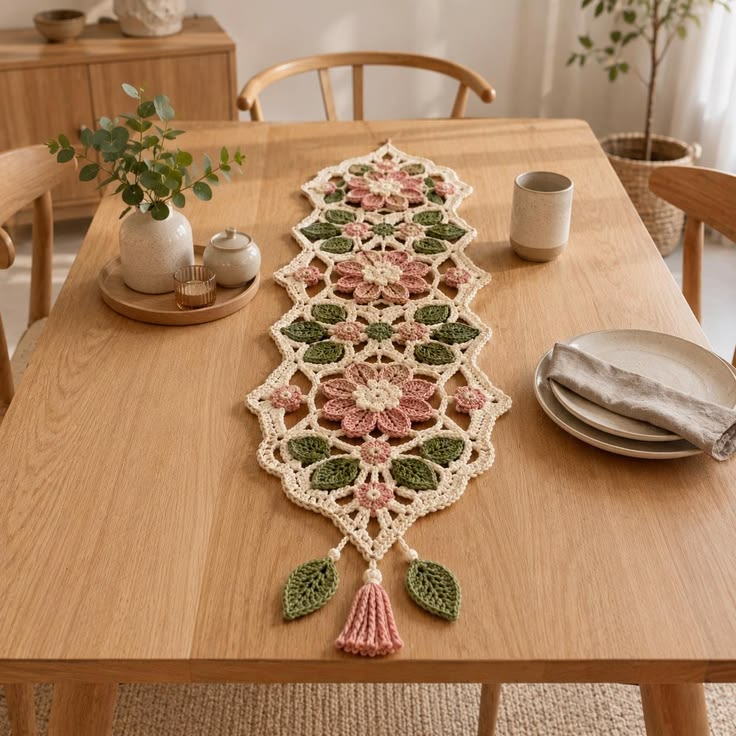
Three large pink blossoms divide this runner into botanical panels, while paired olive leaves control the open spaces between them. This pink floral crochet table runner pattern combines dimensional flowers, leaf motifs, cream lace joins, pointed ends, small accent blooms, and a decorative tassel. DK cotton with a 3.5 mm hook provides enough definition for the petals and openwork. The modular construction also makes the finished length adjustable.
The Design: What Makes This Floral Runner Different
The runner is constructed as a sequence of floral panels rather than one continuous rectangle. Large dusty-pink flowers establish the center line, and olive leaves occupy the spaces between them. Cream crochet chains connect those elements while leaving much of the tabletop visible.
Each large flower uses layered petals so it rises slightly above the surrounding crochet flower table runner. Smaller pink blossoms repeat the flower color without competing with the main motifs.
The pointed cream perimeter performs two jobs: it stabilizes the open construction and gives the runner a defined silhouette. At one end, two hanging leaves and a pink tassel extend the central axis. A frequent mistake with this type of floral motif crochet runner is tightening the connecting chains. Short connectors pull the leaves inward and make the finished piece buckle.
Project Info at a Glance
| Skill Level | Time | Finished Size | Hook | Best For |
|---|---|---|---|---|
| Intermediate | 12–16 hours | Approx. 34 × 135 cm | 3.5 mm | Dining tables, sideboards and spring decor |
The finished dimensions are a target for this original photo-inspired version. Yarn thickness, motif tension, joining length and blocking affect the final measurement.
Materials and Tools
Yarn
Use smooth DK cotton or a cotton-rich blend. A current modular flower table-runner pattern on Ravelry specifies DK cotton with a 3.5 mm hook, making that combination a practical reference point for this interpretation.
- Ivory / warm cream: DK cotton — approximately 220 g
- Dusty pink: DK cotton — approximately 130 g
- Olive green: DK cotton — approximately 100 g
- Light cream: DK cotton — approximately 20 g for flower centers
- Pink tassel yarn: approximately 15 g
The quantities are working estimates for the photo-inspired runner rather than measurements taken from the image. Keep leftover yarn until assembly is complete because additional connectors may be required after blocking.
Tools
- 3.5 mm crochet hook
- Tapestry needle
- Sharp scissors
- Locking stitch markers
- Blocking mats
- Rust-resistant pins
- Measuring tape
- 12 cm piece of cardboard for the tassel
Abbreviations
- MR — magic ring
- ch — chain
- sc — single crochet
- hdc — half double crochet
- dc — double crochet
- tr — treble crochet
- sl st — slip stitch
- sp — space
- sts — stitches
- rep — repeat
- picot — ch 3, sl st into first ch
An invisible decrease is not needed because the runner consists of flat and lightly dimensional motifs rather than stuffed crochet forms.
Pink Floral Crochet Table Runner Pattern
The following instructions create an original runner inspired by the visible geometry of the supplied photograph. Make the flowers and leaves separately, block them, arrange the complete runner, and add the cream connecting structure during assembly.
Large Layered Pink Flower — Make 3
Yarn: cream center and dusty-pink petals.
R1: With cream, work 6 sc in MR. Join with sl st. (6)
R2: Inc ×6. Join. (12)
R3: (1 sc, inc) ×6. Join. (18)
Change to dusty pink.
R4: Working in FLO, *sl st in next st, ch 5, starting in second ch from hook work sc, hdc, dc, hdc; sl st in next st*. Repeat around. (9 inner petals)
R5: Working behind the first petal layer into the unused back loops, *sl st in next back loop, ch 6*. Repeat around. Join.
R6: In each ch-6 sp work (sc, hdc, 3 dc, hdc, sc). (9 middle petals)
R7: Working behind R6, create ch-8 spaces anchored between neighboring petals.
R8: In each ch-8 sp work (sc, hdc, dc, 3 tr, dc, hdc, sc). (9 outer petals)
Fasten off with a 30 cm sewing tail.
Shape the inner petals upward and leave the outer petals flatter. The completed flower should measure approximately 13–15 cm across after light blocking.
Small Pink Flower — Make 10
Yarn: dusty pink with cream center.
R1: With cream, 6 sc in MR. Join. (6)
R2: Inc ×6. Join. (12)
Change to pink.
R3: *Sl st in next st, ch 3, 3 dc in next st, ch 3, sl st in next st*. Repeat around. (6 petals)
R4: Sl st around the outer edge of each petal, placing (sl st, ch 2, sl st) in the center stitch of every petal.
Fasten off with a 20 cm sewing tail.
These flowers fill the smaller spaces beside the large motifs and at the pointed ends.
Small Green Center Flower — Make 2
Yarn: olive green with cream edging.
R1: With olive, 6 sc in MR. (6)
R2: Inc ×6. (12)
R3: *Sl st in next st, ch 3, 2 dc in next st, ch 3, sl st in next st*. Repeat around. (6 petals)
Change to cream.
R4: Work sl st around the outer edge of each petal.
Fasten off.
Place these smaller green-centered motifs between the large pink flowers where the paired leaves meet.
Large Olive Leaf — Make 14
Yarn: olive green.
Ch 15.
Starting in the second ch from hook:
Side 1: Sl st, sc, hdc, dc, dc, tr, tr, tr, dc, dc, hdc, hdc, sc, sl st.
Ch 2 at the point.
Work along the opposite side of the foundation chain.
Side 2: Sl st, sc, hdc, hdc, dc, dc, tr, tr, tr, dc, dc, hdc, sc, sl st.
Join at the base.
Border: Ch 1 and sc evenly around. At the point work (sc, ch 2, sc).
Fasten off with a 25 cm tail.
Raised Leaf Vein
Join olive yarn at the leaf base.
Work surface slip stitches directly over the foundation chain toward the tip.
Add two short diagonal branches on each side of the central vein.
Fasten off on the wrong side.
Keep the surface stitches loose enough that the leaf remains flat. If the center folds sharply, remove the vein and repeat it with less tension.
Small Hanging Leaves — Make 2
Yarn: olive green.
Ch 12.
Starting in the second chain from the hook work:
Sl st, sc, hdc, dc, tr, tr, dc, dc, hdc, sc, sl st.
Ch 2 at the tip.
Work along the opposite side:
Sl st, sc, hdc, dc, dc, tr, tr, dc, hdc, sc, sl st.
Join at the base.
Work one round of sc around the complete leaf, placing (sc, ch 2, sc) at the tip.
Fasten off with a 30 cm tail.
These two leaves hang from cords beside the tassel at one pointed end.
Building the Main Floral Panels
Each major section centers on one large pink flower.
Place a large flower on a blocking mat or flat work surface.
Arrange four large olive leaves around it in diagonal positions. The leaf tips should point away from the flower while their bases disappear slightly beneath the outer pink petals.
Add two small pink flowers in the remaining side openings.
The resulting floral group should remain open enough for cream chain connectors to be visible between the motifs.
Repeat for the second and third large flowers.
Do not sew the entire group together yet. Final spacing depends on the cream framework.
Cream Lace Connector
Yarn: ivory.
The photograph uses an open cream structure around the flowers and leaves rather than a solid background.
Attach cream yarn to the edge of one large flower.
Connector 1: Ch 6 and sc into the nearest leaf edge.
Connector 2: Ch 7 and sc into the next flower or leaf.
Connector 3: Ch 5 and return to the neighboring motif.
Continue alternating ch-5, ch-6 and ch-7 connectors according to the distance between motifs.
Each leaf should connect to the cream framework at its base and at one point along each side.
Each large flower should have at least four cream connection points distributed around its outer petal layer.
Open Diamond Between Floral Panels
Position one small green flower between two large pink floral sections.
Arrange four olive leaves around the green flower with their points facing diagonally outward.
Join cream yarn to the upper leaf.
Ch 7 and sc into the side leaf.
Ch 7 and sc into the lower leaf.
Continue until all four leaves are connected into a loose diamond.
Add a second round of ch-5 spaces between the existing connectors.
Work (sc, ch 3, sc) at the four outermost points to establish the pointed geometry visible between the main flower sections.
Repeat for the second intermediate panel.
Joining the Five Main Sections
The runner consists of three large-flower sections alternating with two leaf-centered sections.
Lay them in this order:
- Section 1: large pink flower panel
- Section 2: green center with four leaves
- Section 3: large pink flower panel
- Section 4: green center with four leaves
- Section 5: large pink flower panel
Align all five sections along one center line.
Use cream yarn to connect neighboring panels with ch-5 and ch-7 arches. Add at least three connections across each transition: one central connection and one on each side.
Measure after joining every section. The runner should remain straight rather than gradually turning toward one side.
Cream Outer Framework
Once the five sections are connected, work around the entire floral arrangement.
Join cream yarn at one side.
R1: *Ch 5, sc into the next available flower, leaf or connector.* Repeat around the complete runner.
Use ch 6 or ch 7 where a larger gap requires additional length.
R2: Sl st into the first chain space. Work (2 sc, ch 3, 2 sc) into each regular chain space.
At major outer points work (2 sc, ch 5, 2 sc).
R3: Work sc along the solid portions and ch 3 across smaller openings. At each major point work (sc, ch 3, sc).
This round begins defining the pointed perimeter.
Pointed Lace Border
The runner has pronounced geometric points rather than a rounded scalloped edge.
At each marked outer point work:
Point sequence: (sc, hdc, dc, tr, ch 3, tr, dc, hdc, sc).
Between points, work ch 3, sc into the next available edge space, ch 3.
Repeat around the complete runner.
At the two short ends, enlarge the central point by replacing each tr with a double treble if additional length is needed.
Fasten off and weave the tail through dense cream stitches.
Decorating the Side Points
Position the remaining small pink flowers inside selected cream side points.
Do not place one in every opening. Alternating decorated and open spaces preserves the lace effect visible in the reference.
Sew each small flower through its center only.
If a flower rotates after attachment, add one hidden stitch through the base of a petal.
Keep the outer cream point free so the border remains clearly visible around the flower.
Making the Pink Tassel
Cut a piece of cardboard approximately 12 cm wide.
Wrap dusty-pink yarn around the cardboard 40–50 times.
Thread a separate 30 cm strand beneath the wrapped yarn at the top and tie firmly.
Cut through the yarn along the opposite edge of the cardboard.
Remove the bundle.
Wrap another strand around the bundle approximately 1.5 cm below the top. Make six to eight tight wraps and secure the yarn.
Trim the lower edge so the tassel measures approximately 9–10 cm.
Tassel Attachment Cord
Join cream yarn to the central point at one end of the runner.
Ch 12.
Starting in the second ch from the hook, sl st back across the complete chain.
Fasten off.
Thread the tassel’s upper tie through the lower end of the cord and knot securely.
Hide the knot inside the top of the tassel.
Hanging Leaf Cords
Join cream yarn approximately 2–3 cm to the left of the tassel attachment point.
Ch 15 and fasten off.
Sew one small olive leaf to the end of the chain.
Repeat on the right side.
Make one cord approximately two chains shorter than the other if a less rigid finish is preferred.
The two leaf tips should hang slightly above or level with the lower section of the tassel.
Adjusting the Runner Length
The modular layout makes length changes practical. Add or remove complete botanical sections rather than stretching the joining chains.
For a shorter runner, use two large pink flower sections with one leaf-centered section between them.
A medium runner can use the five-section arrangement described here.
For a longer dining table, add another leaf panel followed by another large flower panel.
A current floral lace pattern uses a similar repeat-based approach to length adjustment, adding or removing complete sections before finishing the surrounding construction.
Always block a complete panel before calculating final length. Open connectors can grow during wet blocking.
Assembly
- Crochet the three large layered pink flowers and block only their outer petal layers.
- Make all small pink flowers, green center motifs and olive leaves.
- Add surface-crochet veins to the large leaves before attaching them to any panel.
- Arrange each large flower with surrounding leaves and small blossoms, then photograph the placement.
- Construct the two intermediate leaf panels with one small center motif and four leaves in each section.
- Place all five major sections in one line and connect them with cream chain arches.
- Work the cream framework around the complete runner, checking both long edges for equal width.
- Add the pointed outer border and sew the remaining small flowers into selected side openings.
- Attach the two hanging leaves and pink tassel to one pointed end.
- Weave in all remaining tails, wet-block the runner to its target dimensions, and reshape the flower petals and leaf points after drying.
The completed runner should form one continuous openwork strip with three dominant pink flowers, paired olive foliage, small accent blossoms, cream geometric lace and one tassel end.
How to Keep the Large Flowers Dimensional
The large pink flowers need some height, but excessive curling makes them unsuitable for a table runner.
Block only the largest outer petals against the mat. Leave the middle and inner layers unpinned.
Once dry, turn the innermost petals slightly upward with your fingers.
The middle petals should sit at a lower angle, while the final petal layer rests close to the lace framework.
When attaching a flower, sew through its center and several points of the lowest petal layer. Do not stitch every outer petal to the cream framework.
How to Keep the Openwork Flat
The chain connectors need enough length to span the distance between motifs without pulling them together.
Lay the work flat after every five or six new connectors.
If two neighboring leaves begin pointing toward each other instead of lying naturally, the connecting chain is probably too short.
Replace it with one containing one or two additional chains.
If a connector sags noticeably below the surrounding work, remove one chain.
Small corrections during assembly are more effective than attempting to stretch the complete runner during final blocking.
7 Technical Tips for This Floral Table Runner
- Block the three large flowers to matching diameters. A difference greater than approximately 5 mm shifts the center line when the panels are connected. Compare all three before beginning assembly.
- Measure chain connectors instead of pulling them tight. A short ch-5 bridge can draw two motifs inward and create a permanent buckle. Add one or two chains where the natural gap is wider.
- Attach each large flower at four or more points. A single center seam allows a 13–15 cm flower to rotate. Secure the center and several sections of the lowest petal layer.
- Leave leaf tips unattached. Sewing the complete perimeter removes the raised foliage effect. Anchor approximately the lower third of each leaf and leave the pointed section free.
- Check the center line after every panel join. A 1 cm sideways shift repeated across several sections creates a visibly curved runner. Correct alignment before adding the outer framework.
- Keep the tassel attachment light. A heavy tassel can stretch the cream point when the runner is lifted. Limit the finished tassel to approximately 9–10 cm and avoid heavy beads.
- Weave assembly tails through solid stitches. Chain arches provide little friction for short tails. Run each tail through approximately 3 cm of dense crochet, reverse direction once, then trim.
Blocking the Finished Runner
Final blocking controls the pointed outline and the symmetry of the open cream framework.
Dampen the runner according to the yarn manufacturer’s instructions. Remove excess water without twisting the motifs.
Lay the runner on blocking mats and establish the long center line first.
Pin the centers of the three large pink flowers along that line.
Next, pin the two intermediate green motifs and compare the distance between all five sections.
Move outward to the leaves. Pin only the tips required to establish the width.
Target approximately 34 cm across the widest points and approximately 135 cm in length, excluding the hanging tassel if necessary.
Pin every major cream border point individually.
Keep the tassel outside the damp blocking area and comb its strands straight with your fingers.
Leave the runner pinned until completely dry.
Color Placement
The photograph relies on three principal colors rather than a large palette. Cream forms the structural framework, dusty pink identifies the flowers, and olive green separates the botanical sections.
Keep cream dominant if you want the runner to retain its open lace appearance. Increasing the amount of pink around the border can make the individual flower motifs less distinct.
Olive should appear in every major section. Repeating green leaves from one end to the other ties the separate pink flowers into one composition.
Alternative palettes can use ivory with terracotta and sage, white with blue and eucalyptus green, or beige with burgundy and dark olive.
Maintain clear value differences between the framework, flowers and foliage so the open geometry remains visible.
Choosing Yarn for the Flowers and Leaves
DK cotton provides a useful balance between definition and flexibility. A 2024 Ravelry flower-table-runner pattern specifies Stylecraft Classique Cotton DK with a 3.5 mm hook and notes that the finished dimensions can be changed by altering the number of floral units.
Sport-weight cotton can produce a finer interpretation. If changing to sport yarn, make one large flower and one leaf before calculating the runner dimensions.
Worsted cotton produces substantially larger motifs. A longer hook and fewer panels may then be required to keep the runner within the intended size.
Avoid fuzzy fibers for the leaves. Surface-crochet veins and pointed edges are easier to see in smooth yarn.
Finishing
Inspect the runner from both long sides after blocking. The outer cream points should create a repeating rhythm rather than one perfectly straight line.
Check every large flower next. Its center should remain aligned with the central axis, while the outer petals may overlap the cream framework slightly.
Turn the runner over and inspect the joining tails. No knot should sit directly beneath an open chain space where it can become visible from the front.
Test the tassel by lifting the runner several times. Reinforce the attachment point if the cream end begins stretching.
Finally, reshape the free leaf tips and raised flower petals by hand rather than pinning the dimensional sections completely flat.
Conclusion
This construction combines three large pink flowers, olive leaf groups, small accent blossoms, open cream connectors, pointed edging, two hanging leaves and a pink tassel. Make one complete flower-and-leaf section first and block it before committing to the remaining motifs; that sample establishes the actual width and helps calculate the final length. Assemble the five main panels before working the perimeter so alignment can still be corrected. Save this pink floral crochet table runner pattern to Pinterest or share the finished runner on Instagram with #PinkGardenTableRunner. For this specific design, would you keep one tassel end or repeat the hanging leaves and tassel at both ends? “`1









