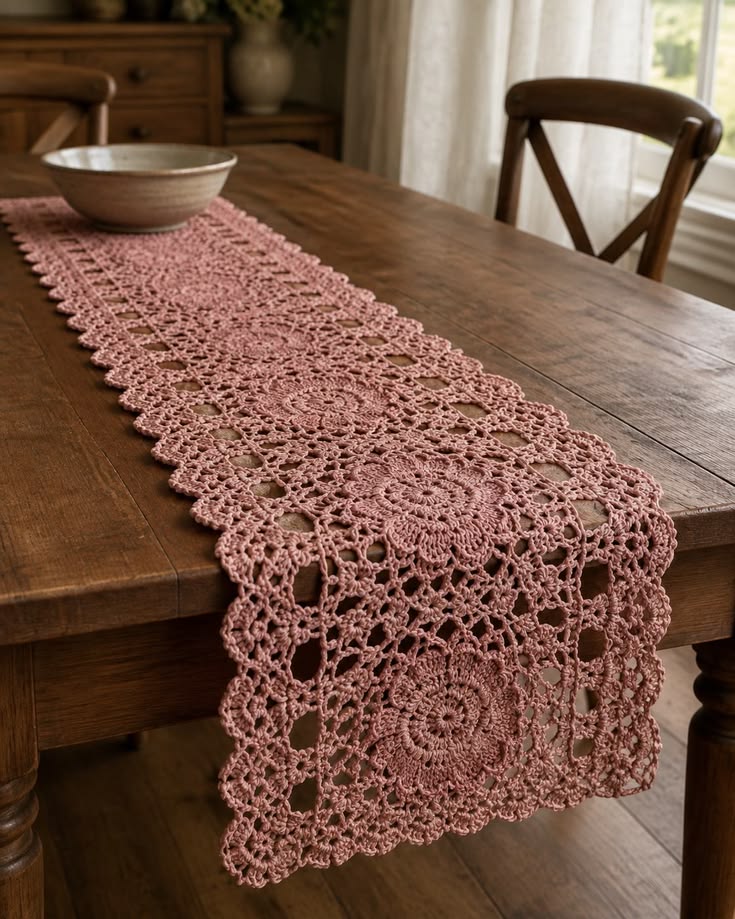
Three large circular medallions interrupt the diamond mesh before the lace drops over the table edge, and that transition controls the structure of this runner. This crochet lace table runner pattern uses dusty-rose cotton, repeating medallions, open chain spaces, and a scalloped border. A 3.5 mm hook with fine sport or light DK cotton creates a practical balance between visible lace and enough body to hold the runner flat after blocking.
The Design: What Makes This Lace Table Runner Different
The runner combines several densities instead of repeating one stitch from end to end. Circular medallions form the dominant motifs, diamond mesh opens the fabric around them, and denser rectangular lace sections stabilize the long center.
The second structural feature is the uninterrupted scalloped perimeter. Each scallop follows the existing lace rather than being attached as a separate trim, which keeps the dusty rose crochet table runner visually continuous.
Large open spaces appear beside the medallions. Those openings reduce weight and allow the circular motifs to remain distinct. A common error with a crochet medallion table runner is tightening chain spaces more than solid stitches. The medallions then cup while the surrounding mesh pulls inward. Measure representative chain loops before joining sections and maintain the same tension throughout.
Project Info at a Glance
| Skill Level | Time | Finished Size | Hook | Best For |
|---|---|---|---|---|
| Intermediate | 12–18 hours | Approx. 32 × 145 cm | 3.5 mm | Dining tables, sideboards and console tables |
The dimensions above are a target for this original photo-inspired reconstruction. Yarn thickness, tension, motif count and blocking determine the actual finished measurements.
Materials and Tools
Yarn
A smooth cotton yarn gives the open chain spaces and medallion stitches enough definition to remain visible from table height. Fine sport or light DK cotton produces a heavier interpretation than traditional thread crochet while preserving the lace structure.
- Dusty rose: fine sport/light DK cotton — approximately 300–350 g
- Optional matching reserve: approximately 30–40 g for length adjustments and border corrections
Buy all yarn from the same dye lot. A single-color lace runner exposes even small color differences because there is no contrasting yarn to separate sections.
Tools
- 3.5 mm crochet hook
- Tapestry needle
- Sharp scissors
- Locking stitch markers
- Blocking mats
- Rust-resistant blocking pins
- Measuring tape
- Row counter — optional
Abbreviations
- MR — magic ring
- ch — chain
- sc — single crochet
- hdc — half double crochet
- dc — double crochet
- tr — treble crochet
- sl st — slip stitch
- sp — space
- sts — stitches
- rep — repeat
- dc2tog — double crochet two together
- picot — ch 3, sl st into first ch
Invisible decreases are not required because this project is constructed as flat lace; shaping is produced with chain-space expansion, increases and motif placement.
Dusty Rose Crochet Lace Table Runner Pattern
The instructions below form an original pattern based on the visible geometry of the supplied photograph. They are not a transcription of another designer’s pattern. Make the circular medallions first, block them, then construct and join the surrounding lace.
Large Circular Medallion — Make 3
Yarn: dusty rose.
R1: Make MR. Ch 3 and work 15 dc into ring. Join with sl st to top of beginning ch 3. (16 dc)
R2: Ch 3, dc in same st, 2 dc in each remaining stitch. Join. (32 dc)
R3: Ch 4, skip 1 st, dc in next st, *ch 1, skip 1 st, dc in next st*. Repeat around. Join to third chain of beginning ch 4. (16 ch-1 spaces)
R4: Sl st into first ch-1 sp. Ch 3, 2 dc in same sp, ch 2, *3 dc in next ch-1 sp, ch 2*. Repeat around. Join. (16 groups)
R5: Sl st to first ch-2 sp. Ch 1, sc in same sp, ch 5, *sc in next ch-2 sp, ch 5*. Repeat around. Join. (16 ch-5 spaces)
R6: Sl st into first ch-5 sp. Work (sc, hdc, 3 dc, hdc, sc) in each ch-5 sp around. Join. (16 shells)
R7: Sl st to center dc of first shell. Ch 1, sc in center dc, ch 6, *sc in center dc of next shell, ch 6*. Repeat around. Join. (16 ch-6 spaces)
R8: Sl st into first ch-6 sp. Work (2 dc, ch 2, 2 dc) in each ch-6 sp. Ch 2 between groups. Join.
R9: Sl st into first internal ch-2 sp. Work (3 dc, ch 3, 3 dc) in each internal ch-2 sp. Ch 3 between groups. Join.
R10: Ch 1. Work sc across each 3-dc group. In each ch-3 space work (sc, ch 4, sc). Continue around. Join.
R11: Sl st into first ch-4 sp. Work (sc, hdc, 3 dc, picot, 3 dc, hdc, sc) in each ch-4 sp. Join.
Fasten off with a 20 cm tail.
The completed medallion should remain circular rather than forming a bowl. If it cups before blocking, loosen the ch-6 spaces on the next medallion instead of increasing the number of stitches randomly.
Medallion Blocking
Block all three medallions before building the surrounding mesh.
Dampen each motif according to the yarn manufacturer’s instructions. Pin the center first, followed by four opposite points around the circumference.
Add pins between those points until the motif forms a balanced circle.
Target approximately 18–20 cm in diameter for this version.
All three medallions should finish within approximately 5 mm of one another. Differences larger than that become increasingly difficult to disguise once the mesh is joined.
Diamond Mesh Panel — Make 4 Main Sections
Yarn: dusty rose.
These sections connect the medallions and create the large open diamonds visible along the runner.
Foundation: Ch 43.
Row 1: Sc in second ch from hook. *Ch 5, skip 3 chains, sc in next ch*. Repeat across. Turn.
Row 2: Ch 5, sc in first ch-5 sp, *ch 5, sc in next ch-5 sp*. Repeat across. Turn.
Row 3: Repeat Row 2.
Row 4: Ch 3, work 4 dc in first ch-5 sp, ch 3, *5 dc in next ch-5 sp, ch 3*. Repeat across. Turn.
Row 5: Ch 1, sc in each dc, 3 sc in each ch-3 sp across. Turn.
Row 6: Ch 5, skip 3 sts, sc in next st, *ch 5, skip 3 sts, sc in next st*. Repeat across. Turn.
Rows 7–11: Repeat the mesh structure established in Rows 2–6.
Fasten off with a 25 cm sewing tail.
Make four panels. Their blocked widths should match the connection area between neighboring medallions.
Long Straight Lace Center Panel
The far section of the photographed runner contains a narrower rectangular lace repeat rather than another full circular motif. This keeps the runner visually varied while extending its useful length.
Foundation: Ch 49.
Row 1: Dc in fourth ch from hook and in each chain across. Turn.
Row 2: Ch 3, dc in next 2 sts, *ch 2, skip 2 sts, dc in next 3 sts*. Repeat across. Turn.
Row 3: Ch 3, dc in each dc and work 2 dc in each ch-2 sp. Turn.
Row 4: Ch 5, skip 2 sts, sc in next st, *ch 5, skip 3 sts, sc in next st*. Repeat across. Turn.
Row 5: Ch 3, work 4 dc in each ch-5 sp, ch 1 between groups. Turn.
Row 6: Ch 1, sc in each dc and sc in each ch-1 sp. Turn.
Row 7: Ch 4, skip 1 st, dc in next st, *ch 1, skip 1 st, dc in next st*. Repeat across. Turn.
Row 8: Ch 1, sc in each dc and each ch-1 sp. Turn.
Repeat Rows 2–8 until this section reaches the required length.
For a runner near 145 cm overall, target approximately 35–45 cm for the straight lace section after blocking.
Joining the Main Medallions
Lay the three blocked medallions in a straight line.
Rotate each motif so corresponding shell groups point in the same direction.
Place one diamond-mesh panel between the first and second medallions.
Using a tapestry needle and matching yarn, attach one end of the mesh panel to approximately one-quarter of the first medallion’s circumference.
Connect the opposite end to the second medallion.
Repeat between the second and third medallions.
Use the remaining mesh sections where required to connect the medallion area to the rectangular lace portion.
Keep all seams flexible. Tight joining stitches can pull a circular motif into an oval.
Side Diamond Lace
The large medallions need additional openwork along both sides to bring the runner to its full width.
Join yarn at one outer medallion point.
Row 1: Ch 5, skip approximately 3 edge stitches, sc into next available edge point. Repeat along the side. Turn.
Row 2: Ch 5, sc into next ch-5 sp across. Turn.
Row 3: Ch 6, sc into next ch-5 sp across. Turn.
Row 4: Ch 5, sc into next ch-6 sp across. Turn.
Row 5: Work (sc, ch 3, 3 dc, ch 3, sc) into each available mesh space.
Fasten off.
Repeat on the opposite long side.
Do not force identical stitch counts if the attachment points differ slightly around a medallion. Instead, maintain equal finished widths on both sides.
End Lace Extension
The end intended to hang over the table can be extended by one complete medallion plus surrounding mesh.
Position the final circular medallion so its center sits approximately 18–22 cm from the short edge of the preceding lace section.
Join it with ch-5 mesh in the same manner as the side panels.
Add mesh around the remaining three sides until the extension reaches the same width as the main runner.
This construction allows the end medallion to remain fully visible when the runner drops vertically over the table edge.
First Perimeter Round
Once all medallions and lace sections are joined, work around the complete perimeter.
Join yarn at a straight section.
R1: Ch 1 and sc evenly around.
Along straight row ends, work approximately 2 sc around each dc row end and 1 sc around each sc row end.
Across open chain sections, place enough sc into each space to cover the chain without bunching it.
At corners or pronounced outer points, work (sc, ch 2, sc).
Join with sl st.
Openwork Border Round
R2: Ch 5, skip 2 sts, sc in next st, *ch 5, skip 2 sts, sc in next st*. Repeat around.
Adjust by skipping 1 or 3 stitches occasionally where necessary to distribute the arches evenly.
R3: Sl st into first ch-5 sp. Work (sc, hdc, 3 dc, hdc, sc) in each ch-5 sp around.
Join.
Scalloped Outer Border
R4: Sl st to center dc of first shell. Ch 1, sc in center dc, ch 5, sc in center dc of next shell. Repeat around.
R5: In each ch-5 sp work (sc, hdc, 5 dc, hdc, sc).
R6: Sl st to center dc of first scallop. *Sc in center dc, picot, sc in same st, ch 3*. Repeat around.
Join and fasten off.
The border should create a continuous sequence of rounded points without pulling the mesh inward.
How to Adjust the Runner Length
The modular structure provides three practical ways to change the finished length.
The first method is adding another medallion. This produces the largest increase and preserves the circular motif sequence.
The second method is extending the rectangular lace section. Repeat its established row sequence until the required measurement is reached.
The third method is adding several rows of diamond mesh between existing motifs. This works for smaller adjustments where another full medallion would make the runner too long.
Measure all sections after blocking rather than relying on unblocked dimensions. Open cotton lace can change noticeably when pinned to its intended geometry.
Assembly
- Crochet all three circular medallions and check the stitch count after every round.
- Block the medallions to matching diameters before constructing any joining panels.
- Make the diamond-mesh sections and rectangular lace extension, then block those pieces separately.
- Arrange all components on a flat surface and establish the complete center line of the runner.
- Join the medallions to the connecting mesh without pulling the circular edges inward.
- Attach the straight lace section and measure both long edges to confirm equal overall length.
- Add side mesh until the runner reaches approximately 32 cm in width.
- Work one stabilizing single-crochet round around the complete assembled piece.
- Add the openwork and scalloped border while checking the fabric for ruffling after every round.
- Weave all yarn tails through solid stitches, wet-block the finished runner to its target dimensions, and allow it to dry completely while pinned.
The completed runner should form one continuous dusty-rose lace strip with circular medallions aligned along its center and an evenly scalloped outer edge.
Keeping the Circular Medallions Flat
Circular lace depends on the relationship between solid stitches and open spaces. Adding stitches whenever a section appears tight can solve one round while creating excessive fabric in the next.
Place an unfinished medallion on a flat surface after every second round.
If the outer edge curls upward, first inspect the chain tension. Tight chains frequently cause cupping even when the stitch count is adequate.
If the outer edge forms visible waves, the round contains too much circumference. Check for accidental extra groups before modifying the pattern.
Blocking can correct mild irregularities. It cannot reliably correct a medallion with several unnecessary repeats.
Creating Even Diamond Mesh
Open mesh exposes differences in tension more clearly than dense crochet. One tight chain can make the surrounding diamonds noticeably smaller.
Allow each ch-5 loop to rest naturally on the hook before anchoring it with the next single crochet.
Do not pull the final chain tight against the hook shaft.
Compare several finished openings. They should have approximately the same height and width before blocking.
If the chains repeatedly work up too tightly, move to a 4 mm hook only for the chain-heavy sections and return to the 3.5 mm hook for solid stitches.
How to Keep the Long Edges Straight
The photograph combines circular and rectangular components, making edge control more important than it is in a simple row-based runner.
Measure from the center line to the outer edge after every major assembly stage.
If one side is wider, determine whether the difference comes from mesh depth or motif positioning before adding the border.
Do not use the final scalloped round to disguise a major width difference. A decorative border follows the underlying edge; it does not correct structural asymmetry.
After the first perimeter round, place the runner flat again. This is the last practical stage for correcting a misplaced join without removing several rounds of edging.
7 Technical Tips for a Cleaner Lace Runner
- Measure all three medallions after blocking. A diameter difference greater than approximately 5 mm can pull the joining mesh off center. Correct motif size before sewing the components together.
- Use a stitch marker at the beginning of every circular round. Joining into the wrong chain can shift the medallion repeat by one stitch. That error becomes increasingly visible as the diameter grows.
- Do not tighten ch-5 spaces. Short chain loops create small diamonds and pull neighboring medallions inward. Compare several loops before continuing a full mesh panel.
- Check for ruffling after the first border round. Excess single crochets along row ends produce waves before the decorative scallops are added. Remove extra stitches rather than attempting to block severe ruffles flat.
- Keep joining seams flexible. A rigid 8–10 cm seam can distort a round motif into an oval. Stop pulling the sewing yarn as soon as the two lace edges meet.
- Pin scallop peaks at equal intervals. A difference of 1 cm repeated along a long edge makes the finished border appear irregular. Measure several consecutive scallops while blocking.
- Weave yarn tails through solid sections. A tail hidden only inside chain mesh can become visible after washing. Run each tail through approximately 3 cm of dense stitches, reverse direction, then trim.
Blocking the Crochet Lace Table Runner
Blocking determines the final geometry of this design. It opens the diamond mesh, rounds the medallions and separates the individual scallops.
Dampen the runner according to the care requirements of the selected cotton yarn. Remove excess water without twisting the fabric.
Place the runner on blocking mats and establish its center line first.
Pin the centers of all circular medallions along that line. Next, pin four opposite points on each motif to restore their circular shape.
Move outward to the long edges. Target approximately 32 cm in overall width for this reconstruction.
Establish the total length next. Aim for approximately 145 cm, or use the measurement required for the intended table.
Finish by pinning every major scallop. The outer points should remain aligned even where the underlying mesh changes direction.
Leave the runner pinned until completely dry.
Choosing Yarn for Defined Lace
Cotton is particularly useful for this construction because it holds blocked chain spaces more predictably than highly elastic fibers. Linen and cotton-linen blends are also practical choices when a crisper fabric is preferred.
A smooth yarn reveals the medallion geometry better than a heavily brushed or fuzzy fiber.
Traditional crochet thread will produce finer lace and require a substantially smaller hook. Sport or light DK yarn creates a heavier runner closer to the apparent scale in the reference photograph.
Whatever yarn is selected, make one complete medallion before purchasing yarn for a very long runner. Block that sample, measure it, and confirm that its scale suits the intended table.
Dusty Rose Color Selection
The single-color treatment places all attention on stitch geometry. Without contrasting yarn, texture and negative space provide the visual separation between sections.
A muted dusty rose works particularly well because the circular centers remain visible without creating the sharp contrast of a multi-color motif runner.
For a lighter version, substitute antique blush, pale mauve or warm cream. Deeper alternatives include muted berry, terracotta or wine.
Keep the entire runner within one dye lot. A color change halfway through a single-color lace project can remain visible even when the yarn labels list the same shade name.
Finishing
Inspect the runner from the wrong side before trimming the final yarn tails. Check every medallion connection and all transition points between mesh and solid crochet.
Turn the work right side up and examine the long edges from one end. Both sides should follow the same general line without one side expanding around a particular motif.
Check the table-overhang section separately. The hanging medallion should remain centered when the runner is positioned lengthwise on the table.
Reshape individual scallops by hand after storage or washing. If the runner requires more substantial correction, damp-block it again rather than stretching isolated chain spaces.
Conclusion
This construction combines circular medallions, diamond mesh, denser rectangular lace and a continuous scalloped border in one monochromatic runner. Make and block the first medallion before committing to the full project; its finished diameter establishes the scale of every surrounding section. Once the three main motifs match, assemble the center line before adding side lace and edging. Save this crochet lace table runner pattern to Pinterest or share the finished version on Instagram with #DustyRoseLaceRunner. For this specific design, would you extend the runner with another circular medallion or add more of the narrow rectangular lace section? “`1









