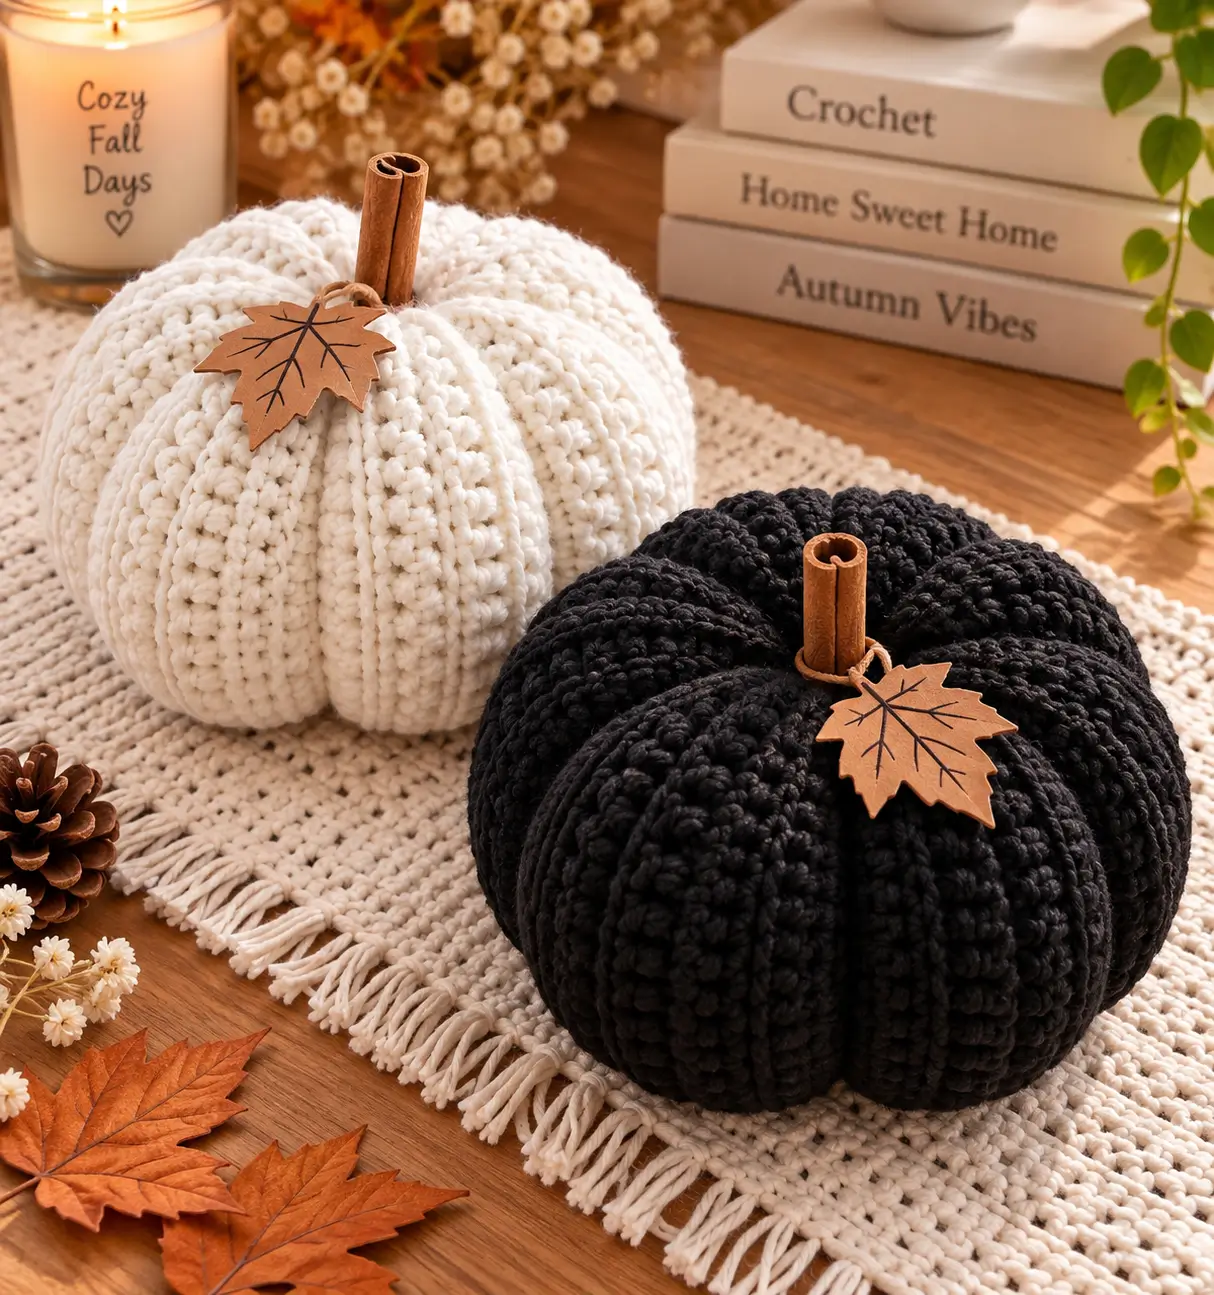
A cinnamon stick changes the entire crown of a crochet pumpkin: the center needs to close tightly enough to grip the narrow wooden stem without flattening the surrounding lobes. This chunky crochet pumpkin pattern recreates the cream and black pumpkins with deep vertical ribbing, a squat stuffed shape and a natural cinnamon-stick stem. Super bulky yarn and a 9 mm hook produce a substantial tabletop pumpkin suitable for fall and Halloween displays.
The Design: What Makes This Ribbed Pumpkin Different
The pumpkin begins as a flat rectangle rather than a sphere worked in continuous rounds. Back-loop crochet creates parallel ridges across that rectangle. Once the short edges are joined, those ridges run vertically from the crown to the base and immediately establish the pumpkin structure.
Additional sculpting strands deepen the major grooves after stuffing. This two-stage approach is useful because the crochet texture creates numerous narrow ribs while the shaping yarn establishes the larger pumpkin lobes.
The photograph also replaces a crocheted stem with a real cinnamon stick. That keeps the crown compact and adds a rigid vertical element without requiring another stuffed component.
The main construction error is excessive stuffing. A rigidly packed pumpkin resists compression, making the sculpted channels shallow and forcing the top opening apart.
Project Information
| Skill Level | Hook | Yarn | Finished Size | Construction |
|---|---|---|---|---|
| Easy to Intermediate | 9 mm | Super Bulky #6 | Approx. 15 cm high × 20–23 cm wide | Flat ribbed rectangle |
The finished dimensions are targets for this photo-inspired version. Yarn thickness, tension, stuffing density and the number of rows will alter the final measurements.
Materials and Tools
Yarn
- Cream super bulky yarn — approximately 90–120 g per pumpkin
- Black super bulky yarn — approximately 90–120 g per pumpkin
- Matching sewing yarn — use the pumpkin yarn or a strong coordinating yarn for sculpting
Only one body color is required for each pumpkin. Use cream for the light version or black for the dark version.
Tools and Additional Materials
- 9 mm crochet hook
- Polyester fiberfill
- Long tapestry or doll needle
- Scissors
- Stitch markers
- 1 cinnamon stick approximately 8–10 cm long per pumpkin
- Strong sewing thread if additional stem anchoring is required
- Optional brown cord or jute
- Optional wooden, faux-leather or felt maple-leaf tag
A published chunky pumpkin pattern uses super bulky yarn, a 9 mm hook and approximately 50–60 yards of yarn for a smaller 13-inch-circumference pumpkin. The larger version here requires additional yarn and stuffing.
Abbreviations
- ch — chain
- sc — single crochet
- hdc — half double crochet
- sl st — slip stitch
- BLO — back loop only
- st/sts — stitch/stitches
The turning chain does not count as a stitch unless specifically stated.
Chunky Crochet Pumpkin Pattern
The pumpkin body is worked flat. Back-loop-only stitches form the ribbed surface, after which the rectangle is converted into a tube, gathered, stuffed and sculpted.
Ribbed Pumpkin Body
Yarn: cream or black super bulky yarn.
Ch 21.
Row 1: Starting in second ch from hook, hdc in each ch across. Turn. (20)
Row 2: Ch 1, hdc BLO in each st across. Turn. (20)
Row 3: Ch 1, hdc BLO in each st across. Turn. (20)
Repeat Row 3 until the rectangle contains approximately 36 rows, or until its long dimension measures approximately 2 to 2.5 times its short dimension.
Count 20 stitches after every few rows. Dropping an edge stitch produces a tapered rectangle, which later causes an uneven pumpkin crown.
Do not fasten off yet if you plan to crochet the seam.
Checking the Rectangle
Lay the rectangle flat without stretching it.
The short dimension determines the approximate height of the pumpkin. The longer row-end edge controls the circumference.
For a broader pumpkin, add more rows rather than increasing the number of stitches in each row.
For a taller pumpkin, increase the starting chain.
Both long edges should remain parallel. Correct any significant taper before assembling the body.
Joining the Pumpkin Body
Bring the first and last rows together with the right sides facing each other.
Slip stitch through the corresponding loops of both edges from one end to the other.
Alternatively, fasten off and whip stitch the two edges together with a tapestry needle.
Turn the resulting tube right side out.
The raised crochet ribs should now run vertically.
Gathering the Bottom
Cut a strand of matching yarn approximately 75–90 cm long.
Thread it onto a large tapestry needle.
Weave the needle in and out through the row ends around one open edge of the tube. Catch approximately one row end with every pass.
After completing the circle, pull the yarn gradually.
The opening should collapse toward the center.
Pass the needle across the remaining hole several times to reinforce the closure.
Knot securely.
Do not trim the yarn immediately. Weave it through the interior of the pumpkin before cutting.
Stuffing the Pumpkin
Turn the gathered end downward.
Add polyester fiberfill in small separated pieces.
Fill the outer perimeter first, then add stuffing to the center.
Continue until the body is rounded but still compressible.
Press downward on the upper edge periodically. The pumpkin should squash into a broad shape rather than spring immediately back into a tall cylinder.
Avoid packing the center as firmly as the outer sections. The central area must compress when the crown is gathered.
Gathering the Top
Thread another 75–90 cm strand of matching yarn through the row ends around the upper opening.
Pull gradually while redistributing the stuffing with your fingers.
Stop when the opening is approximately 2–3 cm wide.
Do not close the center completely because the cinnamon-stick stem must pass into the pumpkin.
Secure the gathering yarn temporarily.
Creating the Pumpkin Lobes
Cut a long strand of matching yarn approximately four to five times the circumference of the pumpkin.
Thread it through a long doll or tapestry needle.
Insert the needle through the bottom center and bring it out through the top opening.
Run the yarn down the outside of the pumpkin, positioning it between two raised crochet ribs.
Insert the needle through the bottom center again and bring it back through the crown.
Pull gently until a deep vertical channel forms.
Repeat around the pumpkin to create approximately 6 to 8 major lobes.
Keep the tension consistent. One overly tight strand can make a single section substantially narrower than the others.
Flattening the Pumpkin
Once the sculpting strands are installed, place the pumpkin on a flat surface.
Press the crown downward while supporting the sides.
Redistribute the fiberfill until the widest point sits around the middle of the pumpkin.
The lower surface should be broad enough for the pumpkin to stand without rolling.
Check the shape from directly above. The major lobes should have approximately equal widths.
Cinnamon Stick Stem
Stem: natural cinnamon stick approximately 8–10 cm long.
Insert approximately 3–4 cm of the cinnamon stick through the remaining crown opening.
Push it into the stuffing rather than forcing it against the bottom of the pumpkin.
Tighten the gathering yarn around the stem.
Pass the yarn across opposite sides of the opening several times.
Pull firmly enough to grip the cinnamon stick without crushing the crochet stitches.
Tie securely and weave the yarn into the pumpkin body.
The exposed stem should measure approximately 4–6 cm depending on the finished pumpkin height.
Optional Double Cinnamon Stem
The reference photograph gives the stem a substantial appearance. To reproduce that effect, place two narrow cinnamon sticks side by side.
Bind the lower ends together with strong thread or brown cord before inserting them into the pumpkin.
Push both pieces into the same crown opening.
Tighten the crochet gathering yarn around the combined stem.
Brown Leaf Tag
The photographed pumpkin uses a flat brown maple-leaf-style tag rather than a crocheted leaf.
Cut a small leaf approximately 6–8 cm long from brown felt, faux leather, kraft material or thin craft wood.
Add leaf veins with dark thread, embroidery or a permanent craft marker.
Punch or create a small hole near the base.
Thread a short piece of brown cord through the opening and tie the leaf loosely around the cinnamon stem.
Keep the tag removable if the pumpkin will be stored for multiple seasons.
Assembly
- Crochet the 20-stitch ribbed rectangle until it reaches approximately 36 rows or the required width.
- Join the first and last rows to convert the rectangle into a tube, then turn the seam toward the inside.
- Gather one open edge completely and reinforce the center with several crossing stitches.
- Add fiberfill gradually, keeping the center slightly softer than the outer circumference.
- Gather the upper opening until approximately 2–3 cm remains for the stem.
- Pass long shaping strands from the bottom center to the crown to establish 6–8 major pumpkin lobes.
- Compress the pumpkin vertically and redistribute the stuffing until the base sits flat.
- Insert the cinnamon stick approximately 3–4 cm into the crown and tighten the gathering yarn around it.
- Tie the optional brown maple-leaf tag around the base of the stem without covering the center completely.
- Rotate the pumpkin, adjust any uneven lobes and weave every remaining yarn tail into the interior.
The completed pumpkin should have a squat profile, clearly visible vertical ribs, a recessed crown and a firmly anchored cinnamon-stick stem.
How the Ribbed Texture Works
Back-loop-only crochet is responsible for the narrow raised lines visible across the pumpkin. Each stitch normally has two top loops. Working into only the back loop leaves the front loop unused, creating a ridge along the fabric.
The orientation changes during assembly. Those horizontal ridges on the flat rectangle become vertical ribs when the short ends are joined into a tube.
This construction is documented across multiple ribbed pumpkin patterns because it creates substantial texture without complicated increases or decreases.
The larger grooves are separate. They come from the shaping strands passed through the center after stuffing. Combining both techniques produces the dense ribbing and pronounced segmentation visible in the cream and black pumpkins.
Making the Cream Crochet Pumpkin
Use cream or warm white super bulky yarn for the first version.
Light yarn exposes stitch definition clearly, so count the edge stitches carefully. A missed final stitch produces a visible diagonal line after the rectangle is assembled.
Choose a medium-brown cinnamon stick for contrast. A tan or brown leaf tag keeps the palette close to the photographed design.
If the finished pumpkin will sit on a cream runner or blanket, use a slightly warmer ivory yarn rather than pure optical white. The ribbing remains visible when the pumpkin and background differ slightly in tone.
Making the Black Crochet Pumpkin
The same stitch counts can be used for the black version.
Black yarn makes individual stitches harder to see, so place a marker in the first and final stitch of the row if necessary. Maintain exactly 20 hdc throughout the rectangle.
Texture becomes particularly important with dark yarn. Keep the BLO placement consistent because the raised lines are what prevent the surface from appearing visually flat.
Use a brown cinnamon stem and brown leaf tag to break up the black crown.
How to Change the Pumpkin Size
The rectangle construction makes resizing relatively simple.
To create a taller pumpkin, add stitches to the starting chain. For example, increasing from 20 to 24 working stitches adds height without directly changing the circumference.
To make a wider pumpkin, crochet additional rows. The long row-end edge eventually becomes the circumference of the stuffed form.
For a smaller pumpkin, reduce both measurements proportionally.
A useful checkpoint is the rectangle itself. Its long dimension should generally be substantially longer than its short dimension so the finished object becomes broad and rounded rather than cylindrical.
Published rectangle-style pumpkin patterns use the same basic relationship: the foundation controls height, while the number of repeated ribbed rows controls circumference.
7 Technical Tips for Better Crochet Pumpkins
- Rectangle tapering: maintain exactly 20 stitches in every row. Missing the final BLO stitch repeatedly creates a wedge instead of a rectangle and produces an uneven crown.
- Ribbing disappearing: insert the hook through the back loop only after Row 1. Working through both loops for even two or three consecutive rows interrupts the vertical ridge after assembly.
- Pumpkin becoming too tall: compress the stuffed tube before tightening the crown. The finished height should be noticeably shorter than the original rectangle width because the pumpkin needs a squat profile.
- Shaping yarn showing: position each sculpting strand inside an existing crochet valley. Matching yarn placed directly over a raised ridge remains much more visible.
- Lobes becoming unequal: mark six or eight approximately equal positions around the crown before sculpting. Random placement can leave one section twice as wide as its neighbor.
- Cinnamon stem becoming loose: insert at least 3–4 cm of the stick into the stuffing. A stem resting only inside the gathered crochet opening can tilt when the pumpkin is moved.
- Stuffing hiding the grooves: keep the pumpkin compressible rather than rigid. If the sculpting strands require excessive force to produce channels, remove some fiberfill before tightening them further.
Stuffing for a Squat Pumpkin Shape
The stuffing technique determines whether the finished project resembles the photographed pumpkin or a tall cylinder.
Start by filling around the perimeter. Push small pieces into the lower outside edge, rotate the pumpkin and repeat. Continue upward while leaving the central column comparatively soft.
After the outer shell holds its shape, add a smaller amount of filling to the center.
Before closing the crown, press both open ends toward one another. The body should compress without requiring significant force.
After sculpting, massage the stuffing outward into individual lobes. Add no extra filling unless a section remains visibly collapsed.
Using a Cinnamon Stick Safely in the Finished Pumpkin
Inspect the cinnamon stick before inserting it. Avoid pieces with sharp broken ends that could work through the crochet fabric.
If necessary, lightly smooth a rough lower edge before assembly.
The cinnamon stick is decorative and should remain above the stuffing rather than passing completely through the pumpkin.
Because the stem is a natural material, keep the finished decoration dry. Do not machine wash the assembled pumpkin with the cinnamon stick installed.
For a washable version, replace the cinnamon with a short crocheted brown stem and attach the decorative tag separately.
Finishing and Shaping
Set the pumpkin on the surface where it will normally be displayed. Check the base before trimming the final shaping tails.
If it rocks, press the lower stuffing outward while pushing the bottom center slightly upward. This creates a shallow central recess surrounded by a broader contact area.
Next, inspect the pumpkin from above. Adjust the major lobes until the cinnamon stem sits close to the visual center.
The crown should dip slightly around the stem. If it remains completely flat, pass one matching strand from the top center through the bottom center, pull gently and secure it underneath.
Finally, rotate the leaf tag toward the front without tightening it against the crochet. It should rest over one lobe rather than compressing the crown.
Color Variations
The cream and black combination works because the construction remains identical while the colors produce two distinct decorative effects. The same pattern can also be worked in burnt orange, rust, mustard, olive, taupe or muted terracotta.
For a coordinated group, keep the yarn weight and hook size constant while changing only the number of foundation stitches and rows. This creates several pumpkin sizes with matching rib textures.
Another option is to use the same cream yarn for three pumpkins and vary only their dimensions. Consistent material makes differences in shape more apparent.
A black pumpkin can also serve as the darkest element in an autumn arrangement containing cream, rust and natural wood tones.
Conclusion
The strongest feature of this chunky crochet pumpkin pattern is the combination of narrow BLO ribs and deeper sculpted channels. Crochet a consistent rectangle first, keep the stuffing compressible, then establish the major lobes before inserting the cinnamon stem. For the next step, make the first 10 rows and measure the rectangle before committing to the full body; that check makes resizing much easier. Once finished, save the cream-and-black pumpkin set to Pinterest or share it on Instagram with #ChunkyRibbedCrochetPumpkin. For your two-pumpkin set, would you keep the photographed cream-and-black combination or replace the black pumpkin with burnt orange? “`1









