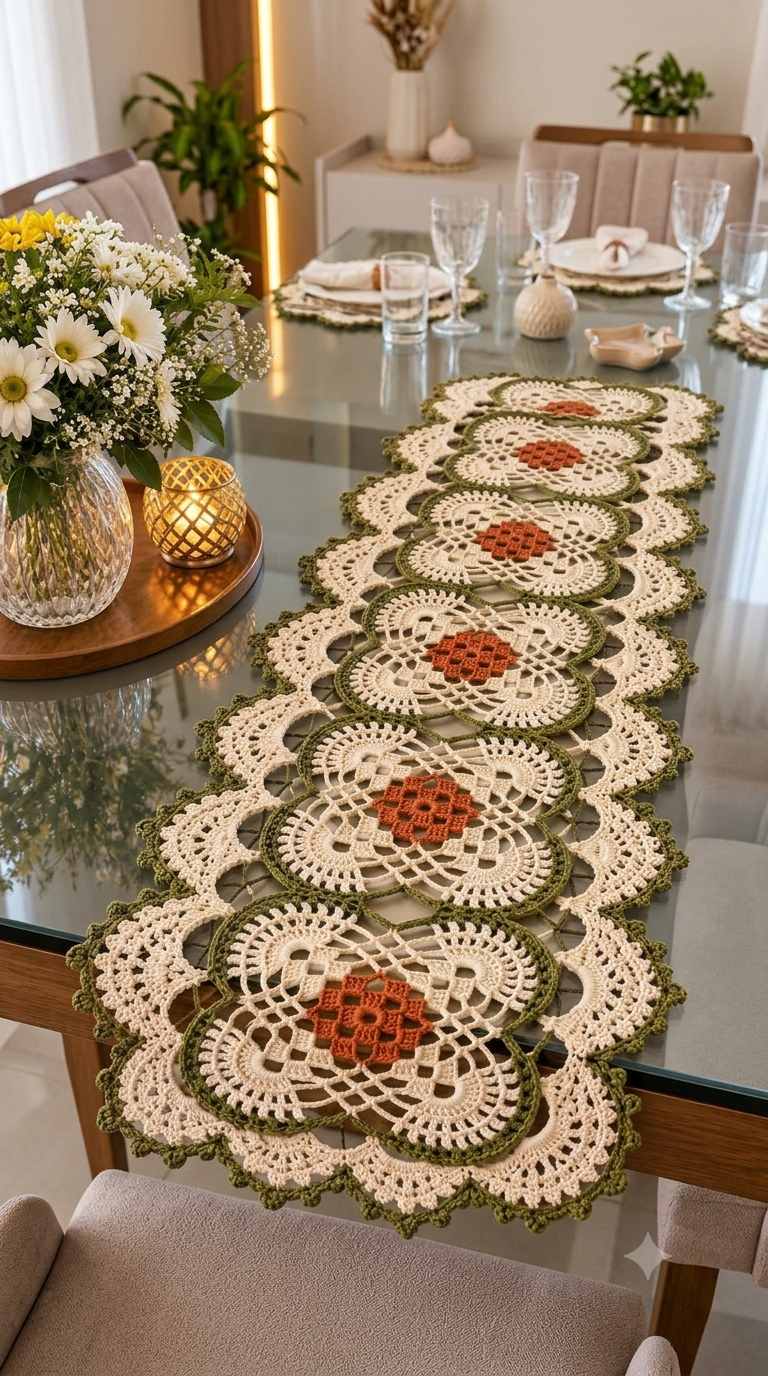
Six terracotta flower centers run down this runner like registration marks, controlling the spacing of every cream-and-olive motif around them. This floral crochet table runner pattern uses sport-weight cotton, a 3 mm hook, and modular lace construction to target roughly 38 × 150 cm after blocking. It suits intermediate crochet skills because the project combines chains, clusters, joined motifs, and shaped edging. Modular construction also makes the length easy to alter.
The Design: What Makes This Floral Runner Different
The runner is built around six large medallions rather than one continuous rectangular stitch repeat. Individual motifs allow the open cream sections to remain symmetrical while the olive round creates a defined boundary between neighboring flowers.
A compact terracotta center provides contrast without making the central strip dense. The cream rounds then expand through chain spaces rather than solid stitches, producing the open structure associated with a crochet flower table runner.
Large side fans perform a second job. They increase the width while breaking up the straight outline of the central medallions. In this type of floral motif crochet, a common error is adding too many stitches to the outer rounds. The motif then ruffles before blocking. Count chain spaces as carefully as solid stitches.
Project Info at a Glance
| Skill Level | Time | Finished Size | Hook | Best For |
|---|---|---|---|---|
| Intermediate | 12–18 hours | Approx. 38 × 150 cm | 3.0 mm | Dining tables, consoles, sideboards |
The finished measurement is a target for this photo-inspired version. Final dimensions depend on yarn, tension, motif count, and blocking.
Materials and Tools
Yarn
A smooth cotton yarn gives the openwork sections enough definition to keep the flower and lace structure visible. Sport-weight or #2 fine cotton works well with a 3.0 mm hook for this construction.
- Cream / natural: sport-weight or #2 cotton — approximately 250 g
- Olive green: sport-weight or #2 cotton — approximately 70 g
- Terracotta / rust: sport-weight or #2 cotton — approximately 40 g
The yarn quantities are working estimates for a runner measuring approximately 38 × 150 cm. Buy additional yarn when changing the length or making a wider border.
Tools
- 3.0 mm crochet hook
- Tapestry needle
- Sharp scissors
- Locking stitch markers
- Blocking mats
- Rust-resistant blocking pins
- Measuring tape
Abbreviations
- MR — magic ring
- ch — chain
- sc — single crochet
- hdc — half double crochet
- dc — double crochet
- tr — treble crochet
- sl st — slip stitch
- sp — space
- sts — stitches
- rep — repeat
- picot — ch 3, sl st into first ch
- dc2tog — double crochet two together
An invisible decrease is normally used for three-dimensional amigurumi shaping and is not required for this flat lace runner.
Floral Crochet Table Runner Pattern
The instructions below create an original runner based on the visible geometry of the reference image. Work joined rounds unless a section specifically states otherwise.
Terracotta Flower Center — Make 6
Yarn: terracotta/rust.
R1: MR, ch 1, work 12 sc into ring; join with sl st. (12)
R2: Ch 3, dc in same st, 2 dc in each remaining st; join. (24)
R3: Ch 1, sc in same st, *ch 3, skip 1 st, sc in next st*; repeat around, ending with ch 3; join. (12 ch-3 spaces)
R4: Sl st into first ch-3 sp. Work *(sc, hdc, 2 dc, hdc, sc) in next ch-3 sp* around. (12 petals)
Fasten off. Leave approximately 12 cm of yarn for weaving in.
The center should remain flat. A strongly cupped center usually indicates that the chain spaces are too tight or the working tension has changed between rounds.
Cream Openwork Flower — Make 6
Yarn: cream.
Join cream yarn behind any terracotta petal.
R1: Ch 1, *sc around the center of next petal, ch 5*; repeat around. Join. (12 ch-5 spaces)
R2: Sl st into first sp, ch 3, 4 dc in same sp, ch 3, *5 dc in next sp, ch 3* around; join. (12 groups)
R3: Sl st to center dc of first 5-dc group. *Sc in center dc, ch 6, sc in next ch-3 sp, ch 6* around; join. (24 arches)
R4: Sl st into first arch. *(3 dc, ch 2, 3 dc) in arch, sc in next arch*; repeat around. (12 shells)
R5: Sl st to first ch-2 sp. *(2 dc, ch 3, 2 dc) in ch-2 sp, ch 4, sc in next sc, ch 4* around; join.
The cream section forms the open radial structure around the terracotta flower. Keep all ch-4 spaces approximately equal in length because differences become much more visible after the motifs are joined.
Four-Lobed Motif Shaping — Make 6
Continue with cream yarn.
Place a stitch marker at every third shell. The four marked positions establish the four major lobes of the motif.
R6: At each marked ch-3 sp work (3 dc, ch 3, 3 dc). In each unmarked ch-3 sp work (2 dc, ch 2, 2 dc). Connect neighboring groups with ch 3.
R7: In each major lobe ch-3 sp work (4 dc, ch 4, 4 dc). In each smaller ch-2 sp work (3 dc, ch 2, 3 dc). Ch 3 between groups.
R8: Work *(sc, ch 5, sc)* into each major lobe space. Across each section between the major lobes, work ch-5 arches anchored with sc into the available spaces.
R9: Work 7 dc into every major ch-5 arch. Work 5 dc into each smaller ch-5 arch. Place ch 2 between neighboring groups.
Fasten off cream unless you prefer to carry the yarn beneath the following olive round.
Olive Green Outline — Make 6
Yarn: olive green.
Join olive yarn at one of the four major lobes.
R1: Ch 1, sc evenly around the complete motif, working 1 sc in each dc and 2 sc in each ch-2 space. At each major lobe point work (sc, ch 2, sc).
R2: Ch 1, sc in each sc around. At every ch-2 point work (sc, ch 2, sc).
R3: *Sc in next 3 sts, picot, sc in next 3 sts* around, adjusting the final repeat by one or two stitches where necessary to preserve symmetry. At the four major points, work (sc, picot, sc) into the ch-2 space.
Fasten off and weave in the yarn tail on the wrong side.
Before joining, block all six motifs to the same dimensions. A difference of even 5 mm per motif can produce a visible length mismatch once six units are connected.
Joining the Six Main Motifs
Arrange all six motifs in a single vertical line with the terracotta flowers facing upward. Rotate every motif into the same orientation before joining.
Position two neighboring motifs so that one major lobe from each piece meets at the center line. Thread a tapestry needle with matching olive yarn.
Whipstitch through the back loops of the corresponding olive stitches for approximately 4–5 cm. Keep the seam flexible rather than pulling it tight.
Repeat until all six motifs form one continuous central strip.
For a join-as-you-go alternative, the final olive round can be connected to the previous motif with slip stitches at corresponding picots. Whichever method is selected, use it for all five joins. Mixing seam styles changes the spacing between motifs.
Large Cream Side Fans — Make 12
Yarn: cream. Make one fan for each side of every large central motif.
Row 1: Ch 8. Join with sl st to form a ring.
Row 2: Ch 3, work 11 dc into ring. Turn. (12 dc including beginning ch)
Row 3: Ch 4, *dc in next dc, ch 1* across. Turn.
Row 4: Ch 3, work 2 dc into each ch-1 sp across. Turn.
Row 5: Ch 5, *sc between next 2-dc group, ch 5* across. Turn.
Row 6: Work 7 dc into each ch-5 sp. Place 1 sc between neighboring shells.
Row 7: Across every shell work *sc, ch 3, skip 1 dc*. Continue across the complete fan.
Row 8: Work (sc, hdc, 3 dc, hdc, sc) into every ch-3 space.
Fasten off, leaving a 20 cm tail for attachment.
Pin one fan against each side of every central medallion. The curved edge should point outward while the narrow base faces the central strip.
Attaching the Side Fans
Lay the runner flat on a blocking mat before attaching the side elements. Measure from the central flower to the outermost point of each fan.
Aim for the same measurement on the left and right sides. The runner shown in the reference relies heavily on bilateral symmetry, so small placement errors repeat down its entire length.
Using cream yarn, sew each fan to the corresponding olive edge through the back loops. Attach approximately 5–7 cm of the fan base rather than sewing around the whole curved edge.
Repeat for all 12 fans.
Openwork Connectors
Yarn: cream.
Small chain connectors fill the spaces between adjacent side fans and stop the border from separating into isolated units.
Join cream yarn at the upper edge of one fan.
Row 1: Ch 5, sc into the closest corresponding point of the neighboring fan.
Row 2: Ch 5 and return with sc to the first fan at the next available space.
Row 3: Repeat the alternating ch-5 connection until the opening between the two fans contains a flexible ladder of chain arches.
Fasten off.
Repeat between every pair of neighboring fans on both sides of the runner.
Outer Scalloped Border
Yarn: cream with olive green finishing accents.
Round 1: Join cream at one end of the runner. Work sc evenly around the complete outer perimeter. Use approximately 3 sc for every two row ends along curved sections. Join.
Round 2: *Skip 2 sts, 7 dc in next st, skip 2 sts, sc in next st* around. Adjust the spacing at the two ends so the scallops remain centered.
Round 3: Sl st to the third dc of the first shell. *Sc, picot, sc in center dc of shell; ch 3, sc in next shell center* around.
Fasten off cream.
For the olive accent visible in the reference image, join olive yarn at an inconspicuous position.
Final Round: Work sl st or surface sc along selected scallop edges. Add one small picot at the peak of each major scallop.
Fasten off and weave the tail beneath at least 3 cm of stitches.
Adjusting the Table Runner Length
The modular structure makes length changes practical. Instead of rewriting every round, change the number of complete central medallions.
For a short coffee-table runner, make four central motifs. A medium dining-table version can use six motifs as shown here. Longer tables may need seven, eight, or more motifs.
Complete and block one entire medallion before buying yarn for a substantially longer runner. Measure its length along the joining axis, then multiply that measurement by the intended motif count. Subtract a small amount for overlap at each join.
For example, a blocked motif measuring 23 cm along the joining axis will produce approximately 138 cm across six motif positions before adjustments for joining and end borders.
Assembly
- Complete all six terracotta flower centers and check that their diameters match.
- Add the cream openwork rounds to each flower center.
- Shape the four main lobes and verify that all motifs have the same orientation.
- Add the olive outline and finish all yarn tails that will become inaccessible after joining.
- Block the six central motifs to identical dimensions before sewing them together.
- Arrange the medallions in one straight line and join the five contact points.
- Crochet 12 cream side fans and block them before attachment.
- Pin six fans along each side, measure their positions, then sew them permanently to the central strip.
- Add the openwork connectors and work the cream scalloped perimeter.
- Add the final olive details, weave in all remaining tails, wet-block the complete runner, and allow it to dry flat.
The completed runner should form a symmetrical strip with six centered rust flowers, a continuous olive framework, cream openwork, and matching scalloped edges.
7 Technical Tips for Cleaner Crochet Lace
- Mark the four major lobes before shaping. A misplaced lobe rotates the motif and prevents neighboring joining points from meeting correctly. Put markers at equal intervals before beginning the shaping round.
- Keep chain spaces consistent. A ch-5 arch that is noticeably tighter than its neighbors pulls the outer rounds inward. Spread five chains over roughly the same width every time rather than tightening the last chain before the anchor stitch.
- Block motifs before joining them. Joining unblocked medallions can lock small size differences into the finished runner. Keep corresponding motifs within approximately 5 mm of one another.
- Measure side-fan placement from the center line. A 1 cm difference repeated across six motifs makes one edge visibly uneven. Pin every fan first and compare both sides before sewing.
- Do not overtighten joining stitches. A rigid 4–5 cm seam creates a narrow waist between adjacent medallions. The joined section should bend as easily as the surrounding crochet fabric.
- Control border expansion. Too many stitches in the first perimeter round cause the scalloped border to ruffle. If the edge begins forming waves before the shell round, remove excess stitches immediately.
- Weave tails along more than one direction. A tail woven only 1 cm through open lace can work loose because there are fewer solid stitches to hold it. Run each tail through approximately 3 cm of stitches, reverse direction, and trim only after blocking.
Blocking the Finished Runner
Blocking is part of the construction rather than an optional finishing step. The open chain spaces, side fans, and four-lobed medallions need controlled dimensions to reproduce the geometric appearance of the reference.
Wash or thoroughly dampen the finished runner according to the yarn manufacturer’s care instructions. Remove excess water without twisting the crochet.
Place the runner on blocking mats and establish the center line first. Pin the six flower centers so they remain aligned. Next, extend the four major lobes of every medallion and compare their widths.
Move outward to the cream side fans. Pin corresponding points on the left and right sides to matching measurements. Finish by shaping the scallops and olive picots.
For the six-motif version, target approximately 38 cm in width and 150 cm in length, but allow the actual gauge to determine the final dimensions. Leave the runner pinned until completely dry.
Color Placement
The three-color arrangement does more than reproduce the photograph. Each color separates a structural layer.
Terracotta identifies the center of every major medallion. Cream carries most of the openwork and prevents the runner from becoming visually dense. Olive outlines the large motifs and provides a clear division between the central strip and the side lace.
For the closest interpretation of the reference, keep the darkest value on the motif outlines rather than the flower centers. Changing the olive border to a pale shade reduces the definition of the four-lobed geometry.
If substituting colors, maintain three distinct values: one light main color, one medium-to-dark outline color, and one warm or contrasting flower-center color.
Gauge and Motif Consistency
Traditional garment gauge is less useful here than finished motif dimensions. Crochet one complete medallion, block it, and record its width, height, and joining-axis measurement.
Use that first blocked piece as the template for the remaining five. If a later motif differs by more than approximately 5 mm, compare the chain-space tension before changing hook size.
Open lace can grow significantly during wet blocking. For that reason, do not calculate the final runner length from an unblocked motif.
Yarn substitution also affects the result. A thicker DK cotton with the same 3 mm hook will create denser fabric and potentially larger motifs, while fine crochet thread will produce a much narrower runner unless the hook and motif count are changed.
Finishing
Inspect every join from the wrong side before the final blocking. No yarn tail should cross an open chain space where it can be seen from the front.
Check the six terracotta centers along the length of the table runner. They should form one visual center line. Next, compare the outermost points of the cream side fans. Correct minor asymmetry during blocking rather than adding stitches to individual finished sections.
The olive outline should remain visible around each main motif after the runner is laid flat. If the cream border covers sections of the outline, reposition those sections during blocking and pin them independently.
Conclusion
The finished construction uses six central flowers, six four-lobed medallions, 12 side fans, open chain connectors, and a shaped outer border. Before making the full runner, crochet and block one complete medallion to establish the actual dimensions produced by your yarn and tension. Then calculate the required motif count for the table. Save the completed floral crochet table runner pattern to Pinterest or share the finished layout on Instagram with #FloralLaceTableRunner. When adapting this specific design, which feature would you change first: the terracotta flower centers, the olive motif outlines, or the large cream side fans?









