Introduction
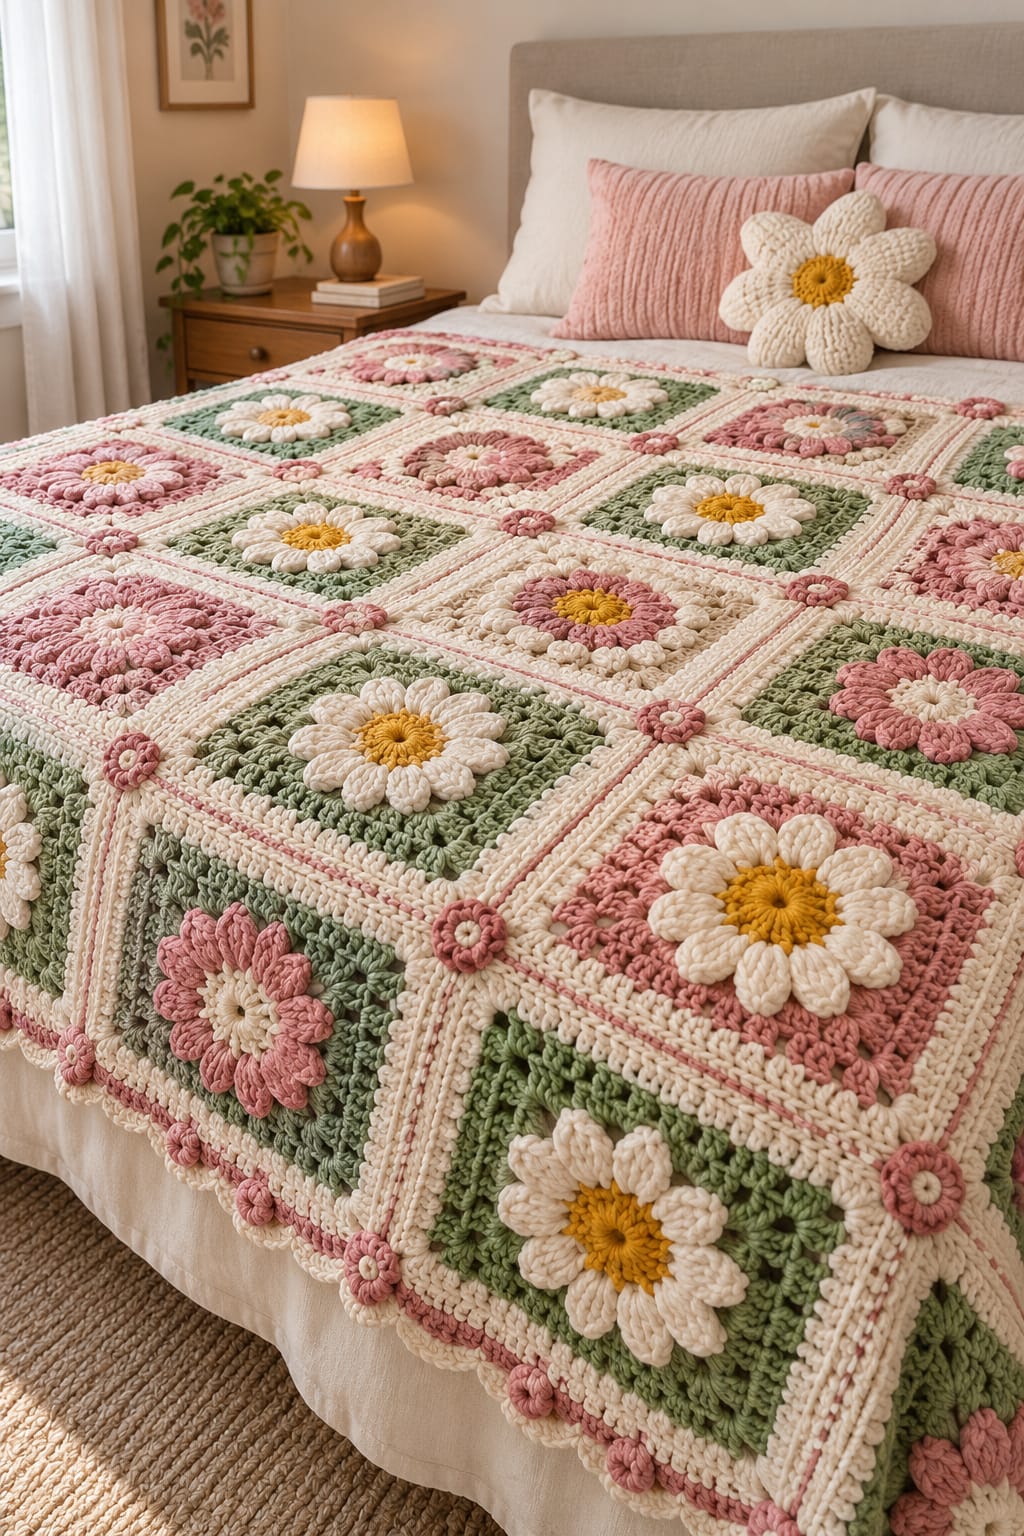
Raised daisies sit above alternating sage, dusty-pink, and cream squares while tiny pink flowers mark the visible cream intersections. This 3D daisy granny square crochet bedspread pattern uses worsted-weight yarn, a 5 mm hook, dimensional petals, flat joining strips, and a layered border. The intermediate reconstruction targets approximately 150 × 190 cm, making it practical for a full-size decorative bed covering.
The instructions below are an original photo-inspired reconstruction based on visible structure; published patterns cited later are used only for sizing, gauge, and material benchmarks.
The Design: What Makes This Floral Bedspread Different
The photograph combines dimensional flowers with unusually broad cream divisions between the blocks. Each square therefore needs three separate structural zones: a raised flower, a colored field, and a cream frame wide enough to remain visible after joining. Sage squares carry cream daisies with mustard centers, while dusty-pink and cream backgrounds introduce reversed pink-and-cream flowers. Small rosettes conceal selected intersections and repeat the dusty-pink accent across the entire surface. This 3D daisy granny square crochet bedspread pattern uses a fixed 6 × 8 layout so the joining and border measurements remain reproducible. A common mistake is allowing the petal round to become part of the square corners. The flower should remain independent and dimensional; squaring happens behind it, preventing stretched petals and keeping the 12-petal daisy centered.
Project Info at a Glance
| Skill Level | Time | Finished Size | Hook | Best For |
|---|---|---|---|---|
| Intermediate | Approx. 45–60 hours | Reconstruction target: 150 × 190 cm | 5 mm | Full-size decorative bedspread or oversized throw |
The finished dimensions above are reconstruction targets inferred from the photograph rather than measurements of an identified original. For comparison, A Crafty Concept publishes a worsted-weight daisy blanket measuring approximately 32 × 39 inches with a 5 mm hook. Jo to the World reports approximately 7 × 7 inches for its five-round flower square in #4 yarn, providing a useful modular sizing benchmark.
Materials and Tools
Yarn
- Warm cream / ivory — worsted #4 — approximately 1,450–1,650 g
- Sage green — worsted #4 — approximately 650–750 g
- Dusty rose pink — worsted #4 — approximately 650–750 g
- Golden mustard — worsted #4 — approximately 120–150 g
These quantities are reconstruction estimates for a bed-sized project, not published yardages for the photographed piece. Jo to the World reports that one seven-inch flower square in #4 yarn can require approximately 3 yards of center color, 7 yards of petal color, 10 yards of a third color, and substantially more yarn in the main square color depending on the arrangement.
Tools
- 5 mm crochet hook
- Tapestry needle
- Scissors
- Blocking mats and rust-resistant pins
- Stitch markers
- Measuring tape
Abbreviations
- MR — magic ring
- ch — chain
- sl st — slip stitch
- sc — single crochet
- hdc — half double crochet
- dc — double crochet
- tr — treble crochet
- inc — increase
- dec — decrease
- dc3tog — three double crochets worked together
- sp — space
- st/sts — stitch/stitches
An invisible decrease is made through the front loops of two adjacent stitches before completing one single crochet; it is not required in the flat squares but remains the standard decrease abbreviation used throughout the pattern terminology.
Blanket Layout
Make 48 squares and arrange them 6 across × 8 down. Block every square to exactly 22 cm × 22 cm before joining.
Use three principal square combinations:
- Square A — make 16: mustard center, cream daisy, sage field, cream frame.
- Square B — make 16: cream center, dusty-pink flower, cream field, cream frame with pink accent.
- Square C — make 16: mustard center, cream daisy, dusty-pink field, cream frame.
Rotate A, B, and C through the layout rather than grouping identical squares. The reference uses floral repetition without forming uninterrupted blocks of one background color.
Pattern — Step by Step
Square A: Cream 12-Petal Daisy on Sage — Make 16
Yarn: mustard, cream, sage, and cream frame — original photo-inspired reconstruction.
Round 1 — Mustard Center
With mustard, ch 4 and sl st to first ch to form a ring.
R1: Ch 3, work 11 dc into ring, sl st to top of beginning ch-3. (12 dc)
Fasten off.
Round 2 — Twelve Cream Petals
Join cream in any dc.
R2: Ch 2, dc3tog in same st, ch 2. *Dc3tog in next dc, ch 2.* Repeat around. Join to first cluster. (12 petals, 12 ch-2 spaces)
Fasten off.
This 12-position construction is consistent with published daisy granny-square methods that begin with 12 center stitches and place one cluster petal in each position.
Round 3 — Sage Squaring Round
Join sage in any ch-2 space.
R3: Ch 3, 2 dc in same sp, ch 1. Work 3 dc in next ch-2 sp, ch 1. In next ch-2 sp work (3 tr, ch 3, 3 tr) for corner, ch 1. Work 3 dc in each of next 2 ch-2 spaces with ch 1 between groups. Repeat the corner sequence around, using every third ch-2 space as a corner. Join.
You now have four corners and two side groups between neighboring corners.
Round 4 — Sage Expansion
Sl st to first side space.
R4: Ch 3, 2 dc in same sp. Work 3 dc in every ch-1 side space. In each corner ch-3 space work (3 dc, ch 2, 3 dc). Join.
Round 5 — Cream Frame
Join cream in any corner.
R5: Work (2 hdc, ch 2, 2 hdc) in each corner. Work 1 hdc in every dc across each side. Join.
Round 6 — Cream Frame
R6: Ch 1. Sc in every stitch across each side. Work (2 sc, ch 2, 2 sc) in every corner. Join.
Fasten off.
Block to exactly 22 × 22 cm.
Square B: Raised Dusty-Pink Flower on Cream — Make 16
Yarn: cream center, dusty pink petals, cream field.
Round 1 — Cream Center
Ch 4 and join to form a ring.
R1: Ch 3, 11 dc in ring, join. (12 dc)
Round 2 — Pink Raised Petals
Join dusty pink.
R2: *Sl st in next dc, ch 4, work 3 tr in same dc, ch 4, sl st in same dc.* Repeat in every second dc around. (6 large petals)
Six unused center stitches remain between the large petals.
Round 3 — Secondary Pink Petals
Join dusty pink behind R2.
In each unused R1 stitch work:
(sl st, ch 3, 3 dc, ch 3, sl st).
Repeat ×6. (6 secondary petals)
The completed flower has twelve visible petal sections arranged in two depths.
Round 4 — Cream Foundation Behind Flower
Join cream behind any petal base.
Ch 4, sl st behind next petal base. Repeat around to form 12 ch-4 spaces.
Round 5 — Convert to Square
In first ch-4 space work 3 dc, ch 1.
In next space work 3 dc, ch 1.
In third space work (3 tr, ch 3, 3 tr), ch 1.
Repeat around so every third space becomes a corner.
Round 6 — Cream Frame
Work 3 dc in each side space and (3 dc, ch 2, 3 dc) in each corner.
Round 7 — Cream Edge
Sc in every stitch. Work (2 sc, ch 2, 2 sc) in each corner.
Fasten off and block to 22 × 22 cm.
Square C: Cream Daisy on Dusty Pink — Make 16
Work the same center and petal construction as Square A.
R1: Mustard center, 12 dc. (12)
R2: Cream dc3tog petal in each center stitch, ch 2 between petals. (12 petals)
Change to dusty pink for the squaring round.
R3: Use every third ch-2 space as a corner: (3 tr, ch 3, 3 tr). Work 3 dc in each of the two intermediate spaces, with ch 1 between groups.
R4: Work 3 dc in each side space and (3 dc, ch 2, 3 dc) in every corner.
Change to cream.
R5: Hdc around with (2 hdc, ch 2, 2 hdc) in each corner.
R6: Sc around with (2 sc, ch 2, 2 sc) in each corner.
Fasten off and block to exactly 22 × 22 cm.
Why the Daisy Uses 12 Petals
The photograph repeatedly shows broad flowers with approximately 10–12 raised petal sections. Twelve is the cleaner crochet choice because it divides evenly into four sides.
The math is exact:
12 petal spaces ÷ 4 sides = 3 spaces per side.
Every third space can therefore become a corner when the circular flower is converted into a square.
Dreamcrochets publishes a 12-petal daisy granny square using Aran yarn, while other documented daisy-square methods also establish 12 center stitches followed by 12 cluster petals.
Small Dusty-Pink Intersection Flower — Make 35
Yarn: dusty pink and cream.
A 6 × 8 square layout creates:
(6 − 1) × (8 − 1) = 35 internal four-square intersections.
Make one small flower for every internal intersection.
With cream, ch 4 and sl st to form a ring.
R1: Work 10 sc into ring. Join. (10)
Change to dusty pink.
R2: *Sl st in next st, (ch 3, 3 dc, ch 3, sl st) in next st.* Repeat ×5. (5 petals)
Fasten off with a 25 cm tail.
Block each flower to approximately 3–3.5 cm across.
Optional Edge Flowers — Make 24
The photographed bedspread continues small floral accents along selected outer joining lines.
For a closer reconstruction, make another 24 five-petal flowers using the same pattern.
Place them at alternating points along the outer cream border rather than at every possible position. Keeping some spaces empty prevents the edge from becoming visually heavier than the center.
Joining the Squares
The reference has visible cream channels, so an invisible mattress seam would remove an important design feature.
Arrange all 48 blocked squares in a 6 × 8 grid.
Each row measures:
6 × 22 cm = 132 cm before joining and border.
Each column measures:
8 × 22 cm = 176 cm before joining and border.
Join with cream.
Place two squares side by side with right sides facing upward.
Insert the hook through the inner loops of corresponding edge stitches.
Work one loose slip stitch through each matching pair.
Do not skip stitches.
Join all vertical seams first, then all horizontal seams.
The resulting raised cream grid should remain visible on the right side.
Adding the Pink Line to the Join
The photograph shows a narrow dusty-pink line inside portions of the broad cream framework.
After all squares are joined, surface crochet along the center of every cream joining seam.
Join dusty pink at one blanket edge.
Work one relaxed surface sl st through each cream seam stitch.
Continue from edge to edge.
Repeat across all vertical and horizontal joining lines.
Do not pull the surface crochet tightly. A shortened accent line will gather the blanket.
Attaching the 35 Intersection Flowers
Place one five-petal pink flower over each internal seam crossing.
Sew through the cream center at four points.
Add one concealed stitch beneath two opposite pink petals.
Leave the remaining petal edges free.
The small motifs hide minor changes in seam direction while reproducing the floral punctuation visible across the reference bedspread.
Outer Border
After joining, the unbordered reconstruction is approximately 132 × 176 cm. The border adds approximately 9 cm per side, producing a final target near 150 × 194 cm; blocking can be used to settle the length near the 190 cm reconstruction target.
Border Round 1 — Cream
Join cream in one corner.
Work 1 sc into every available edge stitch.
At each square junction, work one additional sc into the seam space.
In every blanket corner work (2 sc, ch 2, 2 sc).
Border Round 2 — Cream
Ch 2.
Hdc in every stitch.
In each corner ch-2 space work (2 hdc, ch 2, 2 hdc).
Border Round 3 — Dusty Pink Accent
Change to dusty pink.
Work one surface sl st through the top loops of every R2 hdc.
At each corner, ch 2 rather than stretching one slip stitch across the turn.
Border Round 4 — Cream
Join cream below the pink accent line.
Work dc in every stitch around.
In each corner work (2 dc, ch 2, 2 dc).
Border Round 5 — Cream
Work hdc in every stitch and (2 hdc, ch 2, 2 hdc) in each corner.
Scalloped Final Edge
The lower edge of the reference has a soft decorative finish rather than a plain straight border.
Work the final shell round only after measuring the stitch count on each side.
The basic shell repeat consumes 4 stitches:
Sl st in first st, skip 1 st, 5 dc in next st, skip 1 st.
Before beginning, use the preceding cream round to add or subtract at most one stitch near each corner so the number of side stitches between corner spaces is divisible by four.
Then repeat the four-stitch shell unit across each side.
In each corner ch-2 space work 7 dc.
Fasten off and block.
Assembly
- Crochet 16 Square A motifs, keeping every mustard center at exactly 12 stitches and every cream daisy at exactly 12 petals.
- Make 16 Square B motifs with raised dusty-pink flowers, then make 16 Square C motifs with cream daisies over dusty-pink fields.
- Block all 48 squares to exactly 22 × 22 cm and reject or rework any square differing from the template by more than 5 mm.
- Arrange the motifs in a 6 × 8 grid, alternating sage, pink, and cream-dominant blocks so identical backgrounds do not form large uninterrupted clusters.
- Join all six-square rows with cream slip-stitch seams, then join the eight rows while keeping every intersection square and every raised seam on the right side.
- Surface crochet dusty-pink lines along the centers of the cream joins without shortening the measured width or length of the blanket.
- Crochet 35 five-petal intersection flowers and sew one over every internal four-square junction, attaching the center firmly while leaving most petal edges free.
- Work the five structured border rounds in cream and dusty pink, checking the blanket diagonals after each round for distortion.
- Add the final cream shell edge after adjusting each side to a multiple of four stitches between its corner spaces, then attach any optional edge flowers.
- Weave every tail through at least 5 cm of matching fabric, wet block the bedspread to approximately 150 × 190 cm, and reshape every raised daisy before drying flat.
The completed bedspread consists of 48 large floral squares, 35 intersection flowers, visible cream-and-pink joining channels, dimensional 12-petal daisies, and a layered decorative perimeter.
7 Technical Tips
- The squares finish at different sizes: block every motif against the same 22 × 22 cm template before joining. A 7 mm discrepancy repeated across six squares can alter the blanket width by more than 4 cm.
- The daisy petals flatten into the background: work the square foundation behind the completed petal round rather than through the petal tops. Catching the petals in R3 removes the dimensional separation visible in the reference.
- The cream joining grid puckers: use one loose slip stitch for every matching edge stitch and never tighten the working loop against the hook shaft. A seam shortened by even 2 cm across a 22 cm square creates visible ridges after assembly.
- The dusty-pink surface line gathers the seams: measure the joined strip before and after surface crochet. If a 132 cm row loses more than approximately 5 mm, remake the accent line with looser slip stitches.
- The small intersection flowers rotate: sew their cream centers at four evenly spaced points before anchoring any petals. Attaching only two opposite points lets a 3 cm motif turn during washing or handling.
- The final border waves: verify the side count before starting the four-stitch shell repeat. Forcing an incomplete shell into the final three stitches adds excess fabric directly beside the corner.
- The bedspread becomes excessively heavy: keep the raised petals dimensional but avoid carrying unused yarn behind entire squares. On a 48-square worsted blanket, unnecessary floats add weight and can make blocking less stable.
Published Daisy Blanket Size Benchmark
A Crafty Concept’s Daisy Granny Square Blanket uses worsted-weight yarn with a 5 mm crochet hook and lists finished dimensions of approximately 32 × 39 inches. Its palette includes mustard, ivory, and sage, making it particularly relevant to the color structure visible in the supplied photograph.
The published motif also uses popcorn texture, demonstrating one established method of raising floral elements above a granny-square background.
Published Seven-Inch Flower Square Benchmark
Jo to the World Creations documents a flower granny square made with #4 medium yarn that measures approximately 3 inches after Round 2, 4.5 inches after Round 3, 5.75 inches after Round 4, and 7 inches after Round 5.
Those measurements provide a useful scale reference for this reconstruction. The 22 cm square target is intentionally larger because the photograph shows broad cream framing around each floral field.
Published Per-Square Yarn Benchmark
The same Jo to the World reference provides unusually useful material data for #4 yarn. A sample square uses approximately 3 yards of yellow, 7 yards of white, 10 yards of green, plus considerably more of the principal square color depending on whether the square is multicolored or solid.
For a bed-sized blanket, small per-motif differences multiply quickly across 48 units, which is why purchasing extra cream is preferable to calculating only from finished blanket area.
Published 12-Petal Daisy Benchmark
Dreamcrochets publishes a daisy granny square explicitly built around 12 petals and recommends Aran yarn. Its construction uses double crochet, a three-double-crochet puff stitch, and slip stitches.
Another published 12-petal method begins with 12 center stitches and places one dc3tog cluster in each stitch, separated by chain spaces. This clean 12-position geometry is the basis for the daisy count used in the reconstruction.
Published DK and Aran Square Size Benchmark
A 2026 daisy granny-square reference reports approximately 8 cm for DK cotton with a 3.5 mm hook, approximately 9 cm for DK acrylic with a 4 mm hook, and approximately 12 cm for Aran or medium yarn with a 5.5 mm hook.
The comparison shows why additional framing rounds are necessary to reach the 22 cm modules required for a bed-sized version.
Why the Cream Frames Are Wide
The cream lines in the photograph function as more than seams. They form a secondary geometric pattern across the entire bed.
If the colored flower fields were joined edge to edge, sage and dusty pink would dominate and the reference would lose its paneled appearance.
Two cream finishing rounds on every square establish part of the framework before assembly. The raised cream join then increases that separation, and the narrow dusty-pink surface line adds another layer without increasing seam width significantly.
Why the Flowers Need Raised Petals
The visible daisies project well above the square backgrounds.
Flat double-crochet petals can reproduce the color arrangement but not the depth.
Cluster stitches concentrate several partial double crochets into one attachment point. That creates a thicker petal without requiring a separate stuffed component.
For stronger relief, push every petal toward the front before beginning the background round and work the square-forming stitches behind the petal bases.
Why the Sage Is Muted
The green in the photograph sits between gray-green and botanical sage rather than bright grass green.
That lower saturation allows dusty pink and mustard centers to remain distinct without introducing strong contrast across a bed-sized surface.
When substituting yarn, place the sage beside both cream and pink before purchasing the full quantity. A strongly blue sage can make warm ivory appear yellow, while a highly saturated green changes the vintage floral balance.
Why Dusty Pink Appears in the Seams
Pink is not limited to the large flowers.
The narrow surface lines and intersection rosettes distribute the accent across areas dominated by cream.
This prevents the pink squares from appearing isolated.
The same principle is useful when modifying the palette: whichever color is used for the dimensional accent flowers should reappear in at least one narrow border or joining detail.
Changing the Blanket Size
Each blocked square contributes approximately 22 cm before the outer border.
A 5 × 6 arrangement produces a motif field around 110 × 132 cm.
A 6 × 7 arrangement produces approximately 132 × 154 cm.
The 6 × 8 reconstruction produces approximately 132 × 176 cm before the border.
Add approximately 18 cm to both dimensions for the full border system described here.
Making a Queen-Size Version
Use a 7 × 9 layout of 22 cm squares.
The motif field becomes approximately 154 × 198 cm.
After the same border, the finished dimensions approach 172 × 216 cm.
That version requires 63 squares and substantially more cream yarn. Calculate materials from a completed, weighed sample square before purchasing the final quantity.
Making a Baby Blanket
Use a 4 × 5 arrangement.
Twenty 22 cm squares create an approximately 88 × 110 cm motif field before border.
For a baby item, sew every dimensional petal and intersection flower securely and omit any loose embellishment that could detach.
A simpler flat border is also easier to inspect for wear.
Making the Flowers More Dimensional
Replace each dc3tog petal with a four-double-crochet popcorn.
Keep exactly 12 petal positions.
Popcorn stitches create more pronounced rounded petals but also increase yarn consumption and weight.
Make one complete sample square before committing to 48 motifs because the thicker flower can alter the blocked dimensions.
Making the Blanket Flatter
Replace each cluster petal with a standard 3 dc group.
Keep the same 12 center positions and the same squaring rounds.
This reduces thickness where the bedspread lies beneath the sleeper while preserving the overall floral arrangement.
The small intersection flowers can also be omitted for a flatter surface.
Correcting a Flower That Pulls the Square Inward
Measure the flower before beginning the background.
If the petal round cups strongly, the chain spaces between clusters are probably too tight.
Remake that round with a larger hook or slightly looser chains rather than compensating with extra stitches in the square.
An oversized background cannot permanently correct a center that is already drawing inward.
Correcting Rounded Square Corners
Check that every corner contains the complete stated corner group.
The corner chain space needs enough room for the next round’s stitches.
If the 22 cm square still has rounded corners after blocking, increase only the corner chain from ch 2 to ch 3 on the final cream frame.
Do not add stitches randomly along the sides.
Correcting Uneven Joining Strips
Count corresponding edge stitches before joining neighboring squares.
Both edges must present the same number of attachment points.
If one square differs, inspect its final cream round before sewing.
Correct the square itself rather than skipping a stitch in the longer edge, because skipped join points produce local puckering.
Correcting a Wavy Border
Lay the blanket flat after each border round.
Waves indicate too many perimeter stitches; inward curling indicates too few.
Check corner groups first because an accidental extra corner cluster multiplies rapidly over later rounds.
Do not proceed to the shell edge until all four sides lie flat without pinning.
Blocking 48 Squares Efficiently
Make a rigid 22 cm blocking template.
Stack compatible squares on blocking pins only if the yarn care instructions permit wet blocking in layers.
Keep the corner pins square by checking both diagonals.
A 22 cm square should have equal diagonal measurements; unequal diagonals indicate a rhombus even when all four sides measure correctly.
Yarn Planning
Complete one Square A, one Square B, and one Square C before buying the final quantity if yarn availability permits.
Weigh each finished blocked sample on a gram scale.
Multiply each weight by 16, then add yarn for 35 intersection flowers, seams, surface lines, and the border.
Add approximately 10–15% for swatching, knots, gauge variation, and replacement motifs.
Care and Storage
Follow the washing instructions printed for the chosen worsted yarn.
A large wet bedspread can become extremely heavy, so support the full fabric rather than lifting it by one corner.
Dry flat whenever practical.
Before storage, confirm that every layer is completely dry, fold along the cream joining channels instead of across raised flowers, and avoid placing heavy objects directly over the dimensional daisies.
Sources
A Crafty Concept — Crochet Daisy Granny Square Blanket — worsted-weight yarn, 5 mm hook, mustard/ivory/sage palette, popcorn stitch, and published 32 × 39 inch dimensions.
Jo to the World Creations — Flower Granny Square Blanket — #4 yarn square dimensions, per-square yarn estimates, flower-square construction, joining, and blanket finishing information.
Dreamcrochets — Crochet Daisy Granny Square, 12 Petals — Aran yarn and a documented 12-petal granny-square structure.
Crochet Patterns Free — 12-Petal Daisy Granny Square — 12-stitch center, 12 cluster petals, and circle-to-square construction reference.
EHarrisGallery — Crochet Daisy Granny Square — DK and Aran yarn comparisons with published approximate square dimensions for multiple hook sizes.
Stouto — Spring Daisy Flower Granny Square Blanket — joining options and multi-round blanket-border construction.
Nana’s Crafty Home — Crochet Flower Blanket — modular flower-square assembly, mattress-stitch joining, and multi-round floral border reference.
Etsy — 3D Flower Granny Square Blanket Pattern — published example of dimensional floral motifs used across a full granny-square blanket.
Conclusion
The dimensional daisies should be completed before the background rounds so their petals remain above the sage, pink, and cream fields instead of being trapped in the square structure. Block all 48 motifs to 22 cm before joining, then treat the cream seams, pink surface lines, and 35 intersection flowers as a second design layer. Your next step is to make one Square A and confirm its blocked measurement before calculating final yarn purchases. Save this 3D daisy granny square crochet bedspread pattern to Pinterest or share the finished bedspread on Instagram with #PinkSageDaisyBedspread. Would you place the sage squares on a strict checkerboard or keep the irregular floral distribution shown here?









