Introduction
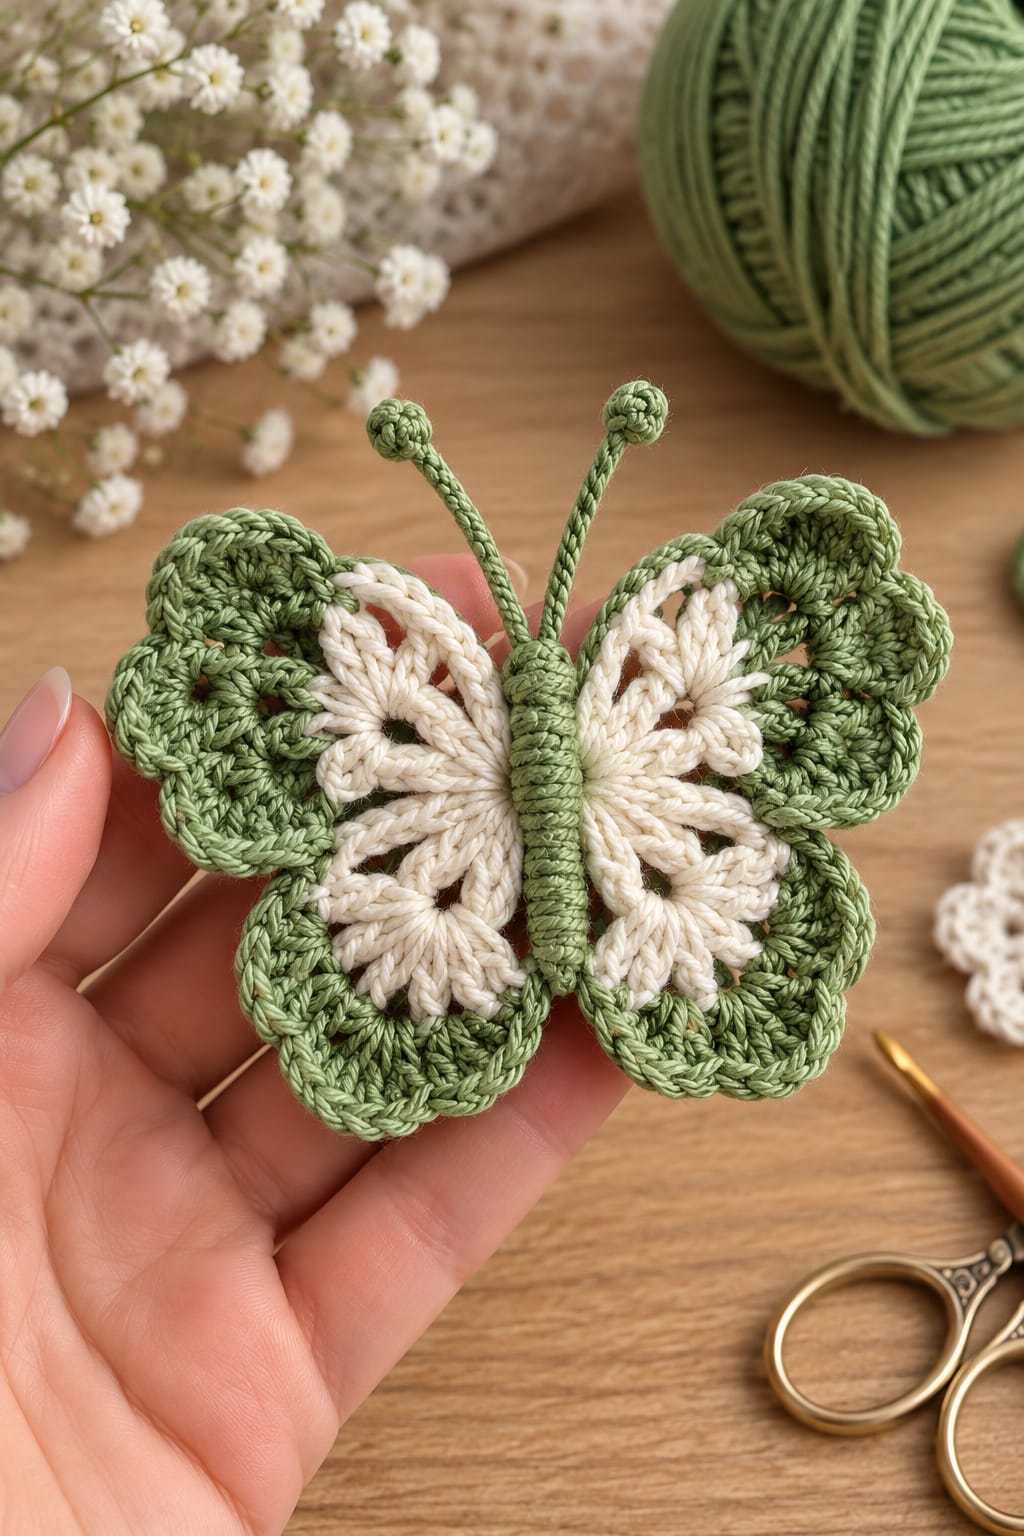
Four scalloped sage wings surround cream openwork panels while two long antennae rise from a narrow green body. This sage green crochet butterfly applique pattern uses DK cotton, a 3 mm hook, separate wing layers, and a lightly dimensional center. The intermediate reconstruction targets a 10–11 cm wingspan and works well as a bag, blanket, garland, brooch, or spring-decoration motif.
The instructions below are an original photo-inspired reconstruction based on visible structure; published patterns cited later are used only for sizing, gauge, and material benchmarks.
The Design: What Makes This Butterfly Different
The photographed butterfly gets its definition from two overlapping structures rather than one folded circular motif. Cream inner wings form four open lace fans, then larger sage sections frame them with rounded scallops and a firm outer edge. The upper wings are deliberately taller than the lower pair, preventing the silhouette from reading as a symmetrical flower. A narrow green body covers the central joins and supports two unusually long antennae with compact rounded tips. This sage green crochet butterfly applique pattern uses separate left and right wing assemblies so you can control symmetry before attaching the body. A frequent mistake with a crochet butterfly motif is making every wing the same size. That removes the characteristic top-heavy proportion; the upper wings should project approximately 15–20% farther than the lower wings.
Project Info at a Glance
| Skill Level | Time | Finished Size | Hook | Best For |
|---|---|---|---|---|
| Intermediate | Approx. 1.5–2.5 hours | Reconstruction target: 10–11 cm wide × 9–10 cm high | 3 mm | Appliqués, bags, blankets, garlands, brooches |
The photographed dimensions are reconstruction targets rather than measurements from an identified original. Published examples support this scale: The Crochet Circle reports approximately 10 cm wingspan with a 3.5 mm hook, while Joanna’s Crochet lists approximately 9–11 cm for a DK butterfly made with a 3.5 mm hook. Jess Crafting also specifies DK yarn with a 3 mm hook for a butterfly appliqué.
Materials and Tools
Yarn
- Sage green — DK #3 cotton or cotton blend — approximately 12–15 g
- Warm cream — DK #3 cotton or cotton blend — approximately 5–7 g
A smooth cotton or cotton-rich yarn gives the scallops and open cream sections sharper definition than a fuzzy fiber. For a slightly larger motif, use light worsted yarn and a 3.5–4 mm hook.
Tools
- 3 mm crochet hook
- Tapestry needle
- Scissors
- Blocking pins
- Measuring tape
- Optional fabric stiffener for hanging ornaments
Abbreviations
- MR — magic ring
- ch — chain
- sl st — slip stitch
- sc — single crochet
- hdc — half double crochet
- dc — double crochet
- tr — treble crochet
- inc — 2 sc in one stitch
- dec — invisible decrease
- sp — space
- st/sts — stitch/stitches
An invisible decrease is worked through the front loops of two adjacent stitches before completing one single crochet; it is used only for the dimensional body in this reconstruction.
Pattern — Step by Step
Cream Upper Inner Wing — Make 2
Yarn: cream — original photo-inspired reconstruction.
Ch 8.
Row 1: Sl st in second ch from hook, sc in next ch, hdc in next ch, dc in next 2 ch, tr in next ch, 6 tr in final ch. Rotate to work along the opposite side of the foundation chain.
Work tr in next ch, dc in next 2 ch, hdc in next ch, sc in next ch, sl st in final ch.
The six treble stitches at the turning point create the rounded outer end.
Row 2: Ch 1. Work sc around the curved perimeter, placing 2 sc into each of the three central turning stitches at the widest end. Finish with sl st at the narrow base.
Fasten off with a 20 cm tail.
Block each upper cream wing to approximately 4.5 cm long × 2.5 cm wide.
Cream Lower Inner Wing — Make 2
Ch 6.
Row 1: Sl st in second ch from hook, sc in next ch, hdc in next ch, dc in next ch, 5 dc in final ch. Rotate.
Work dc in next ch, hdc in next ch, sc in next ch, sl st in final ch.
Row 2: Ch 1. Sc around the curved edge, placing 2 sc into each of the three central stitches at the rounded end.
Fasten off with a 20 cm tail.
Block to approximately 3.5 cm long × 2 cm wide.
Creating the Cream Openwork Detail
The reference contains elongated openings rather than completely solid cream wings. Add those openings with surface chain loops instead of cutting into the completed pieces.
Join cream yarn at the narrow base of one upper inner wing.
Ch 7.
Skip approximately 1 cm of fabric and anchor with sl st near the outer curve.
Ch 7 again and return to the base with sl st.
Fasten off.
Repeat on the second upper wing.
For each lower wing, use two ch-5 loops attached between the base and outer third of the motif.
These loops should lie on top of the solid cream foundation and create the elongated lace lines visible in the photograph.
Sage Upper Outer Wing — Make 2
Yarn: sage green.
Ch 10.
Row 1: Starting in second chain, work sl st, sc, hdc, dc, dc, tr, tr, dc, hdc, then 7 dc in final chain. Rotate.
Working down the opposite side, work hdc, dc, tr, tr, dc, dc, hdc, sc, sl st.
Row 2: Ch 1. Sc in first 3 sts, hdc in next 3 sts, then work (2 dc in next st) ×5 around the broad outer curve. Hdc in next 3 sts, sc in remaining sts to the base.
Row 3 — scalloped edge: *Sl st in next st, skip 1 st, 5 dc in next st, skip 1 st.* Repeat around the outer two-thirds of the wing. Work sl sts over the narrow inner edge.
Fasten off with a 30 cm tail.
Block to approximately 5–5.5 cm long × 4 cm wide.
Sage Lower Outer Wing — Make 2
Ch 8.
Row 1: Starting in second chain, work sl st, sc, hdc, dc, tr, dc, then 6 dc in final chain. Rotate.
Work dc, tr, dc, hdc, sc, sl st along the opposite side.
Row 2: Ch 1. Sc in first 2 sts, hdc in next 2 sts, work 2 dc in each of the next 4 curved stitches, hdc in next 2 sts, then sc to the base.
Row 3 — scalloped edge: *Sl st in next st, skip 1 st, 5 dc in next st, skip 1 st.* Repeat around the broad outer curve. Sl st across the inner edge.
Fasten off with a 30 cm tail.
Block to approximately 4–4.5 cm long × 3.5 cm wide.
Building the Left Wing Assembly
Lay one sage upper wing with its narrow end pointing toward the center.
Position one cream upper wing over its inner half. Approximately 8–10 mm of sage should remain visible around the cream section.
Place one sage lower wing below it, overlapping the upper wing by approximately 5 mm at the inner base.
Position one cream lower wing over the sage lower section.
Pin all four layers.
Sew only through the narrow inner edges and several points around the cream pieces. Leave the sage scallops free so they retain their dimensional edge.
Building the Right Wing Assembly
Mirror the left-side layout.
Measure from the center line to the widest point of each upper wing before sewing.
The two sides should differ by no more than approximately 3 mm.
Repeat the same 8–10 mm sage border around the cream upper section and the same 5 mm overlap between upper and lower wings.
Green Butterfly Body
Yarn: sage green.
The body is lightly dimensional rather than a flat chain.
R1: 6 sc in MR. (6)
R2: Inc ×6. (12)
R3: Sc around. (12)
R4: Sc around. (12)
R5: (1 sc, dec) ×4. (8)
R6: Sc around. (8)
R7: Sc around. (8)
R8: Sc around. (8)
R9: Sc around. (8)
R10: Sc around. (8)
R11: Sc around. (8)
R12: Sc around. (8)
R13: Dec ×4. (4)
Add only a narrow strand of fiberfill or spare yarn through R2–R6 if a dimensional body is wanted. The lower section should remain relatively flat so it can sit over the wing joins.
Fasten off with a 35 cm tail.
Target approximately 5.5–6 cm long.
Antenna — Make 2
Yarn: sage green.
Ch 18.
Starting in second chain, sl st through the next 15 chains.
Three chains remain at the tip.
Into the third chain from the tip area, work 5 sc tightly around the same chain space, then join with sl st to form a compact rounded end.
Fasten off with a 20 cm tail.
Repeat for the second antenna.
Each finished antenna should project approximately 4–5 cm above the head after attachment.
Alternative Firmer Antennae
For a hanging ornament, use surface-crocheted cords instead of ordinary chains.
Ch 18, then sl st back through every chain.
At the free tip, attach a small six-stitch ball:
R1: 6 sc in MR. (6)
R2: Sc around. (6)
Close and sew the ball to the cord tip.
This version adds weight but keeps the rounded antenna ends clearly visible.
Joining the Wings
Place the left and right wing assemblies side by side.
Keep approximately 5–7 mm between their inner edges.
Tack the two upper inner corners together with cream yarn.
Repeat at the lower inner corners.
The joins will be hidden beneath the body, so concentrate on alignment rather than decorative stitching.
Measure the total wingspan before proceeding. Aim for approximately 10–11 cm.
Attaching the Body
Center the green body over the joined wing edges.
The widest head section should sit approximately 5 mm above the upper-wing junction.
Sew through both sides of the body at approximately 8–10 mm intervals.
Catch the wing fabric underneath without sewing through to the decorative outer scallops.
Leave the upper head edge open until the antennae have been positioned.
Attaching the Antennae
Insert one antenna base into each side of the upper body.
Separate them by approximately 8–10 mm.
Sew through the lower 10–12 mm of each cord.
Close the remaining head opening around the bases.
Angle the antennae outward so their rounded tips finish approximately 3–4 cm apart.
Defining the Sage Scallops
The outer green edge in the photograph forms rounded lobes rather than a continuous oval.
After assembly, pinch each five-double-crochet shell at its center and pull it outward gently.
Wet block the upper wings to approximately three visible major scallops each.
Shape the lower wings into approximately two or three rounded scallops.
Allow the motif to dry completely before removing pins.
Assembly
- Crochet two cream upper inner wings and two smaller cream lower inner wings, then block them flat before adding the decorative chain-loop openings.
- Make two sage upper outer wings and two smaller sage lower outer wings, shaping their outside edges with the specified five-double-crochet scallops.
- Place each cream upper section over a sage upper wing, leaving approximately 8–10 mm of green visible around the outer perimeter.
- Position each cream lower section over its matching sage lower wing and overlap the upper and lower wing bases by approximately 5 mm.
- Sew the layered left and right wing assemblies independently, leaving all outer sage scallops free from attachment stitches.
- Place the completed wing assemblies approximately 5–7 mm apart, align their upper and lower edges, and tack the four inner corners together.
- Crochet the 13-round sage body and position it vertically over the central wing joins with its wider head section extending approximately 5 mm above them.
- Crochet two 18-chain antennae, form the compact rounded tips, and sew the lower 10–12 mm of each cord securely inside the upper body.
- Sew the body over the wing joins at 8–10 mm intervals, then block the finished butterfly to approximately 10–11 cm across without flattening the scallops.
- Weave every tail through at least 3 cm of matching crochet, trim only after blocking, and check that the upper wings remain visibly larger than the lower pair.
The finished reconstruction has four layered wings, cream internal lace details, scalloped sage borders, a narrow dimensional green body, and two long antennae with rounded tips.
7 Technical Tips
- The butterfly twists instead of lying flat: block the four outer wings individually before assembling them. A difference greater than approximately 5 mm between corresponding left and right wing lengths can rotate the center body after sewing.
- The silhouette resembles a flower: keep each upper wing approximately 15–20% larger than its lower partner. Four equal lobes remove the size hierarchy that makes the motif read clearly as a butterfly.
- The cream sections disappear: preserve approximately 8–10 mm of visible sage around the upper cream wings. A border narrower than about 5 mm loses most of its scalloped outline when the motif is viewed from a distance.
- The outer scallops curl backward: do not tighten the slip stitches between five-double-crochet shells. Tight connectors shorten the perimeter and force the rounded green sections out of plane.
- The center body looks bulky: restrict filling to a narrow amount in the upper half and leave the lower section nearly flat. A fully stuffed 8-stitch tube can hide too much of the cream inner-wing detail.
- The antennae flop sideways: sew the lower 10–12 mm of each cord inside the head instead of attaching only its final chain. That longer anchoring area distributes the bending load and keeps the 4–5 cm antennae upright.
- The finished wingspan exceeds the target: change to a 2.5 mm hook before removing rows from the wing construction. Reducing the hook by 0.5 mm preserves the wing proportions more reliably than deleting outer scallops.
Why the Upper Wings Are Larger
The upper pair establishes most of the butterfly’s width. In the supplied image, each upper sage wing extends farther sideways and slightly higher than the lower pair.
That difference is deliberate.
Butterfly appliqués made from four equal circles often resemble bows or flowers. Here the upper-wing reconstruction reaches approximately 5–5.5 cm from inner base to outside edge, while the lower sections target approximately 4–4.5 cm.
Once overlapped at the body, the final dimensions become smaller than the combined individual measurements.
Why the Wings Use Two Colors
Cream forms the internal structural pattern, while sage defines the outside silhouette.
Using the darker value at the perimeter gives every scallop a clear boundary. It also lets the open cream loops remain visible without adding another accent color.
For the closest match, choose a muted botanical sage rather than emerald or blue-green yarn. Warm ivory works better than bright optical white when a softer contrast is wanted.
Published 10 cm Butterfly Benchmark
The Crochet Circle publishes a flat butterfly motif that demonstrates how strongly yarn and hook size affect final dimensions. Its example made with lace cotton and a 1.75 mm hook measures approximately 5 cm, while a version made with a 3.5 mm hook reaches approximately 10 cm wingspan.
That 10 cm result closely matches the scale inferred from the photographed butterfly held in the maker’s hand.
Published DK Butterfly Benchmark
Jess Crafting specifies DK-weight yarn with a 3 mm crochet hook for its butterfly appliqué.
That yarn-and-hook combination is particularly useful for the photo reconstruction because it produces enough stitch definition for small scallops without making the finished motif excessively stiff.
The pattern uses standard crochet stitches including chains, single crochet, double crochet, and treble crochet.
Published 9–11 cm Benchmark
Joanna’s Crochet lists a textured DK butterfly at approximately 9–11 cm wingspan and approximately 4–5 cm body length when made with a 3.5 mm hook.
The same reference gives a gauge of approximately 22 single crochets and 24 rows per 10 cm.
Those published measurements support the 10–11 cm reconstruction target used here, although the layered wing construction in this article is different.
Published Small Butterfly Benchmark
B.Hooked Crochet & Knitting’s Simple Crochet Butterfly Applique is published at approximately 3.25 inches / 8.3 cm wide and 3 inches / 7.6 cm high.
The Ravelry listing specifies a 5 mm hook and approximately 9–11 m of yarn.
That example demonstrates that butterfly dimensions depend as much on motif architecture as yarn thickness; a larger hook does not automatically produce a larger result than a more elaborate DK construction.
Published Worsted Butterfly Benchmark
Maria’s Blue Crayon publishes a butterfly appliqué made from worsted-weight yarn with a 3.75 mm hook.
Its construction separates the project into a body and two wings rather than folding one circular motif.
That separate-component approach is relevant to the photograph because independent wing pieces make it easier to control the distinct upper and lower proportions.
Published Fingering Butterfly Benchmark
TLH Patterns lists a butterfly appliqué using fingering-weight yarn and a 3 mm hook.
The finished size is intentionally variable according to the yarn and hook selected.
Fingering yarn can therefore be used with this reconstruction when a smaller ornament is required, but the antennae and scalloped edges will also become substantially finer.
Published Cotton Butterfly Benchmark
GoldenLucyCrafts publishes a tiny butterfly measuring approximately 1 inch using size 10 cotton thread and a 1.8 mm hook.
This provides a useful lower-end scaling reference. The same principle applies here: thinner fiber and a smaller hook reduce the motif without requiring the wing architecture to become less detailed.
Making the Butterfly Smaller
Switch to fingering cotton and a 2–2.5 mm hook.
Keep the same wing construction and shorten each antenna by two or three chains.
A target wingspan around 7–8 cm is practical without redesigning the motif.
Block carefully because the narrower cream loops can distort more easily at that scale.
Making the Butterfly Larger
Use worsted #4 cotton or a smooth cotton-acrylic blend with a 4 mm hook.
Keep every stitch sequence unchanged.
A wingspan around 13–15 cm is a reasonable scaling target, depending on tension.
Increase each antenna by approximately four chains if the larger wings make the original 18-chain cords look too short.
Changing the Color Placement
The two-color structure can be reversed.
Cream outer wings with sage internal panels produce a lighter silhouette, while darker green inner wings create stronger central contrast.
For the photographed arrangement, retain sage around the outside and cream near the body. The green perimeter is what makes the rounded wing lobes visually continuous.
Making a Four-Color Butterfly
Assign one color to the upper outer wings, another to the lower outer wings, cream to the internal lace, and a fourth shade to the body.
Keep corresponding left and right pieces identical.
Color changes between opposite wings can exaggerate minor size differences, so block both sides against the same paper template before assembly.
Turning the Motif into a Brooch
Block the butterfly first.
Sew a brooch bar horizontally across the rear of the body, catching the inner edges of both upper wings for added support.
Use a backing circle approximately 25–30 mm wide if the pin mechanism is visible through the open cream sections.
A brooch version should use the firmer antenna option so the tips retain their position during wear.
Turning the Butterfly into a Garland
Make several motifs and omit heavy body stuffing.
Pass the garland cord behind the upper body rather than through the wing tips.
Space butterflies approximately 10–15 cm apart.
Supporting each motif from the body prevents the scalloped upper wings from stretching under their own weight.
Using the Butterfly on a Blanket
Sew the body down completely.
Secure each wing at the inner edge and at one point approximately halfway toward the outside.
Leave the final scalloped centimeter free if dimensional texture is wanted.
For baby items, avoid beads, wire, detachable decorations, or other small components and attach every crocheted part securely.
Using the Butterfly on a Bag
A bag appliqué needs more attachment points than a framed motif.
Sew around the inner cream sections and tack every second sage scallop to the bag fabric.
Keep the outermost tips free only if they cannot catch on closures or straps.
Use matching sewing yarn so reinforcement stitches disappear into the crochet texture.
Correcting Uneven Wings
Do not try to compensate by pulling the body sideways.
Remove the affected wing and block it against its matching opposite piece.
If the difference remains greater than approximately 5 mm, remake the smaller or larger component.
The narrow central body emphasizes rather than hides major asymmetry.
Correcting Cupped Sage Wings
Cupping usually indicates that the outer edge does not contain enough length for the inner fabric.
Check the five-double-crochet scallops first.
If they were worked tightly, dampen the wing and pin each shell separately at full width.
Persistent cupping can be corrected by moving up 0.5 mm in hook size for the final scalloped row only.
Correcting Ruffled Wings
Ruffling is the opposite problem: too much outer-edge fabric.
Check whether extra double crochets were accidentally added to the curved sections.
Steam or wet blocking cannot permanently correct a severe stitch-count error.
Remove the affected row and restore the stated increase placement instead.
Correcting Loose Antennae
Open the top body seam.
Insert an additional 10–12 mm of each antenna base.
Sew through the cord and both body walls at least three times.
Close the seam and test the antennae by gently moving their tips from side to side.
Correcting a Bulky Center
Remove any fiberfill below R6.
Flatten the lower body between your fingers and sew it directly over the wing joins.
The upper head can remain rounded, but the abdomen should function almost like a padded strip.
This exposes more of the cream wing structure beside the center line.
Blocking the Finished Butterfly
Pin the body vertically first.
Measure equal distances from the center to both upper-wing tips.
Repeat for the lower pair.
Shape each green scallop individually rather than stretching the entire edge at once.
Arrange the antennae last and allow the motif to dry completely before removing the pins.
Yarn Planning
This project is suitable for small DK remnants.
Reserve approximately 12–15 g of sage because the body, four outer wings, scalloped borders, and antennae all use the main color.
Approximately 5–7 g of cream should cover the four inner sections and their decorative loops.
When substituting yarn, compare meterage per 50 g as well as the printed weight category.
Sources
Jess Crafting — Crochet Butterfly Applique — DK-weight yarn, 3 mm hook, standard crochet stitch reference, and flat appliqué construction.
The Crochet Circle — Crochet Butterfly Applique — published examples around 5 cm with a 1.75 mm hook and approximately 10 cm with a 3.5 mm hook.
Ravelry — Simple Crochet Butterfly Applique by B.Hooked — approximately 8.3 cm wide × 7.6 cm high, 5 mm hook, and 9–11 m published yardage.
Maria’s Blue Crayon — Crochet Butterfly Applique Pattern — worsted-weight yarn, 3.75 mm hook, and separate body-and-wing construction.
GoldenLucyCrafts — Tiny Butterfly Applique — approximately 1-inch finished size using size 10 cotton thread and a 1.8 mm hook.
Ravelry — Butterfly Applique by TLH Patterns — fingering-weight yarn, 3 mm hook, and variable finished sizing.
I Like Crochet — Double Layer Butterfly Applique — medium-weight cotton blend, 4.25 mm hook, layered butterfly construction, and contrasting-color reference.
Joanna’s Crochet — Textured Crochet Butterfly Applique — DK yarn, 3.5 mm hook, 9–11 cm wingspan benchmark, and 22 sc × 24 rows per 10 cm published gauge.
Conclusion
Block the four wing sizes before joining them because the narrow center body cannot compensate for mismatched left and right proportions. Keep the upper sage sections visibly larger, preserve 8–10 mm of green around the cream inserts, and attach the antennae through enough of the head to support their long stems. Your next step is to crochet one upper sage wing and block it to the 5–5.5 cm reconstruction target before making its mirror. Save this sage green crochet butterfly applique pattern to Pinterest or share the finished motif on Instagram with #SageGardenButterfly. Would you keep the inner wings cream or replace them with pale yellow?









