Introduction
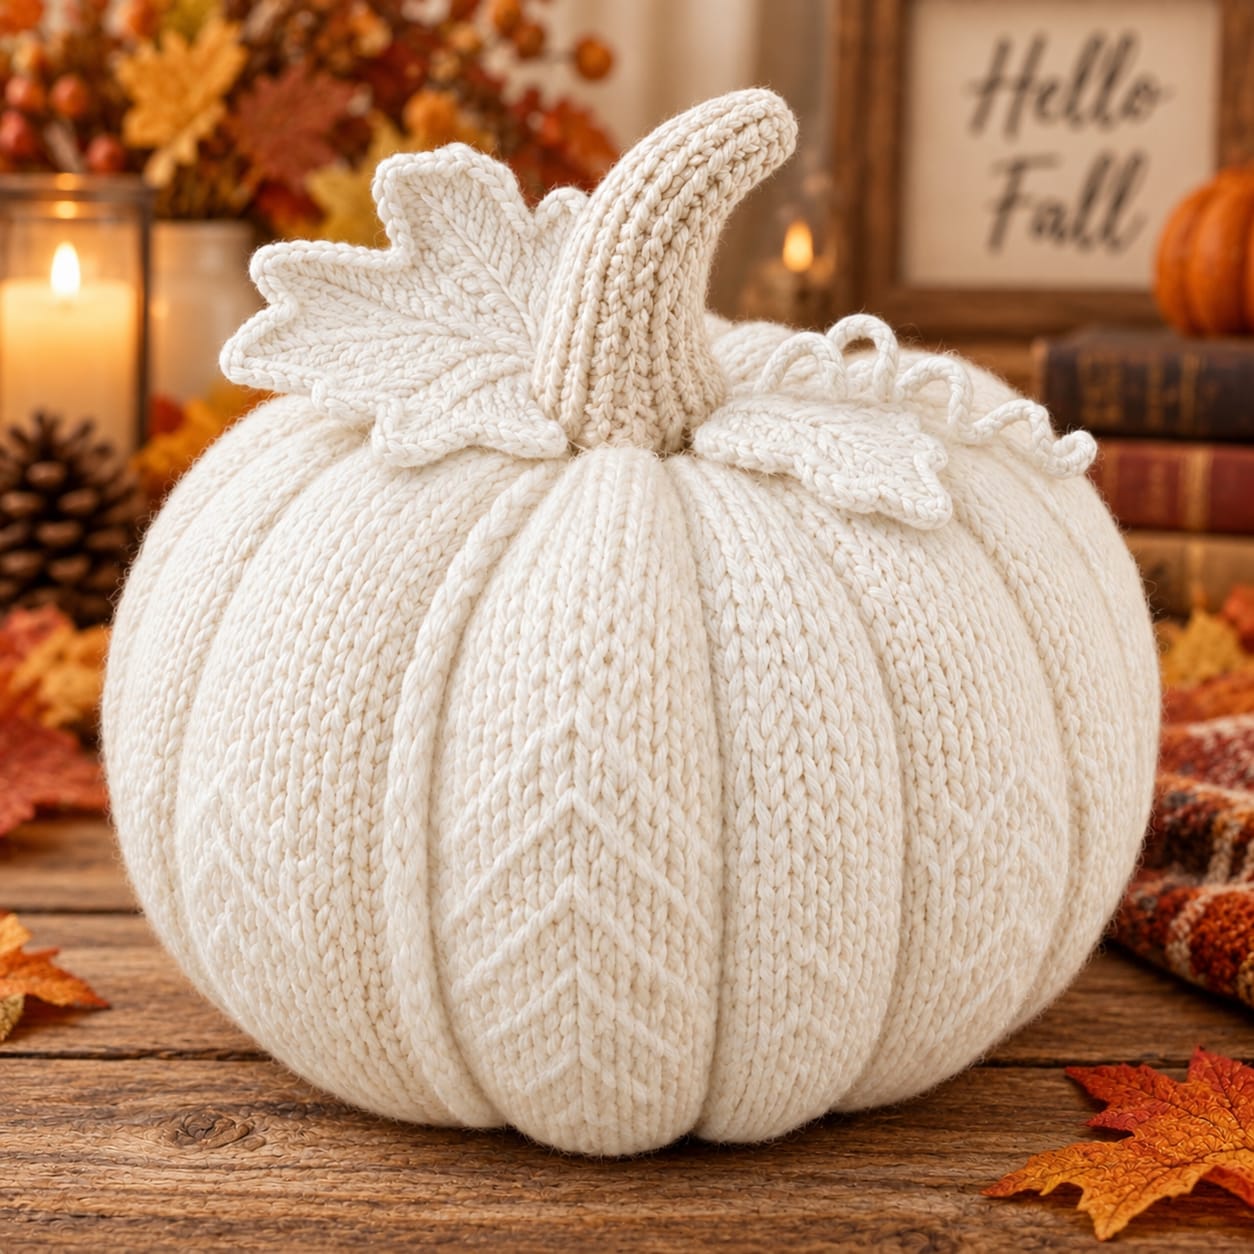
Eight ivory ribs rise like narrow cable columns before disappearing beneath an oversized hooked stem. This large white cable crochet pumpkin pattern uses Aran-weight yarn, a 5 mm hook, fiberfill, raised post-stitch ribs, two sculpted leaves, and a curly vine. The intermediate reconstruction targets approximately 28–32 cm wide and 27–30 cm overall, creating a substantial freestanding pumpkin for an autumn table or mantel.
The instructions below are an original photo-inspired reconstruction based on visible structure; published patterns cited later are used only for sizing, gauge, and material benchmarks.
The Design: What Makes This White Cable Pumpkin Different
The reference does not rely on ordinary surface sculpting alone. Eight broad ivory sections carry raised vertical ridges that imitate knitted cables, while narrow valleys separate the lobes from crown to base. A tall stem supplies the second structural feature: its broad lower section emerges from a deep crown recess and bends strongly near the upper third. Two large cream leaves and several narrow curls keep the entire topper monochromatic. This large white cable crochet pumpkin pattern therefore needs texture to remain readable without color contrast. The body reconstruction uses a repeatable raised-rib panel rather than copying a published cable chart. A common failure is overstuffing before the external shaping strands are installed; a rigid center prevents the channels from sinking between the raised columns and leaves the pumpkin looking nearly spherical.
Project Info at a Glance
| Skill Level | Time | Finished Size | Hook | Best For |
|---|---|---|---|---|
| Intermediate | Approx. 9–12 hours | Reconstruction target: 28–32 cm wide × 27–30 cm overall | 5 mm | Fall centerpieces, mantels, shelves, neutral seasonal decor |
The dimensions above are reconstruction targets inferred from the photograph, not verified measurements of an identified original. See Love Share’s published Crochet Cable Pumpkin uses Aran yarn and a 5.5 mm hook and measures approximately 8 inches wide × 6 inches tall. MJ’s Off The Hook Designs publishes a cable pumpkin in six- and eight-section versions using Aran yarn, 4–5 mm hooks, and approximately 78–183 m of yarn.
Materials and Tools
Yarn
- Warm ivory / natural — Aran #4 — approximately 260–320 g for body, stem, leaves and vine
- Extra ivory — reserve approximately 15–20 g for sculpting strands and repairs
Choose a smooth, tightly twisted yarn rather than a fuzzy fiber. The photographed pumpkin depends on visible vertical ridges, and excessive halo will soften the distinction between the raised columns and recessed valleys.
Tools
- 5 mm crochet hook
- Polyester fiberfill — approximately 300–400 g
- Long doll or upholstery needle — approximately 12–15 cm
- Tapestry needle
- Eight locking stitch markers
- Scissors
- Measuring tape
Abbreviations
- MR — magic ring
- ch — chain
- sc — single crochet
- hdc — half double crochet
- dc — double crochet
- tr — treble crochet
- inc — 2 sc in one stitch
- dec — invisible decrease
- sl st — slip stitch
- FPdc — front-post double crochet
- BPdc — back-post double crochet
- BLO — back loop only
- st/sts — stitch/stitches
For an invisible decrease, insert the hook through the front loops of the next two stitches and complete one single crochet through both loops.
Pattern — Step by Step
Textured Pumpkin Body
Yarn: ivory — original photo-inspired raised-rib reconstruction.
The body is worked as one stuffed form. Raised post-stitch columns establish the visual ribs, and eight external sculpting passes deepen the valleys after stuffing.
R1: 6 sc in MR. (6)
R2: Inc ×6. (12)
R3: (1 sc, inc) ×6. (18)
R4: (2 sc, inc) ×6. (24)
R5: (3 sc, inc) ×6. (30)
R6: (4 sc, inc) ×6. (36)
R7: (5 sc, inc) ×6. (42)
The 42-stitch plateau follows standard six-stitch amigurumi expansion. From this point the texture is added without changing the stitch total.
R8: Sc around. (42)
R9: *FPdc around next st from R8, sc in next 6 sts.* Repeat ×6. (42 working positions)
R10: *FPdc around the post of the FPdc below, sc in next 6 sts.* Repeat ×6. (42)
R11: Repeat R10. (42)
R12: Repeat R10. (42)
R13: Repeat R10. (42)
R14: Repeat R10. (42)
R15: Repeat R10. (42)
R16: Repeat R10. (42)
R17: Repeat R10. (42)
R18: Repeat R10. (42)
R19: Repeat R10. (42)
R20: Repeat R10. (42)
Begin stuffing after R20. Fill the outer circumference evenly but keep the crown, bottom center, and internal core somewhat compressible.
R21: (5 sc, dec) ×6. (36)
R22: Sc around. (36)
R23: (4 sc, dec) ×6. (30)
R24: Sc around. (30)
R25: (3 sc, dec) ×6. (24)
R26: Sc around. (24)
Add the remaining stuffing. Form a broad body rather than a tall sphere.
R27: (2 sc, dec) ×6. (18)
R28: (1 sc, dec) ×6. (12)
R29: Dec ×6. (6)
Fasten off with a 160 cm tail. Pass through the remaining front loops and close.
Creating Eight Deep Lobes
The photographed pumpkin reads as approximately eight broad segments. The six raised crochet columns provide surface texture, while the shaping yarn establishes the stronger eight-part silhouette.
Mark eight positions around the equator at approximately 45-degree intervals.
Thread a long doubled ivory strand through the upholstery needle.
Insert through the bottom center and emerge at the crown.
Bring the strand down the exterior at the first marker and return through the bottom center.
Pull until a defined channel appears.
Repeat at all eight markers.
Do not fully tighten the first channel before the eighth is installed. Establish all sections at moderate tension, compare their widths from above, and then make a second pass where deeper sculpting is required.
Optional Raised Surface Columns
The reference has particularly pronounced narrow ridges on several lobes. Additional surface crochet can reproduce that effect without changing the body construction.
Join ivory at the bottom of one selected lobe.
Surface sl st vertically toward the crown, following a straight column of stitches.
Fasten off.
Repeat on selected lobes rather than every section. Keep each surface line relaxed enough that it does not shorten the body.
Tall Curved Ivory Stem
Yarn: ivory.
Target approximately 13–15 cm from crown to tip.
R1: 6 sc in MR. (6)
R2: Inc ×6. (12)
R3: (1 sc, inc) ×6. (18)
R4: BLO sc around. (18)
R5: Sc around. (18)
R6: (4 sc, dec) ×3. (15)
R7: Sc around. (15)
R8: (3 sc, dec) ×3. (12)
R9: Sc around. (12)
R10: Sc around. (12)
R11: Sc 8, sl st 4. (12)
R12: Sc 8, sl st 4. (12)
R13: Sc 8, sl st 4. (12)
R14: Sc 9, sl st 3. (12)
R15: Sc 9, sl st 3. (12)
R16: Sc around. (12)
R17: Sc around. (12)
R18: (2 sc, dec) ×3. (9)
R19: Sc around. (9)
R20: (1 sc, dec) ×3. (6)
R21: Sc around. (6)
Stuff the first 8–9 cm firmly. Add only a small amount of fiberfill through the bend so the unequal stitch heights can pull the upper section forward.
Close the six-stitch tip.
Leave a 60 cm attachment tail at the base.
Adding Vertical Texture to the Stem
Join ivory at the R4 BLO ridge.
Surface sl st toward the stem tip along one stitch column.
Repeat around the stem at approximately four evenly spaced positions.
These narrow lines reproduce the strongly ribbed appearance visible in the reference.
Do not pull the surface stitches tightly because shortened columns will exaggerate the bend.
Large Three-Lobed Pumpkin Leaf — Make 1
Yarn: ivory.
The larger leaf sits behind and to the left of the stem.
Ch 16.
Starting in second chain from hook, work into the next 14 chains:
sl st, sc, hdc, dc, tr, tr, dc, hdc, sc, hdc, dc, tr, dc, sc.
Work 5 sc into the final foundation chain to turn around the tip.
Working down the opposite side:
sc, dc, tr, dc, hdc, sc, hdc, dc, tr, tr, dc, hdc, sc, sl st.
Join at the base.
First Side Lobe
Ch 8.
Starting in second chain work sl st, sc, hdc, dc, tr, dc, sc.
Sl st into the main leaf edge approximately one-third of the way toward the tip.
Second Side Lobe
Move two stitches farther toward the main tip with sl sts.
Ch 7.
Starting in second chain work sl st, sc, hdc, dc, hdc, sc.
Sl st into the main leaf edge.
Fasten off with a 40 cm tail.
Block the three points separately. Target approximately 12–14 cm from base to longest point.
Medium Three-Lobed Leaf — Make 1
Ch 13.
Starting in second chain, work into the next 11 chains:
sl st, sc, hdc, dc, tr, dc, hdc, dc, hdc, sc, sl st.
Work 5 sc in the final chain.
Mirror the eleven-stitch sequence down the opposite side.
For the first side lobe, ch 6 and work sl st, sc, hdc, dc, hdc back toward the main leaf.
For the second side lobe, ch 5 and work sl st, sc, hdc, dc back.
Fasten off with a 35 cm tail.
Target approximately 9–10 cm.
Leaf Veins
Join ivory at the base of each leaf.
Surface sl st along the central foundation chain to the main tip.
Fasten off.
Repeat a shorter surface line along each side lobe if stronger vein definition is wanted.
Keep all surface stitches relaxed so the leaves remain flat.
Curly Vine — Make 2
Yarn: ivory.
Vine 1: Ch 28.
Starting in second chain, work 3 sc in each of the next 20 chains, then sl st in the remaining seven chains.
Fasten off with a 25 cm tail.
Vine 2: Ch 22.
Starting in second chain, work 3 sc in each of the next 15 chains, then sl st in the remaining six chains.
Fasten off with a 25 cm tail.
The two different lengths prevent the crown curls from appearing mechanically symmetrical.
Forming the Crown Recess
The large stem should not sit on a flat surface.
Thread a doubled ivory strand through the bottom center and bring it out approximately 1 cm from the crown center.
Reinsert on the opposite side of the center and return through the bottom.
Pull gently.
Repeat at a perpendicular angle.
The resulting depression should measure approximately 4–5 cm across, large enough to accept the 18-stitch stem base.
Attaching the Stem
Push the broad stem base into the crown recess.
Sew through every base stitch.
Make a second attachment circle through the R5 area approximately 1 cm above the pumpkin surface.
Add three concealed anchoring stitches from the lower stem into different points of the pumpkin crown.
Rotate the bend so the tip curves slightly forward and to one side rather than directly backward.
Attaching the Large Leaf
Place the large leaf behind the left side of the stem.
Sew its base completely to the crown.
Add one concealed stitch approximately 3 cm along the center vein.
Leave the three pointed sections free.
The largest point should extend laterally rather than vertically.
Attaching the Medium Leaf
Position the medium leaf on the opposite side of the stem.
Rotate it so one lobe overlaps the pumpkin surface while another rises slightly behind the vine.
Secure its base and approximately 2 cm of center vein.
Do not stitch around the outside edge.
Attaching the Vines
Place the flat slip-stitch section of each vine beneath the medium leaf.
Sew that section completely to the crown.
Add one concealed stitch at the beginning of each curl.
Leave the spiral sections free.
One curl can rise above the leaf while the second falls toward the pumpkin surface.
Assembly
- Crochet the ivory body through R29, maintaining the 42-stitch plateau from R8 through R20 and stuffing only after the broad central section is established.
- Mark eight equatorial positions approximately 45 degrees apart, then install all eight exterior shaping strands at moderate tension before tightening any individual groove.
- Compare the lobes from above and make a second sculpting pass through shallow channels until the pumpkin has a balanced broad silhouette.
- Compress the crown into a 4–5 cm recess so the tall stem has a defined socket instead of resting on the upper surface.
- Crochet the 21-round ivory stem, stuff its lower section firmly, preserve the curved upper section, and add relaxed vertical surface ribs.
- Sew the stem through every base stitch, add a second attachment line approximately 1 cm higher, and orient the curved tip forward.
- Crochet the large and medium three-lobed leaves, add surface-slip-stitch veins, and block all points before attaching them around the stem.
- Sew the large leaf to the left side and the medium leaf to the opposite side, securing only their bases and first 2–3 cm of center structure.
- Crochet the two different-length spiral vines, secure their flat attachment sections beneath the medium leaf, and leave the curled sections mobile.
- Weave all remaining tails through at least 5 cm of matching fabric, flatten an 8–10 cm base beneath the pumpkin, and reshape the eight channels by hand.
The completed pumpkin should have a broad ivory body, eight deeply sculpted lobes, visible raised columns, a tall curved ribbed stem, two three-lobed leaves, and two monochromatic spiral vines.
7 Technical Tips
- The raised columns disappear after stuffing: keep the body fabric dense and use a smooth Aran yarn with clear stitch definition. Stuffing that stretches the 42-stitch circumference by more than roughly 10% flattens the post texture.
- The eight lobes finish at different widths: place eight markers at approximately 45-degree intervals around the equator before inserting shaping yarn. A channel displaced by 2 cm can make one lobe visibly narrower than its neighbors.
- The crown collapses under the stem: keep the outer 2 cm around the stem socket firmly stuffed while compressing only the 4–5 cm central recess. Removing too much filling from the entire crown creates a flat top instead of a defined stem socket.
- The tall stem falls sideways: sew through every stitch of its 18-stitch base and add a second attachment circle 1 cm higher. A single attachment ring acts as a hinge under a 13–15 cm stem.
- The leaf points curl inward: compare the surface-slip-stitch vein with the underlying foundation before fastening off. A vein shortened by even 5 mm can pull a 12 cm leaf into a pronounced fold.
- The vines form waves instead of coils: work exactly three single crochets into each designated foundation chain. Irregular groups of two and three stitches produce inconsistent curvature rather than the tight spirals visible at the crown.
- The pumpkin rocks after finishing: redistribute stuffing away from the exact bottom center and press an 8–10 cm flat contact area into the base. A concentrated central stuffing mass produces a rounded pivot point.
Understanding the Cable-Look Texture
The photographed pumpkin resembles knitted fabric because its ridges travel vertically while the spaces between them remain comparatively smooth.
True crochet cables can be built by crossing front-post stitches, but a highly complicated crossing chart is unnecessary for this photo-inspired reconstruction. Repeated FPdc columns provide a similar raised longitudinal effect while keeping the body stitch count measurable.
The external sculpting channels then create a second layer of texture.
Those two systems should remain distinct: post stitches create surface relief, while shaping strands create the pumpkin’s actual segmentation.
Published Crochet Cable Pumpkin Benchmark
See Love Share’s Crochet Cable Pumpkin is a documented crochet cable design using Aran-weight Red Heart Super Saver and a 5.5 mm hook.
Its published finished dimensions are approximately 8 inches wide × 6 inches tall. The pattern was first published in 2022 and includes cable texture plus an assembly walkthrough.
Those measurements provide a useful benchmark for how quickly an Aran crochet pumpkin gains physical volume even before scaling toward the oversized reference shown here.
Published Six- and Eight-Section Cable Benchmark
MJ’s Off The Hook Designs publishes the Cozy Cottage Cable Pumpkin in six-section and eight-section versions.
The pattern uses Aran yarn with 4 mm and 5 mm hooks, lists approximately 85–200 yards / 78–183 m, and gives a cable-repeat gauge of approximately 2 inches.
The existence of an eight-section published cable pumpkin is particularly relevant to the segmentation visible in this photo, although the original instructions and cable chart are not reproduced here.
Published Worsted Pumpkin Material Benchmark
A documented stuffed pumpkin pattern using #4 worsted yarn specifies approximately 140–160 yards for the body, about 10 yards for a stem, and approximately 8 yards for an optional leaf.
That reference pairs the yarn with a 5 mm hook and approximately three ounces of fiberfill.
The much larger reconstruction here requires additional yarn and stuffing because its target width approaches 30 cm and its tall topper contains two leaves, vines, and a substantial stem.
Published Pumpkin Topper Benchmark
ChristaCoDesign’s stem, leaf, and vine pattern uses #4 medium worsted yarn and a 5 mm hook.
The published material estimate is approximately 21–23 m for topper components.
Its stem is worked continuously in the round and expands at its base, demonstrating a practical structural principle for attaching a relatively narrow stem to a larger pumpkin surface.
Published Leaf Benchmark
Doily Designs publishes a pumpkin leaf using #4 worsted yarn with a 5 mm hook.
The finished leaf measures approximately 2.25 inches / 5.7 cm including its stem and is constructed by crocheting along both sides of a foundation chain.
The leaves in this reconstruction use the same general foundation-chain geometry but are intentionally larger and multi-lobed to match the foliage visible in the photograph.
Why Ivory Requires Stronger Texture
Color variation normally helps define a pumpkin’s sections.
This project removes that tool completely.
The body, stem, leaves, and vines are all ivory, so shape has to create the visual separation. Raised columns catch light differently from the recessed channels, while leaf veins and stem ribs prevent the topper from merging into one pale mass.
Use consistent stitch tension. Random loose stitches are considerably more visible in a single-color project.
Why the Pumpkin Needs Deep Grooves
A large smooth sphere with shallow lines would not reproduce the reference.
The photographed body has substantial depth between sections, particularly near the crown and lower third.
External shaping yarn compresses the stuffing without requiring eight separate stuffed wedges.
Multiple moderate passes are safer than one extremely tight strand because pressure can be distributed and adjusted after all lobes are visible.
Why the Crown Is Recessed
The stem is proportionally large.
If its 18-stitch base sits directly on the upper surface, the topper appears pasted onto the pumpkin and becomes mechanically unstable.
A 4–5 cm recess allows part of the base to sit below the surrounding lobe tops.
That lowers the attachment point and gives the stem a broader visual transition into the body.
Making a Smaller White Pumpkin
Stop increasing at 36 stitches.
Maintain 36 stitches for approximately eight rounds.
Decrease through:
36 → 30 → 24 → 18 → 12 → 6.
Reduce the stem to approximately 9–10 cm and use only one large leaf plus one vine.
Maintain the same eight sculpting positions if you want narrow lobes, or use six positions for broader sections.
Making an Extra-Large Pumpkin
The cleanest method is to use thicker yarn while preserving the tested body geometry.
A heavier Aran or light bulky yarn with an appropriately sized hook can increase diameter without introducing another increase round.
If you do add a round after 42 stitches, maintain standard six-stitch expansion:
R8: (6 sc, inc) ×6. (48)
Reverse that extra increase before returning to the existing decrease sequence.
Making the Stem Shorter
Omit R15–R17.
Begin the reduction to nine stitches immediately after R14.
This removes approximately 2–3 cm while retaining the curved section.
A shorter stem is useful when the pumpkin will sit beneath a shelf or inside a low display basket.
Increasing the Stem Curve
Repeat one additional round of sc 8, sl st 4 before returning to full single-crochet rounds.
Keep the shortened side aligned with the existing bend.
Do not add several shortened rounds at once without testing the stem because excessive imbalance can fold the tube instead of producing a smooth hook.
Making the Leaves Firmer
Move down to a 4.5 mm hook for the leaves only.
Keep the same stitch sequence.
The denser fabric will support the pointed lobes without wire.
Do not reduce the hook excessively because an overly tight foundation chain will prevent the leaf from blocking flat.
Adding More Knitted-Look Ridges
Surface crochet provides the easiest adjustment after the body is complete.
Add vertical slip-stitch lines to the center of selected lobes.
Work from bottom toward crown so every ridge follows the same direction.
Keep at least one smooth stitch column between neighboring raised lines; filling every column removes the contrast that makes the ribs readable.
Correcting a Pumpkin That Is Too Tall
Before closing the body, remove stuffing from the crown and bottom center.
Push the remaining filling outward toward the equator.
After closure, run a temporary strand through the vertical center and compress the top toward the bottom.
Tie only when the target broad profile has been reached.
Correcting Shallow Channels
Check stuffing density first.
If the body is rigid, reopen the crown and remove approximately 10–15% of the central filling.
Replace the shaping strands at moderate tension.
Do not simply pull harder against an overstuffed body; excessive pressure can separate stitches or cut into the yarn.
Correcting Unequal Lobes
View the pumpkin directly from above.
Measure the equatorial distance between neighboring channels.
Move the wider section’s boundary inward before tightening it again.
Trying to correct width only by changing strand tension alters groove depth but does not reliably relocate the channel.
Correcting a Twisted Stem
Remove the upper anchoring stitches but leave the base circle intact.
Rotate the stem until the shortened slip-stitch rounds face the intended bend direction.
Reattach the three upper anchors.
The bend should read as one smooth curve rather than a corkscrew.
Correcting Leaves That Disappear Behind the Stem
Move their attachment points outward by approximately 2 cm.
The leaf bases may remain beneath the stem, but at least two-thirds of each large leaf should be visible from the front.
Rotate the large leaf laterally and the medium leaf diagonally to prevent their points from stacking.
Yarn Planning
Cable and post-stitch texture consumes more yarn than a comparably sized smooth surface.
Make the body first and weigh the remaining yarn before starting the stem.
Reserve approximately 50–60 g for the stem, leaves, vines, surface texture, and sculpting strands.
When substituting yarn, compare meterage per 100 g rather than relying only on the printed Aran classification.
Stuffing Strategy
Use small pieces of fiberfill.
Build firmness around the outside first.
Leave the central core less dense so the shaping strands can compress it.
Check the body after every few handfuls by pressing two opposite sides together. If the center no longer yields under moderate hand pressure, stop adding stuffing until the sculpting requirement has been considered.
Care and Storage
Follow the care instructions supplied with the selected yarn.
Spot cleaning is generally practical for a large stuffed seasonal decoration because full washing can alter the carefully established groove depth.
Store the pumpkin without weight on the stem or leaves.
After storage, massage the eight lobes outward, redefine the crown recess with your fingers, and reshape the vines around a pencil if their coils have relaxed.
Sources
Ravelry — Crochet Cable Pumpkin by See Love Share — Aran yarn, 5.5 mm hook, cable construction, and published dimensions of approximately 8 inches wide × 6 inches tall.
Ravelry — Cozy Cottage Cable Pumpkin by MJ’s Off The Hook Designs — Aran yarn, 4 mm and 5 mm hooks, 78–183 m yardage, two-inch cable-repeat gauge, and six- or eight-section options.
ChristaCoDesign — Crochet Pumpkin Stem, Leaf and Vine Pattern — #4 medium worsted yarn, 5 mm hook, approximately 21–23 m for topper components, and round-based stem construction.
Doily Designs — Crochet Pumpkin Vine Leaf Pattern — #4 worsted yarn, 5 mm hook, approximately 2.25-inch finished leaf, and two-sided foundation-chain construction.
Free Crochet Pumpkin Pattern — #4 worsted yarn, 5 mm hook, approximately 140–160 yards for a pumpkin body, 10 yards for a stem, and 8 yards for an optional leaf.
CrochetNet — Crochet Pumpkin Pattern in Three Sizes — worsted and bulky yarn benchmarks, 5 mm worsted hook recommendation, and published small-to-large pumpkin sizing.
Conclusion
The raised ivory columns need to remain visible after stuffing, so establish texture first and sculpt the eight deep channels only after the body is closed. Build the crown recess before attaching the stem, then use the leaves and vines to frame its strong forward curve rather than covering it. Your next step is to crochet a small FPdc swatch with the selected Aran yarn and confirm that the posts remain distinct at 5 mm tension. Save this large white cable crochet pumpkin pattern to Pinterest or share the completed pumpkin on Instagram with #WhiteCablePumpkin. Would you keep this pumpkin completely ivory, including the stem and leaves, or make only the stem brown?









