Introduction
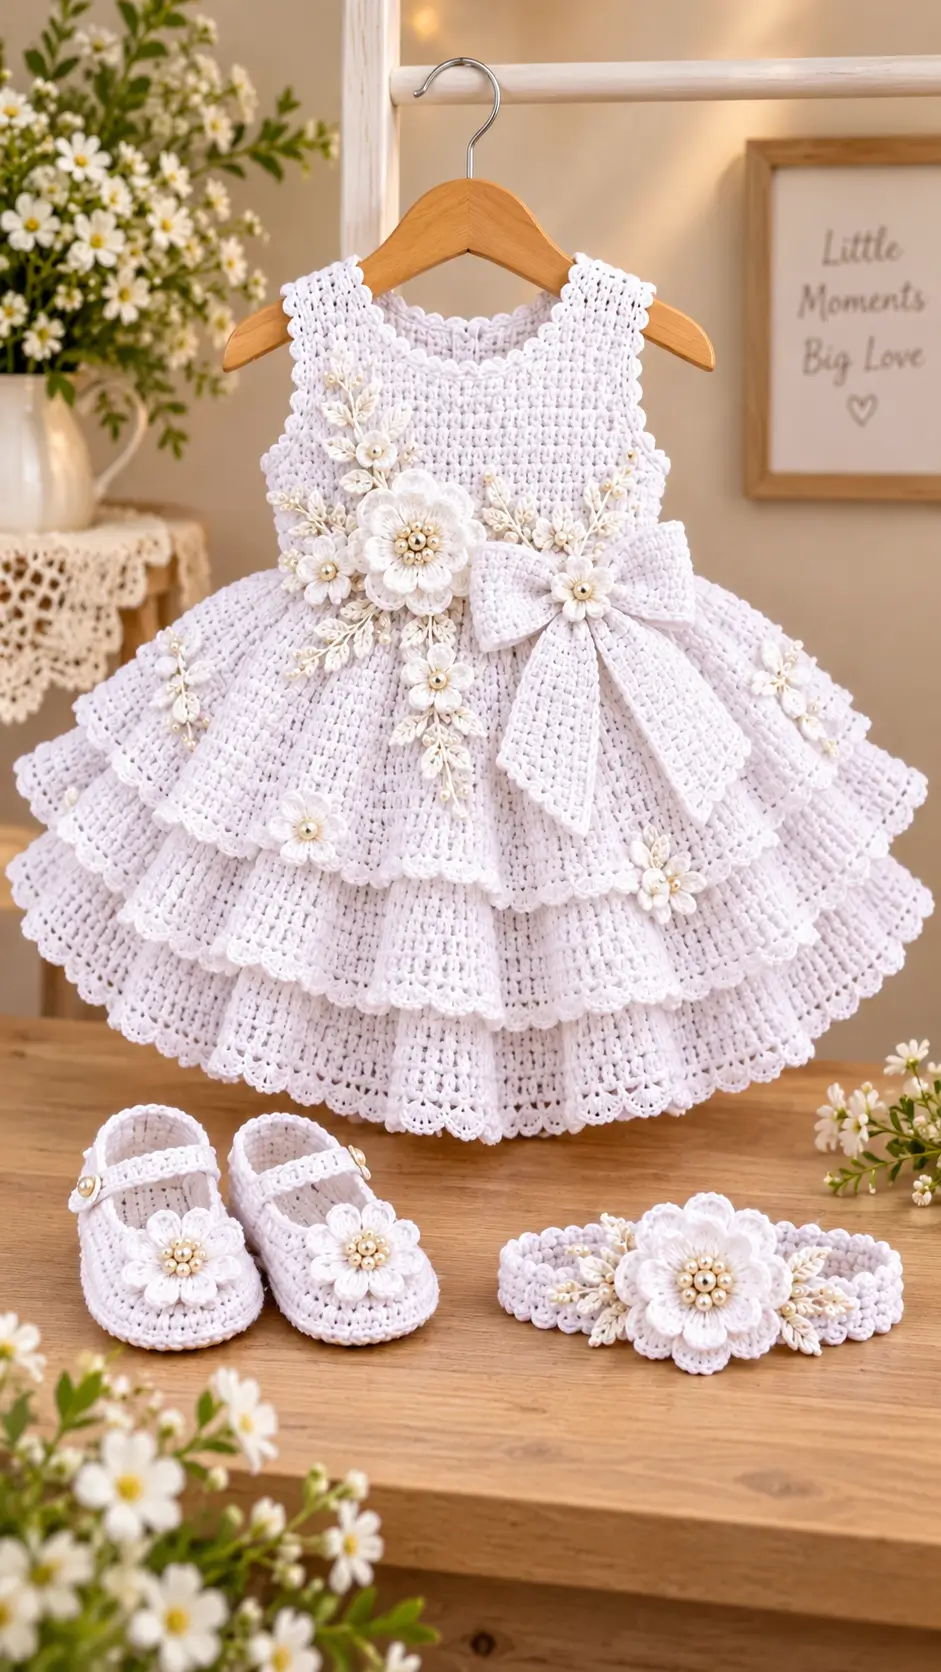
Three stacked skirt tiers change the engineering of this white crochet baby dress set: each layer must flare without pulling the bodice forward. This photo-inspired version uses sport-weight yarn, a 4 mm hook and a 6–12 month reference size of about 38 cm long. The skill level is intermediate. Dress, shoes and headband share the same motifs, which reduces leftover yarn and keeps the complete set visually consistent.
The Design: What Makes the Floral Ruffle Set Different
The first structural choice is a compact round yoke above a much wider skirt. That keeps the shoulder area flat while giving the lower dress enough circumference for three ruffle layers. Second, the support skirt stays relatively plain; ruffles attach to reserved front loops instead of being stacked directly onto one another. This limits bulk at the waist.
Third, the crochet ruffle baby dress uses concentrated appliqué placement rather than covering every tier evenly, so the large flower and bow remain separate focal points. A common error with this type of flower applique baby dress is adding the decorations before the skirt hangs naturally. Heavy flowers can rotate the front panel or pull one side lower, so placement should happen only after the dress is blocked and suspended from the shoulders.
Project Info at a Glance
| Skill Level | Time | Finished Size | Hook | Best For |
|---|---|---|---|---|
| Intermediate | Varies by crochet speed | Approx. 6–12 months; 38 cm reference length | 4 mm | Ceremony, christening or special-event dress set |
The 38 cm reference length and 4 mm hook are based on published baby-dress sizing data. The photographed garment itself cannot be measured accurately from the image alone.
Materials and Tools
Yarn
- White — sport/baby weight, category 2 — have approximately 200 g available for the complete dress, shoes and headband.
- Ivory or cream — same yarn weight — approximately 10–20 g if contrast leaves or flower details are wanted.
- Fiber suggestion — smooth cotton, cotton-acrylic or baby yarn that produces clearly defined stitches and flowers.
Comparable published baby dresses vary considerably in yarn consumption, so 200 g should be treated as a practical supply allowance rather than an exact consumption figure for the photographed dress.
The photograph includes pearl-style flower centers. For clothing intended for a baby, crocheted or embroidered centers are a safer construction choice than loosely attached decorative pieces.
Tools
- 4 mm crochet hook
- Yarn needle
- Stitch markers
- Scissors
- Measuring tape
- Blocking pins
- 12–15 mm back button or a securely crocheted toggle
Abbreviations
- MR — magic ring
- ch — chain
- sl st — slip stitch
- sc — single crochet
- hdc — half double crochet
- dc — double crochet
- inc — increase
- dec — decrease
- dc2tog — double crochet two together
- BLO — back loop only
- FLO — front loop only
- st/sts — stitch/stitches
- picot — ch 3, sl st into first chain
An invisible decrease catches the front loops of the next two stitches before completing one sc. It is mainly useful if the shoe shaping is adapted to single crochet.
Working Gauge
The pattern is calculated around 18 dc = 10 cm across the lower bodice after light blocking. With approximately 80 body stitches, the finished torso circumference should be around 44–45 cm depending on yarn and tension.
Measure the intended child or a well-fitting garment before beginning the skirt. Baby sizing labels vary between designers and brands.
Pattern — Step by Step
The garment uses turned rows and joined rounds rather than a continuous amigurumi spiral. Stitch totals refer to active stitches and include underarm chains once those chains become part of the bodice.
Round Yoke and Bodice — Make 1
Yarn: white.
Foundation: Ch 66.
Row 1: Dc in 3rd ch from hook and across. (64)
Row 2: Ch 2, turn; *dc in next 3 sts, 2 dc in next st* ×16. (80)
Row 3: Ch 2, turn; dc in each st across. (80)
Row 4: Ch 2, turn; *dc in next 4 sts, 2 dc in next st* ×16. (96)
Row 5: Ch 2, turn; dc across. (96)
Row 6: Ch 2, turn; *dc in next 5 sts, 2 dc in next st* ×16. (112)
The yoke should now begin to curve rather than lying completely flat.
Row 7 — Armhole Split: Ch 2, dc 18, ch 4, skip 20 sts, dc 36, ch 4, skip 20 sts, dc 18. Join the lower back edges with sl st. (80)
Round 8: Ch 2, dc in every dc and each underarm ch around; join. (80)
Round 9: Ch 2, dc around; join. (80)
Round 10: Ch 2, dc around; join. (80)
Round 11: Ch 2, dc around; join. (80)
Round 12: Ch 2, *dc in next st, 2 dc in next st* ×40; join. (120)
Do not sew the flowers to the bodice yet. The weight of the finished skirt can change the final hanging line.
Support Skirt
Yarn: white.
The support skirt carries all three ruffle layers. Working selected rounds in the back loop only leaves visible front loops where the ruffles will later be attached.
Round 13: Ch 2, BLO dc around. (120)
Rounds 14–20: Ch 2, dc around. (120 each)
Round 21: Ch 2, BLO dc around. (120)
Rounds 22–28: Ch 2, dc around. (120 each)
Round 29: Ch 2, BLO dc around. (120)
Rounds 30–36: Ch 2, dc around. (120 each)
Round 37: *Skip 2 sts, 5 dc in next st, skip 2 sts, sc in next st* ×20. (20 scallops)
Fasten off and weave in the end.
Upper Ruffle Tier — Make 1
Attach white yarn to the exposed front loops of Round 13.
Round 1: Ch 2, *dc in next loop, 2 dc in next loop* ×60. (180)
Rounds 2–6: Ch 2, dc around. (180 each)
Round 7: *Skip 2 sts, 5 dc in next st, skip 2 sts, sc in next st* ×30. (30 scallops)
Fasten off. Leave approximately 10 cm of yarn for finishing.
Middle Ruffle Tier — Make 1
Attach white yarn to the exposed front loops of Round 21.
Round 1: Ch 2, *dc in next loop, 2 dc in next loop* ×60. (180)
Rounds 2–7: Ch 2, dc around. (180 each)
Round 8: *Skip 2 sts, 5 dc in next st, skip 2 sts, sc in next st* ×30. (30 scallops)
Fasten off and leave approximately 10 cm of yarn.
Lower Ruffle Tier — Make 1
Attach white yarn to the exposed front loops of Round 29.
Round 1: Ch 2, *dc in next loop, 2 dc in next loop* ×60. (180)
Rounds 2–8: Ch 2, dc around. (180 each)
Round 9: *Skip 2 sts, 5 dc in next st, skip 2 sts, sc in next st* ×30. (30 scallops)
Fasten off.
The increase from 120 support-skirt stitches to 180 ruffle stitches gives each visible tier approximately 1.5 times the underlying circumference. Adding substantially more stitches will produce stronger rippling and additional weight.
Back Button Bands
Yarn: white.
With the right side facing, join yarn at the lower edge of one back-yoke opening.
Row 1: Work 12 sc evenly toward the neckline. (12)
Fasten off.
Join yarn to the opposite lower edge.
Row 1: Work 12 sc evenly toward the neckline. (12)
At the final stitch, ch 5 and sl st into the same stitch to form a button loop.
Fasten off. Match the loop to a securely sewn 12–15 mm button or replace it with a crocheted toggle.
Large Layered Flower — Make 2
Use one flower on the dress bodice and one on the matching headband.
Round 1: 6 sc in MR. (6)
Round 2: In each st work *(sl st, ch 2, 3 dc, ch 2, sl st)*. (6 petals)
Round 3: Working behind the petals, *ch 4, sl st around next Round-1 post* ×6. (6 loops)
Round 4: In each ch-4 loop work *(sc, hdc, 5 dc, hdc, sc)*. (6 petals)
Round 5: Working behind the second layer, *ch 5, sl st around next post* ×6. (6 loops)
Round 6: In each ch-5 loop work *(sc, hdc, 7 dc, hdc, sc)*. (6 petals)
Fasten off with approximately 25 cm of yarn for sewing.
For baby clothing, embroider the flower center with yarn instead of attaching loose pearl beads.
Small Six-Petal Flowers — Make 13
Suggested use: ten on the dress, one on the bow and two on the shoes.
Round 1: 6 sc in MR. (6)
Round 2: In each st work *(sl st, ch 2, 2 dc, ch 2, sl st)*. (6 petals)
Fasten off with approximately 15 cm of yarn for sewing.
White and ivory yarn can be mixed between flowers to create definition while keeping the overall design monochrome.
Crochet Leaves — Make 24
Yarn: white or ivory.
Ch 7.
Round 1: Starting in second ch from hook: sc, hdc, dc, dc, hdc; 3 sc in final ch. Continue along the unused side of the foundation chain: hdc, dc, dc, hdc, sc. (13)
Sl st to the first sc. Fasten off with approximately 15 cm of yarn for sewing.
Group the leaves in pairs or groups of three rather than distributing every leaf separately.
Oversized Waist Bow — Make 1
Yarn: white.
Bow Loop
Ch 35.
Row 1: Hdc in third ch from hook and across. (33)
Rows 2–8: Ch 2, turn, hdc across. (33)
Fasten off with approximately 25 cm of yarn. Sew the short ends together to form a loop. Position the seam at the center back, flatten the bow and pinch the center into three folds.
Center Wrap
Ch 8.
Row 1: Hdc in third ch from hook and across. (6)
Rows 2–5: Ch 2, turn, hdc across. (6)
Wrap the strip firmly around the pinched center of the bow and stitch the ends together at the back.
Bow Tails — Make 2
Ch 31.
Row 1: Hdc in third ch from hook and across. (29)
Rows 2–4: Ch 2, turn, hdc across. (29)
Fasten off. Fold one lower corner of each tail slightly inward before stitching the tails behind the bow loop. Position the diagonal ends in opposite directions.
Sew one small six-petal flower over the center wrap.
Mary Jane Crochet Shoes — Make 2
Yarn: white.
Sole
Ch 15.
Round 1: 2 hdc in second ch, hdc in next 12 ch, 5 hdc in last ch; working along the opposite side of the foundation chain, hdc in next 12, 3 hdc in first foundation ch. (34)
Round 2: 2 hdc in each of next 2 sts, hdc 12, 2 hdc in each of next 5 sts, hdc 12, 2 hdc in each of final 3 sts. (44)
Measure both soles before continuing. Their finished lengths should differ by no more than approximately 3 mm.
Shoe Upper
Round 3: BLO sc around. (44)
Round 4: Sc around. (44)
Round 5: Sc 14, dec ×8, sc 14. (36)
Round 6: Sc 14, dec ×4, sc 14. (32)
Round 7: Sc around. (32)
Fasten off.
Mary Jane Strap
Join yarn at the outside edge of the shoe opening.
Ch 18.
Row 1: Sc in second ch and across. (17)
Stretch the strap across the instep and stitch its free end securely to the opposite side.
A permanently attached crochet strap removes the need for a decorative shoe button. Sew one small crochet flower centrally over each toe.
Floral Headband — Make 1
The headband uses the same layered flower and leaf structure as the dress.
Ch 7.
Row 1: Hdc in third ch from hook and across. (5)
Rows 2 onward: Ch 2, turn, hdc across. (5)
Continue until the strip measures approximately 34–36 cm unstretched, or adjust it to the measured head circumference and the stretch of the chosen yarn.
Seam the short edges securely.
Sew one large layered flower over the seam. Position four to six crochet leaves underneath the flower before making the final stitches.
Assembly
- Block the yoke and support skirt lightly, keeping the 120-stitch attachment rounds circular rather than stretching them into points.
- Add the three ruffle tiers from top to bottom and check that each scalloped edge overlaps naturally without becoming trapped underneath the next tier.
- Sew the back button or crocheted toggle in place only after checking that the neckline lies flat.
- Position the large bodice flower slightly to the left of center at waist level to reproduce the asymmetrical floral arrangement visible in the reference image.
- Pin the small dress flowers before sewing them permanently. Concentrate more motifs around the front center and use fewer toward the side seams.
- Add pairs or groups of leaves behind selected flowers. Hide the leaf ends underneath the flower centers.
- Attach the oversized bow on the opposite side of the waist and keep its center level with the main floral arrangement.
- Compare both shoes sole-to-sole, attach the straps and sew one small flower to each toe.
- Seam the headband and attach the second large flower with its surrounding leaves over the seam.
- Weave every yarn tail through several direction changes, complete the final blocking and inspect every attached decoration before the garment is worn.
The completed set contains one dress with three visible ruffle tiers, one oversized waist bow, two Mary Jane-style crochet shoes and one matching floral headband.
7 Technical Tips
- Prevent marker drift: Place locking markers in the exposed front loops of Rounds 13, 21 and 29 before continuing the support skirt. Attaching a ruffle one round too high or low can make the finished tier appear tilted.
- Control ruffle expansion: Keep the written increase from 120 to 180 stitches unless a test swatch shows that the yarn needs a different ratio. Increasing immediately to 240 stitches can create excessive rippling and additional skirt weight.
- Check shoe symmetry: Stack the two completed soles after Round 2 and compare the heel, toe and total length. Correct a difference greater than approximately 3 mm before starting the uppers.
- Check bodice circumference: Measure the 80-stitch torso before beginning the skirt expansion. At a gauge of approximately 18 dc per 10 cm, the circumference should be roughly 44–45 cm.
- Prevent appliqué distortion: Pin the large flower and bow while the finished dress is hanging from both shoulders. Sewing large decorations while the dress lies flat can cause the front panel to rotate once the garment is suspended.
- Limit detachable decoration: The pearl-style centers shown in the photograph are decorative, but embroidered or crocheted centers are more appropriate when reducing detachable parts on baby clothing. Inspect every sewn element before wear.
- Measure the headband: Use the child’s actual head circumference when possible instead of relying only on age-based sizing. The finished band should stretch comfortably without producing a loose loop or excessive pressure.
Conclusion
Block the full dress before committing to the floral layout, because the three ruffle tiers change both skirt length and the apparent waistline. Next, pin the large flower and bow in place, hang the garment, and adjust the smaller motifs before sewing them permanently. For an infant version, replace removable pearl-style centers with embroidered or crocheted details and check every seam before wear.
Save the finished white crochet baby dress set to Pinterest and share the coordinated dress, shoes and headband on Instagram with #WhiteRuffleBabySet. When adapting this design, would you keep all three overlapping skirt tiers or remove the middle tier for a lighter silhouette?









