Introduction
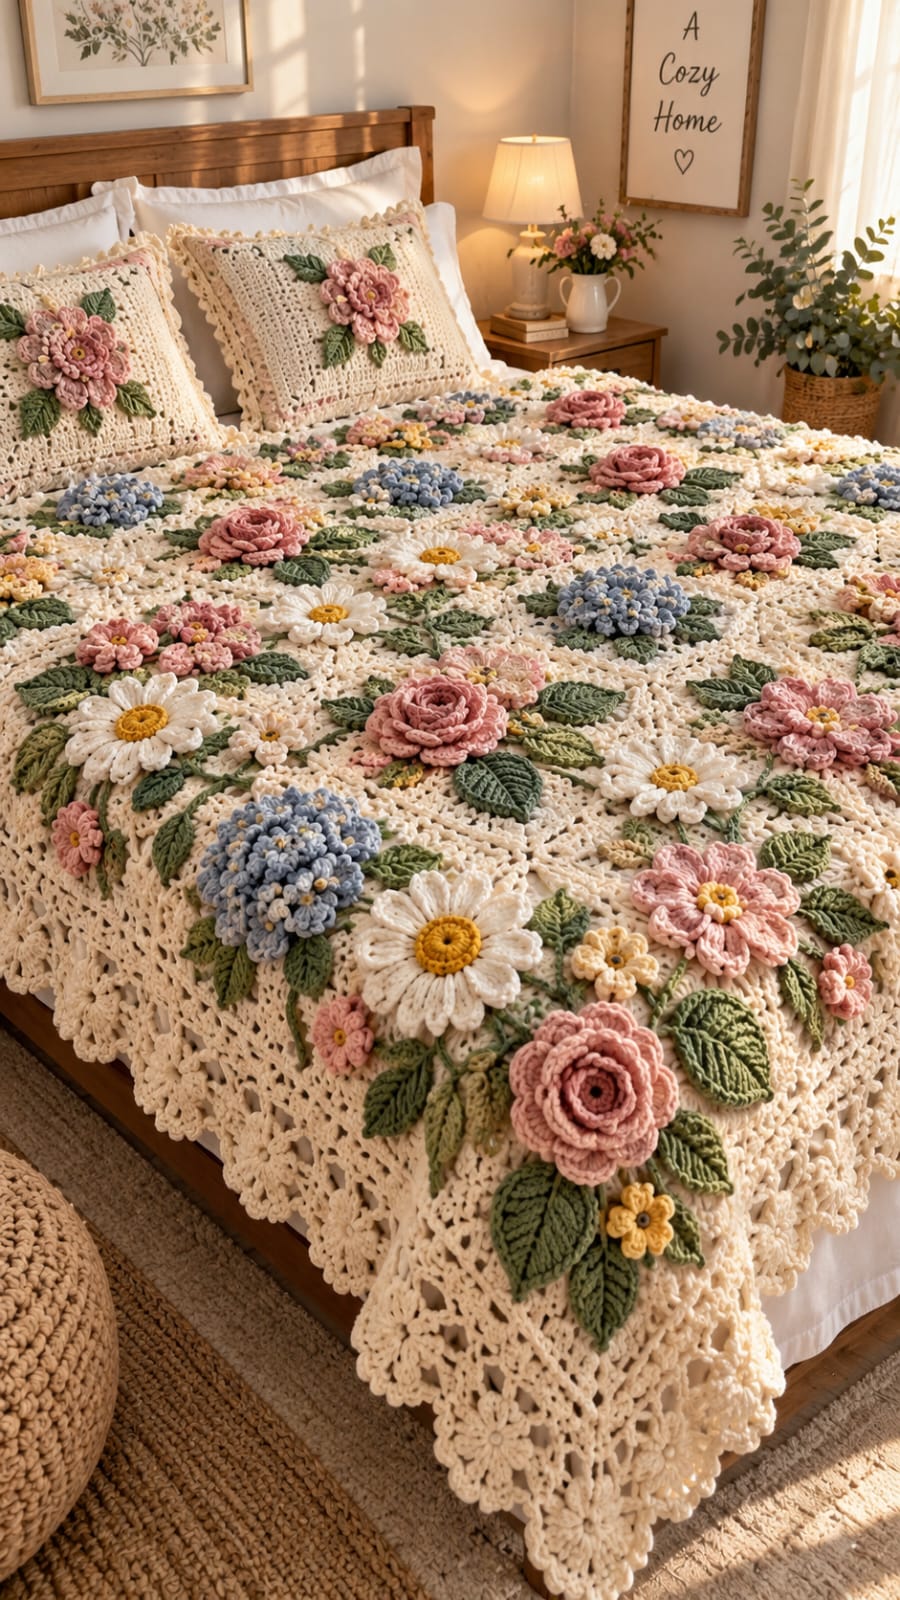
Pink roses, white daisies, and blue hydrangea domes all rise to different heights above the same cream lace field. This 3D crochet flower garden blanket pattern uses worsted yarn, a 4.5–5 mm hook, raised floral appliqués, textured leaves, and an openwork border. The intermediate reconstruction targets approximately 150 × 180 cm, providing bed-cover scale while keeping the dimensional flowers concentrated above a flexible foundation.
The instructions below are an original photo-inspired reconstruction based on visible structure; published patterns cited later are used only for sizing, gauge, and material benchmarks.
The Design: What Makes This Flower Blanket Different
The photographed blanket treats the cream ground as negative space rather than making every stitch decorative. Large dusty-pink roses provide the deepest relief, white daisies create broad flat circles, and blue hydrangea clusters introduce a third flower structure made from many small florets. Sage leaves bridge the gaps and prevent neighboring blooms from visually merging. A modular cream lace foundation also distributes the appliqués across a large bed-sized surface without forcing every flower into a rigid grid. This crochet flower garden blanket therefore depends on controlled differences in height as much as color. One common mistake is sewing every petal and leaf completely flat. That removes the layered relief visible in the photograph and can pull the openwork background out of square around heavier roses.
Project Info at a Glance
| Skill Level | Time | Finished Size | Hook | Best For |
|---|---|---|---|---|
| Intermediate | Approx. 45–60 hours | Reconstruction target: approx. 150 × 180 cm | 4.5–5 mm | Bed covers, floral throws, cottage-style bedroom decor |
The finished dimensions are reconstruction targets inferred from the photographed bed rather than verified dimensions of an identified pattern. For comparison, Courtney Kelley’s published Flower Garden Blanket uses worsted yarn and a 5 mm hook and includes a medium 124 × 182 cm size and large 178 × 248 cm size. Knit Crochet Create also publishes an Aran-weight Flower Garden Blanket measuring approximately 108 × 108 cm.
Materials and Tools
Yarn
- Warm cream / ivory — worsted #4 — approximately 1,300–1,500 g
- Dusty rose pink — worsted #4 — approximately 300–350 g
- Blush pink — worsted #4 — approximately 180–220 g
- Muted blue — worsted #4 — approximately 220–280 g
- Sage and olive green — worsted #4 — approximately 350–450 g total
- White / natural — worsted #4 — approximately 250–300 g
- Mustard yellow — worsted #4 — approximately 70–90 g
- Pale yellow — worsted #4 — approximately 50–70 g
Plan approximately 2.7–3.2 kg total yarn for a full bed-scale reconstruction. The floral count and three-dimensional petal density can change consumption substantially, so these quantities include working margin rather than representing measurements from the photographed blanket.
Tools
- 5 mm crochet hook — cream foundation and border
- 4.5 mm crochet hook — flowers and leaves
- Tapestry needle
- Locking stitch markers
- Blocking mats
- Rust-resistant pins
- Scissors
- Measuring tape
Abbreviations
- MR — magic ring
- sc — single crochet
- inc — increase
- sl st — slip stitch
- ch — chain
- hdc — half double crochet
- dc — double crochet
- tr — treble crochet
- BLO — back loop only
- st/sts — stitch/stitches
Invisible decreases are not required for the flat foundation or appliqué construction used in this blanket.
Pattern — Step by Step
Cream Lace Foundation
Yarn: warm cream — original photo-inspired reconstruction.
The blanket foundation is worked as a large rectangular lace panel. Make a gauge swatch before committing to the foundation count because bed dimensions matter more than a fixed number of rows.
Foundation: Ch 217.
Row 1: Dc in fourth ch from hook and in every remaining chain. (215 dc including turning chain)
Row 2: Ch 3, turn. Dc in next 4 sts, *ch 2, skip 2 sts, dc in next 3 sts*. Repeat across, adjusting only the final solid edge section so both side margins match.
Row 3: Ch 3, turn. Dc in each dc and work 2 dc into each ch-2 space across.
Row 4: Ch 3, turn. Dc in next 2 sts, *ch 3, skip 3 sts, sc in next st, ch 3, skip 3 sts, dc in next 3 sts*. Repeat across, ending with a solid edge.
Row 5: Ch 3, turn. Dc across, working 3 dc into each ch-3 space.
Rows 6 onward: Repeat Rows 2–5 until the panel measures approximately 165 cm long.
Finish with a solid double-crochet row.
The border adds approximately 7–8 cm at each end, bringing the reconstruction close to the 180 cm target.
Foundation Reinforcement
Dimensional flowers place more localized weight on the background than flat colorwork.
Before adding appliqués, work a surface-slip-stitch grid approximately every 15–18 cm across the wrong side.
Follow existing solid crochet rows rather than crossing open chain spaces.
This hidden reinforcement is especially useful beneath large roses and hydrangea clusters.
Large Dusty-Pink Layered Rose — Make 10
Yarn: dusty rose — original layered-flower reconstruction.
The roses are assembled from three separate petal layers. Crochet each layer independently, stack them, then stitch through the center.
Inner Rose Layer
R1: 6 sc in MR. (6)
R2: Inc ×6. (12)
R3: *Sl st in next st, ch 3, 3 dc in next st, ch 3, sl st in next st.* Repeat 4 times around. (4 compact petals)
Fasten off.
Middle Rose Layer
R1: 6 sc in MR. (6)
R2: Inc ×6. (12)
R3: (1 sc, inc) ×6. (18)
R4: *Sl st in next 2 sts, ch 3, 5 dc in next st, ch 3, sl st in next 2 sts.* Repeat around to form six broad petals.
Fasten off.
Outer Rose Layer
R1: 6 sc in MR. (6)
R2: Inc ×6. (12)
R3: (1 sc, inc) ×6. (18)
R4: (2 sc, inc) ×6. (24)
R5: *Sl st in next 2 sts, ch 4, 7 tr in next st, ch 4, sl st in next st.* Repeat six times, distributing the six petals evenly around the 24-stitch ring.
Fasten off with a 40 cm sewing tail.
Assembling the Rose
Place the middle layer inside the outer layer.
Rotate it approximately 30 degrees so its petals sit between the outer petals.
Add the compact inner layer.
Roll its four petals slightly inward around the center.
Pass the outer-layer sewing tail through all three centers at least four times.
Do not sew the outer petal edges together.
Target approximately 11–13 cm diameter and 3–4 cm of raised depth.
Medium Blush Flower — Make 10
Yarn: blush pink with mustard center.
R1: With mustard, 6 sc in MR. (6)
R2: Inc ×6. (12)
Change to blush.
R3: *Sl st in next st, ch 4, 4 dc in next st, ch 4, sl st in following st.* Repeat around to create six petals.
R4: Working behind the petals, join blush around the R2 posts. *Ch 5, sl st around the next two center posts.* Repeat six times.
R5: Into each ch-5 loop work sc, hdc, 5 dc, hdc, sc.
Fasten off with a 30 cm tail.
The second petal layer should project behind the first rather than lying directly beneath it.
Large White Daisy — Make 10
Yarn: mustard center and warm white petals.
R1: With mustard, 6 sc in MR. (6)
R2: Inc ×6. (12)
Change to white.
R3: *Sc in next st, ch 8. Starting in second chain from hook, sc, hdc, dc, tr, dc, hdc, sc. Sc in next center st.* Repeat six times. (6 long petals)
Fasten off.
For the fuller appearance in the reference, make a second six-petal layer using the same center and position its petals between those of the first layer.
A published E’Claire Makery daisy appliqué uses worsted #4 yarn, a 4.5 mm hook, a 12-stitch center, and chain-based elongated petals. GoldenLucyCrafts also publishes a worsted 3.5 mm daisy measuring approximately 11 cm across.
Blue Hydrangea Cluster — Make 7
Yarn: muted blue with cream or pale-yellow centers.
The hydrangea is built from multiple small four-petal florets rather than one large flower. This follows the structural principle used in published crochet hydrangea patterns, where numerous florets are assembled into a rounded cluster.
Small Blue Floret — Make 15 per Hydrangea
R1: With pale yellow, 6 sc in MR. (6)
Change to blue.
R2: *Sl st in next st, ch 2, 2 dc in next st, ch 2, sl st in same st.* Repeat four times around, spacing the four petals around the center.
Fasten off with a 15 cm tail.
Hydrangea Base
With sage green:
R1: 6 sc in MR. (6)
R2: Inc ×6. (12)
R3: (1 sc, inc) ×6. (18)
R4: (2 sc, inc) ×6. (24)
R5: (3 sc, inc) ×6. (30)
Fasten off with a long sewing tail.
Building the Hydrangea Dome
Sew one blue floret at the exact center of the green base.
Position six florets around it.
Add the remaining eight around the outer area, allowing neighboring petals to overlap slightly.
Attach each floret only through its center.
As the cluster fills, pull several central attachment stitches slightly tighter than the outside stitches. This cups the green base and creates the rounded hydrangea profile visible in the photograph.
Target approximately 10–12 cm across.
Small Cream Flower — Make 12
R1: With mustard, 6 sc in MR. (6)
Change to cream.
R2: *Sl st, ch 3, 3 dc, ch 3, sl st* in successive attachment positions around the ring to create five compact petals.
Fasten off with a 20 cm tail.
Target approximately 4–5 cm.
Large Sage Leaf — Make 28
Yarn: dark sage and medium olive.
Ch 17.
Starting in second chain from hook: sl st, sc, hdc in next 2 ch, dc in next 3 ch, tr in next 5 ch, dc in next 2 ch, hdc, sc.
Work 3 sc into the final chain.
Working along the opposite side: sc, hdc, dc in next 2 ch, tr in next 5 ch, dc in next 3 ch, hdc in next 2 ch, sc, sl st.
At the base, ch 5.
Sl st back through the five chains to create a short stem.
Fasten off with a 30 cm sewing tail.
Raised Leaf Vein
Join matching yarn at the base.
Surface sl st along the original foundation chain to the leaf tip.
Fasten off.
Published crochet leaf appliqué references use worsted yarn with hooks around 3.5 mm; the slightly larger 4.5 mm hook here keeps the bed blanket leaves flexible while preserving their raised center line.
Small Sage Leaf — Make 24
Ch 12.
Starting in second chain: sl st, sc, hdc in next 2 ch, dc in next 2 ch, tr in next 3 ch, dc, hdc.
Work 3 sc in the final chain.
Mirror the stitch sequence down the opposite side.
Ch 4 for the stem and sl st back to the base.
Fasten off.
Add one surface-slip-stitch vein.
Blocking the Appliqués
Block leaves before sewing them to the blanket.
Pin the base, center vein, and pointed tip first.
Do not aggressively flatten the roses or hydrangeas.
White daisies can be lightly blocked at their petal tips, but retain some vertical lift near the center.
Floral Layout
Lay the blocked cream foundation flat.
Mark an imaginary grid of approximately 25 × 25 cm areas without drawing on the fabric.
Place the ten largest pink roses first.
Distribute them irregularly across the center and outer thirds rather than making identical rows.
Add seven blue hydrangeas next.
Position the ten large white daisies in the remaining broad spaces.
Fill smaller gaps with blush and cream flowers.
Leaves should radiate away from flowers rather than appearing as isolated motifs.
Why the Flowers Should Not Form a Perfect Grid
The photographed blanket has a garden-like distribution.
Repeated motif spacing exists, but the different flower types interrupt the grid.
If every 25 cm square receives the same flower, the blanket begins to resemble a tiled motif afghan.
Instead, alternate large and medium flowers while preserving similar overall visual weight across the surface.
Attaching Large Roses
Thread the rose’s long sewing tail.
Pass through the cream foundation directly beneath the flower center.
Make four attachment points around an approximately 3 cm circle.
Add one stitch beneath two opposite outer petals.
Leave the remaining petals free.
The rose should remain firmly centered without being compressed against the background.
Attaching Hydrangeas
Sew through the green circular base rather than individual blue petals.
Use six to eight attachment points around its circumference.
Add one central attachment stitch if the cluster rocks.
Do not pull the center so tightly that the hydrangea collapses into a crater.
Attaching Daisies
Secure the yellow center with four passes.
Tack every second petal approximately 1–1.5 cm from its base.
Leave the outer halves free.
This keeps the elongated petals organized while preserving dimensional relief.
Attaching Leaves
Sew the complete leaf stem to the cream background.
Continue approximately 2 cm along the raised center vein.
Stop there.
The tip and outer edges remain free so the foliage sits above the lace rather than becoming a flat color patch.
Cream Lace Border
Join cream at one corner after all large appliqués have been positioned but before final small flowers are attached.
Border R1: Sc evenly around, placing 3 sc in each corner.
Border R2: Ch 5, skip 2 sts, sc in next st. Repeat around. At corners work sc, ch 5, sc into the corner stitch.
Border R3: Sl st into first ch-5 loop. Work 5 dc into every loop. In each corner loop work 5 dc, ch 2, 5 dc.
Border R4: Ch 1. *Sc in next dc, ch 4, skip 2 dc.* Repeat around, adding one extra ch-4 loop at each corner.
Scalloped Outer Border
Border R5: In each ch-4 loop work sc, hdc, 3 dc, hdc, sc.
At each corner use sc, hdc, 5 dc, hdc, sc.
Fasten off.
Block the scalloped border separately from the raised flowers.
Assembly
- Crochet the cream openwork foundation to approximately 150 × 165 cm before the border, then block it square and add hidden reinforcement lines beneath the planned flower zones.
- Work the five-round cream lace border and remeasure the foundation, targeting approximately 150 × 180 cm after the scalloped edge has been shaped.
- Crochet ten dusty-pink roses from separate inner, middle, and outer petal layers, stacking the layers with offset petals before sewing their centers together.
- Make ten large white daisies, ten blush flowers, seven blue hydrangea clusters, and twelve smaller cream flowers, keeping the published flower measurements only as scale benchmarks.
- Crochet twenty-eight large and twenty-four small sage leaves, add a raised surface-slip-stitch vein to each, and block the foliage before placement.
- Position the ten roses first across the blanket, keeping approximately 20–30 cm between neighboring large dimensional blooms and avoiding rigid horizontal rows.
- Add the seven hydrangeas and ten white daisies, then distribute blush and cream flowers through the remaining open areas without covering all visible cream lace.
- Arrange large leaves around the roses and hydrangeas, use smaller leaves around secondary flowers, and keep leaf tips directed away from each flower center.
- Sew every flower through its structural center or base and every leaf through its stem plus the first approximately 2 cm of its center vein, leaving outer petals and tips free.
- Weave all tails through at least 6–8 cm of matching crochet, reshape the border, and inspect the blanket flat to confirm that no heavy flower cluster pulls the cream foundation out of square.
The completed reconstruction should combine a cream openwork foundation, layered pink roses, white daisies, blue hydrangea clusters, smaller blossoms, sage foliage, and a deep scalloped lace border.
7 Technical Tips
- The foundation sags beneath a large rose: place the rose over solid stitches or a hidden reinforcement line and use four attachment points across approximately 3 cm. A single center stitch concentrates the weight and can enlarge nearby lace openings.
- The roses collapse into flat circles: rotate each successive petal layer approximately 30 degrees before sewing the centers together. Aligning all petal gaps creates visible channels through the flower and reduces its 3–4 cm raised profile.
- The hydrangea looks sparse: use approximately fifteen florets over a 30-stitch circular base and overlap neighboring petals by several millimeters. Widely separated florets expose the green foundation and remove the dense clustered appearance.
- The daisy petals twist: block each long petal from its base to its tip before attachment. A difference of approximately 5 mm between opposite sides of a chain-based petal can make it rotate when sewn down.
- The leaf center puckers: work the surface-slip-stitch vein at the same relaxed length as the original foundation chain. A vein shortened by even 5–8 mm can fold the leaf lengthwise.
- The scalloped border ripples: correct the single-crochet setup round before adding shell rounds. Excess stitches around a 150 × 180 cm perimeter multiply into large waves at the outer edge.
- The finished blanket becomes too heavy: weigh the completed foundation before making all appliqués and keep the full reconstruction near the planned 2.7–3.2 kg yarn range. Adding tightly packed roses to every open area can increase both weight and drying time substantially.
Published Flower Garden Blanket Benchmark
Courtney Kelley’s Flower Garden Blanket, published in December 2024, provides a useful current size and yarn benchmark. The design uses worsted-weight Kelbourne Woolens Germantown and a 5 mm hook.
Published sizes include 71 × 83 cm, 124 × 182 cm, and 178 × 248 cm. Yardage ranges from approximately 2,615 to 8,650 m depending on size.
Its construction is motif-based rather than appliqué-based, so those yardages should not be treated as exact requirements for this reconstruction.
Published DK Flower Blanket Benchmark
Tracy Wright’s Flower Garden Blanket / Runner uses DK yarn and a 4 mm hook.
The pattern lists approximately 1,829–1,920 m and uses cream, saffron, sage, pistachio, pink, blue, and other floral shades.
That palette closely demonstrates why cream backgrounds work effectively with muted garden colors, although the photographed reconstruction uses heavier raised appliqués.
Published Aran Flower Blanket Benchmark
Knit Crochet Create’s Flower Garden Blanket uses Stylecraft Special Aran and a 5 mm hook.
Its finished measurement is approximately 108 × 108 cm, including edging, with individual squares measuring approximately 13 × 13 cm.
The pattern reports a gauge of 18 stitches and 24 rows per 10 cm.
Published Worsted Floral Blanket Benchmark
Nicole Riley’s Granny’s Flower Garden Blanket uses Aran-weight Caron One Pound, a 5 mm hook, and approximately 2,195–2,743 m.
The published blanket measures approximately 42 × 50 inches / 107 × 127 cm and can be resized.
That provides another useful reference for the amount of yarn required once a flower-themed project reaches throw dimensions.
Published Daisy Size Benchmarks
GoldenLucyCrafts publishes a worsted-weight daisy appliqué using a 3.5 mm hook with a finished diameter of approximately 11 cm.
Lion Brand’s Simply Made by Erin daisy uses medium/worsted yarn and recommends a 5 mm hook. Its published flower measures approximately 3.5 inches / 8.9 cm across, or approximately 5 inches including leaves.
Those measurements support an 9–12 cm target for the prominent white daisies used across this reconstruction.
Published Hydrangea Construction Benchmark
Loopara’s Crochet Hydrangea Flower uses multiple small four-petaled flowers assembled into a rounded cluster.
The published version uses fingering-weight milk cotton and a 2 mm hook.
This blanket scales the same general botanical concept into worsted yarn rather than transferring the published instructions. The larger yarn produces a substantial blue cluster appropriate for a bed-scale project.
Making a Smaller Throw
For a sofa throw around 120 × 150 cm, reduce the foundation proportionally.
Make approximately six large roses, four hydrangeas, six daisies, six blush flowers, and eight small flowers.
Reduce the leaf collection to approximately 30–35 pieces.
Keep the same border depth so the floral center remains framed by visible cream lace.
Making a Queen-Size Version
Measure the mattress and decide how much side drop is required before calculating the foundation.
A blanket intended to cover only the mattress top needs much less width than one that hangs over both sides.
Increase flower counts in proportion to surface area rather than merely adding motifs around the edges.
Maintain approximately 20–30 cm between neighboring large flowers.
Making the Blanket Less Dimensional
Use only the outer layer of each rose.
Reduce hydrangeas to nine florets.
Make single-layer daisies.
Sew leaves farther along their center veins.
These changes reduce both weight and relief while retaining the photographed palette and botanical layout.
Making the Blanket More Dimensional
Add a fourth rose layer with a 30-stitch center.
Keep the outer petals broad rather than increasing their number excessively.
Hydrangeas can be expanded to 18–20 florets.
Do not increase every flower simultaneously; excessive relief can make a bed blanket difficult to fold and wash.
Color Distribution
Cream should remain the dominant color.
Dusty pink is the primary flower shade, while blue functions as a cooler secondary accent.
Sage foliage should appear around nearly every major bloom.
Mustard is most effective in small centers rather than broad areas.
A practical large-flower distribution is:
- 10 dusty-pink roses
- 10 white daisies
- 7 blue hydrangeas
- 10 blush layered flowers
- 12 small cream or pale-yellow flowers
Why the Blue Hydrangeas Matter
Pink, cream, yellow, and sage all sit relatively close in warmth.
The muted blue clusters interrupt that range.
Because each hydrangea is composed of many small petals, it also contributes a texture that cannot be reproduced by simply changing the color of a rose.
Distribute the seven blue clusters through the full blanket rather than grouping them at one end.
Creating Matching Pillow Covers
The photograph includes coordinating floral pillows.
For a reconstruction, crochet a cream square approximately 45 × 45 cm.
Add one large blush flower or rose to the center.
Arrange four to six sage leaves around it.
Finish with a narrower version of the blanket’s cream scalloped border.
Keep the back of the cushion flat so dimensional flowers appear only on the display face.
Correcting a Rose That Cups Too Deeply
Loosen the stitches joining its three layers.
Spread the outer petals before resewing the center.
The inner layer can remain tightly curled, but the outside layer should approach horizontal at its outer edge.
A rose that forms a deep bowl projects farther from the blanket and catches more easily during use.
Correcting a Flat Hydrangea
Check the attachment tension between the blue florets and green base.
Pull the central seven florets slightly closer together.
Leave the outer eight less compressed.
This difference in tension converts the circular base into a shallow dome without requiring stuffing.
Correcting Uneven Flower Distribution
Photograph the entire blocked foundation from above before sewing.
Convert the image mentally to three dominant color groups: pink, blue, and white.
If one quadrant contains noticeably more of one group, move motifs before attachment.
Perform this check after large flowers are placed but before filling gaps with smaller blossoms.
Correcting Overcrowded Leaves
Remove the smallest leaves first.
At least some cream background should remain visible around every major flower cluster.
If two neighboring flowers are connected by an uninterrupted mass of green, rotate or remove one leaf.
The foliage should link the garden visually without becoming a continuous green carpet.
Correcting a Distorted Foundation
Do not try to block severe distortion after all flowers have been attached.
Remove the appliqué nearest the stretched area.
Restore the cream panel to its measured dimensions.
Add a hidden reinforcement line if necessary, then reattach the flower through a wider group of solid stitches.
Correcting Border Waves
Lay one complete side flat after Border R1.
If the edge already waves, remove excess single crochets before continuing.
If it pulls inward, add stitches evenly along that side.
A correct setup round is more important than preserving an arbitrary stitch count on a large blanket.
Washing Considerations
Choose yarns with compatible fiber and washing instructions.
Large layered roses retain more water than the openwork cream foundation.
Support the entire blanket when wet rather than lifting it by an edge.
Reshape roses and hydrangeas while damp and dry the blanket flat whenever practical.
Storage
Fold the blanket loosely with clean tissue or cotton fabric between heavily dimensional sections.
Do not place a hard crease directly through hydrangea domes or layered roses.
For long storage periods, refold the blanket periodically so the same flowers are not compressed continuously.
Avoid placing heavy bedding or storage boxes over the floral surface.
Sources
Ravelry — Flower Garden Blanket by Courtney Kelley — worsted yarn, 5 mm hook, published sizes from 71 × 83 cm through 178 × 248 cm, motif dimensions, gauge information, and yardage benchmarks.
Ravelry — Flower Garden Blanket by Knit Crochet Create — Aran yarn, 5 mm hook, 108 × 108 cm finished measurement, 13 cm squares, and published gauge.
Ravelry — Flower Garden Blanket / Runner by Tracy Wright — DK yarn, 4 mm hook, approximately 1,829–1,920 m, and a cream, sage, pink, blue, and yellow floral palette.
Ravelry — Granny’s Flower Garden Blanket by Nicole Riley — Aran yarn, 5 mm hook, approximately 2,195–2,743 m, and a published 42 × 50 inch blanket size.
E’Claire Makery — Crochet Daisy Appliqué — worsted #4 yarn, 4.5 mm hook, 12-stitch flower center, and chain-based elongated petal construction.
Ravelry — Daisy Appliqué by GoldenLucyCrafts — worsted yarn, 3.5 mm hook, intermediate classification, and approximately 11 cm published flower diameter.
Lion Brand — Crochet Daisy Flower Appliqué — medium/worsted yarn, 5 mm recommended hook, and approximately 3.5-inch flower measurement.
Ravelry — Crochet Hydrangea Flower by Loopara Crochet — reference for assembling numerous four-petaled florets into one rounded hydrangea cluster.
Ravelry — Crochet Leaf Appliqué by Uma M Natarajan — worsted yarn, 3.5 mm hook, and approximately 5–7 yards per leaf as a published foliage benchmark.
Conclusion
Build this blanket in layers: establish the cream foundation first, block it to size, position the largest roses, then use daisies, hydrangeas, smaller flowers, and leaves to control the remaining spaces. The practical next step is to crochet one rose, one daisy, one hydrangea cluster, and two leaves before starting the full foundation; their measured scale will determine the final motif spacing. Save this 3D crochet flower garden blanket pattern to Pinterest or share the completed bed cover on Instagram with #3DFlowerGardenBlanket. On this specific garden design, would you keep the muted blue hydrangeas or replace them with lavender clusters?









