Introduction
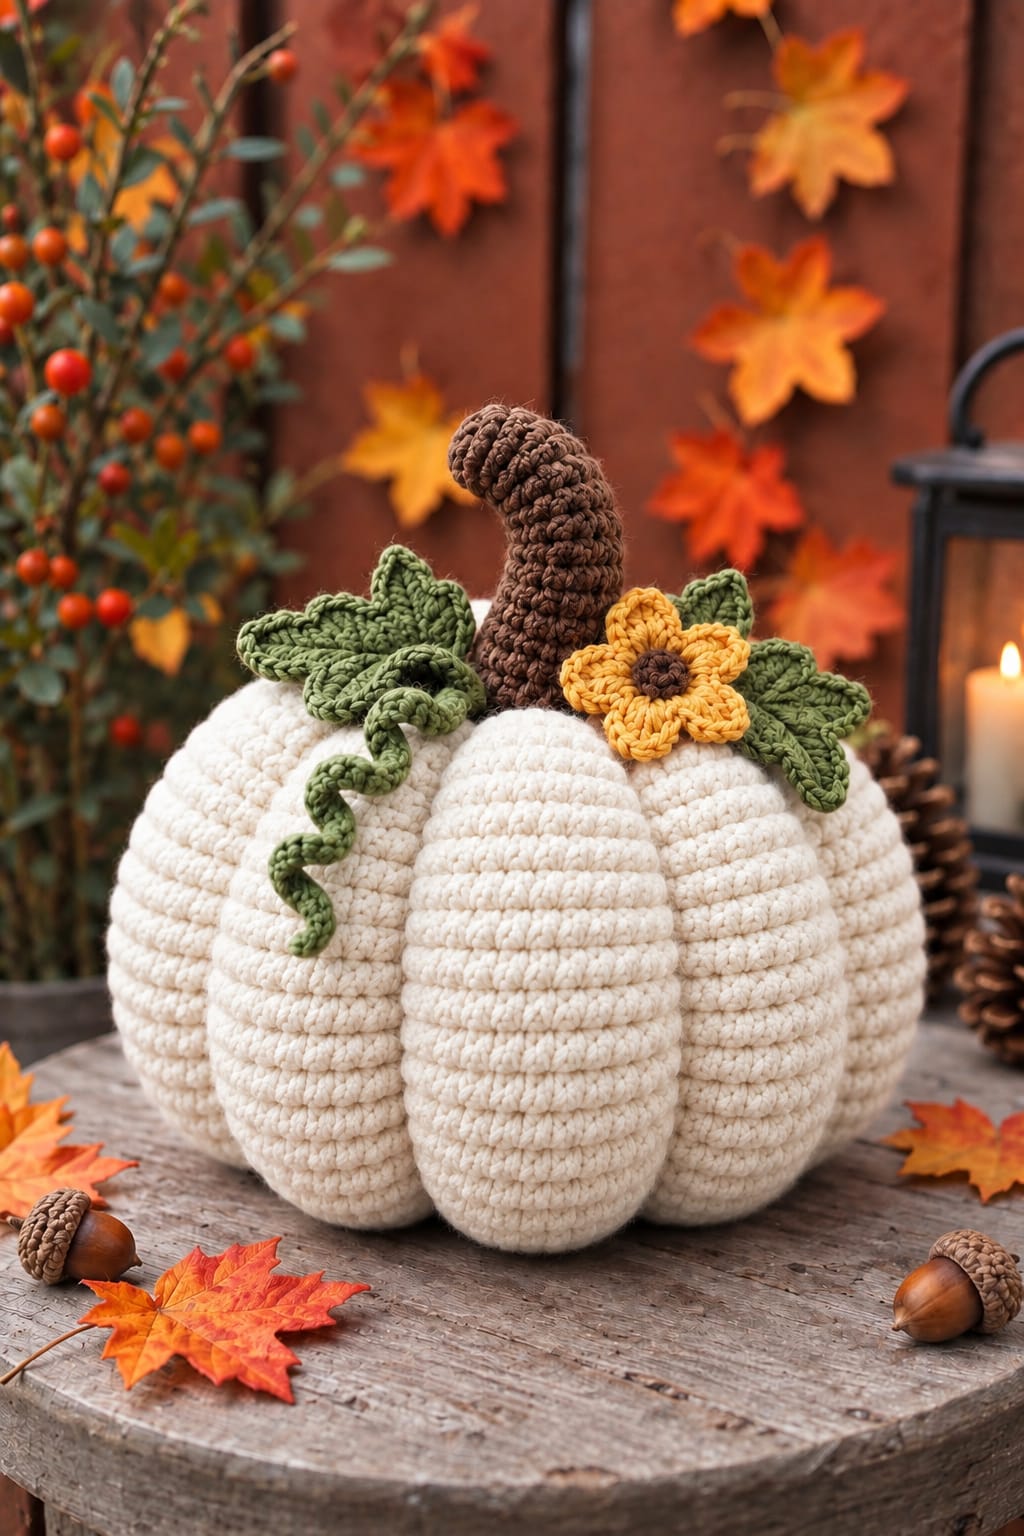
Six oversized ivory lobes have to support a tall curved brown stem without letting the pumpkin lean toward its crown. This large white crochet pumpkin pattern uses worsted or Aran yarn, a 5 mm hook, sculpting strands, olive leaves, a curling vine, and one mustard flower. The intermediate reconstruction targets approximately 23–26 cm wide and creates substantial freestanding autumn table decor.
The instructions below are an original photo-inspired reconstruction based on visible structure; published patterns cited later are used only for sizing, gauge, and material benchmarks.
The Design: What Makes This White Pumpkin Different
The reference uses six exceptionally broad lobes rather than many narrow ribs, so the body begins as one 42-stitch stuffed form and receives six external sculpting passes after closing. A slightly compressed vertical profile keeps the pumpkin wide enough to stand beneath its unusually tall curved stem. The botanical crown is deliberately asymmetric: three olive leaves spread laterally, one spiral vine drops down the front, and a mustard five-petal flower fills the opposite side. That arrangement distinguishes this crochet white pumpkin with leaves from a basic ribbed pumpkin. One common mistake is packing the center with too much stuffing. A rigid sphere resists the sculpting strands, producing shallow grooves and a taller body instead of the broad segmented silhouette visible in the photograph.
Project Info at a Glance
| Skill Level | Time | Finished Size | Hook | Best For |
|---|---|---|---|---|
| Intermediate | Approx. 6–9 hours | Reconstruction target: 23–26 cm wide, 25–28 cm overall height | 5 mm | Fall tables, mantels, shelves, harvest displays |
The dimensions above are reconstruction targets inferred from the photograph rather than measurements of an identified commercial pattern. A recent published large six-lobe crochet pumpkin benchmark uses worsted/Aran yarn, a 5 mm hook, a 42-stitch body, and reports approximately 21–24 cm finished width. Gina Michele’s large crochet pumpkin is another useful size comparison at approximately 9 inches / 23 cm high including its stem.
Materials and Tools
Yarn
- Warm ivory / cream — worsted or Aran #4 — approximately 180–230 g
- Chocolate brown — worsted #4 — approximately 30–40 g
- Olive / moss green — worsted #4 — approximately 45–60 g
- Mustard / golden yellow — worsted #4 — approximately 10–15 g
- Dark brown flower center — approximately 3–5 g
A smooth cotton, cotton-acrylic blend, or tightly spun acrylic gives the sculpted channels stronger definition than fuzzy yarn. Published pumpkin-topper instructions from ChristaCoDesign use #4 worsted yarn with a 5 mm hook, providing a useful technical benchmark for the stem, leaf, and vine components.
Tools
- 5 mm crochet hook
- 4.5 mm hook — optional for a firmer stem
- Polyester fiberfill — approximately 150–220 g
- Long tapestry or doll needle
- Stitch markers
- Scissors
- Measuring tape
Abbreviations
- MR — magic ring
- sc — single crochet
- inc — 2 sc in one stitch
- dec — invisible single-crochet decrease
- sl st — slip stitch
- ch — chain
- hdc — half double crochet
- dc — double crochet
- tr — treble crochet
- BLO — back loop only
- st/sts — stitch/stitches
For an invisible decrease, insert the hook through the front loops of the next two stitches, yarn over and pull through both front loops, then complete one single crochet.
Pattern — Step by Step
Work the pumpkin body and stem in continuous spirals unless a joined round is specifically stated. Move the stitch marker after every round.
Large Ivory Pumpkin Body — Make 1
Yarn: warm ivory — original reconstruction using standard six-stitch amigurumi expansion.
R1: 6 sc in MR. (6)
R2: Inc ×6. (12)
R3: (1 sc, inc) ×6. (18)
R4: (2 sc, inc) ×6. (24)
R5: (3 sc, inc) ×6. (30)
R6: (4 sc, inc) ×6. (36)
R7: (5 sc, inc) ×6. (42)
The 42-stitch plateau places the reconstruction in the large amigurumi range and agrees with a published large six-lobe pumpkin benchmark.
R8: Sc around. (42)
R9: Sc around. (42)
R10: Sc around. (42)
R11: Sc around. (42)
R12: Sc around. (42)
R13: Sc around. (42)
R14: Sc around. (42)
R15: Sc around. (42)
R16: Sc around. (42)
R17: Sc around. (42)
R18: Sc around. (42)
R19: Sc around. (42)
R20: (5 sc, dec) ×6. (36)
R21: (4 sc, dec) ×6. (30)
Begin stuffing. Place most fiberfill around the outside circumference rather than forcing a dense ball into the exact center.
R22: (3 sc, dec) ×6. (24)
R23: (2 sc, dec) ×6. (18)
Add remaining stuffing. Keep approximately 2–3 cm around the center axis compressible for sculpting.
R24: (1 sc, dec) ×6. (12)
R25: Dec ×6. (6)
Fasten off with a 150 cm tail. Thread the tail through the front loops of the six remaining stitches and close the opening.
Sculpting the Six Large Lobes
Thread a separate 180–200 cm length of ivory yarn onto a long needle.
Pass the needle from the bottom center through the pumpkin and out through the crown.
Bring the yarn down the outside surface and return through the bottom center.
Pull only until the first groove becomes visible.
Repeat this process five more times, positioning the six grooves approximately 60 degrees apart.
Do not fully tighten the first groove before all six positions have been established.
Set the pumpkin on a hard surface. Compare opposite lobes, redistribute stuffing where necessary, then tighten each shaping strand in stages.
Make a second pass through each groove if the body remains too spherical.
The target is approximately 23–26 cm wide × 16–18 cm high before the stem is attached.
Tall Curved Brown Stem — Make 1
Yarn: chocolate brown.
R1: 6 sc in MR. (6)
R2: Sc around. (6)
R3: Sc around. (6)
R4: Sc around. (6)
R5: Sc around. (6)
R6: 2 sc, inc, 3 sc. (7)
R7: Sc around. (7)
R8: Sc around. (7)
R9: 3 sc, inc, 3 sc. (8)
R10: Sc around. (8)
R11: Sc around. (8)
R12: 4 sc, inc, 3 sc. (9)
R13: Sc around. (9)
R14: Sc around. (9)
R15: (2 sc, inc) ×3. (12)
R16: Sc around. (12)
Stuff only the lower two-thirds. Leave the upper section lightly filled so it can bend.
R17: (1 sc, inc) ×6. (18)
R18: Sc around. (18)
Fasten off with a 45 cm tail.
Target approximately 10–12 cm stem length. Bend the lightly stuffed upper section into the forward curve visible in the reference before attaching the base.
Why the Stem Expands at the Base
A six-stitch tube alone creates too little contact area for a tall stem.
Expanding the final rounds to 18 stitches forms a wider base that can be stitched across the pumpkin crown.
ChristaCoDesign uses the same general structural principle in a published larger stem: a six-stitch tube expands to 12, 18, and eventually 24 stitches near its base.
The reconstruction stops at 18 because the photographed stem remains narrow relative to the pumpkin.
Large Olive Leaf — Make 2
Yarn: olive green.
Ch 17.
Starting in second ch from hook: sl st in next ch, sc in next ch, hdc in next 2 ch, dc in next 3 ch, tr in next 5 ch, dc in next 2 ch, hdc in next ch, sc in final ch.
Work 3 sc into the final chain to turn.
Working along the opposite side of the foundation chain: sc, hdc, dc in next 2 ch, tr in next 5 ch, dc in next 3 ch, hdc in next 2 ch, sc, sl st.
At the base, ch 5 for the stem.
Sl st back through all five chains.
Fasten off with a 30 cm tail.
Large Leaf Edging and Vein
Join olive at the base.
Sc around the leaf.
At the tip work sc, ch 2, sc.
Fasten off.
Rejoin at the base and surface sl st directly over the foundation chain to the tip.
This raised center line reproduces the strongly defined vein visible in the photograph.
Small Olive Leaf — Make 1
Ch 12.
Starting in second chain: sl st, sc, hdc in next 2 ch, dc in next 2 ch, tr in next 3 ch, dc, hdc.
Work 3 sc in the final chain.
Mirror the same stitch heights along the opposite side.
At the tip work sc, ch 2, sc.
Ch 4 for the stem and sl st back through the chain.
Fasten off with a 25 cm tail.
Olive Curly Vine — Make 1
Yarn: olive green.
Ch 28.
Starting in second chain from hook, work 3 sc in each of the next 22 chains.
Sl st in each of the final 5 chains.
Fasten off with a 25 cm tail.
The repeated increases force the first portion into a spiral while the final slip stitches create a straighter attachment stem. ChristaCoDesign documents the same curl principle with three single crochets worked into successive chains.
Mustard Five-Petal Flower — Make 1
Yarn: dark brown center and mustard petals.
Center R1: With dark brown, 6 sc in MR. (6)
Center R2: Inc ×6. (12)
Fasten off brown.
Join mustard in the first center stitch.
Petal 1: Ch 3, 3 dc in next st, ch 3, sl st in following st.
Petal 2: Ch 3, 3 dc in next st, ch 3, sl st in following st.
Petal 3: Ch 3, 3 dc in next st, ch 3, sl st in following st.
Petal 4: Ch 3, 3 dc in next st, ch 3, sl st in following st.
Petal 5: Ch 3, 3 dc in next st, ch 3, sl st in following st.
Five petals consume ten of the twelve center stitches. Sl st across the final two stitches and join at the base of the first petal.
Fasten off with a 30 cm sewing tail.
Target approximately 6–7 cm diameter.
Alternative Six-Petal Flower
If you prefer mathematically equal use of all twelve center stitches, make six petals instead.
For each petal, work sl st in one stitch, then ch 3, 3 dc, ch 3, sl st in the next stitch.
Repeat six times.
The photographed flower appears closest to five broad petals, so the five-petal construction is used for the primary reconstruction.
Crown Placement
Attach the stem first.
Position it slightly behind the exact crown center so the curve projects toward the front-left side.
Spread the two large olive leaves around the base.
Place the smaller leaf behind the mustard flower.
The flower should sit toward the front-right side of the stem rather than directly in front of it.
Position the vine on the opposite side and allow its curl to descend across the upper left pumpkin lobe.
Attaching the Stem
Thread the 45 cm stem tail.
Sew through all 18 stitches around the expanded stem base and through several stitches surrounding the pumpkin’s crown opening.
Make a second complete pass.
Then run two longer anchoring stitches from opposite sides of the stem base into the stuffed pumpkin body.
Those deep stitches counteract the leverage produced by the 10–12 cm curved stem.
Attaching the Leaves
Sew each leaf stem completely to the pumpkin crown.
Add one concealed stitch approximately 2 cm along the center vein.
Leave the outer two-thirds of each leaf free.
The large leaves should overlap the pumpkin slightly without being flattened against the lobes.
Attaching the Flower
Position the mustard flower over the base of the small leaf.
Sew through the brown center four times.
Add one concealed stitch beneath two petals if the flower rotates.
Leave the remaining petal edges unattached.
Attaching the Vine
Sew the five-stitch straight end beneath the stem base.
Place one additional tack approximately 3 cm below the crown.
Leave the remaining spiral free.
The lowest curl should project away from the pumpkin rather than being stitched flat into a groove.
Assembly
- Crochet the ivory pumpkin from the six-stitch magic ring through the 42-stitch plateau, stuff it gradually, decrease back to six stitches, and close the crown securely.
- Pass a long ivory shaping strand through the center and establish six groove positions approximately 60 degrees apart before applying full tension to any single channel.
- Set the pumpkin on a hard surface, compare opposite lobe widths, redistribute stuffing where necessary, then tighten all six sculpting channels evenly.
- Crochet the tall brown stem to 18 stitches at its expanded base, lightly stuff only the lower two-thirds, and shape the upper portion into a controlled forward curve.
- Sew the stem slightly behind the pumpkin’s exact center using two complete base passes plus two deep anchoring stitches through the stuffed body.
- Crochet two large olive leaves and one smaller leaf, add raised center veins, and arrange them asymmetrically around the brown stem.
- Sew each leaf through its stem and the first approximately 2 cm of its center vein, leaving the tips and side edges free.
- Crochet the mustard flower with its dark brown center and attach it on the front-right side of the crown, partially overlapping the smaller leaf.
- Make the olive spiral vine and secure its straight end beneath the opposite side of the stem, adding only one secondary tack before leaving the curl free.
- Weave all tails through at least 6–8 cm of matching fabric, reshape the six lobes, and confirm that the finished pumpkin stands without leaning beneath the curved crown.
The completed pumpkin should have six broad ivory lobes, a tall curved chocolate stem, three olive leaves, one hanging spiral vine, and one raised mustard flower.
7 Technical Tips
- The pumpkin remains spherical: keep the center approximately 2–3 cm softer than the outer circumference during stuffing. A densely packed center prevents the six sculpting strands from pulling deep channels into the body.
- One lobe becomes much narrower: mark all six groove positions at approximately 60-degree intervals before tightening the first strand. Moving a groove even 2 cm around a 25 cm pumpkin can create an obvious difference between neighboring sections.
- The tall stem falls sideways: expand its base to 18 stitches and add two deep anchoring passes through the stuffed crown. Sewing only around the surface edge leaves the 10–12 cm stem acting as a lever against a flexible attachment.
- The leaves curl into tubes: compare tension on both sides of the foundation chain before adding the surface vein. A center vein shortened by approximately 5 mm can fold a large leaf along its axis.
- The vine loses its spiral: work three single crochets into each chain through the curling section rather than one stitch per chain. Reducing the increase rate removes the excess fabric responsible for the coil.
- The flower rotates under its own weight: attach the center with at least four passes and tack two opposing petal bases. Sewing only one point through a 6–7 cm flower creates a pivot rather than a stable attachment.
- The finished pumpkin rocks on the table: pull the lower closure approximately 1 cm inward before burying the sculpting tail. A projecting bottom center can lift the broad lobes away from the surface and destabilize the decoration.
Why a 42-Stitch Body Fits This Pumpkin
The reference is clearly larger than a compact 30- or 36-stitch decorative pumpkin.
A six-stitch increase sequence reaches 42 stitches cleanly:
6 → 12 → 18 → 24 → 30 → 36 → 42.
That geometry preserves six equal increase sectors before sculpting.
A recent published large six-lobe pumpkin reference also uses a 42-stitch plateau with worsted/Aran yarn and a 5 mm hook, producing approximately 21–24 cm of finished width.
Why Six Lobes Match the Photograph
The visible front and side channels indicate a relatively small number of broad sections rather than eight or ten narrow ribs.
Six lobes also align naturally with the six-section increase geometry of the body.
Viewed from above, each lobe occupies approximately one-sixth of the circumference.
Using eight sculpting passes would create a noticeably narrower, more conventionally ribbed pumpkin.
Stuffing for Deep Channels
Add stuffing in small pieces.
Build a dense outer shell first.
Keep the axial center more compressible.
Before closing R24 and R25, press a finger through the crown toward the bottom center. You should be able to compress the body slightly without feeling an immovable plug of fiberfill.
This distribution lets the shaping strand move the center inward while the outer lobes retain volume.
Correcting Uneven Stuffing
Do not tighten the sculpting yarn permanently until all six grooves have been established.
If one lobe appears flat, loosen the two neighboring strands.
Massage stuffing into the affected section.
Retighten the grooves gradually.
A completed stuffed body can usually be corrected without reopening it if the center was not packed too firmly.
Changing the Pumpkin Size
For a medium version, stop increasing at 36 stitches.
Work eight to ten even rounds.
Decrease:
36 → 30 → 24 → 18 → 12 → 6.
Keep six external sculpting passes.
Reduce the large leaf foundations from 17 chains to approximately 13–14 chains and shorten the stem by three or four rounds.
Making an Extra-Large Pumpkin
Increase beyond 42 stitches only when the yarn and hook combination remains dense.
A 48-stitch body would require a nonstandard increase distribution if strict six-stitch amigurumi expansion is maintained beyond the specified large plateau, so a larger yarn or hook is usually preferable to altering the reconstruction geometry.
Using a heavier Aran yarn while keeping the 42-stitch structure can increase the final diameter without adding another shaping sector.
Published Large Pumpkin Benchmark
A recent large six-lobe crochet pumpkin reference specifies worsted or Aran yarn, a 5 mm hook, and a 42-stitch plateau. Its finished width is approximately 21–24 cm.
That range is close to this reconstruction’s 23–26 cm target. The additional width here comes from slightly longer plateau shaping and broad external compression rather than increasing the stitch count beyond 42.
Published 23 cm Height Benchmark
Gina Michele’s 2026 large crochet pumpkin reports a finished height of approximately 9 inches / 23 cm including the stem.
That design uses a ribbed rectangular construction rather than a closed amigurumi sphere, so its stitch instructions are not transferred here.
The published dimension is useful for judging the physical scale of a large tabletop pumpkin.
Published Stem, Leaf and Vine Benchmark
ChristaCoDesign’s pumpkin topper uses #4 medium worsted yarn and a 5 mm hook.
The published materials specify approximately 21–23 m of yarn for the topper components.
Its larger stem begins with six stitches and later expands through 12, 18, and 24 stitches, demonstrating why a flared stem base is useful when a narrow tube must be sewn securely to a pumpkin.
Published Leaf Benchmark
Doily Designs publishes a pumpkin leaf using #4 worsted yarn and a 5 mm hook.
The resulting motif measures approximately 2.25 inches / 5.7 cm including its stem.
The leaves in the photograph are larger, so this reconstruction extends the foundation to 17 chains and uses taller stitches through the central section.
Changing the Ivory Shade
Warm cream best matches the photographed body.
Bright white creates stronger contrast with the brown stem and olive foliage.
Oatmeal introduces visible fiber variation and makes individual stitches more apparent.
Whichever shade is selected, buy enough yarn from one dye lot because a subtle color change across six broad lobes is easy to see.
Changing the Flower Color
Mustard echoes the warm fall colors surrounding the reference pumpkin.
Rust produces a darker crown.
Cream creates a quieter monochrome treatment.
If the flower is changed to cream, keep its center dark brown so the petals remain visually distinct from the pumpkin body.
Making a Larger Flower
Increase the brown center from 12 to 18 stitches.
Then distribute six broad petals around the center.
Use taller treble stitches instead of double crochet at each petal midpoint.
Keep the finished diameter below approximately 8 cm; a larger flower begins to compete with the tall stem rather than functioning as a crown accent.
Making the Stem More Curved
Do not insert rigid wire into a washable decorative pumpkin.
Instead, stuff one side of the lower stem slightly more firmly than the opposite side.
Leave the upper four or five rounds lightly filled.
Bend that section by hand after attachment.
Several concealed stitches through the inside curve can hold a stronger bend if required.
Making the Stem Shorter
Omit Rounds 10–13.
Continue directly into the base expansion.
This produces a stem closer to 7–8 cm.
Keep the 18-stitch base even when shortening the upper tube because the attachment area, rather than stem length, determines crown stability.
Adding a Second Vine
Make a second vine with ch 20.
Work three sc in each of the first 15 chains and sl st through the final four chains.
Attach it behind the flower so the two curls descend on opposite sides.
Keep the second vine shorter than the first to avoid creating symmetrical loops.
Making More Botanical Leaves
The photographed crown uses broad pointed foliage rather than tiny round leaves.
Add no more than two extra medium leaves if increasing the crown.
Place them behind the existing foliage.
Too many leaves conceal the top lobe divisions and make the pumpkin appear to have a continuous green cap.
Correcting a Pumpkin That Is Too Tall
Check stuffing before changing the crochet rounds.
A firmly packed 42-stitch body naturally pushes upward.
Remove some filling if the crown has not yet been closed.
After closing, deepen all six sculpting channels in equal increments. The center compression shortens the vertical profile while pushing volume outward into the lobes.
Correcting a Pumpkin That Is Too Flat
Loosen the sculpting passes slightly.
Massage stuffing toward the crown and lower center.
Retighten only until the grooves remain visible.
A freestanding pumpkin needs enough vertical volume that the broad lobes support the stem without allowing the crown to sink below them.
Correcting a Crooked Stem
Inspect the attachment base before altering the curve.
If one side of the 18-stitch base sits higher, remove the stitches on that side and resew it level.
Only after the base is horizontal should the upper tube be bent.
A deliberately curved stem and an accidentally tilted stem are structurally different.
Correcting a Loose Flower
Do not tighten one center stitch excessively.
Add three additional passes through different sections of the brown center.
Tack two opposite petal bases.
Distributed attachment prevents rotation without pulling the flower center into a deep cup.
Correcting a Flat Vine
Check the increase rate.
Three single crochets in each chain produce substantially more curvature than two.
If the finished vine still hangs almost straight, twist the spiral gently in its natural direction rather than forcing it against the coil.
Only the straight attachment section should be sewn to the crown.
Correcting Visible Sculpting Yarn
Use the same ivory yarn as the pumpkin body.
Position each shaping strand in the natural valley between adjacent lobes.
After tightening, massage neighboring stitches over the strand.
Do not substitute dark thread or clear monofilament; both can cut into the yarn surface under high tension.
Correcting the Bottom
The six-lobe body should rest primarily on the lower surfaces of the lobes rather than the central closure.
If the center protrudes, thread a yarn tail through the bottom closure and pull it approximately 1 cm inward.
Anchor the tail through several neighboring stitches.
Test the pumpkin on a hard table before burying the end.
Yarn Quantity Planning
Make a 42-stitch swatch or complete the first seven body rounds and weigh the yarn used.
Large stuffed forms consume more material through their plateau rounds than their increase rounds.
For the photographed scale, keeping 180–230 g of ivory available provides a practical reconstruction range.
Reserve extra ivory for sculpting because six deep grooves require several meters beyond the body itself.
Care and Storage
Follow the yarn manufacturer’s washing instructions.
Spot cleaning is usually easier for a firmly stuffed decorative pumpkin than full immersion.
If washing is required, support the stem and leaves while the piece is wet.
Reshape all six lobes before drying.
For seasonal storage, avoid placing weight over the curved stem because long compression can alter its intended bend.
Sources
ChristaCoDesign — Crochet Pumpkin Stem, Leaf and Vine Pattern — #4 worsted yarn, 5 mm hook, approximately 21–23 m of yarn, flared stem construction, leaf instructions, and three-single-crochet vine technique.
Doily Designs — Crochet Pumpkin Vine Leaf Pattern — #4 worsted yarn, 5 mm hook, and approximately 2.25-inch finished leaf measurement.
Gina Michele — Easy Large Crochet Pumpkin Pattern — large decorative pumpkin benchmark measuring approximately 9 inches high including the stem.
The Caffeinated Snail — Crochet Pumpkin Pattern with Leaves — published reference for separately crocheted pumpkin leaves, stem, and spiral vine construction.
Maria’s Blue Crayon — Crochet Pumpkin Appliqué Pattern — worsted yarn and 4 mm hook reference for pumpkin shaping and a chain-based curling vine.
The Birch Cottage — Crocheted Pumpkin Pattern — reference for stuffed crochet stems, paired leaves, pumpkin assembly, and curved vine finishing.
Conclusion
The six sculpting channels determine this pumpkin’s final proportions, so establish all groove positions before pulling any one strand tight. Keep the center compressible, build volume into the outer lobes, and attach the 18-stitch stem base only after the body stands level. Your next step is to crochet through the 42-stitch plateau, stuff the body, and check its width before making the crown pieces. Save this large white crochet pumpkin pattern to Pinterest or share the finished decoration on Instagram with #WhiteHarvestCrochetPumpkin. For this specific pumpkin, would you keep the single mustard flower or replace it with a rust-orange blossom?









