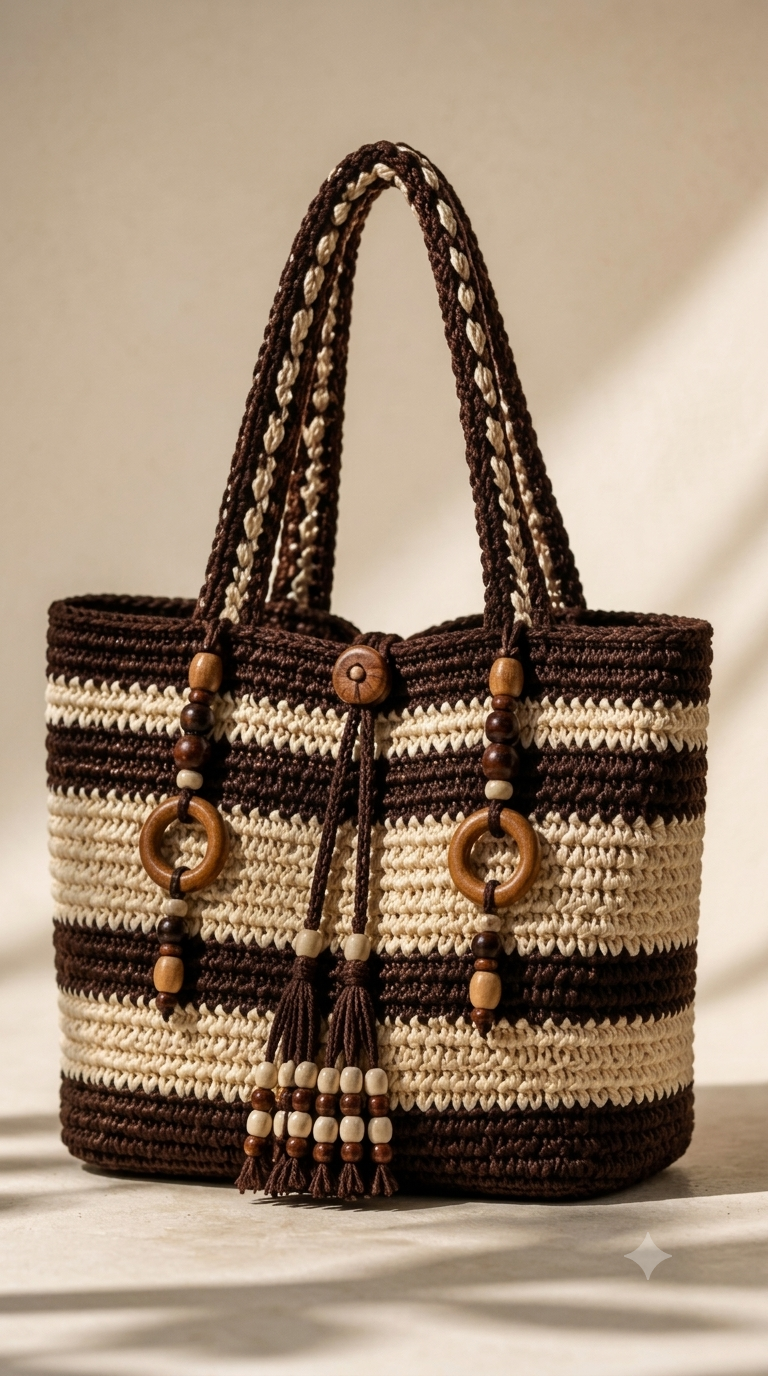
The wooden rings hanging below the handles change this striped tote from a basic shopper into a distinctly ornamented bag. This brown and cream striped crochet tote bag pattern uses worsted cotton, a 4 mm hook and dense single crochet to target a body about 38 × 33 cm. It suits an intermediate maker and produces a practical bag with a firm base, reinforced handles and removable bead decorations.
The Design: What Makes This Striped Tote Different
Three structural decisions define this bag. First, the bottom and lower edge remain dark brown, visually anchoring the wide rectangular body while hiding wear that would show quickly on cream yarn. Second, the body uses horizontal color blocks instead of changing color every round. Wider cream sections therefore balance the narrow dark stripes without creating excessive yarn ends.
The long handles need more attention than those on a lightweight striped crochet tote bag. Four dense rows reduce lateral stretch, while decorative cream surface stitching echoes the body colors without weakening the strap.
Finally, the wooden rings and beads hang from separate cords rather than carrying structural load. A common mistake in a crochet bag with wooden beads is using an ornament cord as a handle attachment. Keep those systems separate.
Project Info at a Glance
| Skill Level | Time | Finished Size | Hook | Best For |
|---|---|---|---|---|
| Intermediate | 10–14 hours | Approx. 38 × 33 cm | 4.0 mm | Market tote / everyday carry |
The final dimensions depend on yarn choice and personal tension. Measure the base and body during construction rather than relying only on the stated finished dimensions.
Materials and Tools
Yarn
- Chocolate brown — worsted/#4 cotton — approximately 300 g
- Natural cream/ecru — worsted/#4 cotton — approximately 200 g
Use the same yarn family for both colors so the stripe thickness and gauge remain consistent. A firm cotton yarn works particularly well because the bag needs enough structure to support the wooden decorations and long handles.
Tools
- 4.0 mm crochet hook
- 2 locking stitch markers
- Tapestry needle
- Scissors
- Tape measure
- 2 wooden rings, approximately 35–45 mm outside diameter
- 1 large wooden button or bead, approximately 25–30 mm
- 16–24 assorted wooden beads, approximately 8–15 mm
- Firm fabric or plastic base insert, optional
- Cotton fabric lining, optional
- Sewing needle and matching thread, if adding a lining
For a bag expected to carry books or other heavier objects, a lining helps limit stretching and prevents small items from pushing through the crochet fabric.
Abbreviations
- ch — chain
- sc — single crochet
- sl st — slip stitch
- BLO — back loop only
- st/sts — stitch/stitches
- RS — right side
- rep — repeat
Invisible decrease is unnecessary in the main bag body because the tote maintains a fixed circumference rather than being shaped like a stuffed crochet form.
Pattern — Step by Step
The base is worked flat. The body is then picked up around the base and worked continuously. Place a stitch marker in the first stitch of every round and move it upward as you work.
Base
Yarn: chocolate brown.
Ch 35.
Row 1: sc in second ch from hook and across (34).
Rows 2–12: ch 1, turn, sc in each st across (34).
Do not fasten off.
The base should form a firm rectangle. If it already feels loose enough to distort when lifted, change to a smaller hook before continuing.
Body Setup
Work around the entire rectangular base.
Round 1: sc 34 across the long edge, place 1 extra sc at the corner, work 11 sc evenly down the short edge, place 1 extra sc at the corner, sc 34 across the opposite long edge, place 1 extra sc at the corner, work 11 sc up the final short edge, place 1 extra sc at the corner (92).
Round 2: BLO sc around (92).
Round 3: sc around (92).
The BLO round creates the fold between the flat bottom and the vertical walls of the tote.
Striped Body
Yarn: chocolate brown and natural cream.
Rounds 4–7: brown, sc around (92).
Rounds 8–11: cream, sc around (92).
Rounds 12–15: brown, sc around (92).
Rounds 16–23: cream, sc around (92).
Rounds 24–27: brown, sc around (92).
Rounds 28–35: cream, sc around (92).
Rounds 36–39: brown, sc around (92).
Rounds 40–42: cream, sc around (92).
Rounds 43–48: brown, sc around (92).
Keep the single crochet firm and consistent throughout the body. The objective is a dense fabric capable of holding the rectangular shape without excessive stretching.
At each color change, work the final yarn-over of the preceding stitch with the new color. Do not carry the unused yarn through the wider eight-round sections because that adds unnecessary bulk to the inside of the bag.
Reinforced Top Rim
Yarn: chocolate brown.
Round 49: BLO sc around (92).
Rounds 50–52: sc around (92).
Round 53: sl st loosely around (92).
Fasten off and weave the tail through at least 5 cm of dense stitches.
The rim should maintain approximately the same circumference as the body. Avoid pulling the slip stitches tightly because a contracted opening will interfere with handle placement.
Handles — Make 2
Yarn: chocolate brown.
Ch 81.
Row 1: sc in second ch from hook and across (80).
Row 2: ch 1, turn, sc across (80).
Row 3: ch 1, turn, sc across (80).
Row 4: ch 1, turn, sc across (80).
Fasten off, leaving a 30 cm sewing tail at both ends.
Run cream yarn through the center of each brown handle with evenly spaced surface slip stitches or long embroidery stitches. Keep this cream section decorative. Pulling it too tightly will shorten the handle and cause it to curve.
Handle Reinforcement
Yarn: chocolate brown.
Cut four brown yarn lengths approximately 60 cm long. Thread one length through a tapestry needle for each handle attachment.
Position each handle end approximately 8–9 cm from the nearest side edge. Pin all four attachment points before sewing anything permanently.
Sew each end through several rounds of the reinforced top band using a box-and-cross arrangement. Do not attach a handle through only one row of crochet.
Check both handle drops before weaving in the structural tails. A difference of 1–1.5 cm becomes visible when the bag is filled.
Side Bead Dangles — Make 2
Yarn: chocolate brown.
Ch 26.
Row 1: sl st back along the chain (25).
Fasten off, leaving tails for attachment.
Thread the cord through one wooden ring. Add a combination of dark brown, natural and medium-brown wooden beads above and below the ring.
Repeat for the second ornament and position the two pieces symmetrically near the outer handle attachment points.
Tie each decorative cord securely to the inside of the reinforced top band. These ornaments are decorative only and should not carry any of the bag’s load.
Center Closure Cord
Yarn: chocolate brown.
Ch 51.
Row 1: sl st in second ch from hook and across (50).
Fasten off.
Fold the cord at its midpoint and attach it beneath the large wooden button or bead at the front center of the rim.
Allow the two ends to hang vertically down the front of the bag. Thread a small cream wooden bead onto each cord before attaching the tassels.
Tassels — Make 2
Yarn: chocolate brown.
Cut approximately 20 strands, each 15 cm long, for each tassel.
Fold the strands in half around the end of the closure cord. Cut another piece of brown yarn and wrap it firmly around the bundle approximately 12 mm below the fold.
Knot the wrapping yarn securely and pass its ends down through the tassel body.
Trim each finished tassel to approximately 6 cm.
Lower Beaded Tassel Detail
For a closer match to the photographed design, add short beaded cords beneath the main tassels.
Cut four brown yarn lengths approximately 18 cm long. Attach them at the lower tassel wrap or immediately above the tassel.
Thread alternating cream and dark wooden beads onto each cord. Knot the yarn securely beneath the final bead.
Trim the remaining yarn approximately 15–20 mm below the knot and separate the yarn strands to form miniature fringe.
Assembly
- Block the base and body lightly to the target dimensions before attaching the decorative pieces.
- Flatten the bag and mark the exact front and back centers.
- Position both handles symmetrically, keeping each attachment point approximately 8–9 cm from the nearest side.
- Sew every handle end through the reinforced brown top band rather than through a single round.
- Add the cream decorative stitching to both handles and compare the spacing before securing the yarn.
- Sew the large wooden button or bead at the front center without pulling the rim inward.
- Attach the center closure cord immediately below the wooden centerpiece.
- Secure the two side bead-and-ring dangles close to the outer handle attachment points.
- Add both tassels and the lower beaded strands, then weave all structural tails through several directions inside the crochet fabric.
- Insert a base stiffener or lining if required and check the loaded bag for handle distortion.
The completed tote should have a flat rectangular base, parallel horizontal stripes and four independently reinforced handle attachment points.
7 Technical Tips for a Better Crochet Tote
- Mark the first body stitch every round. Losing the round boundary can move a color change several stitches sideways, producing a diagonal stripe break instead of a controlled seam.
- Keep the rectangular base flat. If the corners curl by more than about 1 cm before the body begins, check the hook size and tension rather than continuing upward.
- Measure the circumference after Round 3. If the upper edge becomes more than about 2 cm narrower than the base perimeter when laid flat, the body tension is too tight.
- Pin the handles before sewing. A placement error of 1 cm or more between the left and right attachment points becomes visible because the cream handle decoration creates a strong vertical reference line.
- Control cotton tension at every color change. Pulling the first stitch of a new stripe too tightly creates a vertical pinch where the brown and cream sections meet.
- Do not hang the wooden rings from handle stitches. Attach the side ornaments independently to the reinforced rim so their movement cannot distort the handle seam.
- Weave structural tails for at least 5 cm. Short tails can work loose under repeated loading, particularly at the four handle attachments and around the wooden centerpiece.
Finishing the Brown and Cream Crochet Tote
Before using this brown and cream striped crochet tote bag pattern for a finished project, make a small single-crochet gauge swatch with the intended cotton yarn and 4 mm hook. Match the fabric density before starting the 34-stitch base.
Once assembled, photograph the tote from the front so the horizontal stripe sequence, wooden rings, cream handle stitching and center tassels remain visible. Save the finished project to Pinterest or share it on Instagram with #BrownCreamStripedTote.
Record any changes you make to the handle length, stripe sequence and bead placement. For another version of this specific bag, which detail would you change first: the wooden ring dangles, the cream handle stitching or the length of the center tassels?









