Introduction
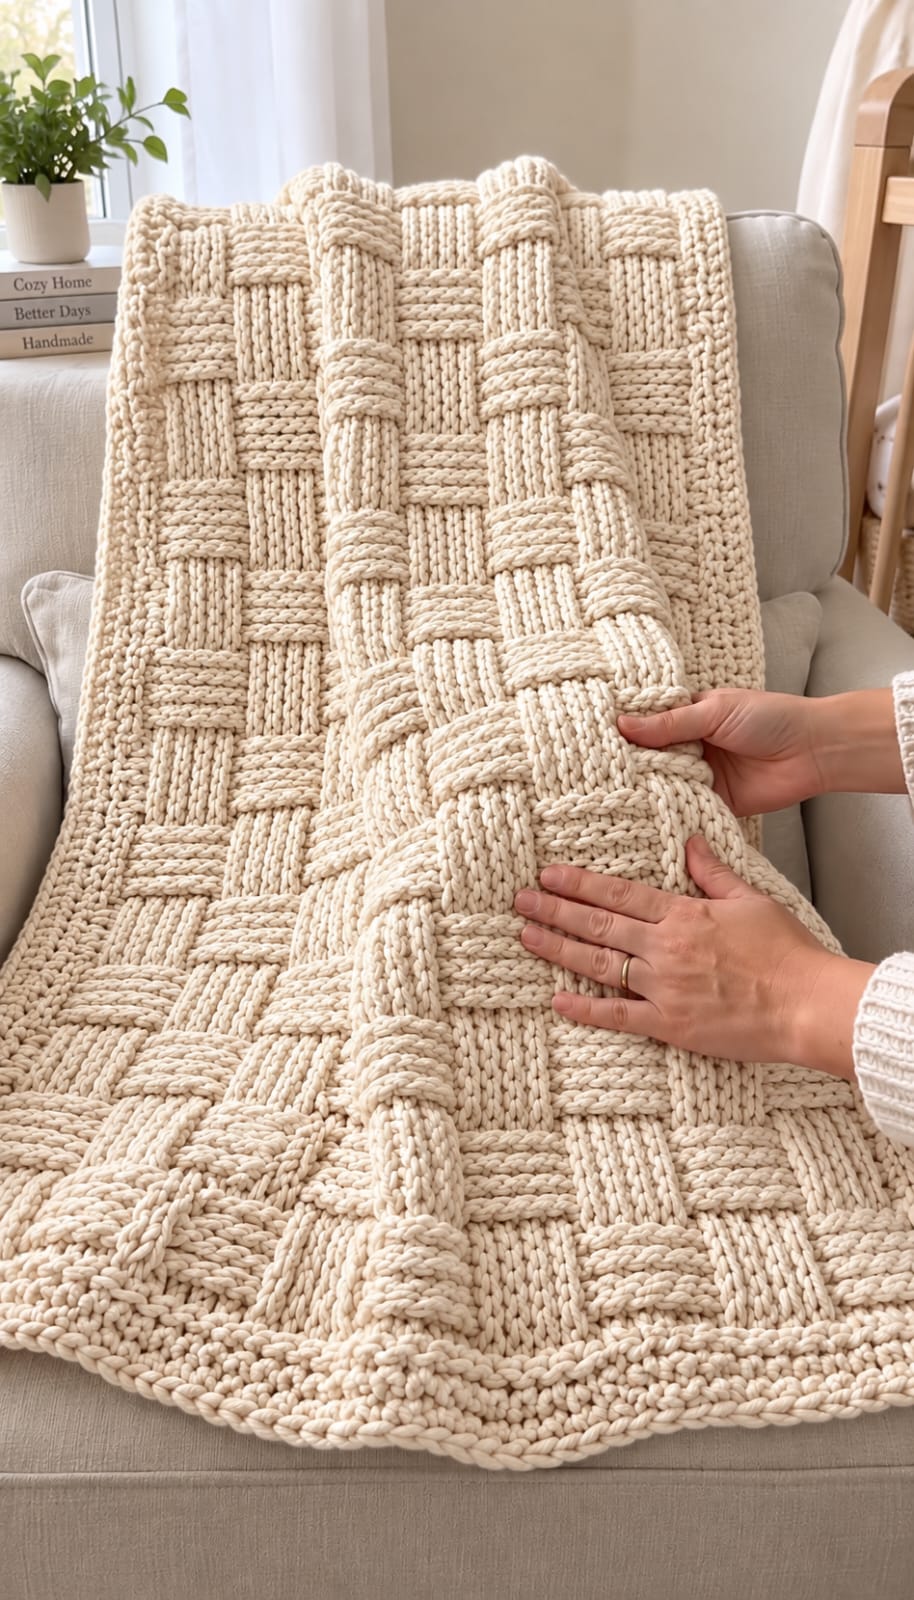
Oversized woven blocks only look convincing when every raised cream band crosses its neighbor at the same width. This cream chunky basket weave crochet blanket pattern uses super-bulky yarn, an 8 mm hook, and front- and back-post double crochet to reproduce the photographed texture. The intermediate reconstruction targets approximately 115 × 145 cm, a practical throw size for an armchair, sofa, or layered bed covering.
The instructions below are an original photo-inspired reconstruction based on visible structure; published patterns cited later are used only for sizing, gauge, and material benchmarks.
The Design: What Makes This Cream Basketweave Different
The reference uses large four-stitch woven blocks rather than narrow ribbing, allowing the alternating vertical and horizontal sections to remain visible in thick cream yarn. Post stitches create the illusion: front-post double crochet pushes one group forward while back-post double crochet recesses the neighboring group. Reversing those groups after four rows produces the woven crossing. A narrow dense perimeter then controls the heavy fabric without competing with the central chunky basketweave crochet blanket texture. Cream also makes tension errors conspicuous because shadows collect beside every raised post. The most common mistake is working through stitch tops instead of around the posts. That removes the relief and creates a visibly flat block within an otherwise deeply textured super bulky basket weave blanket.
Project Info at a Glance
| Skill Level | Time | Finished Size | Hook | Best For |
|---|---|---|---|---|
| Intermediate | Approx. 18–24 hours | Reconstruction target: approx. 115 × 145 cm | 8 mm | Sofa throws, armchairs, bed layering |
The 115 × 145 cm measurement is a reconstruction target inferred from the photograph rather than a published measurement of this exact blanket. Michele Webb’s published Chunky Basketweave Blanket uses super-bulky Bernat Blanket, an 8 mm hook, and finishes at approximately 45 × 55 inches / 114 × 140 cm. Sirdar’s super-bulky Basketweave Blanket measures approximately 107 × 150 cm, providing a second useful size benchmark.
Materials and Tools
Yarn
- Warm cream / natural — super bulky #6 — approximately 1,350–1,550 m
- Border allowance — reserve approximately 150–200 m from the total quantity
Michele Webb’s 45 × 55 inch super-bulky crochet version lists approximately 1,335–1,408 m and 75 oz of yarn. Yarnspirations’ Forever Fleece basketweave uses eight 250 g balls totaling approximately 2,000 g and 1,102 m, while Sirdar’s 107 × 150 cm blanket lists approximately 1,125 m. Fiber density varies considerably within the super-bulky category, so meterage is more useful than ball count.
Tools
- 8 mm crochet hook
- 9 mm hook — optional for foundation chain only
- Large tapestry needle
- Locking stitch markers
- Scissors
- Measuring tape
Abbreviations
- ch — chain
- sc — single crochet
- hdc — half double crochet
- dc — double crochet
- FPdc — front-post double crochet
- BPdc — back-post double crochet
- sl st — slip stitch
- st/sts — stitch/stitches
- RS — right side
- WS — wrong side
An invisible decrease is not required because this blanket is worked flat at a constant stitch count.
Gauge and Construction Math
Basketweave fabric contracts more than ordinary double crochet because the hook travels around the stitch posts. Make a swatch before committing to the full foundation.
A practical reconstruction gauge is approximately 8–9 structural stitches per 10 cm after the fabric has relaxed. Published benchmarks show how strongly yarn choice changes gauge: Sirdar reports 8 stitches and 6 rows per 10 cm, while Yarnspirations’ Forever Fleece version reports approximately 6.5 stitches and 4 rows per 10 cm with an 11.5 mm hook.
The central pattern uses 96 post stitches, divided into twelve groups of eight. Two plain edge stitches bring every working row to 98 stitches.
Pattern — Step by Step
Foundation
Yarn: warm cream — original reconstruction based on standard four-stitch basketweave structure.
Ch 100.
The foundation uses the standard multiple-of-eight structure required for four FPdc followed by four BPdc, with additional chains establishing the turning stitch and edges.
Foundation Row
Row 1: Dc in the fourth ch from hook and in every remaining chain across.
The three skipped chains count as the first dc.
Total: 98 dc.
Count now. The blanket needs 98 stitches before the post-stitch pattern begins: one edge stitch, 96 structural stitches, and one opposite edge stitch.
Basketweave Section A
The blanket is turned after every row. Because the fabric is viewed from alternating sides, the post used on the wrong side must preserve the intended appearance on the right side.
Row 2 — RS: Ch 2; the turning chain does not count as a stitch. Dc in first st. Work [FPdc around next 4 posts, BPdc around next 4 posts] ×12. Dc in last st. (98)
Row 3 — WS: Ch 2, turn. Dc in first st. To keep the same four raised blocks projecting on the right side, work [BPdc around next 4 posts, FPdc around next 4 posts] ×12. Dc in last st. (98)
Row 4 — RS: Ch 2, turn. Dc in first st. Work [FPdc around next 4 posts, BPdc around next 4 posts] ×12. Dc in last st. (98)
Row 5 — WS: Ch 2, turn. Dc in first st. Work [BPdc around next 4 posts, FPdc around next 4 posts] ×12. Dc in last st. (98)
Rows 2–5 form the first four-row woven section.
Basketweave Section B
The block direction now reverses.
Row 6 — RS: Ch 2, turn. Dc in first st. Work [BPdc around next 4 posts, FPdc around next 4 posts] ×12. Dc in last st. (98)
Row 7 — WS: Ch 2, turn. Dc in first st. Work [FPdc around next 4 posts, BPdc around next 4 posts] ×12. Dc in last st. (98)
Row 8 — RS: Ch 2, turn. Dc in first st. Work [BPdc around next 4 posts, FPdc around next 4 posts] ×12. Dc in last st. (98)
Row 9 — WS: Ch 2, turn. Dc in first st. Work [FPdc around next 4 posts, BPdc around next 4 posts] ×12. Dc in last st. (98)
Rows 6–9 complete the second four-row section.
Eight-Row Basketweave Repeat
Repeat Rows 2–9 until the central fabric measures approximately 136–138 cm long, ending after a complete four-row block.
Measure the blanket while it is lying flat and relaxed. Do not stretch the post stitches lengthwise.
Sam Bartley’s basketweave tutorial documents the same core structural principle: groups of four front-post and four back-post double crochets, four rows in one orientation, followed by four rows with the groups reversed.
Why the Wrong-Side Rows Look Reversed
A front-post stitch projects toward the crocheter. After the work is turned, however, the crocheter is viewing the opposite face.
Therefore, a section intended to remain raised on the blanket’s right side is worked as FPdc while the right side faces you and BPdc while the wrong side faces you.
This distinction matters. Repeating FPdc over the same physical block from both faces does not maintain a consistent right-side raised band.
Final Body Row
After completing the final four-row basket block, turn.
Final Row: Ch 2, dc in each stitch across. (98)
Do not fasten off.
The plain double-crochet row provides a cleaner surface for beginning the perimeter.
Border Foundation
Border R1: Ch 1.
Sc evenly across the top edge.
At the first corner work 3 sc.
Continue down the long side, distributing stitches evenly along row ends. Work 3 sc at the lower corner, sc across the foundation edge, work 3 sc at the next corner, then sc evenly up the final long edge.
Work 2 additional sc in the starting corner and join to the first sc.
Lay the blanket flat before proceeding.
Dense Cream Border
Border R2: Ch 1. Sc in each stitch around, working 3 sc in the center stitch of each corner. Join.
Border R3: Ch 1. Hdc in each stitch around. At each corner work 3 hdc in the center corner stitch. Join.
Border R4: Ch 1. Sc in each stitch around, again placing 3 sc in each corner. Join.
Fasten off with a 25 cm tail.
The border should measure approximately 3–4 cm wide. The reference perimeter is substantial enough to frame the woven blocks but narrower than one complete basketweave block.
Optional Braided-Look Final Edge
The photograph has a rounded, cord-like perimeter. A reverse-single-crochet round can approximate that finish.
Join cream in any non-corner stitch.









