Introduction
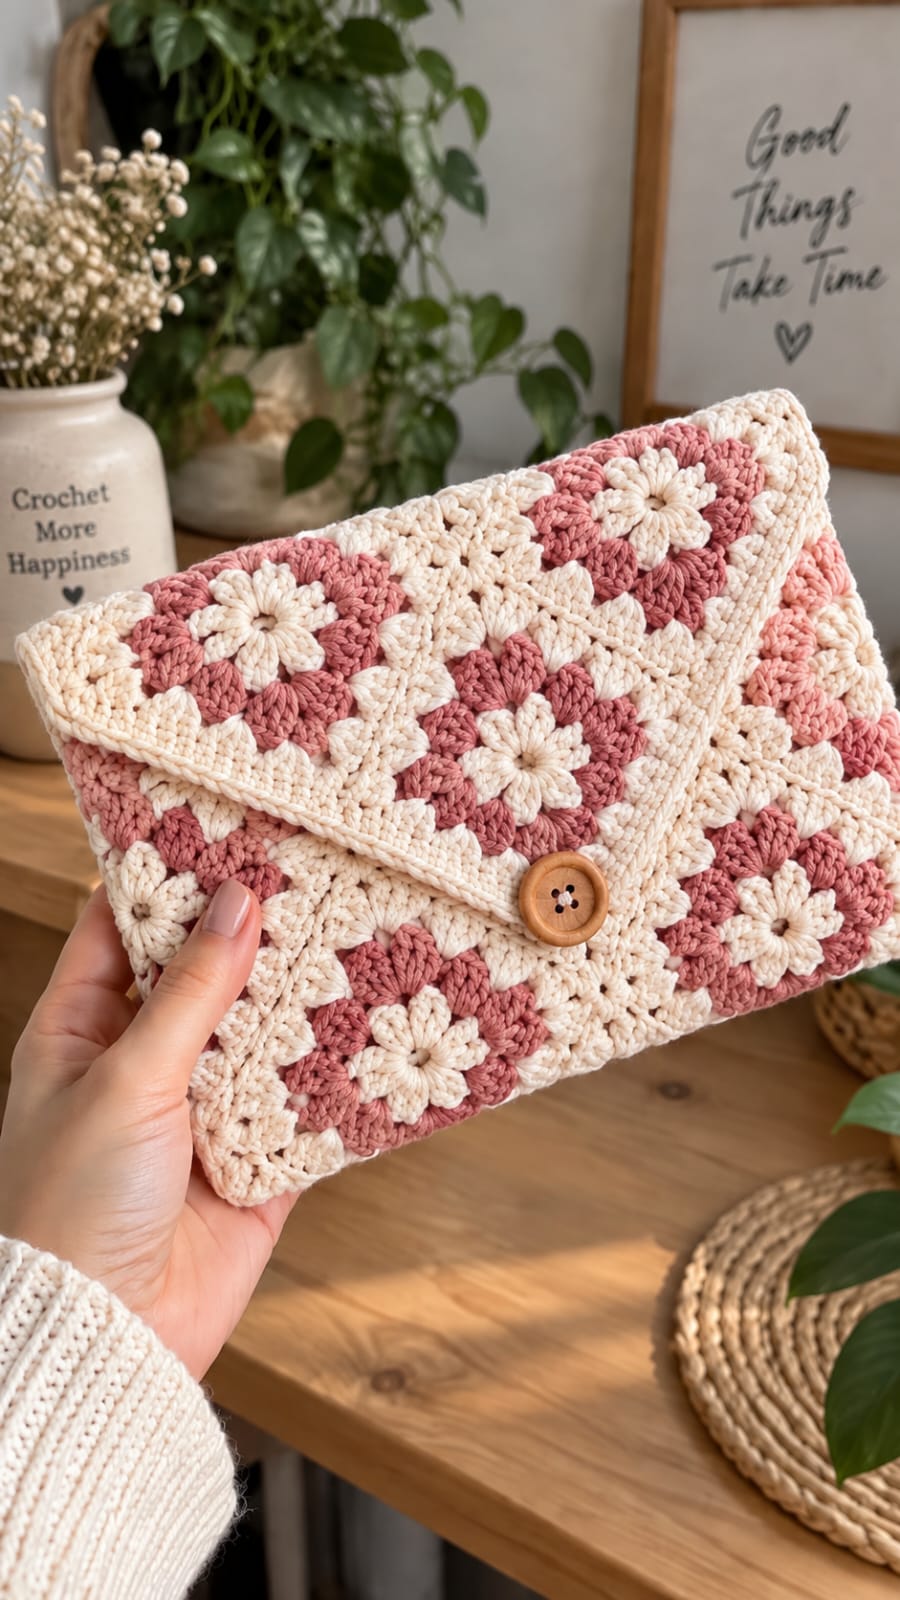
Each visible square carries an eight-petal cream flower, so the flap must close without folding those raised petals into the button. This flower granny square clutch crochet pattern uses DK cotton, a 4 mm hook, dusty-rose and cream motifs, and a wooden button. The intermediate reconstruction targets approximately 24 × 16 cm, providing a compact clutch for a phone, cards, keys, and other small essentials.
The instructions below are an original photo-inspired reconstruction based on visible structure; published patterns cited later are used only for sizing, gauge, and material benchmarks.
The Design: What Makes This Flower Clutch Different
The photographed clutch uses repeated floral squares rather than one continuous rectangle. Cream eight-petal centers alternate with dusty-rose and cream granny sections, while a broad triangular flap places additional flowers above the front panel. Joining the motifs with cream yarn creates pale structural lines that frame each square and visually connect the flap border to the body. A centered wooden button adds weight at the point where the envelope flap closes, so that area needs a firm edging rather than open chain spaces. This crochet flower granny square clutch also benefits from cotton because the fibers hold blocked corners more cleanly than highly elastic yarn. A common construction mistake is joining unblocked squares; a difference of even 5 mm per motif can twist the finished envelope and move the button away from the flap center.
Project Info at a Glance
| Skill Level | Time | Finished Size | Hook | Best For |
|---|---|---|---|---|
| Intermediate | Approx. 7–10 hours | Reconstruction target: approx. 24 × 16 cm closed | 4 mm | Small clutch, cosmetic pouch, phone and card holder |
The 24 × 16 cm measurement is a reconstruction target based on the photographed proportions rather than a published measurement of this exact clutch. For comparison, Marie Bruandet’s published Daisy Granny Square Purse measures approximately 22 × 15 cm and uses DK cotton with a 4 mm hook. Fiona Field’s Granny’s Clutch Bag measures approximately 9 × 5 inches / 23 × 13 cm and also specifies DK cotton-blend yarn.
Materials and Tools
Yarn
- Warm cream / ivory — DK #3 cotton or cotton blend — approximately 90–110 g
- Dusty rose / muted pink — DK #3 cotton or cotton blend — approximately 60–80 g
A smooth DK cotton gives the petals enough definition while keeping the finished clutch reasonably firm. Phildar Phil Coton 4 is one published purse reference; another practical category is a DK cotton-acrylic blend similar to the yarn specified for Granny’s Clutch Bag.
Tools
- 4 mm crochet hook
- 3.5 mm hook — optional for a firmer edging
- Wooden button — approximately 28–32 mm diameter
- Tapestry needle
- Locking stitch markers
- Blocking mats and rust-resistant pins
- Scissors
- Measuring tape
- Cotton lining fabric — optional but recommended
- Sewing needle and matching thread — for optional lining
Abbreviations
- MR — magic ring
- ch — chain
- sc — single crochet
- hdc — half double crochet
- dc — double crochet
- tr — treble crochet
- sl st — slip stitch
- sp — space
- st/sts — stitch/stitches
- RS — right side
- WS — wrong side
An invisible decrease is not needed because the clutch is assembled from flat motifs whose size is controlled by complete rounds and blocking.
Motif Plan
The reconstruction uses 12 full flower granny squares plus a shaped flap assembled from additional motifs and cream edging.
Each full square should block to approximately 7.5–8 cm. Three squares placed across the clutch therefore produce a panel approximately 23–24 cm wide after joining.
The flower itself is cream. Dusty rose forms the strongest contrast round, and cream returns at the outer edge. Reversing selected motif rounds produces the irregular cream-and-pink distribution visible in the reference without changing the dimensions.
Pattern — Step by Step
Eight-Petal Flower Center — Make 12
Yarn: cream.
R1: In MR, ch 1 and work 8 sc. Join with sl st to first sc. (8)
R2: Ch 1. Work 2 sc in each st around. Join. (16)
R3: *Sl st in next st, ch 3, work 3 dc in next st, ch 3, sl st in next st.* Repeat the petal placement evenly around until 8 petals are formed. Join at the base of the first petal.
Fasten off cream and weave the center tail toward the wrong side.
The finished flower should have eight distinct cream petals with a small open center rather than a dense raised bobble.
Dusty-Rose Flower Background
Yarn: dusty rose.
R4: Join dusty rose behind any petal. Ch 3. Work 2 dc in the same space. Ch 1. Work 3 dc behind the next petal, ch 1. Continue around, placing one 3-dc cluster behind each petal. Join. (8 clusters)
R5: Sl st into first ch-1 sp. Ch 3, 2 dc, ch 2, 3 dc in the same space to form Corner 1. In next ch-1 sp work 3 dc. In following space work 3 dc, ch 2, 3 dc for Corner 2. Continue this sequence around so every second space becomes a corner. Join.
The circular flower is now converted into a four-corner framework.
Cream Squaring Round
Change to cream.
R6: Join in any corner ch-2 sp. Work ch 3, 2 dc, ch 2, 3 dc in the corner. Work 3 dc in each space across the side. In the next corner work 3 dc, ch 2, 3 dc. Repeat around. Join.
R7: Ch 1. Sc in each dc and each ch-1 space around. In every corner ch-2 sp work 2 sc, ch 1, 2 sc. Join.
Fasten off with a 20 cm tail.
Alternate Cream-Dominant Square
The photograph includes motifs where cream occupies more of the visible square.
For these variations, work the flower in cream as written, use cream again for R4, switch to dusty rose for R5, then return to cream for R6–R7.
Do not alter the stitch counts or corner placement.
Make approximately half the motifs pink-dominant and half cream-dominant. This gives the clutch the mixed floral-grid appearance without compromising assembly.
Blocking Every Square
Pin each finished motif to approximately 7.5–8 cm square.
Measure all four sides and both diagonals.
The diagonals should match within approximately 5 mm. If one corner is substantially longer, inspect that corner for an additional chain or cluster before trying to correct it with aggressive blocking.
Let the motifs dry fully before removing the pins.
Front Panel Layout
Arrange six motifs in a 3 × 2 grid.
Alternate pink-dominant and cream-dominant squares.
Keep all flower centers facing the same direction.
Once arranged, the panel should measure approximately 23–24 cm wide × 15–16 cm high before the final edging.
Back Panel Layout
Arrange another six motifs in a matching 3 × 2 grid.
Use the same overall dimensions as the front.
The exact color placement can differ from the front because the photographed clutch uses an irregular flower distribution rather than a strict checkerboard.
Block the assembled front and back independently before joining them into the pouch.
Joining the Granny Squares
Yarn: cream.
Place two squares with wrong sides together.
Insert the hook through the corresponding outer loops of both motifs.
Sl st across the complete edge.
Keep the seam relaxed so it does not shorten the motifs.
Repeat until each 3 × 2 panel is complete.
For a flatter seam, mattress stitch with a tapestry needle may be substituted. The important measurement is that every joined square remains close to its blocked width.
Front Panel Border
Join cream at one upper corner.
Border R1: Ch 1 and sc evenly around the complete panel, placing 3 sc in each outside corner. Join.
Border R2: Ch 1 and sc in every stitch around, again placing 3 sc in each corner. Join and fasten off.
This border stabilizes the motif seams before the front is attached to the back.
Back Panel Border
Work the same two sc rounds around the back panel.
Do not fasten off after the second round if you are ready to begin joining the pouch.
Joining Front and Back
Place the panels with wrong sides together.
Align the lower corners.
Working through both layers, sc from the upper left corner down the first side, across the bottom, and up the opposite side.
Leave the top completely open.
Fasten off and weave the tail through at least 6 cm of dense edging stitches.
Triangular Envelope Flap
The reference flap spans the full width and narrows toward a centered point.
Yarn: cream with dusty-rose floral accents.
Join cream to the back panel’s upper edge.
Flap Row 1: Sc evenly across the complete back opening. Turn.
Flap Row 2: Ch 1, skip first st, sc across to final 2 sts, sc2tog. Turn.
Flap Row 3: Ch 1, sc across. Turn.
Flap Row 4: Repeat Row 2.
Continue alternating one decrease row with one plain row until approximately half the original stitch count remains.
At this stage, begin decreasing at both ends on every row until 3 stitches remain.
Work sc3tog and fasten off.
This creates the structural triangular base onto which decorative flower motifs can be attached.
Decorative Flap Flowers
Make 3 additional flower centers using Rounds 1–5 of the full square pattern.
Do not add the final cream squaring rounds.
Block the three partial motifs flat.
Position one near the left upper flap, one near the right upper flap, and one close to the center point, matching the floral density visible in the photograph.
Sew each motif around its outer dusty-rose clusters without stitching across the cream petals.
Flap Edging
Yarn: cream.
Join at the upper left flap corner.
Edge R1: Sc evenly down the first diagonal, work 3 sc in the flap point, then sc evenly up the opposite diagonal.
Edge R2: Ch 1 and work reverse sc across both diagonals and around the point.
Fasten off.
The second round creates the corded cream outline visible along the photographed flap.
Button Loop
The flap can close around a wooden button with a small chain loop.
Join cream approximately 2–2.5 cm above the flap point.
Ch 8–10, depending on button diameter.
Sl st back into the same stitch to form a loop.
Work sc around the chain loop if additional firmness is required.
Test the loop over the button before fastening off. Make it slightly smaller than the button diameter so the crochet stretches around the button rather than slipping off.
Wooden Button
Use a wooden button approximately 28–32 mm in diameter.
Close the flap and mark the position where the loop naturally reaches the front panel.
Sew the button at that exact point using strong thread or doubled cream yarn.
Pass through the button holes at least six to eight times.
A current Made With Sally granny-square bag pattern similarly specifies repeated passes when securing a wooden button, while Make & Do Crew recommends adjusting the closure-chain length to the actual button.
Optional Fabric Lining
A lining prevents small objects from catching in granny-square openings.
Cut two fabric rectangles approximately 1.5 cm larger than the crocheted pouch on the sides and bottom.
Place the fabric pieces right sides together.
Sew the two sides and bottom with an approximately 1 cm seam allowance.
Turn the lining right side out.
Fold the upper raw edge inward approximately 1 cm and press.
Insert the lining into the clutch and hand-sew it just below the upper crochet edge using small stitches.
Assembly
- Crochet 12 complete flower granny squares, varying the dusty-rose and cream outer rounds while keeping every finished motif at approximately 7.5–8 cm.
- Block all 12 squares to identical dimensions and check that corresponding diagonals differ by no more than approximately 5 mm.
- Arrange six motifs into a 3 × 2 front panel and six into a 3 × 2 back panel, then join the corresponding edges with cream yarn.
- Work two stabilizing sc rounds around both assembled panels and confirm that the front and back remain the same width and height.
- Place the panels together and sc through both layers along the left side, bottom, and right side while leaving the complete upper edge open.
- Attach cream yarn to the upper back edge and crochet the decreasing triangular flap until only the centered point remains.
- Make three partial flower motifs, position them across the flap, and sew only their outer clusters so the cream petals retain visible relief.
- Work the cream flap edging, add the fitted chain loop, then close the flap to mark the wooden button’s exact position on the front panel.
- Sew the 28–32 mm button through the front crochet fabric with at least six secure passes and install the optional cotton lining without stitching through the exterior petals.
- Weave every remaining tail through at least 6 cm of matching stitches, lightly block the completed clutch to approximately 24 × 16 cm, and check that the flap point aligns with the button center.
The completed clutch should form a firm rectangular pouch with repeated cream flower centers, dusty-rose accents, a full-width triangular flap, cream edging, and one centered wooden button.
7 Technical Tips
- The finished panel twists: block every individual square to 7.5–8 cm before joining. A motif that differs by more than 5 mm can pull an entire 3 × 2 panel away from a true rectangle.
- The flower petals curl inward: loosen the petal stitches or move up 0.5 mm for the flower round only. Petals that are substantially tighter than the background clusters will cup the center after blocking.
- The seams form hard ridges: keep every joining slip stitch at approximately the same height as the outer motif loops. Pulling the seam tight can remove 1–2 cm from the finished width across three joined squares.
- The triangular flap leans to one side: count each decrease row and place a marker at the flap midpoint. Unequal decreases move the final point away from the wooden button even when the pouch itself is square.
- The button pulls through the granny openings: position the 28–32 mm button over dense cream edging or reinforce its wrong side with a small fabric patch. Sewing a heavy button directly over an open chain space can stretch the motif.
- The closure loop becomes loose: make the chain loop approximately 3–5 mm narrower than the button’s widest diameter before testing. Cotton relaxes slightly with repeated opening, so an initially oversized loop will not hold the flap securely.
- The lining shows above the crochet: position its folded edge approximately 5–8 mm below the pouch opening. Sewing the lining directly level with the top edge can expose fabric whenever the clutch flexes.
Published Daisy Purse Benchmark
Marie Bruandet’s Daisy Granny Square Purse provides a close technical comparison for flower motifs used in a small bag. The published Ravelry information specifies DK cotton, a 4 mm hook, and approximately 150–180 m of yarn.
The listing reports a finished size of approximately 22 cm wide × 15 cm high. Those measurements closely support the 24 × 16 cm reconstruction target used here, although the photographed clutch uses an envelope flap and button rather than the construction of Bruandet’s purse.
Published Granny Clutch Benchmark
Fiona Field’s Granny’s Clutch Bag uses a DK 50% cotton and 50% acrylic blend. Its published finished dimensions are approximately 9 × 5 inches / 23 × 13 cm.
That design uses a zipper and wrist strap, demonstrating that granny-square fabric can be scaled effectively for a compact clutch rather than only for larger shoulder bags.
The photo-inspired reconstruction is slightly taller to accommodate the prominent envelope flap.
Published Six-Motif Clutch Benchmark
Nancy Brown’s Granny Square Clutch Bag uses six granny motifs, Aran yarn, 4.25 and 5 mm hooks, and approximately 200–274 m of yarn.
Its listing specifies a 3-inch granny-square gauge and a finished bag approximately 22 inches around × 8 inches deep.
This provides another useful reference for how repeated motifs translate into a structured clutch, though the motif count and folding method differ from the reconstruction.
Why DK Cotton Suits the Photograph
The stitches in the image are clearly defined but not oversized. Individual petal stitches remain visible, and the cream borders have enough density to hold a straight edge.
DK cotton fits that visual scale.
It also produces a practical 7.5–8 cm motif with a 4 mm hook. Worsted yarn can reproduce the design, but the same seven-round square would become larger and would require fewer motifs or a smaller hook to retain the photographed dimensions.
Yarn Quantity Planning
The published Daisy Granny Square Purse uses approximately 150–180 m for a 22 × 15 cm bag. Another small granny-square bag tutorial reports approximately 85 g of cotton yarn.
The envelope flap, multiple cream borders, and additional decorative flowers in this reconstruction increase consumption.
Planning approximately 150–190 g total provides a practical margin for joining, edging, button reinforcement, and gauge differences.
Keep additional cream available because it is used for flowers, borders, seams, flap structure, and finishing.
Making the Clutch Wider
Add a fourth square to each horizontal panel row.
With 8 cm motifs, the body width increases by approximately 8 cm before edging.
The flap must also begin across the new full back width.
Recalculate the midpoint before beginning decreases so the triangular point remains centered.
Making the Clutch Smaller
Use motifs blocked to approximately 6.5–7 cm.
A 3 × 2 panel will then measure roughly 20–21 cm wide × 13–14 cm high before edging.
Use a button closer to 25 mm and reduce the flap loop proportionally.
Do not remove petal stitches simply to reduce size; changing hook size and yarn weight preserves the motif geometry more reliably.
Making a Tablet Sleeve
Measure the device first, including its protective case.
Arrange blocked squares until the panel exceeds the device dimensions by approximately 2–3 cm in both directions.
Add a padded fabric lining rather than ordinary lightweight cotton.
Replace the protruding wooden button with a magnetic snap if the hardware could press against the device screen.
Making a Cosmetic Pouch
Keep the same 3 × 2 panels but replace the triangular flap with a zipper across the upper edge.
Fiona Field’s published granny-square clutch demonstrates zipper closure as a practical alternative.
Add washable cotton lining because cosmetics can pass through the open spaces between granny clusters.
The flower motifs and dusty-rose palette can remain unchanged.
Adding a Wrist Strap
Attach cream yarn to one upper side seam.
Chain approximately 45–50, or enough to create a comfortable loop around the hand.
Sl st back to the attachment point.
Work one round of sc around the chain for strength.
Fasten off and reinforce the attachment through several dense side-edge stitches.
Adding a Shoulder Strap
A longer strap converts the clutch into a small crossbody bag.
Make a dense thermal-stitch or Roman-cord strap rather than a single chain because narrow chains stretch under load.
Make & Do Crew’s granny-square bag documentation uses a Roman cord as one strap option and also notes that a leather strap can substitute for crochet.
Attach the strap at the side seams rather than through open flower rounds.
Button Closure Options
The wooden button is the closest match to the photograph.
A magnetic snap gives a flatter exterior but requires lining or reinforcement to conceal the hardware.
A crochet-covered button can also be made. Make & Do Crew documents a compact crochet button beginning with six single crochet stitches in a magic loop and increasing to 12 before shaping and stuffing.
Whatever closure is selected, reinforce the attachment point.
Why the Flap Needs a Firm Border
The flap point receives repeated tension every time the clutch opens.
Open granny clusters alone can stretch at that point.
Two compact edging treatments distribute the force over multiple stitches and create the corded outline visible in the photograph.
If the flap still feels soft, use the 3.5 mm hook for the final edging round only.
Color Placement
The photographed palette is dominated by warm cream with dusty rose acting as the secondary color.
A useful allocation is approximately 60% cream and 40% rose by visible surface area.
Keep every flower cream to establish repetition. Change the surrounding granny rounds instead.
This gives the finished clutch variation without losing the floral identity of individual squares.
Alternative Color Palettes
Sage with cream creates a botanical version. Dusty blue with ivory produces lower contrast, while terracotta with natural cotton shifts the clutch toward an autumn palette.
For a stronger graphic effect, combine charcoal outer rounds with cream flowers.
Whatever colors are selected, retain enough contrast between the flower and its immediate background to keep all eight petals readable.
Correcting a Cupped Flower
First count the eight petals and confirm that they are distributed evenly.
If the center still cups, loosen the petal round or use a hook 0.5 mm larger for that round.
Do not stretch a severely cupped flower flat with blocking pins. Once the motif is sewn into a bag, the tension can return and distort the surrounding square.
Correcting a Ruffled Square
Ruffling indicates too much circumference in the outer rounds.
Count every granny cluster and corner space.
If the counts are correct, reduce the hook by 0.25–0.5 mm for the final cream rounds.
The square should lie nearly flat before blocking rather than depending on pins to remove large waves.
Correcting an Uneven Seam
Place a locking marker through both squares at each corner and midpoint before joining.
Match corresponding stitches between those markers.
Never stretch the shorter motif until it fits a longer neighbor.
If the difference exceeds approximately 5 mm, reblock or remake the inaccurate square.
Correcting a Crooked Flap
Fold the clutch closed and run a measuring tape from each upper back corner to the flap point.
The two measurements should match.
If they do not, inspect the decrease rows for a missed stitch on one side.
Correct the shaping before attaching decorative flowers because appliqués can hide the exact row where the error occurred.
Correcting a Loose Button
Remove the button before its movement stretches the surrounding crochet.
Add a small felt or cotton reinforcement patch behind the front panel.
Sew through the button, crochet fabric, and reinforcement patch together.
Use at least six passes and knot the thread against the reinforcement rather than against an open granny space.
Blocking the Finished Clutch
Lightly dampen the crochet according to the yarn-care instructions.
Insert a folded towel inside the pouch to keep the panels separated.
Shape the body to approximately 24 × 16 cm.
Align the flap point directly above the wooden button.
Let the clutch dry flat with the flap open so raised flower petals are not compressed against the front panel.
Care and Storage
Follow the selected yarn manufacturer’s washing instructions.
Remove detachable wooden hardware before washing when possible. If the button cannot be removed, hand washing limits prolonged soaking of the wood.
Reshape the motifs while damp and dry the clutch flat.
Store it with the flap open or lightly closed rather than tightly compressed beneath other objects, which can flatten the raised cream flowers.
Sources
Marie Bruandet’s Daisy Granny Square Purse on Ravelry — DK cotton, 4 mm hook, 150–180 m of yarn, and a published finished size of approximately 22 × 15 cm.
Fiona Field’s Granny’s Clutch Bag on Ravelry — DK cotton-blend construction with a published finished size of approximately 9 × 5 inches / 23 × 13 cm.
Nancy Brown’s Granny Square Clutch Bag on Ravelry — six granny motifs, Aran yarn, 4.25 and 5 mm hooks, and approximately 200–274 m of yarn.
Make & Do Crew’s Granny Square Bag — reference for motif joining, closure-square construction, wooden-button loops, crochet buttons, and reinforced strap options.
Loopara’s Single Granny Square Bag — 5-ply combed cotton with 3.5 and 4 mm hooks plus a button closure, providing a current cotton-bag construction comparison.
Start Crochet’s Puff Flower Granny Square Tutorial — current 2026 reference for flower-centered granny construction using Aran/worsted cotton.
Made With Sally’s Lavender Fields Granny Square Bag — reference for a reinforced chain button loop, wooden-button attachment, and optional fabric lining.
Conclusion
The most important control point is not the flower itself but the repeated 7.5–8 cm square surrounding it. Block every motif before assembly, build matching 3 × 2 panels, and shape the triangular flap only after the pouch dimensions are stable. Your next step is to crochet one cream-and-dusty-rose test square and measure both diagonals after blocking; that measurement determines the finished clutch width more reliably than an assumed stitch gauge. Save this flower granny square clutch crochet pattern to Pinterest or share the finished version on Instagram with #PinkFlowerGrannyClutch. Would you keep every eight-petal flower cream as pictured, or alternate cream and dusty-rose flower centers across the flap?









